If children in a family go to first grade, this means that in the fall they need to prepare natural materials for crafts. Mothers can prepare a herbarium and, together with their child, collect acorns and cones, seeds of various plants, straws, and corn cobs. Little students must make crafts for school day; on the autumn holiday they bring homemade items, for the production of which generous gifts of nature or scrap materials were used.
Origami
The simplest material for creating DIY crafts in elementary school is colored paper. It is pliable, easy to cut and fold, its use will allow the child to learn how to work with a ruler and scissors, teach him to combine colors and glue parts evenly.
Leaves
Multi-colored leaves are good to use in a variety of applications, so if the only material you have at your disposal is leaves, arm yourself with paper, glue and a little imagination. Here are some options for inspiration:
Female portrait
We draw a woman’s face on paper, and use leaves as hair. This applique can be framed and you will get an original piece of furniture. In order for this decor to remain beautiful longer and not lose its appearance, the leaves must first be dried. Such a masterpiece will certainly attract the attention of participants and spectators of the exhibition. Such portraits can be framed and used to decorate the interior. And instead of a drawn woman’s face, try using someone else’s photograph, then you will get an unusual gift.
Hedgehog
The essence is the same as in the portrait of a woman, but we take a hedgehog as a model, and instead of needles we glue multi-colored leaves. The hedgehog is easy to make and looks original. All you have to do is draw a cute hedgehog face and glue leaves instead of needles. A child can easily make such beauty himself, but the baby will be pleased if you take part. For example, you can draw a hedgehog, and the child will only have to glue the leaves. Or help your child create a craft for the school fall fair.
Princess ballerinas
Leaves make beautiful skirts and dresses for girls, so you can get creative in this direction. The varied shapes of the leaves will help create interesting images. Here are a couple of examples.
Owl birds
What do the leaves look like? If you look at them from a certain angle, you can recognize the feathers of birds. Therefore, we can use leaves in applications depicting birds. Owls look very cute, but peacocks are no less impressive.
Trees
Some of the simplest applications are trees. Just draw a trunk, glue a crown of leaves and the tree is ready. The second option is that the leaves themselves act as trees. The result is an original autumn landscape. This is an application for very busy parents, as it is done very quickly.
Vase of leaves
This is already a lot of work. Inflate the balloon and cover it with leaves. We glue only half of the ball. For these purposes it is better to use PVA. When the leaves and glue dry well, blow off the ball and get a beautiful and original vase. Such a vase can be used both as an independent exhibit and as a basis for other crafts and compositions. Here is such an interesting DIY craft for the fair.
Leaf mobile
Very simple to make, but very beautiful thing. For a mobile you will need a ring (for example, a plastic one), threads, leaves and cones. We string the leaves onto threads, fasten them to a ring, and attach pine cones at the bottom for weight. After this, we tie the threads on top on which the mobile will be hung.
Topiary
If you have time and materials and want to build something more impressive and voluminous, then try making a topiary from bright leaves. You will need a base ball for this. The simplest version of a ball is a crumpled newspaper wrapped in thread. Leaves and other topiary details are attached to such an improvised ball. Don't forget to insert the stem and secure it in the pot. To make the topiary stable, fix the trunk in the pot with cement mortar or plasticine.
Bouquet of colored paper
The easiest DIY craft for school is a bouquet of flowers made from bright colored paper. Cut out 3-5 daisies with a diameter of 5 cm from white paper. The centers for them can be cut out from yellow or orange paper, or you can draw them with felt-tip pens.
Fold a whole sheet of colored paper lengthwise like an accordion. At approximately 1/3 height, secure the folded accordion with a stapler or glue to form a fan. Cover the attachment point with a strip of colored paper to match. Glue daisies to the top of the workpiece. The bouquet for March 8 or Mother's Day is ready!
Current topics
It would be strange to make snowflakes and snowmen if it’s summer, and it would probably be stupid to give crafts in the form of flowers to dad on February 23rd. Schoolchildren already consciously approach the matter, understand what and when to do, but still this issue must remain under control. Therefore, the teacher sets the theme according to the season or the upcoming holiday.
The autumn theme is very rich in ideas, and the variety of natural materials allows you to create unimaginable compositions. For work, they use almost everything that can be collected or picked up underfoot - these are leaves, cones, flowers, vegetables, twigs, seeds and much more. Also, cereals, almost all types, and seeds remain a favorite material for crafts. Let's consider one of these options.
"Hedgehog made from seeds"
To make such a hedgehog you will need a small piece of plasticine and seeds. Everything original is simple.
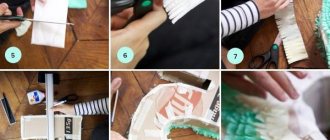
Operating technique:
- The first step is to make a base from plasticine. Plasticine, as a rule, is taken in light shades (beige or white) so that the hedgehog’s head does not merge with the spines.
- Then from the same plasticine, only black, we make eyes and a nose.
- And finally, decorate the back of the hedgehog with spines, using seeds so that the sharp edge is on the outside.
Such hedgehogs are made not only from sunflower seeds; you can also use pine nuts, pumpkin seeds, pine needles and anything else you can imagine as thorns. And when difficulties arise with choosing a material or topic, you always have the right to turn to the Internet for help, where you will find thousands of photos and videos with hints.
Inventiveness and imagination in working with children are something that no creative process can do without. If you create all the comfortable conditions for the child, give him the right to choose, tell him how to simplify the craft and help with the theme, then your “little master” will certainly create a real masterpiece.
Paper hedgehog
Using a similar technique you can create a small hedgehog. Help your child draw the profile of the animal's head, cut it out and glue it to the narrow part of a sheet of colored paper. Then fold it into an accordion so that the folds are parallel to the muzzle.
Fold the accordion in half in the middle and glue the touching ends together so that it takes the shape of a triangle. Now you can glue a paper apple or mushroom onto the “needles” of the cheerful hedgehog.
Variety of school extracurricular activities
Topics for creative assignments can be very different. These are the seasons, women's holiday, New Year, various dates and events related to both the life of the country and the life of one school.
Thematic assignments may also refer to work performed using certain techniques or materials. They often refer to various trades such as sewing, knitting, weaving, pastry making, carpentry, designing and modeling.
The list can be endless, just like human imagination, which finds creative application in any field of activity.
Cardboard crafts
For a competition for school, you can make a craft with your own hands from colored cardboard.
A flower pot
The basis of the craft will be an ordinary clay flower pot, which must be beautifully painted. This is where the artist’s talent comes in handy; acrylic paint is used; the top of the drawing can be coated with clear varnish.
You can depict any design on the pot - animals, birds, plants, various patterns and abstractions. You can make such a pot for your class and donate it to the school.
Mice
You can make charming mice from cardboard cones. One of the advantages of making mice using this technique is that a first-grader will be able to learn how to work with a compass.
Take colored cardboard in 2 contrasting colors for the body and eye. Using a compass, draw a circle of the size you need, making sure to mark its center. Make a cut from the edge of the circle to its middle. Depending on how plump you want your mice to be, twist and glue a cone.
Cut out the paws, ears and tail of the rodent from cardboard of the same color.
It is best to glue the legs on the side of the cone where the gluing seam is located, the tail - from the inside of the upper part of the cone. You need to cut out the eyes and nose of the mouse from contrasting cardboard, and then carefully glue it to the workpiece.
Help from parents with assignments
Great help will be provided by parents who will find enough time and mental strength not to hastily do a task instead of a child, but to help him express himself independently.
It is important that the young creature acquires new skills and learns how to handle unusual materials and tools. Support, attention from parents and joint creative work with a child will bring you closer together than any other activity.
At home, the elders will help you pick up some items that no longer have any value, but will serve as part of a unique exhibit. This could be old jewelry, unwanted cans, spools, leftover yarn, scraps and much more. Adults can also remember original recipes from their childhood and teach them to children.
ladybugs
Photos of handmade crafts for school in the form of voluminous postcards with ladybugs look cute and interesting.
Note!
- Plasticine figures: TOP-120 photos of plasticine figures with step-by-step instructions + simple diagrams for children
- Crafts for boys - TOP-180 photos of design ideas for crafts for boys. Simple DIY craft plans + step-by-step instructions
- Application from geometric shapes: TOP-110 photo options for applications for children. Schemes for creating types of applications with your own hands
To create a postcard you will need double-sided cardboard in red, white, black and green. Cut out the base of the card from white cardstock. It can be square, round or even leaf or heart shaped.
Cut out 2 symmetrical hearts from red cardboard and fold them in half lengthwise. Also cut out a heart from green cardboard and fold it in the same way. Cut out an oval from black cardboard, which will become the head and body of the bug.
Glue the red parts onto the black blank to create a heart shape. Draw black dots on the resulting wings, and an eye on the head. Glue the bug and the leaf heart to the base of the craft.
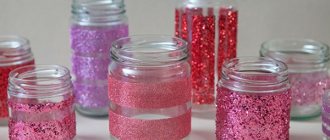
Christmas balls
The variety of round toys made from improvised materials is amazing. The basis for them can be: knitting threads or twine, burnt out light bulbs, the tops of plastic bottles, disposable paper cups, Christmas tree cones, pasta, ice cream sticks, clothespins, etc.
Crafts from bushings
You can make your own crafts for school from recycled materials, such as cardboard tubes.
Spongebob
Many children know who SpongeBob is. This is a cartoon character that is very popular. If the child loves this character, he can be made as a craft at a needlework lesson.
The base is a yellow sponge for washing dishes; the remaining parts are glued to the hard felt side - pants, eyes, mouth and arms. These details need to be painted according to the character’s appearance; it is best to use thick cardboard.
Crown
Use a pencil to mark the crown teeth on the bushing. You can make them sharp, or you can make them rounded so that a “precious” stone is inserted into the top of each tooth. Use scissors to cut out the workpiece. Now you can decorate it at your discretion - with beads, rhinestones, gold spray paint or acrylic.
Acorns
You can use the whole acorn or its cap. By fastening the acorns with matches, we get funny little animals. If you take acorns without caps, glue eyes, beak and wings on them, you will get miniature and very cute birds. Such cuties will not leave anyone indifferent. Acorns also make cute interior items - photo frames, door wreaths, topiaries.
Plastic crafts
Making crafts from garbage for school with your own hands is not so easy. It takes a lot of imagination to make something beautiful and useful out of unnecessary things that are usually thrown away as unnecessary.
Volumetric works
Volumetric works surprise with their multi-layeredness and originality. They are performed using origami and other techniques, creating a composition from many individual elements.
We recommend reading:
- DIY crafts from Kinder surprise eggs - 125 photos of exclusive options with step-by-step instructions, master class and video
- Crafts made from twine - an overview of original design solutions. More than 100 photos of new products + step-by-step instructions for creating crafts with your own hands
- DIY crafts from candy wrappers: 150 photos of the best ideas from craftswomen. Simple instructions, master class, diagrams and video tutorials on creating crafts from candy wrappers
Snowflakes
To make beautiful, festive snowflakes you will need smooth, transparent plastic. Lids from sour cream, cakes, and toy packaging are suitable for this purpose.
Find on the Internet and print a beautiful template of wide snowflakes. It is better to find snowflakes of different sizes and shapes so that you can choose the optimal size of the workpiece.
Place the plastic on the stencil sheet and trace the outlines with an alcohol marker. Cut out the resulting blanks along the contour and wipe off the marker with any alcohol-containing liquid.
Now you can start painting the blank. To do this, you can use white contour paint, stained glass paints, or just a corrector pen. Using them, apply a pattern to the snowflake and, if desired, sprinkle it with glitter before the paint hardens.
Chestnuts
Where would we be without them in autumn creations? Many compositions can be made from this versatile material. After all, in essence, a chestnut is a ball, albeit not of a completely regular shape, and almost any shape can be made from balls by connecting them together. It is convenient to connect chestnuts with ordinary matches or toothpicks. For reliability, we fix it with glue.
You can also pierce the chestnuts with a needle and thread a thread through them - this method of fastening is also quite reliable. We involve dad to pierce the chestnuts. His strong hands get the job done quickly and efficiently. Chestnuts make cute caterpillars, various bears and Cheburashkas, and even an original and very beautiful topiary. You can also make a basket from chestnuts and use it as the basis for a future composition.
Butterflies
DIY bottle crafts for school are one of the most popular types of creativity.
Note!
- Crafts for the senior group of kindergarten: photos of the best ideas and new products. Instructions on how to make a craft with your own hands
- The best crafts for children: instructions on how to make them yourself step by step (60 photo ideas)
- DIY crafts for kindergarten: a review of the best creative ideas for creating beautiful crafts (90 photos)
To make a bright plastic butterfly, cut off the bottom and neck of a transparent bottle, and cut the cone to create a plastic sheet. Draw the outline of a butterfly on paper, place the plastic on it and trace it with a marker.
Cut out all the resulting blanks and fold them in half so that the butterflies have raised wings. You can decorate them with acrylic or stained glass paints, permanent markers and even nail polish.
Applications
There are several appliqué techniques, one of the most popular is quilling, which is used to make holiday cards. To make a flower, cut out circles from colored paper, glue them in the middle of the flower; the blank for the stem is an ear stick or a rod from a student’s pen, which has already ended.
A bow made of colorful braid is used as decoration; “Congratulations!” is written in large letters on a special flag.
DIY photo of crafts for school
Cereals, seeds and even pasta
Applications are made from these materials. The texture of cereals or seeds makes the picture three-dimensional and adds zest to it. Such applications are not difficult to perform; even a primary school student can do it. Cereals and pasta can be glued to the base with glue, or they can be fixed on plasticine. A great option when the fair is just around the corner and you need to quickly create something original. And such creations look quite impressive. You won’t immediately guess that the crown of the tree is made of ordinary pasta. To make the composition look even more interesting, paint the seeds or pasta with paint.
Pumpkin seeds deserve special attention. If you paint them, you can use these painted seeds to create a wide variety of compositions, looking at which you would not immediately guess that they are made from pumpkin seeds.
Surprise of...food?
As we remember, classes begin almost at the end of the year. What can you find at this time of year as additional means for decorating an exhibition of crafts?
The correct answer is healthy and sweet food, which comes to us straight from the garden. From them you can create a huge number of unusual ideas and ideas. Here, for example, are some of them:
- fruit bird made from kiwi, strawberry and other fruits;
- lemon and parsley mouse;
- hedgehog made from pear and grapes;
- cars made of bananas and apples;
- apple human figurines;
- radish, lettuce, olive and radish rat;
- helicopter made from eggplant and carrots;
- cucumber mice;
- carrot giraffe.
This is just a tiny part of what you can come up with in the creative process. Faith is what matters!
Other materials
Crafts for the autumn fair do not have to be made from natural materials. If you didn’t have time to stock up on leaves and cones, it doesn’t matter. Take what you have at hand and create masterpieces. Paper, cardboard, and even shavings from colored pencils will do. You can cut out leaves from paper, from which we make garlands, wreaths and other beauty. Here are some interesting ideas for inspiration.