Crafts for a summer cottage or cottage plot
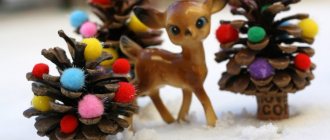
Compositions made from artificial mushrooms create an atmosphere of fairy tales and comfort in the open area. A mushroom meadow will decorate the area, and toy animals can enliven the overall look.
Why did it happen so?
Perhaps the automatic requests do not belong to you, but to another user accessing the network from the same IP address as you. You need to enter the characters into the form once, after which we will remember you and be able to distinguish you from other users exiting from this IP. In this case, the page with the captcha will not bother you for quite a long time.
You may have add-ons installed in your browser that can make automatic search requests. In this case, we recommend that you disable them.
It is also possible that your computer is infected with a virus program that is using it to collect information. Maybe you should check your system for viruses.
If you have any problems or would like our support team, please use the feedback form.
If automatic requests actually come from your computer, and you know about it (for example, your line of work requires you to send similar requests to Yandex), we recommend using the Yandex.XML service, specially developed for these purposes.
Mushrooms from a stump
Many owners of country houses when purchasing a plot are faced with a common problem - tree stumps stick out in several places and spoil the view. Uprooting the stump of a large tree is not at all easy. But many summer residents have found a simple solution to this problem - they create crafts on the theme of “mushrooms”, in which the stump becomes the stem of a mushroom.
To turn a large stump into a decorative element, you need to clear it of bark and sand the surface. Then you can draw a cheerful face on the resulting leg, and attach an inverted basin of a suitable shape on top. It can be painted brown with acrylic paint.
Birch stumps make wonderful fly agarics. There is no need to remove the bark from a birch stump - it imitates the leg of a fly agaric. A small red basin with painted white spots is attached to a cut of a stump, turning it into a fly agaric.
If the stump is very thick, you can turn it into a house for a mushroom family. You need to paint the cut with green paint and attach the moss to it.
Honey mushrooms are imitated by gluing small pebbles painted in different shades of beige or brown. Pebbles form mushroom stems.
Crafts made from natural materials
Another option using natural materials. We take autumn leaves, cover them with paint and print them on paper all over the sheet. After drying, glue on the mushroom applique.
This craft is best done in two stages, the first stage is the background, and the second stage is the applique. At master classes they often suggest using dried flowers, seeds, pieces of bark and moss as natural materials. Crafts from cereals and salt dough are also actively made.
Concrete mushroom
Some craftsmen make their own “mushrooms” crafts from concrete. It is necessary to mix cement, crushed stone and sand. Standard proportions are 1:3:3. Water is added to this mixture until the consistency of mayonnaise is achieved. The solution is poured into prepared forms.
You will need one cylinder-shaped container, which can be cut after the mixture has hardened; an old basin can be used as a second shape. You can line it with a layer of polyethylene - this will make it easier to get the resulting workpiece.
In addition, the irregularities and folds that will cover the surface of the concrete workpiece will be similar to the irregularities of real mushrooms. Next, the stem and cap of the mushroom are painted with acrylic paint, connected to each other and installed in the chosen location.
We use vegetables and fruits
As a basis for the composition, you can use a regular box, board or sheet of cardboard. Leaves or greens are placed on it. To make a mushroom-shaped vegetable craft, take several carrots that will act as legs.
Hats can be made from potato or apple halves. It is advisable to fasten the workpieces together using matches or toothpicks.
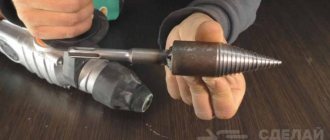
Wooden mushroom
People who know how to work with wood can easily create wooden mushrooms that can decorate not only the yard, but also the room.
To make a wooden mushroom you will need:
- Hacksaw;
- Chisel;
- Axe;
- Knife;
- Hammer;
- File;
- Bulgarian;
- Grinder machine.
The stem and cap are cut out. They can be rounded using a knife, an ax and a file. It is better to varnish the painted figurine. A sample photo of a “mushroom” craft made from wood can be found on the Internet.
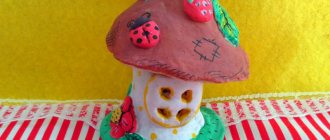
Mushroom house for a mouse using papier-mâché technique
Having mastered more complex techniques for working with different materials, you can realize any complex idea, for example, create a house for a mouse. It’s not difficult to make crafts from wood mushroom, because this element will become the head of the future home of the Little Mouse, and the leg can be easily created using the papier-mâché technique from paper. The mouse is molded from plasticine, like other fairy tale heroes, and you can create your own stories about the inhabitants of the house, developing the imagination and creative skills of children.
Mushroom craft with children
Children's crafts "mushrooms" can be of different levels of complexity. Even children 2-3 years old can handle the simplest jobs. These mushrooms are small in size. It is important to choose safe materials that are easy and convenient to work with.
Note!
How to make a rose from paper - the best ideas for DIY crafts + master classes on creating a rose from paper (160 photos)- Craft letter - TOP 120 photo reviews of craft letter. Simple diagrams + step-by-step DIY instructions
- Crafts made from nut shells: the best step-by-step master classes on creating DIY crafts with photo examples of finished works
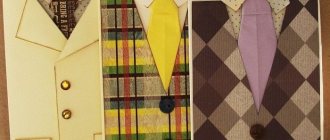
How to sew pillow letters?
If you want children to learn to read from an early age, make pillows in the shape of some elements of the alphabet. You can sew a pillow in the shape of the first letter of the name of the child or parents. One of the simplest tasks is to make it into our theme. Then the baby will know that the word “mushroom” begins with the letter “G.” You can make another one in the shape of a “T”. Why not a mushroom on a stem? Then the upper straight line needs to be slightly bent so that a hat of this shape appears on the leg.
You don't even need a pillow pattern for this craft. For the product itself, you need to cut out the following elements:
- rectangle for the leg;
- circle for the bottom;
- 2 crescent-shaped pieces for the hat.
Here are the materials you need to stock up on:
- cotton or soft cloth;
- padding polyester;
- finishing tapes.
Next we work according to the following plan:
- Take a fabric rectangle for the leg and stitch its sides. Remember the width of the rectangle; this will be the diameter of the bottom of the leg. Cut out this detail.
Sew the bottom to the bottom of the leg, stuff it with padding polyester.For the hat, cut out 2 identical semicircular parts. Stitch them at the top and sides at the bottom. Fill the hat with padding polyester.
- Insert the stem into the bottom hole of the hat and sew it on the arms.
If you want, first decorate the elements of the product with ribbons, and then grind and stuff them with padding polyester.
This right letter pillow also looks like a slightly modified letter T. Cut the stem for such a mushroom in the shape of a trapezoid. We stitch it down and on the sides - we don’t do the bottom. The hat is made as in the previous case - in the form of two semicircular parts.
If you know how to sew a pillowcase, make one to continue the mushroom theme. For this you will need:
- blue and red fabric with white polka dots;
- white cloth for the stem and lower part of the fly agaric cap;
- scissors;
- centimeter.
Next we adhere to the following sequence:
- Measure your pillow. Whatever width it is, cut the pillowcase out of fabric the same width, adding 3 cm for seam allowances.
The length of the fabric is equal to two pillow lengths, plus 2.5 seam allowance.Before sewing the pillow, you need to cut out the applique pieces and stitch them in place.
- Now fold the rectangle and stitch its sides. Place the pillowcase over the pillow and sew it on top with a hidden seam. If you want, you can sew ties or buttons and make loops, then the pillowcase can be removed for washing.
If you are looking for beautiful cushions for your sofa, then check out these.
The leg is also cut out in the shape of a trapezoid, and the bottom is sewn on from below. The hat consists of two circles of different colors, which are ground together.
Let's go back to the beginning of the section and talk a little more about how to sew pillow letters.
As you can see, they are voluminous and consist of several faces.
- For the letter “G”, cut out 2 pieces of fabric in the shape of an “G”. You need to cut 2 ribbons of the same width. You will need 2 more squares to cover the side hole on one of the other sides.
Sew the first, small, ribbon between the two halves of the “G”, and then the second.
- Fill the pillow blank with padding polyester. Sew one square on one side and the other on the other side of the letter.
Plasticine mushroom
One of the crafts that are included in the mandatory curriculum in kindergarten. At home you can make a whole clearing with your child.
You will need:
- Plasticine brown and white;
- Modeling board;
- Stack for plasticine.
The child rolls 2 thick sausages (legs) from white plasticine. He must make a ball from brown plasticine, which is cut in half with a knife using a stack, forming a hemisphere. This makes 2 hats. The hats are neatly connected to the legs. 2 mushrooms are ready.
Application “mushroom clearing” from dry leaves
Carefully collected and dried leaves are actively used to make appliques in different styles.
You can use dry leaves in their original form or cut out individual elements of a future application from them, paint them with bright colors or glue them without changing the shade. The main motive for the application is most often mushroom meadows, a lonely fungus hidden in the grass, a basket with gifts of nature containing mushrooms and berries.
Fly agaric made of plasticine
This craft is suitable for children 4-5 years old.
Materials and tools:
- Plasticine in white, red and green colors;
- Stack for plasticine;
- Modeling board.
First, a foundation is made - a green clearing on which the mushroom will grow. To do this, the child rolls a ball of green plasticine and flattens it to make a round pancake. When the clearing is ready, you can begin to create the leg. White plasticine is rolled out into a sausage and attached to the base.
Note!
- Crafts from toilet rolls: step-by-step instructions for creating crafts. Master classes with simple work schemes (140 photos)
- Crafts from corrugated paper - step-by-step master classes on how to create crafts from corrugated paper with your own hands + photo diagrams
- DIY crafts made from cereals: photo reviews of the best works made from cereals. Step-by-step instructions and diagrams for creating DIY crafts
To form a hat, you need to take red plasticine and make a ball. The child places this ball on a modeling board and gently smoothes it from the center to the edges to form a cone.
By pinching off small pieces of white plasticine, the child sticks them onto the resulting red hat. The spotted cap is connected to the stem. The result of the work is a bright red fly agaric in the clearing.
Fabric applique on a dense basis
Making such a craft is very simple, but you must first prepare felt or other fabric whose edges will not fray. The elements are cut out according to the sketch, and they can be sewn or glued to the base; the assembly technique is chosen based on the age and skills of the child.
You will get beautiful crafts if you choose bright fabric of a certain color; funny mushrooms made from pieces of multi-colored fabric with a print will decorate the finished work.
Cardboard mushroom
One of the simple crafts that does not require a lot of time, money and patience is a “mushroom” craft made from cardboard.
Materials and tools:
- Scissors;
- PVA glue;
- Cotton wool;
- Green corrugated paper;
- White paper;
- Cardboard in white and red colors.
Take green crepe paper and cut out a circle. Make small frequent cuts along the edges of the circle. This will be grass. It can be slightly lifted and curled upward using scissors.
Cut a sheet of white cardboard in half and roll it into a cylinder. Glue the joint with PVA glue. This is a leg.
Cut the red cardstock in half lengthwise to create a long rectangle. Roll it into a cone shape and secure with glue. Glue small white circles onto the cone. This is a hat.
Fill the cone from the bottom with cotton wool. The cotton wool is glued to the base of the cone. The hat along with the cotton wool is glued to the leg.
Take a sheet of white paper. Cut a thin rectangular strip. Make even cuts on one side. Use scissors to curl them. This is a mushroom skirt. Glue it to the leg.
The result is a colorful fly agaric!
Bulk applique of cereals and seeds
To make such a craft, you will need a sketch template depicting a fungus and cereals or seeds of different colors.
All elements of the sketch are one by one covered with a thin layer of PVA glue and filled with selected bulk elements, outlined along the contour with fairly wide lines using a felt-tip pen.
After complete drying, the picture can be further decorated using watercolors or bright gouache; these crafts perfectly develop fine motor skills of the child’s hands.