Coral rowan clusters are one of the most impressive, expressive decorations of autumn, a kind of its distinctive sign. They can be a good theme for creating autumn crafts in kindergarten or at home.
The rowan tree craft for kindergarten can be made from a wide variety of creative materials and using a variety of techniques. We suggest trying to create your own rowan branch from thin colored paper or napkins.
Rowan craft for kindergarten: 10 master classes with step-by-step photos
What you will need to create this craft: a branch of rowan (only its dried leaves, which can be prepared in the summer), thin transparent colored paper, glue, a landscape sheet, a brush and paints.
If there is no rowan branch prepared in advance, it can be replaced with another plant with a similar leaf shape.
Rowan sprig
Rowan for decorating autumn compositions
Rowan berries will perfectly complement the autumn composition for kindergarten.
Rowan in an autumn composition of vegetables
Rowan can be used to complement various people and animals made from natural materials.
People and animals made from natural materials
Rowan berries can be used to decorate an autumn leaf topiary.
Rowan in autumn topiary
Features of rowan amulets
The peculiarity of rowan amulets is that they work in stages. The presence of a protective rowan product in the house first, as it were, absorbs information, the atmosphere with which you need to interact. Then rowan, as a talisman for a home or an individual, “filters” the information received and clears existing ailments. For example, if there is a family member in the house who suffers from a chronic disease that cannot be treated, then the rowan amulet gradually drives away the poisonous energy from him.
This rule is noted for the reason that rowan gives the owner a lot of energy. It is likely that a person will not immediately be able to curb the energy received, which is why it is so important to approach the first “acquaintance” with the amulet step by step.
Preparations of autumn materials for creativity
Autumn time is rich in natural materials, from which you can make a lot of things with your children or decorate your home. In this small selection I will tell you what can be done with leaves, flowers, cones, etc., so that they retain their original appearance longer.
Collected autumn leaves can be preserved in 3 ways. In any case, they need to be washed well and laid out to dry easily.
The fastest way is to dip the leaves in melted wax. To do this, melt a candle in the oven or on the stove and dip a leaf into liquid wax, let it drip and put it on paper to harden. It is important here not to overheat the wax so that it does not burn (do not allow white bubbles to appear in the liquid wax), and you also need to remove the leaves from the wax quickly, otherwise the layer of wax will be very thick. The leaves turn out to be moderately soft, over time they harden a little, but still remain suitable for various crafts
Or decoration for a room. Glue a piece of paper to one end of the thread or fishing line with a glue gun, and to the other end a paper clip straightened into a hook shape. Use a paper clip to hang leaves from a chandelier or curtains.
How to dry rowan:
A lot has been said about the beneficial properties of red rowan more than once. But the fruiting period of this berry is not the longest, so you need to know how to preserve all the beneficial properties for the maximum period. It is most optimal to dry rowan, and then prepare healthy drinks from it all winter.
You can dry rowan in different ways. It dries well in the open air; you can also use an electric dryer, oven, or even a microwave for this. Rowan berries should be dried in the open air either in clusters upside down in a well-ventilated place, or scattered in one layer on a tray or fine wire rack.
To dry rowan, we need the berries themselves and paper napkins.
Spread a paper napkin.
Place clean rowan berries in one layer.
Cover with a napkin and microwave at 400 W for 10-12 minutes.
Dried rowan is ready.
To dry rowan berries in the oven, you need to scatter the berries in one layer on a baking sheet lined with baking paper. Place in the oven at 40-50°C for 50 minutes, then increase the temperature to 70°C and dry with the door ajar for 16-20 hours.
Red rowan is usually dried in two ways - natural (indoors) and forced (in an electric dryer or oven).
When choosing the first option, remember that the room in which the red rowan will dry should be well ventilated.
With the second option, if you use a dryer, then everything is very simple. Just follow the instructions that come with it.
If you decide to dry the berries in the oven, then when drying you need to set the temperature from 40 to 60 degrees and monitor the uniformity of drying, constantly stirring the rowan fruits. Drying needs to be done in several stages. After 5-6 hours in the oven, the berries need to be allowed to cool for 12-20 hours. Then, if necessary, continue drying in the oven again, lowering the temperature by 5-10 degrees each time.
It is good to store dried red rowan berries in fabric bags, jars or boxes. From such a simple preparation for the winter you can make healthy desserts, brew tea, add to compotes or decoctions. Thus, knowing how to dry correctly, you can benefit from red rowan berries all year round.
Use the rosehip as a spout, and the mouth, of course, is made from red rowan berries using the same method as earrings, you just need to string them on a wire, and then lay them out in the correct shape and secure them to a head of cabbage. Decorate your autumn with beads made from rowan berries. These DIY autumn crafts are suitable for any children's creativity competition; moreover, they are very easy and every child can do them.
Autumn gives people a lot of material for creativity - these are a variety of vegetables that can be collected in your garden, and colorful leaves flying from tree branches, as well as cones, chestnuts, seeds, wild berries, which are traditionally used to make autumn crafts.
So, for example, from an ordinary head of cabbage you can make a symbol of autumn or even autumn itself; all that is required for this is the gifts of this wonderful time of year, such as the berries of red and chokeberry, rose hips, pumpkin seeds, watermelon, melon, ash. Also prepare additional materials that you may need to achieve the desired result, such as toothpicks, thin copper wire, plasticine, colored paper and acrylic paints.
Use the rosehip as a spout, and the mouth, of course, is made from red rowan berries using the same method as earrings, you just need to string them on a wire, and then lay them out in the correct shape and secure them to a head of cabbage. Decorate your autumn with beads made from rowan berries. These DIY autumn crafts are suitable for any children's creativity competition; moreover, they are very easy and every child can do them.
How to collect:
Before we talk about how to dry acorns for crafts, we'll talk about how to collect them. When the right period has arrived, you can start collecting. To do this, you should go to the place where this tree grows (it could be a park, forest, oak grove, etc.). When choosing a gathering place, you should pay attention to its location. It is advisable to collect acorns away from the roadway and railway tracks. Due to the short shelf life, take the fruits in a certain quantity required for the product. You can collect acorns near the foot of an oak tree. But to do this you will have to rake away the branches and leaves. Pay attention to the fruits, they must be whole and “healthy”.
There is another way to collect. To do this, you just need to shake the tree, and you can lay some fabric or, for example, polyethylene on the ground. Be careful with this method because when the acorns fall, several fruits from the tree may fall on you. Choose quality fruits. Break a few things and look inside. Good acorns are the same color both inside and outside, they are free of damage, cracks and mold/fungi. If you notice brown flour or larvae inside, then refuse to collect. Such fruits are not suitable for you. You will not be able to make beautiful products from them that will delight you for many years.
Protective properties
When choosing a plant from which you want to make a protective amulet, you should pay attention to its magical qualities. Rowan was considered a truly magical tree with unique properties that could protect its owner from various disasters and failures.
Anyone can create a talisman from rowan with their own hands; it is not particularly difficult. The main thing is to decide for what purpose it will serve. Rowan can be used on special occasions.
- An ordinary dry sprig of rowan, hung at the front door of the house, will protect against the penetration of negative energy into it.
- Healers and fortune tellers often use rowan to heal a sick person. To do this, a special spell against the disease is whispered onto a plant branch, after which it is placed in the place where the patient spends the most time.
- Rowan is considered a powerful neutralizer of negative energy. Strong resentment, anger, envy can be transferred to a tree that transforms these negative emotions.
- In a house where there are many strangers, rowan can protect from bad influences and envy. In this case, the rowan amulet will be aimed at making people with unclean, vicious thoughts feel uncomfortable in your residential building and try to leave it as quickly as possible.
- A competently and correctly made red rowan amulet helps to create more mutual respect, peace and love in the house.
When making an amulet, it is important to maintain the appropriate spirit and attitude. This will strengthen the work of the amulet, making it even more effective. It is recommended to apply a separate spell to rowan in each specific case.
Crafting a rowan tree for kindergarten: master class with step-by-step photos
Coral rowan clusters are one of the most impressive, expressive decorations of autumn, a kind of its distinctive sign. They can be a good theme for creating autumn crafts in kindergarten or at home.
The rowan tree craft for kindergarten can be made from a wide variety of creative materials and using a variety of techniques. We suggest trying to create your own rowan branch from thin colored paper or napkins.
Rowan craft for kindergarten: 10 master classes with step-by-step photos
What you will need to create this craft: a branch of rowan (only its dried leaves, which can be prepared in the summer), thin transparent colored paper, glue, a landscape sheet, a brush and paints.
If there is no rowan branch prepared in advance, it can be replaced with another plant with a similar leaf shape.
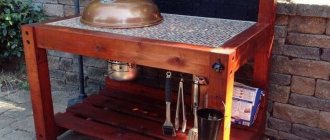
Which stand should I use?
After all the elements of the tree have been prepared, you can proceed to the final stage, which involves securing the craft. For beginners, rowan woven from beads is a ready-made craft. But experienced craftsmen know that in this form the craft is not complete. You definitely need to secure it.
You will need a special stand. You can make it yourself from scrap materials or purchase a finished product, decorate it and make the design more suitable. For this you can use beads and even stones. You can make the stand heavier, but you shouldn’t get carried away with it. The weight of the craft should not be too heavy.
Do-it-yourself rowan: crafts from rowan. The best ideas with photos
Another beautiful and bright autumn craft - a DIY rowan tree will definitely captivate children and parents into the creative process. You can use natural material to create original flower arrangements, or you can make a twig with berries using your knowledge of beadwork.
In this case, how to make a rowan with your own hands, it is better to use silicone-based glue for the mosaic rather than PVA glue; it will fix the beads on the surface faster. You need to grease one element (berries or leaves) of the picture and sprinkle beads on top: for berries - red, for leaves - orange or green of your choice. Thus, you need to fill in all the elements without going beyond the outline. Each time, the beads must be pressed with your finger against the surface of the cardboard for a more secure fastening. When the glue sets, you can turn the sheet over and all the excess beads will fall off on their own, after which you need to manually fill in the empty spaces, if any.
Panel
Butterfly
Step-by-step master class:
1. First of all, you need to sort out the berries and throw out the soft ones that are rotting.
2. The cardboard needs to be covered with material. Glue is applied to the edges of the sheet and in a zigzag motion to the rest of the surface. The burlap is pressed and smoothed.
3. The stencil is carefully cut out along the borders of the design. It is fixed to the burlap with the help of pins. You can start gluing the berries.
4. Glue chokeberry berries onto the dark parts of the stencil; the white parts in the picture are filled with red berries. Try to glue them tightly to each other.
The remaining space of the panel can be decorated at your discretion either with natural material or ribbons, or you can leave only the butterfly, it will still be beautiful and original.
DIY crafts from rowan. Autumn mood
Joint creativity brings parents and children closer together, awakens the imagination of both children and older children, so DIY rowan crafts will be an interesting experience for a child and will diversify family leisure time.
The child will not only learn how to make various cute things under the guidance of mom and dad, but will also receive positive emotions from contact with natural materials. Creativity develops perseverance, attentiveness, and motor skills. In addition, natural materials are environmentally friendly, which is important for many parents these days.
First of all, you will have to take care of preparing the material. The end of August, the beginning of September is the best time to collect rowan, since it is during this period that the berries become firm and their color acquires rich shades. Don’t be lazy - it’s better to harvest more, because the child should have a lot of material for creativity. In addition, a walk in the fresh air will be beneficial for the whole family.
The collected berries must be cleared of twigs, leaves and cuttings. The material is ready and now you can start making crafts from rowan with your own hands. If you also want to use rowan leaves, then you should choose those that have not yet dried out and are flexible enough. Such leaves can be easily dried under pressure or among the pages of books, and they can also be used to form various three-dimensional structural elements for crafts.
Rowan beads
The little princess will surely love beautiful beads. To do this, in addition to the rowan fruits, you will need a strong thread. When the berries dry out, the thread will become visible, so it is better to take a red one so that it does not catch the eye. The thread should be long enough - you can always cut off the excess, but if the length is not enough, you will have to tie more pieces, which will not look too neat.
The berries are strung along the cutting, being careful not to damage the berries. Working with a needle is a delicate thing; a small child should not be trusted with it. Let the girl help her mother by giving her “beads.” But an older girl can try to collect part of the beads herself.
After a few days, the berries will dry out and gaps will appear between them. To make them smaller, you need to slightly tighten the beads. This rowan decoration can become an original accessory to a costume at a children's party. Probably, in the future the girl will have a desire to make a rowan necklace for dolls.
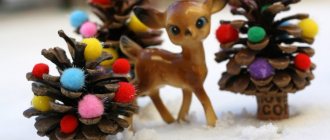
Autumn topiary
Another great idea for making crafts from rowan berries with your own hands is topiary, or in other words, the Tree of Happiness. This product is suitable for a children's crafts competition in kindergarten or elementary school. Here you will need a variety of materials that are easy to find while walking through an autumn park or forest:
The child will not only breathe in the fresh autumn air, but will also discover an unimaginable palette of autumn colors.
It is necessary to prepare a pot where the tree will be installed and a glue gun. To begin with, take leaves of the same color, fold them like an accordion and distribute them around a small branch of rowan. Thus, bunches are formed - the basis for the future crown. Leaves of other colors can be inserted into the bunches to give the tree an interesting look. Each bundle must be secured at the base with thread. When there are about 7 or 8 such elements, you can move on to the next stage.
An unnecessary glass will serve as a pot under the Tree of Happiness. There are many ways to decorate, you just need to put in a little effort and use your imagination. As an option, the glass is carefully covered with colored cloth and decorated with rowan leaves and berries. A sheet of paper or newspaper needs to be crumpled, coated with glue and placed in a glass. The paper should lie tightly inside and occupy about half the volume.
Use scissors or a knife to make a hole in the center. A small stick is used as the trunk of the tree. The more intricate the shape, the more interesting it is. You can even make two barrels. Coat one end of the stick with glue and insert it into the hole. However, there was an empty space left in the glass. It can be filled with acorns and cones, which are also lightly coated with glue on one side so that they do not fall out of the stand in the future.
The next stage is making the crown. Roll a ball out of paper or newspaper, and secure the shape with threads. A hole is cut in the ball, smeared with glue and placed on the top of the tree trunk. For convenience, it is better to sharpen the end of the barrel. After the glue has dried, the paper ball must be decorated with previously prepared bunches of leaves. They are glued evenly over the entire surface of the ball, trying to fill the entire space. When the tree is ready, you can spray it with varnish, then the berries and acorns will become shiny. The child will be happy to see the bright, beautiful result of joint creativity.
Multi-colored garland
Bright autumn crafts - garlands can also be made from rowan berries with your child's own hands. To do this, you need to prepare threads of different lengths, multi-colored paper confetti, and also make several maple leaves or flowers using the origami technique.
There are a lot of pieces of colored paper left over from children's crafts. This is also suitable for making confetti. Using a hole punch, the task is completed very quickly. Then the berries mixed with confetti need to be strung on threads. However, threading each circle on a needle is a tedious and time-consuming task. The process will become much easier and faster if you pour confetti onto a computer mouse pad and prick the pieces of paper with a needle. At the same time, you must not forget to alternate them with rowan berries.
When the threads are ready, paper flowers or maple leaves are attached to the ends. The garland can be hung in a doorway or decorated with a window. The threads can be placed not only vertically, but also hung in arcs on the wall.
If you wish, you can come up with many more crafts using rowan berries. Surely, during the creative process, the child himself will think out the details and make his own additions.
For the first method of drying chokeberry berries, we need to dry the berries for a relatively short period of time. It will take time from picking the berries until spring. In this case, the berries are cut directly from the tree using scissors and they are cut out with a single branch (it looks like an umbrella).
Hedgehogs are all different
Did you know that the Soviet cartoon “Hedgehog in the Fog” 15 years ago was recognized as the best animated film of all time? You see what a difficult animal this hedgehog is. It is definitely worthy of repeated embodiment using various natural materials.
Volumetric hedgehog made of seeds and plasticine
A cheerful and thrifty hedgehog, cheerfully carrying mushrooms on its back, may come to visit your apartment in the fall. To do this, you will need to stock up on simple natural materials, an hour of free time and involve young assistants in the work.
photo: MK
For joint creativity you will need:
- foil;
- leg-split;
- black and brown plasticine;
- unpeeled seeds;
- PVA glue;
- acorns and leaves for decoration.
Make the base of the hedgehog from foil. You can immediately tear off a large piece of foil and form it into a drop-shaped piece. Or roll a separate ball for the body and a small cone for the spout and connect them together, wrapping them in foil.
Cover the hedgehog's body with black plasticine and its face with brown plasticine. This important stage can be safely entrusted to the child; nothing will be spoiled, and all the flaws will then be hidden.
Lubricate the muzzle with a thin layer of PVA. Also moisten the twine a little with glue and wrap it tightly, row by row, around the face, starting from the nose. You'll have to stop there for now and let the glue dry. Remember that this should happen naturally. On a radiator or when drying with a hairdryer, the plasticine will melt.
The next stage is the design stage. You need to make needles for the hedgehog from the seeds. Start work from the head, arrange the rows of seeds in a checkerboard pattern. Stick the “needles” into the plasticine as tightly as possible to each other.
Decorate the face with plasticine eyes and nose.
Mushrooms can be easily made from acorns by simply covering their caps with brown plasticine. If you wish, you can attach real leaves to them. Using plasticine, attach the mushrooms to the back of the hedgehog.
Such a cutie will definitely please your child, and will also allow you to enjoy joint creativity.
Hedgehog applique made from dry leaves
While walking through the autumn park, did you pick up a beautiful bouquet of yellow leaves? Great, add glue and cardboard to them and we’ll make a cute hedgehog.
All you need is to draw an outline. Your baby will be happy to glue the leaves on himself. Just show him how it's done.
You can download the hedgehog template, we offer you 4 options:
Hedgehog applique made from seeds
Did you like the idea of using seeds for hedgehog needles, but a voluminous craft seems too complicated to implement? We have prepared another simple MK, which features a funny hedgehog, seeds and plasticine.
With a little perseverance, you can make a surprisingly cute and easy craft for kindergarten.
Do-it-yourself rowan
By the way, many needlewomen forget that you can make original jewelry from natural materials, for example, do-it-yourself rowan beads, which are perfect for a themed autumn photo shoot. Many creative brides add such elements to their finished product, and it looks more refined and delicate than those for which ordinary fresh roses are used.
You can make a rowan wreath with your own hands using not only bunches of berries, but also twigs with yellowed leaves and other autumn materials.
If you decide to make crafts from rowan with your own hands, you can find photo ideas on the Internet, and the first thing you will stumble upon on the vastness of the global web is a beaded tree. Its craftswomen perform it in two versions: autumn - with yellowed leaves, winter - with a “snow” cap over the bunches.
The berries themselves can be made using several beads, or you can take large red beads, and for the leaves twist five green beads in the same way as we did for other beaded trees.
Beads can be made into prefabricated pieces, i.e. make not only rowan branches, but also other flowers and plants, which are arranged into one beautiful flower arrangement.
For such crafts, thin wire is used, from which individual branches are created. At the end, these thin branches are combined into several thick ones, from which the finished tree is formed.
To make your creation pleasing to the eye, it must be mounted on a stand or in a decorative pot; plaster or alabaster is used for fixation. The pot also needs to be decorated; you can draw a “Khokhloma” pattern on it or simply wrap it with twine.
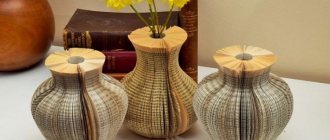
DIY paper rowan
Naturally, if we are talking about do-it-yourself rowan berries, then we must not forget about the most accessible material for creativity - this is, of course, paper. The quilling technique allows you to create bright, voluminous floral paintings and cards using only paper strips and glue.
First, you need to think about what a bouquet of rowan berries will look like with your own hands, perhaps even make a sketch on a sheet of thick white cardboard where the berries will be located and where the leaves will be. As a basis, you can take a picture from the Internet and modify it to suit our technique.
Ready-made strips can be bought in stores, along with other art supplies; you can also cut them out yourself by first drawing a sheet of red and green paper into strips with a pencil. The width of one strip can be 5-7 mm.
Each strip is twisted, then the resulting element must be shaped (drop, heart, eye or circle). And from many such elements the finished picture is laid out; you must glue them to the surface using PVA.
There is another available material that can be made from, for example, corrugated paper. Children like to work with corrugated paper because it easily glues, cuts and creases. And a DIY rowan tree made from paper will fill your home with bright colors and will lift your spirits on cold, rainy autumn evenings.
The master class is intended for children from 5 years old.
Purpose: group, class design.
Goal: to master the technique of working with cotton wool and cotton swabs.
Objectives: developing the ability to roll cotton wool into flagella, roll cotton balls, place cotton swabs in certain places. Develop imagination, thinking, creativity, interest in cotton wool applications.
We tint a sheet of cardboard with yellow gouache.
We paint the cotton wool brown and red. We paint cotton swabs green, red, half red and green.
We make a rowan tree trunk: from brown cotton wool we roll up a rope the length and width of which resembles a tree trunk. Tree branches: roll the flagella thinner and glue them onto a sheet of cardboard.
We continue to roll flagella from cotton wool and glue them to the trunk.
Tree with branches photo ready.
For rowan leaves, cut off the cotton swabs, leaving only the part with cotton wool.
Rowan leaves: glue the base of the cotton swabs at an angle to the branches.
Rowan berries: roll small balls out of red cotton wool and glue them into a rowan brush.
We continue gluing leaves and berries.
In autumn it is important to make crafts from natural materials. Children create figures with their own hands from chestnuts, acorns, vegetables and fruits, and by adding moss, twigs and leaves, original compositions are obtained. No less attractive crafts are made from rowan for children, since the products do not require much skill. Red berries will add freshness to future masterpieces.
The crafts are quite simple to make. They are easy to make and add a pleasant atmosphere to your home. Viburnum is used to create unusual panels, voluminous appliqués, and plant bouquets combined from rowan branches and tree leaves.
Using rowan berries in children's creativity is quite a fascinating process. Having the fruits of the tree at your disposal, you can make beautiful beads.
To work you need to prepare the following materials:
- a needle with strong thread;
- rowan berries.
A child can make such beads himself. And if you are afraid to trust him with a needle, replace it with wire. Picking berries and stringing them on a wire develops fine motor skills. This activity will interest not only girls, but also boys. They can give a gift to the mother, grandmother or girl they like.
The rowan berry looks very beautiful. Adults associate it with medicinal properties, but children immediately imagine what crafts they can make from rowan with their own hands. If you pick a few berries, your child will enjoy the creative process. Rowan berries can be used to make not only beads, but also arm bracelets, and even hairpins. It is enough to string the berries on a strong thread, and the original decoration is ready. To make a hairpin, tie the pendant to a bobby pin.
DIY crafts from rowan in autumn
A very beautiful ornamental tree is made from rowan berries. It will decorate a living room or children's room. It will look original in the kitchen, breathing a breath of fresh air into the room.
For work, prepare the following materials:
- flowerpot;
- rowan sprigs with berries;
- beads or pebbles for filling the pot;
- corn husks or beads;
- tree branch;
- wire.
A tree branch will serve as a trunk. The leaves can be replaced with corn husks or made from beads. Leaves and berries are fastened with wire. Insert the workpiece into the pot and pour pebbles or beads into it.
Figures of people and animals made of rowan
The caterpillar is created in a similar way. You need to string the fruits on a fishing line, and place the rosehip berry first in the row, since this will be the head. Attach eyes from plasticine and several legs along the entire length. If desired, you can attach the tongue using a dry sheet of wood. Beads, snakes, caterpillars and similar products are made from several fruits, which makes the craft movable. Touching it with your hands develops fine motor skills.
In addition, berries can be used as an additional material when creating crafts from the gifts of nature: chestnuts, acorns, etc. For example, when creating an animal or a person from rowan, parts of the face are made from oak and chestnut fruits: nose, eyes, ears, neck. They are fixed with a toothpick. If you make a hedgehog out of plasticine and attach a berry instead of a nose, you will get a cute craft. One fruit (apple) can be placed on the back of a hedgehog. Birds are often made from chestnut, but rowan berries are used as the head. In a person who is harvested from acorns, the ears and hands are also replaced with rowan fruit.
Bunches of rowan can add their own touch to creating a composition of leaves and flowers. Ikebana is quite simple to do.
First, prepare a large vase and place a floral sponge there, after wetting it with water. Then insert a bunch of rowan berries and dried flowers into it, periodically adding water to the vase.
Ikebana will delight you for a long time. You can decorate the composition with ears of wheat. Our ancestors considered the rowan tree to be a strong talisman against many diseases and misfortunes, so they hung a rowan branch at the front door.
Many children love to do applique. They often cut out figures from colored paper and glue them onto a landscape sheet. But this type of creativity involves more than just cutting out paper. The applique can be made from rowan berries. To do this, you need to draw a sketch of the future composition with a pencil and stick on natural material. For example, decorate the bottom with leaves, and cover the figure itself with rowan berries, as shown in our picture.
This bouquet is very easy to make. It will become a real decoration of your home. Plus it will last for several months.
Choose a beautiful vase and place a sprig of rowan in it, then apply acrylic paint to the leaves and berries.
Here is another rowan craft for children that can decorate your home. For work, prepare the following materials:
- a tree branch with a lot of knots;
- wire;
- yellow wallpaper;
- cardboard;
- rowan berries;
- glue;
- gouache;
- cotton wool
Step 1: Wrap the wire around the branch, leaving room for leaves and berries.
Step 2. Cut out leaves from wallpaper and cardboard.
Step 3. Glue them together over the wire, two at a time;
Step 4. Roll small balls of cotton wool, coat them with glue and let dry;
Step 5: Paint them red and orange;
Step 6. Thread live and homemade berries onto a wire.
The result will be a beautiful brush of rowan.
We invite you to watch a master class on how to make a rowan branch from scrap materials.
A kind of distinctive sign of hers. They can be a good theme to create in a kindergarten or at home.
The rowan tree craft for kindergarten can be made from a wide variety of creative materials and using a variety of techniques. We suggest trying to create your own rowan branch from thin colored paper or napkins.
What you will need to create this craft: a branch of rowan (only its dried leaves, which can be prepared in the summer), thin transparent colored paper, glue, a landscape sheet, a brush and paints.
If there is no rowan branch prepared in advance, it can be replaced with another plant with a similar leaf shape.
Let's get to work.
Draw the petiole of a branch on a landscape sheet using a simple pencil and paint. The craft will look more interesting if several petioles are directed in different directions. Separately, draw the base of the bunch of berries.
Using glue, we attach rowan leaves to our petiole, arranging them as they are located on a real rowan branch, that is, opposite each other, from smaller to larger, and again decreasing.
Now we need to glue the berries to our branch. But first we will make them from thin paper.
We tear off a piece of paper and roll it into an even ball - you get one berry. We try to tear off pieces of the same size so that the berries do not differ from each other. We make as many berries as we need.
Glue the berries to the drawn base of the bunch. We try to place them as naturally as possible and press them tightly against the sheet for better fixation.
Depending on the age and gender of the child, you can make crafts from rowan of different levels of complexity and type with him. Girls will love stringing rowan beads. True, the berries will soon dry out, and the beads will look different than they did immediately after assembly. After complete drying, the beads can be varnished or used for other crafts.
A rowan snake-caterpillar or centipede is made almost as easily as beads. The berries need to be strung either on a thin wire or on a strong thread. Centipede legs are made from slightly sharpened pieces of matches that are stuck into the berries. The eyes can be made either from the same match heads, or from any oblong seeds stuck into the first bead head. For the head, you can take a larger rose hip. Stringing berry beads develops fine motor skills and helps develop patience, accuracy and perseverance. Crafts made from rowan are great for such activities.
Bunches of rowan berries and autumn leaves make beautiful bouquets with which you can decorate a room. If the child is already old enough, you can try making a bouquet or wreath from rowan and flowers collected from autumn leaves. Physalis fruits, dried flowers, curved branches and wood growths are suitable as additional decorative elements. To make such crafts from rowan, you will need floral tape, wire, glue, tape, and strong threads.
Options for making crafts
Of course, there are several different technologies that involve creating very unusual crafts. You can use different techniques. It all depends on the size and shape of the product, as well as on your imagination.
The appearance of crafts may differ depending on which tree the master decided to take as a basis:
- winter rowan - sometimes the leaves of this craft are made exclusively from silver beads. And then the tree looks snow-covered, and therefore especially beautiful. In some cases, leaves are made not only from silver, but also from white and green bugles;
- chokeberry - looks even more impressive thanks to its bright color, which will combine beautifully with other shades in the interior. And therefore, such crafts are often made to order even for owners of apartments with a modern interior.
The master must independently decide what kind of look to give to the craft. However, you need to remember to follow one rule: the craft should look like a real tree. This can only be achieved if the color of the glass beads is chosen correctly.
How to make beads from rowan
To make beads you will need rowan, thread and a thin needle. Progress:
- Collect berries from late August to early September. During this period, rowan is hard and has a rich red color.
- Clean the berries from excess twigs and cuttings.
- Thread the thread through the needle and carefully string the “beads” along the handle.
- Tie the end and beginning of the thread into a knot.
Choose rowan berries of the same size so that the beads look impressive. The length of the thread and the number of “beads” depend on the number of turns around the neck. For an impressive result, wrap the beads around your neck 8-10 times, although 3 turns look no less beautiful.
Use strong thread. For example, double nylon. Do not use fishing line as it will “tear” the berries. Experiment with the color of the thread, add beads or stones.
After a couple of days, the berries will dry out and small “gaps” will form between them. Therefore, slightly pull up the red “beads” to remove any excess gaps. When dried, rowan does not lose color and has a special texture, which distinguishes it from other ecological decorations.
How to choose wire thickness?
At the beginning of work, it is difficult for every master to decide exactly what thickness the wire should have. How convenient it will be for the master to work with it depends on the correct choice in this case. There is one rule, guided by which you can make the right choice. It is necessary to choose a wire of such thickness that it easily passes through the beads. If the wire passes through the beads at least 2 times, then it is suitable for work.
How to preserve rowan beads
After picking the berries, immediately begin making beads. If you do not plan to make decorations on the same day, then put the rowan in the freezer.
Spray the finished rowan beads with hairspray several times. This coating will preserve the elasticity of the berries and add shine to the product. Setting nail polish will give the same result, but you will have to spend a couple of hours painting each bead.
You can treat your jewelry using wax or paraffin. Melt wax or paraffin and dip the beads for a couple of seconds. Another way is to cover the jewelry with clear gel soap. It is sold in soap shops.
Everyone at least once in their life wants to do something with their own hands. Try your hand at beading. It's very entertaining and exciting! The activity allows you not only to create jewelry for yourself or loved ones, but also calms you down.
DIY children's crafts from rowan
If you look at DIY rowan crafts in the photo, you will definitely pay attention to the original applications, where the main material is small red berries. You can choose any picture and fill its surface along the contours with berries, gluing them with PVA glue. Working with such miniature round beads, the child will practice working with small materials and develop fine motor skills of his fingers and hands. He will become more careful and diligent, and will learn to concentrate.
This DIY craft made from rowan berries will be called “Moon Cat”, and we will create a beautiful image of a cat using appliqué (or mosaic) on paper, and also add additional elements to the picture.
- Rowan berries
- Wolf berries (other black berries)
- PVA
- Thick cardboard for the base
First, you need to draw the outline of the cat on a sheet of cardboard; it should be a simple drawing without small details; we can separately draw all the necessary details of the face using paints and a brush.
Using PVA glue, you need to glue red berries onto the base, which should fill the entire base of our drawn picture. Now we have a red cat ready, but it needs to be framed using any black berries, maybe it will be wolfberries or chokeberries. They can be fresh or already dried.
You should definitely use cardboard as a basis, since the applique itself will be quite weighty, and an ordinary sheet of paper will not withstand such a “load”, it will soften from the glue and tear.
To prevent the base from becoming covered with lumps and irregularities (from glue) during the drying process, it is advisable to place a flat board on top and place a small load on it, for example, several heavy books. Such a painting will take a long time to dry; you will need to interrupt work for two days and do other options for autumn creativity, and this could be a beautiful bouquet of leaves, which can also be decorated with rowan bunches. You definitely need to fill your DIY rowan tree crafts for school with various additional elements, experimenting with a variety of materials and decoration options.
Additionally, the composition can be decorated with an image of the moon, and the likeness of a tree can be made from dry twigs to make our composition more complete. You can also draw or glue stars cut out of paper; it’s not for nothing that the picture is called “Moon Cat”.
All that remains is to make eyes and a nose for our cat, these will be ordinary small buttons, and the whiskers can be made by cutting the string into short pieces and smearing them with glue so that the whiskers are straight and stick out in different directions.
DIY children's crafts made from rowan can be anything, but for some reason the theme of cats, recreated using red miniature beads, has gained the most popularity.
Rowan under the snow
Externally, this craft looks more interesting. But to make it you will have to make the snow yourself from beads. Painting the branches in this case will not give the desired effect.
To make snow, you need to use loop weaving technology, which is not too complicated, so it is suitable for beginners:
- You need to collect beads on a white wire and make a loop. It is better to use white beads, but they can also be replaced with transparent glass beads;
- Next you need to twist exactly two turns;
- Another loop should be made near the twist.
Please note that the length of one piece of wire used should be enough for at least 6-7 loops. You cannot make too few loops, because in this case the “snow” will not cover the fruit.
Crafts from rowan leaves
Rowan berries are often used in school work to make your work brighter and more beautiful. But you can also use rowan leaves to create autumn-themed crafts.
Sources
- https://vericon.ru/vorozheya/kak-sdelat-vetochku-ryabiny.html
- https://posuda-inet.ru/sedobnoe/kak-pravilno-vysushit-kashtany-dlya-podelok.html
- https://bluda-doma.ru/pitanie/detskie-podelki-iz-ryabiny.html
- https://landshafto.ru/info/podelki-iz-rjabiny-foto/
- https://3dpen-art.ru/produkty-i-napitki/ryabina-v-vaze-2.html
- https://myhandmade7.com/1029-podelki-iz-ryabiny-svoimi-rukami-luchshie-idei-s-foto.html
- https://larecmasterici.ru/podelki-iz-prirodnyx-materialov/interesnye-i-krasivye-podelki-iz-osennix-listev-v-sadik-i-shkolu.html
What natural materials might be useful?
Crafts on the theme of autumn can be made without natural materials, but with them the work will be much more reminiscent of this time of year. And the collection of such raw materials itself is a separate fascinating ritual. And the smell of natural materials, which immerses you in a special state and brings you closer to nature?
What will be useful?
Fallen leaves of yellow, green and red color spectrums, acorns, chestnut fruits, dried (or hard) berries and fruits, birch bark, dried or withered grass and flowers, seeds, tree bark, straw, pine cones, moss, nuts.
The material must be carefully prepared: cleaned of dirt and soil, dried (or brought to a state where the appearance will no longer deteriorate).
Other MKs in this technique: video tutorials
The art of quilling consists of creating three-dimensional or flat compositions from strips of colored paper twisted in different shapes. This technique is also called paper rolling. Why is quilling so popular?
This art is an activity that can unite people of different age categories. Children develop fine motor skills and imagination, while adults unleash their creativity and calm their nerves. This activity is ideal for beginner needlewomen and craftsmen.