Industrial electric motors are complex technical devices that convert electrical energy into mechanical energy. Widespread use in household and industrial equipment was ensured by the design and technological thought of many people. An electric motor assembled by self-taught craftsmen from scrap materials is unlikely to find the same distribution as industrial designs. However, it is quite suitable as a teaching aid that clearly demonstrates the principle of operation of an electric motor.
The process of converting into a generator
The sequence of actions is as follows:
- The rotor is removed after removing the cover;
- The same stator windings remain; rewinding is not carried out;
- In order for it to become prefabricated, as opposed to its original solid state, it must be ground down to a predetermined size;
- A steel cup five millimeters thick is pressed onto the rotor;
- One of the most difficult operations is marking, which is carried out in order to glue the magnetic elements to the rotor according to the template. The dimension is individually selected for each engine unit;
- Magnetic elements made of neodymium are glued with superglue and additionally reinforced with a nylon filament mesh;
- Everything is wrapped with tape and formwork is carried out to seal it, and then filled with epoxy;
- Flowing down, the resin hardens, after which the tape must be removed;
- The rotor is driven into the generator part with all precautions so that the rotor “stands up” and does not “fly” into the stator due to the force of the magnets;
- The structure is assembled and closed with a lid;
- The functionality is checked using a drill.
We make an adjustable electric motor from a drill
Many fairly enterprising fishermen have the idea of creating their own electric motor from a drill or a screwdriver. Their peculiarity is that they also operate on batteries, like industrial designs. To make such a device with your own hands, the layout for this unit will always be the same:
- you need to take a battery as a power source;
- the engine will be an electric motor;
- to move the vehicle through water in the future, it is necessary to take a propeller equipped with a gearbox;
- the control unit will make it possible to turn the boat while moving and monitor the control speed of the electric motor.
Every man can easily find all these elements that are required to create such a motor in a screwdriver or drill. If you decide to use an electric drill, then in the future you should make sure that it is placed as far as possible from the surface of the water. If even a small amount of water gets on the control unit, it can immediately stop the boat while moving in the middle of a body of water.
To make an electric motor from a drill or screwdriver, it is important to take care of preparing such important tools and elements as:
- scissors designed for metal carving;
- a set of drills and an electric drill;
- welding machine;
- grinding and cutting wheels together with a grinder;
- for the motor you need to purchase an electric drill;
- to secure the motor, in the future you will need handmade or factory-made clamps;
- to secure the motor to the so-called transom of the boat, you can take a gearbox from a device such as an angle grinder;
- tubes designed to connect the motor and create a rod;
- a metal round rod, which will subsequently be used for the motor shaft;
- for a propeller type, you can take sheet metal.
Nuances of the rewinding process
Asynchronous operation of the motor allows it to maintain a constant frequency at which the rotor part rotates, even under different loads. If we talk about the principle of rewinding electric motors, then it is common in terms of execution technology. But individual nuances may vary.
It is best to take a failed device to a workshop, but in some cases it turns out that it is preferable to rewind the engine at home. Only on the condition that you still have certain skills in this matter, despite the relative ease of the process.
For engines there are two types of winding:
- Rotor part;
- Stator.
Taking into account the differences in the size of devices and their design, you can use generalized instructions for rewinding with visual photographs and a descriptive part.
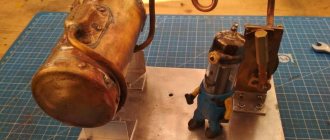
Why build a steam engine in the 21st century
So, this is the 21st century, the digital age, the age of high computer technology, one might ask the question, “Why would anyone build a steam engine now?”
There are people who say that they want to make a model of a steam locomotive, a steam generator for their home and use it for their needs - all this is nonsense.
If these needs were really important to them, they would rather use a more efficient internal combustion engine.
In fact, nowadays steam engines are built for the pleasure of engineering, the pleasure of modeling and the pleasure of experience - the same experience that the great inventors of antiquity had.
Basic provisions of the instructions
Once a breakdown is detected, the engine must initially be removed from the device.
Further work is carried out in the following sequence:
- The wire parameters and the total number of turns of the coil are determined during the inspection of the motor part;
- The most intact section of the winding fragment is cleaned;
- Carbon deposits are removed using a solvent or firing;
- The protruding upper part of the installation is cut off with an appropriate tool, depending on the cross-sectional area of the wire. Then it is decomposed into separate wires in order to be able to find out the number of turns;
- All detected irregularities on the surface of the iron where the winding was wound must be completely cleaned to make the surface smooth. Otherwise, a new breakout will not be long in coming;
- The cross-section of the new wire must be identical to the old one or as close as possible to it;
- A template is made from cardboard corresponding to the size of the iron on which the winding is carried out. When winding, a special machine is used.
Materials
First of all, you need to stock up on the necessary materials:
- bolts;
- bicycle spoke;
- nuts;
- electrical tape;
- copper wire;
- metal plate;
- super and hot glue;
- plywood;
- washers.
You can’t do without these tools:
- electric drills;
- stationery knife;
- pliers;
- grinding machine;
- hammer;
- scissors;
- soldering iron;
- tweezers;
- sewed
Why do you need a soft start?
Smooth starting of an electric motor makes it possible to reduce the noticeable shortcomings of electric machines.
Besides:
- Repair costs are reduced, since any starting current always overheats the winding, thereby reducing the overall service life of the machine;
- There are practically no jerks, which has a good effect on reducing the wear of gears in transmission mechanisms, as well as the possibility of water hammer in the network when supplying fluid;
- Electrical energy consumption is greatly reduced, since direct starting requires a considerable amount of electrical energy. You need to know that the possibility of voltage sags in cases of power limitation in the network can negatively affect each of the connected devices;
- The overall cost of switching equipment is significantly reduced. Technical electrical devices for drives with an asynchronous operating principle are selected with a sufficient power reserve. The presence of a smooth descent makes it possible to connect more budget protection and switching devices.
The presence of acceleration after a soft start contributes to a significant expansion of the applied scope of asynchronous electric motors.
How many phases
A private house can be supplied with single-phase voltage (220 V) or three-phase (380 V). According to energy consumption standards for a private house, the maximum consumption per house for a single-phase network can be 10-15 kW, for a three-phase network - 15 kW.
Three-phase input is needed only when you need to connect powerful equipment operating from a 380 V network
So what's the difference? The fact is that powerful electrical appliances can be directly connected to a three-phase network - electric stoves or heating boilers, ovens and similar equipment. However, the input requirements and wiring of the 380V network are much stricter: higher voltage, greater chance of serious injury. Therefore, if your house is no more than 100 square meters, and you do not think of heating it with electricity, you are better off using 220 V.
Carrying out the armature winding
To wind the armature of an electric motor, a copper wire with a large cross-section is required. An option is used with a non-insulated wire with a rectangular cross-section and an insulated wire with a round cross-section.
In the first case, the wire is intended for power starters with the ability to carry currents of six hundred Amperes or more.
- Insulated wire is used when winding low power starters.
- The winding is single-turn, consisting of a certain number of conductors.
- They are laid in loops in the core. One loop - one turn. A bandage on both sides of the exits beyond the core secures parts of the winding.
Reactive modification
You can make a switched reluctance motor with your own hands only on the basis of a brush commutator. First of all, you will need to select a rotor with a winding. Next, a shaft is installed under it. In some cases it is used with a volumetric nozzle. To reduce friction, you will need a small ring on roller bearings.
Next, a bendix is installed on the switched reluctance motor. In this case, the disk is fixed on a key. The terminal box must be located at the rear of the motor. The shaft must be located in the central part of the housing. Ventilation holes are most often made above the rotor.
Photo of a homemade electric motor
Share with friends
Battery device
The battery is a simple, cheap and reliable source of energy for household appliances.
Battery design.
Inside such a device are:
- Positively and negatively charged poles.
- Catholyte.
- Mercury, nickel, lead, cadmium, nickel.
- Resin.
- Carbon rod.
The most important indicator of a power source is the charge capacity. It determines the price and operating period: the larger the capacity, the longer the battery will last.
Precautionary measures
Do not dispose of it yourself. Do not burn or bury batteries, no matter how many. According to the latest data, one old battery harms the territory that can be inhabited by a hedgehog, 2 trees and a thousand worms.
Do not store batteries in metal boxes. The contents cause metal corrosion and seep into the soil and groundwater.
Failure to recycle causes irreparable damage to the environment and public health. Recycling old batteries is an event organized solely for the purpose of preserving the environment.
How to determine if the battery is charged
Many companies put a scale on the shell of their product that displays the amount of charge. When the light is red, it means the battery needs to be replaced.
Many companies put a charge scale on the shell of their product.
If there is no indicator, you can determine the amount of charge as follows: lift the battery 3-4 cm from the table (or other flat surface) and carefully release it. A discharged battery will bounce and fall, but a charged one will land smoothly.