Home › Cosmonautics Day ›
Is there life on Mars? And on the Moon? Humanity is still looking for an answer to this question. Every time, from year to year, astronauts go on a spaceship into mysterious outer space. There is even a holiday in their honor - Cosmonautics Day. And this memorable date is April 12, the date of the first manned flight into space.
But who really lives in space, people, animals, are there plants there, or maybe so-called lunatics who fly on flying saucers live on the Moon. And why on plates, and not on forks or spoons.
No one knows this yet. But people themselves have already created the image of this very flying saucer.
And since it also relates to space, below I will show you how to make a flying saucer for Cosmonautics Day, with your own hands from disposable tableware.
In addition, with school-aged children, you can make a rocket using the modular origami technique.
In order to make a flying saucer, we need:
- disposable cardboard plates
- disposable cardboard cup
- silver spray paint
- toilet paper roll
- hot glue
- scissors
- newspaper
- multi-colored sequins
- brown gouache paints
- art brush
How to make a flying saucer with your own hands from cardboard and paper
A DIY flying saucer will delight any boy or girl, regardless of age. You can make a paper spaceship to celebrate Cosmonautics Day or World UFO Day (celebrated on July 2) with your children, recreate scenes from your favorite science-fiction films, or simply create an entire space fleet and play with it.
Alien life forms are diverse, so the UFO craft, like the alien itself, can be created from anything, and the choice of material for making and decorating the craft will develop the child’s imagination and creative thinking.
Rocket from a sleeve
Craft product Cosmonautics Day corrugated quilling Soyuz spacecraft corrugated cardboard
Having looked at photos of space crafts on the World Wide Web, you can see that this is quite easy to do, for this you will need a sleeve, scissors, a sheet of cardboard, foil or shiny wrapping paper, a glue pencil, a glue gun , marker.
The sleeve will play the role of the “body” of the rocket, so it must be covered with shiny wrapping paper or wrapped in foil. The sharp nose for the spaceship will be made of cardboard, which must be cut to the required size (the larger the sheet, the longer the nose of the rocket) and rolled into a cone (it should be rolled approximately the same way as “cups” for sunflower seeds used to be made). Wrap the resulting workpiece in foil or cover it with paper.
The resulting parts must be connected; it is recommended to do this with a glue gun for better adhesion of the parts (do not leave children alone with a glue gun). From the remaining pieces of cardboard you can make flaps for our rocket, they will make it more stable. Use a marker to draw portholes.
After going through all the simple steps, you get an excellent craft for Cosmonautics Day, and if you supplement it with plasticine astronauts or an applique of the starry sky, you can arrange a whole space trip with your child!
Templates and stencils for applications
In order to make a picture on the UFO theme, you just need to print out a flying saucer, color it (you can decorate it with foil or three-dimensional elements) and insert it into a frame.
The application of the flying saucer is carried out according to the same patterns, for this:
- cut the printed picture into individual elements;
- trace them on colored paper;
- cut out blanks;
- paste them onto a new sheet in the correct order.
You can use alien templates to cut out, color, and place them in the cabin of a 3D paper plate UFO.
A home-made flying saucer toy will be unlike any store-bought toy and will not bore your child for a long time.
Air waltz
The first flight was made in complete secrecy at one of the northern airfields. “There was a deafening roar of three jet engines, and the dark disk, after a very short takeoff, easily took off from the ground and soared into the sky,” recalls Mikhail Dubik. “If it weren’t for the sound, it would all look like an alien UFO.” The disk had outstanding characteristics for its time, especially in terms of carrying capacity and minimum cruising speed - it could easily go to 100 km/h, performing maneuvers at this speed that many fighters of those times had never dreamed of. The disk could spin almost on the spot, making a circulation (remembering the German roots of the machine, the pilots called this figure the “Strauss Waltz”, or simply “Strauss”).
Flying saucer, children's craft
Is there life on Mars? And on the Moon? Humanity is still looking for an answer to this question. Every time, from year to year, astronauts go on a spaceship into mysterious outer space. There is even a holiday in their honor - Cosmonautics Day. And this memorable date is April 12, the date of the first manned flight into space.
But who really lives in space, people, animals, are there plants there, or maybe so-called lunatics who fly on flying saucers live on the Moon. And why on plates, and not on forks or spoons. No one knows this yet. But people themselves have already created the image of this very flying saucer. And since it also relates to space, below I will show you how to make a flying saucer for Cosmonautics Day, with your own hands from disposable tableware.
In addition, with school-aged children, you can make a rocket using the modular origami technique.
In order to make a flying saucer, we need:
- disposable cardboard plates
- disposable cardboard cup
- silver spray paint
- toilet paper roll
- hot glue
- scissors
- newspaper
- multi-colored sequins
- brown gouache paints
- art brush
Ideas for making rockets from scrap materials for children
Well, we’ve reached the last point, let’s look at a bunch of ideas for what else you can do with your children from waste material to make a spaceship that can possibly fly).
Use your imagination and create for your health. In any case, the kids will be satisfied and happy, because they love to work so hard.
Postcard in the shape of a rocket for February 23
Unusual and very stylish, this is the motto of a postcard that you can give to your dad or grandfather on a men's holiday. Using cardboard, draw an image of a rocket on the cardboard. And also the stand on which it will stand.
Cut out the spaceship parts according to the template and make notches where shown in the photo.
Then place the rocket on the stand.
Then cut out blanks from wallpaper or other decorated paper and decorate the craft.
Glue a photograph or your picture into the porthole.
Think more about the design, you can alternate the paper.
The end result should be such a beautiful product, such a wonderful three-dimensional postcard in the shape of a rocket.
A rocket made from an ordinary bottle, paper and cardboard
There are a lot of options for such crafts on the Internet, I suggest using these instructions as a basis, and you yourself, using the drawings, can create such a souvenir. You will need a bottle that you need to measure.
And then make markings for it on paper.
Then develop a design for the site.
Then transfer the details onto cardboard and cut them out.
Well, now go ahead and glue it with a glue gun.
And this will be a masterpiece that still needs to be decorated.
Or consider this type of work, if the previous one seemed very difficult to you, this one looks great.
You can hide the bottle, put a regular new sock on it and decorate it with threads and other improvised means.
Master class on making a rocket from a toilet paper roll
This is probably the most common option, because there is nothing easier, take a ready-made base, that is, a tube or a roll of toilet paper and decorate it. All the steps for making a rocket from this material will be shown in the pictures below:
Paper rocket for Cosmonautics Day in kindergarten and school
Well, now for another interesting and original job, make these rockets with the whole class or with preschoolers and design a stand newspaper for Cosmonautics Day. For this craft, take scissors and paper again.
Fold the sheet in half.
Then unfold and bend the right and left corners to the central marked line.
Next, turn the workpiece over to the other side and bend the sheet again, as shown, towards the middle on both sides.
After that, turn the workpiece over again and fold the sides towards the center.
Then turn it over again to the other side.
Then follow these step-by-step photos:
This is the kind of masterpiece you should end up with.
And here is the finished stand newspaper.
Well, in conclusion, catch a rocket made of candies.
This is a short article published today, I hope you have learned how to fold rockets not only from paper and cardboard, since these are the simplest models. But you can also do work from bottles or other materials that are always in your home.
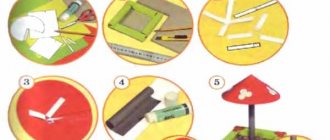
How to make a flying saucer with your own hands from disposable tableware:
Take a sheet of newspaper and crumple it into a rope.
Next, we roll the rope into a snail and glue it to the plate to make the figure more voluminous.
Glue the second plate on top with hot glue. Now take a cardboard glass and measure 4 cm from the base.
We cut off the top part of the glass with scissors, stepping back from the line about 1 cm. Using scissors, we make cuts in a circle to the drawn line.
We get the upper part of the flying saucer - the cabin.
We apply hot glue to the base of the cabin and glue it in the center of the flying saucer.
The next step is to paint the flying saucer silver. To do this, arm yourself with a can of paint and spray it evenly over the entire surface of the plate. When working, use newspaper so as not to stain anything, and also work in a well-ventilated area, because... the paint is toxic.
Cut the toilet paper roll into three parts.
Roll into tubes and glue.
Using scissors, we cut the ends on both sides diagonally - these are the legs for the flying saucer.
Paint the legs brown and let dry.
After the paint has completely dried, glue the legs onto the flying saucer using hot glue.
Turn the plate over and place it on its feet.
We decorate the flying saucer with multi-colored sequins around the plate and cockpit.
The flying saucer is ready to fly into space.
Winner takes all
From 1943 to 1945, Zimmerman's team addressed stability problems (caused by engine instability and the inability to accurately control thrust) and designed a larger model of the disk. By the spring of 1945, the project was almost ready; all that remained was to implement it in hardware. But this was prevented by Germany's defeat in the war. To prevent the developments from falling into the hands of the Allies, the SS ordered all papers to be destroyed and the engineers to be shot. However, the designers managed to escape (only Zimmerman himself did not).
This is what it was supposed to be: a 50-meter, heavily armed disk, designed for attacks on allied naval convoys and squadrons.
After the defeat of Germany, the Allies did not find any documents confirming the existence of this device, and concluded that it was just another “duck”. Soviet search teams were much more fortunate. The Soviet Union not only got all the documentation for this project - they discovered Irman Mayer and his entire team of engineers hiding in a wine cellar on the outskirts of Berlin (where control mechanisms for the Panthers were produced some time ago). “A complete set of materials” (including designers) was taken to the USSR to continue work.
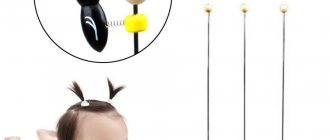
Operating principle:
The principle of operation is outrageously simple. One end of the fishing line is attached to the toy, the other can be glued behind your ear with a small piece of tape or made into a loop. The main condition is that the fishing line is thin and barely noticeable. The length of the fishing line should be such that the toy hangs down by about 50-60 centimeters when tilting its head slightly.
Then, in this position, take the toy by the edges with your hands and spin it clockwise. Quickly grab the line in the middle, placing it between the thumb and index finger of your left hand. Moving the line up and down with your hand while rotating the toy creates the illusion of floating in the air. The rest is a matter of technique and long training. Download…
And in conclusion, for those who are too lazy to make anything, you have a second option to get this wonderful hand-made UFO...
Santa Claus mask
You will need:
- 2 paper plates
- red paper
- cotton wool
- scissors
- PVA glue
How to make a craft:
- Cut out the bottom of 2 paper plates. We glue the edges together.
- Cut out 2 large triangles from red paper. Lubricate each of them with glue along the contour, except for the bottom part, and glue them together. We should get a red cap.
- We insert the circle of plates into the hat by 4-5 cm and coat it with glue. Glue both sides of the hat to the base.
- We form many white balls from cotton wool and glue them at the bottom of the white circle. We also lay them out in a row at the junction of the hat and the circle of plates.
- We make a large ball of cotton wool and glue it to the top of the hat. The Santa Claus mask is ready!
From fantasies to knowledge: how does the world work?
Among other tasks, it is desirable to create such crafts in which space is not just a beautiful fantasy, works based on the study of the structure of the Universe and methods of exploring it. The task needs to be formulated in such a way that the student, when assembling a model rocket, turns to the history of flights, not only understands how to make a comet, but inquires about what it consists of.
Visually depicting the Solar System is not technically difficult: select a dark background, draw eight orbits using a compass, attach planets made of plasticine or plastic, paper. It is unlikely that it will be possible to accurately reflect on the sheet the relationship in distance between the Sun and the planets, but it is necessary to show the relative sizes of all objects (Jupiter is the largest planet, Mercury is the smallest). When choosing colors, keep in mind that Mars is red, Earth and Venus are blue, hot Mercury can be painted bright orange. A well-executed space model will be a worthy addition to the school’s teaching aid fund.
A child cannot create a sample of complex technology, for example, a small copy of the Soviet lunar rover, but getting to know its structure, while admiring the skill of the teacher, is interesting and useful. Therefore, at a themed school exhibition, space crafts for children made by adults are appropriate.
Sunflower
The photo of crafts made from plates shows that the idea of a sunflower for implementation is quite popular. Moreover, it will take little time and materials to make the craft:
- Plate;
- Dye;
- Glue;
- Seeds for decoration.
Progress:
- To make a sunflower craft from a plastic plate, you need to trim the edges in the same way as a real flower;
- Now you need to paint the base yellow. If you take a plastic plate, then it is better to use gouache, it will fit better on the plastic. If you have paint in a can, you can use it;
- You can glue real seeds to the middle of the flower if you have the desire and opportunity. You can also draw them;
- All that remains is to cut and glue the green stem to the color or leave it without it.
Price: 1 pc. — 300 rub. 2 pcs. — 500 rub.
Delivery throughout Russia is free! When purchasing 2 pieces, indicate the quantity in the comments and change the amount in the payment field to 500 rubles. We'll send two. If a larger quantity is needed there will be a further discount. Contact the administration.
Important! Be sure to indicate your First Name, Last Name and Patronymic, also indicate your zip code and address. Please check your details before paying. Delivery time 15-35 days. After payment you will receive a letter with notification and shipping number.
Ask questions in the comments, we will definitely answer.
Source
Painting Space
The truth is, three-dimensional paintings look more interesting. Look how interesting the author came up with. Glue all the details of the picture onto double-sided thick tape, which makes them look three-dimensional. And even a hose from an astronaut can be not only drawn, but glued with thread or wire.
Author irina_voinova_13
And the background is the usual cosmic one. You can paint with a sponge, as in MK with the moon, or you can use a brush. Drawings made with gouache or acrylic look brighter, although watercolors can also be done.
And templates for coloring: