What could be a better gift for a sailor on Defender's Day than a model ship? Let it be the simplest one, but made with your own hands! A chic submarine model is easy to make from the simplest and most unexpected materials.
- You will need: - a body from a large firecracker; - a smooth plastic ball (Christmas tree, for example), with a diameter suitable for a cracker; — a cap from an antiperspirant (the cap from Mennen Speed Stick fits perfectly); - cardboard;
- — tin lid from preservation;
- — 1 cotton swab;
- - black paint in a can.
- 1 match; - scissors; - awl; - glue; Manufacturing:
The hull of the boat will be a firecracker on which all other parts of the submarine are attached. We cut a hole approximately in the middle of the firecracker body into which we insert the cap - the wheelhouse (fencing of retractable devices). We make the stern part of the boat from a cardboard cone. We also cut out the rudders, bow and stern depth rudders from cardboard.
You can secure the steering wheels by making protrusions on them and slots in the body: this is more reliable, but more difficult. It's easier to bend the edges and glue the tail to the cone. Using scissors (not manicure scissors, but good cutting scissors), cut out a screw from the tin lid. Having bent the blades, we make a hole in the center with an awl and secure the propeller to the stern using an axis made from a match.
The submarine's propeller even spins! If it's difficult to make 6 blades, try three or four.
We glue the stern part to the hull - the hardest part of the job is done! The nose part is much easier to make: you just need to insert the ball into the body of the firecracker about halfway and secure it tightly.
You will get the rounded nose of a submarine. Stepping back a little, we glue the bow depth rudders.
Having made two holes in the roof of the superstructure with an awl heated on a fire, we insert an antenna and a periscope made from the rod of a cotton swab: one is shorter, the other is longer.
Assembly is complete, it's time to start painting.
The fastest and easiest way to paint our boat is from a spray can. What a beauty it turned out to be! The only thing missing is the tail number.
It can be written using a proofreader, but it is better to make it clear and beautiful by printing white letters and numbers on a black background and gluing it to the boat’s superstructure on both sides.
The submarine goes to sea!
Sometimes you really want to do something with your own hands, so that it’s both interesting and gives you spiritual satisfaction. But in reality, in order to do something you need a bunch of tools, and you also need material, which is always not at hand, and money for this material need to.
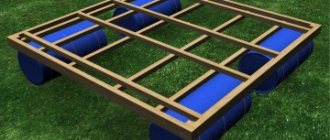
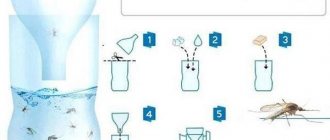
And here is the usual model of two plastic water bottles, a couple of paper clips and an elastic band, which we use to tighten money.
In order; To create this toy, you will still need something, namely two bottles, a drill - you will have to drill, or you can poke holes, the old fashioned way. A couple of paper clips or wire, and most importantly, a knife. Yes, a couple of ice cream boards and sticks will do just fine. And don’t forget the rubber band, it will be needed for the rubber motor.
So, when everything you need has been collected to the heap, you can start. The first thing to start with is making a propeller; without it, our boat will not float
There is no point in telling how to make a screw, it’s already clear from the drawing.
The more accurately we make the propeller, the greater the chance that the boat will float. This is where you will need a paper clip.
The main thing is not to forget to place something like a thick washer between the screw and the lid, maybe a bead ball.
When the main unit is assembled, take the second plastic one and drill or use a nail to poke a hole in the bottom.
Now we need a second paperclip, which we attach in the form of a loop to the hole in the bottom of the bottle. You can see everything in the picture. Don’t forget to attach a rubber band in advance, and preferably more than one, the thicker the rubber band, the stronger the thrust of the submarine.
Now you can assemble the structure to the heap, hook the rubber band to the hook on the screw and tighten the lid with the screw. All that remains is to secure the stabilizers; they are needed so that the model does not turn over in the water.
- It should look something like this.
Yes, the most important thing is for the boat to float - you need to use the handles - one holds the frame, and the other we turn the screw, in which direction it doesn’t matter - it will be visible there while sailing. After the screw is screwed on, we lower the boat into the water and lower it. Nothing complicated. If everything was done at least 50% correctly, it should float. Well, you understand me: smile.:
- And now you can start testing so that the boat floats under water by experimentally adding water to the bottle.
- I don’t know about adults, but children will be delighted.
07:31 pm - How to make a submarine yourself (top secret)
19:31 01.04.2012
Following the precepts of the program “Crazy Hands,” the DaVinci Learning channel told us how to make a working model of a submarine from scrap materials, mostly plastic bottles. It is effective in the sense that it can float and sink not at random, but at our request.
So, what is needed for work:
" " on Yandex.Photos
Two bottles, large and small, an inflatable balloon, a hose, a rubber ring and electrical tape. If you tear electrical tape with your teeth, you don't need a knife.
In a small bottle you need to make a lot of holes, 3-4 mm in diameter. I pierced it with a nail heated on gas. I’ll say right away that more was needed, both in diameter and in quantity. But it turned out pretty good too:
- Make a hole in the cork of a small bottle for the hose:
" " on Yandex.Photos " " on Yandex.Photos
Insert the hose and secure the inflatable ball to it. I actually wanted to wrap it with electrical tape, but my son insisted on using an elastic band, “like on TV.” Well, with an elastic band, so with an elastic band:
- After this, push the ball inside the bottle, tighten the cap and secure the hose. Again, I wanted to use duct tape, but my son again insisted on the “from TV” option and covered it with plasticine:
- Now all that remains is to connect both bottles with electrical tape (like on TV, yay!) and the submarine is almost ready:
" " on Yandex.Photos " " on Yandex.Photos " " on Yandex.Photos
The only problem is that without ballast this structure absolutely does not want to submerge. And this turns out to be some kind of garbage, not a submarine. Simply filling a large bottle with water is also not enough - it still floats.
In the transfer, some beautiful sand was poured inside, but the sand that I managed to find did not want to fall through the funnel. So I threw all sorts of rusty bolts and nuts into the bottle. Well, I poured some water.
By the way, it is convenient to regulate buoyancy with water, because it would be much more inconvenient to pour sand back.
Well, now sea trials.
We ended up with a strong trim to the stern, because the bolts and nuts, such pests, fall in one direction, no matter how you shake them. But in principle it worked :-)
January 8, 2018
The appearance of the first submarines dates back to the 17th century, but the first ideas of immersing people deep under water appeared in antiquity.
In practice, the first submarines began to be used in the 18th century during the American Civil War.
Two centuries later, submarines play a huge role not only in military operations, but are also actively used to study the depths of the sea. We offer you ideas on how to make a submarine from scrap materials.
Features of a paper submarine
Submarine crafts are more attractive to boys. But girls can also find a use for it.
You can download the layout layout for free here
Where can crafts on this topic come in handy?
A paper submarine is not a primitive flower, so its use is characterized only by an urgent need or a strong desire to make it. You can use the finished craft in the following cases:
- Often it adds to the collection of a child or adult who is interested in military marine equipment. Making a submarine in this case gives indelible pleasure to the collector. Every detail is cut and put together with excellence.
- Can be done with children during classes to develop their fine motor skills and imagination. It is enough to use a simple scheme for the kids to enjoy the fact that they are succeeding.
- The craft is also made simply for the child, so that he can play games corresponding to the theme. The voluminous craft attracts the attention of other children, who happily start playing together.
It is important to ask the child whether he wants to have the presented toys in his arsenal. If he is not interested in such topics, it is better to refuse it.
Examples of ready-made crafts and paper designs
There are a huge number of manufacturing methods. To choose a suitable and interesting one for yourself, it is recommended to familiarize yourself with examples of finished works:
- Applique submarine, which is suitable for young children. It's easier to make a craft here because there are many templates to cut out. They can be painted or attached to colored paper and cut out to later form a composition on cardboard.
- Using origami technique. It is difficult to make, so it is recommended for working with older children. This craft develops fine motor skills and increases finger strength.
- Complex layouts. Mainly used by adults or children and schoolchildren who are interested in marine themes.
You should not involve your child in making a submarine if he does not like it. But you can persuade your child if you and him start making military submarines out of paper. They have significant differences in shape and appearance, so it is more interesting for children.
Sealing
We need to ensure the tightness of 3 elements:
- robust housing
- motor shaft
- steering control rods
Durable Case
often called WTC (Water Tight Cilinder) or WTC (Water Tight Cilinder), it is a plastic pipe with a diameter of 75 mm and a length of 600 mm. Cylindrical plugs with a groove for the sealing ring are inserted into it at both ends. The pipe is bought at a plumbing store, the plugs will be made from several layers of PVC sheet 4-5mm thick, and the rings will be ordered from China (how to buy on Aliexpress is written at the end of the article).
The plug will consist of 6 layers. The internal diameter of the pipe is 71 mm, the thickness of the sealing ring is 3.5 mm. Then the main sheets have a diameter of 70mm, the small ones are 65mm and the outer large one is 75mm. It is very important and very difficult to maintain the alignment of the sheets so that the rings are pressed evenly against the pipe. For centering, a bolt with a diameter of 6 mm (or a construction pin) is used. First, we drill a hole, then we draw a cylinder of the required diameter and cut it out with a jigsaw with a margin. We bring it to the desired diameter on the axis clamped in the drill. I sanded it with sandpaper on a block.
We also glue the sheets on the axis, trying to maintain perpendicularity. The best adhesive for PVC “Moment-Gel”. Titan doesn’t take it, nor does the usual “Moment”. That's it, put on the rubber rings and go test for leaks.
Later I printed the plug on a 3D printer - I really liked the accuracy. Now I plan to print all the details. More on this in a separate article.
Deadwood
This is the name of the unit that ensures the tightness of the motor shaft. Bearings are soldered into the ends of the outer pipe. The shaft is inserted and a thick lubricant (for example lithol) is driven into the pipe. It must be added sometimes, because... the water gradually washes away.
I bought shafts and bearings on Ali, copper tubes and lubricant on the construction market. I found bearings 3mm internal and 6mm external diameter. Accordingly, we buy 3 mm stainless steel shafts, and a copper tube with an internal 6 mm (the external one turned out to be 8 mm). It is necessary to buy special shafts; ordinary wire is not symmetrical, and there will be beatings. First we solder the pipe, then drill a hole in it. For soldering you will need acid and a 3rd hand 
Steering rods
The rods are brought out through rubber cuffs mounted on copper tubes with a diameter of 6 mm. The diameter of the rods themselves is 1.5mm. I used hard wire with the insulation stripped.
How to do
To make a boat yourself, it is recommended to decide on the type, prepare all the materials and tools, and only then get to work. This way you can really get children interested in the process. Otherwise, they will run away from their parents, refusing to take part in work.
Required materials and tools
When it comes to how to make a submarine out of paper, they start with preparing tools and materials. To work you will need:
- paper – colored or office paper, if you need to print the finished drawing;
- ready-made printed templates, possibly purchased magazines that contain similar layouts;
- scissors and a stationery knife, which adults will use, since such a tool is dangerous for children;
- glue stick or PVA - for young children it is better to use a glue stick, since it does not stain your hands, and it is easier to learn to work with paper and glue;
- a pen, a simple pencil, a ruler and other tools if you need to make a drawing yourself.
Materials and tools are selected in accordance with manufacturing technology. For origami you only need paper and instructions for action.
Step-by-step assembly of a three-dimensional craft
In most cases, a submarine attracts children more in its volumetric form. Their assembly is simple if ready-made templates are used in the work.
The work occurs in the following sequence:
- It is necessary to use ready-made templates, which are designed for cutting and subsequent joining of parts. You can download and print them for free here.
- Connect the details in the order in which they are presented on the page. If you have any questions, you can use a photo of the sequence of actions. Download them here.
- If desired, the finished craft can be embellished. Felt-tip pens and markers are used for this.
The cut out parts can be painted immediately, so as not to have to start complicated work in the future. Preliminary decoration is required if the parts were printed on a black and white printer.
Video master class
There is also a video of a master class on making a paper submarine, which even a child can do. In the process of work, you will mainly have to twist the elements. If the baby cannot cope with the work presented, the parents can get down to business and help the baby get a finished craft. The boat turns out to be dense, it can be played to its fullest, creating a whole military arsenal.
Origami with a simple diagram
There are several submarine origami techniques designed for kids of different ages. If these are schoolchildren, you can use a more complex version as a basis. But sometimes this is not necessary, because you want to play with a finished craft right away. Therefore, the children begin to make a simple variety.
Next, both options for making submarines will be presented - a simple one and a slightly more complicated one. It is also noted here that a complex craft comes out smoothly from simplified instructions.
To make a simple version of origami with your own hands, it is recommended to immediately use the video. It will tell the child more than the instructions from the photo report.
There is a more complex design designed to be made with the help of parents or older children. This requires accuracy, attentiveness, patience and perseverance, since a complex design is formed from one sheet of paper. You can use the instructions for origami diagrams for children based on the pictures. They are detailed, each action is numbered so as not to confuse the child.
It is better to make a boat from colored paper, which is what is presented in the instructions. This will help in your work, since from the pictures it becomes clear in which parts the colored side of the material remains and in which the white side.
Applications for children
Applications for children are often presented not only as a simple picture on cardboard, but also in the form of a postcard. It is given to the father for a professional or general Russian holiday. As an example, children are offered the following application options:
This is a simple option for making crafts where you only need to use a cutting template and colored paper. The parts are cut out and glued onto cardboard as shown in the picture.
High quality corner sofasHow to wash a crystal chandelier
- Secrets of builders: working with couplings
This is a card that can be given to your father, grandfather or relative. The boat is cut out according to a template from black construction paper. First, make a card for it by bending a sheet of cardboard in half and making cuts in the middle. The cut should be turned in the other direction, which results in a convex base. Cover one part with torn pieces of blue and green paper, which imitates water. Glue the boat to the base.
Submarine applique on a disposable plate. Here you need to cut a circle out of blue paper and glue it to the plate. Then make blanks for the boat, cut and glue them in the presented way. Next, you need to use plasticine and glue small pieces of material onto the blue circle to create the seabed. While the plasticine has not hardened, shells are glued to it.
Select applications in accordance with the wishes of the children. If they don't want to make a plate or a card, but want a painting, they choose this option.
Balancing
The volume of the case is approximately 2.8 liters. The mass of all parts is about 1 kg, we had to add another 1.8 kg of weight. The main principle is simple:
The volume of the surface part must be less than the volume of the tank
It can be of any weight, as long as the total remains 2.8 kg. Therefore, the surface elements are made of copper or thin plastics.
Balancing is carried out in 2 positions:
- Surface — By moving/adding weights and gluing foam plastic to the underwater part, we achieve zero trim. It is important at this stage to attach the foam only below the waterline.
- Submerged — add foam above the waterline and achieve the horizon.
How to make a submarine: crafts for boys on a military theme
DIY New Year's crafts - 9 best options- DIY snowman craft
- Autumn paper crafts
The appearance of the first submarines dates back to the 17th century, but the first ideas of immersing people deep under water appeared in antiquity. In practice, the first submarines began to be used in the 18th century during the American Civil War. Two centuries later, submarines play a huge role not only in military operations, but are also actively used to study the depths of the sea. We offer you ideas on how to make a submarine from scrap materials.
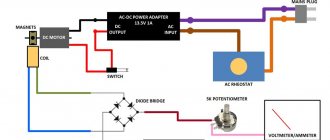
Battery and charger
An inexpensive computerized charger allows you to charge directly from a car battery. Costs 680 rubles.
We take LiPo batteries - these are the best that can be found on the model market.
We put 2 batteries in the cart for 380 rubles, the total price became 5710.
You can not skimp and take the top ones, 2 pieces for 1150 rubles and the total price will be 8150 rubles, but since fishing is not every day, it is cheaper to change cheap ones every 3-4 years.
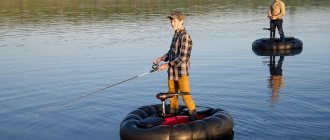
And here is a video of how a homemade boat sails to deliver bait across the lake.
I’ll talk about connecting all the electronics in a separate article, but for now, let’s summarize.
How to make a submarine with your own hands
- Take an empty cracker. Cut a hole in the shape of a deodorant cap on top and glue it on top in the form of a chopping block. Using an awl, you can make several holes and insert an antenna from a cotton swab.
- Make a cone out of cardboard with a base diameter corresponding to the diameter of the cracker. This will be the stern of the boat.
- Next, prepare the blades for the stern and the bow and stern rudders from cardboard.
- Glue the cardboard pieces to the boat hull. You can make cuts in the cracker so that the parts hold better.
- A propeller with six blades can be made from a tin can. Bend the blades slightly, use an awl to make a hole in the center and secure the propeller to the stern with a match.
Here's how to make a submarine out of a firecracker. The craft is ready. All that remains is to paint the craft. You can use regular paints or an aerosol can for this. The boat can be painted in any color, but the most commonly used colors are black, green and gray.
The tail number can be written with proofreader or acrylic paints. If the boat is a gift, you can write the name of the future owner. This is the first option on how to make a submarine from scrap materials.
What is the propeller shaft made of?
Any submarine must have propellers that ensure its movement through the sea. Even if you make another model of a submarine - “Stars”, for example - then this element must be present on the submarine without fail. It can be made from a regular pharmaceutical tourniquet, and attached using a pin that has a ring-shaped needle at the end. A thread for the future rubber motor is passed through this very ring, and a propeller is attached to the opposite end. The easiest way to do this is with glue.
As for the hole for the shaft, it can be made using iron heated over a fire. For example, you can heat the same pin so that the hole is the perfect size for the motor. However, there is no need to rush, since any sailor knows that the boat’s performance depends on the correct positioning of the screws. As an alternative, you can use a regular screwdriver or drill with a thin drill bit for fastening.
It may happen that after burning or drilling, the stern of the submarine becomes less durable than its bow. To prevent breakage, it is recommended to additionally wrap the structure with strong threads soaked in water-repellent glue. There is no need to worry that this will make the submarine look unnatural, as the model will be covered with several layers of paint.
Cardboard submarine
Another option is to make a boat out of empty toilet paper rolls. For the body, glue two elements together. Cut two portholes on both sides of the body. Make a cutting from another bushing. You can complement it with toothpick antennas. Inside the sleeves, insert white or blue colored paper, rolled into a roll, so that the windows are closed. Attach a cardboard screw to the back; the bow of the boat can be made from the bottom of a small plastic bottle. Now let your child decorate the craft himself. This is the easiest way to make a submarine out of cardboard.
Submarine made from a plastic bottle
If you are interested in the question of how to make a submarine from a bottle, you will need:
- Plastic bottle.
- Window cleaning spray bottle.
- Scissors.
- Stationery knife.
- Silicone glue or glue gun.
First you need to decide on the appearance of the craft. A boat with a bottle as the main part will look good; the deckhouse can be made from the top of a spray bottle, covering it with a regular cap. It is better to glue bottles with a gun. You can also use plasticine. You need to cut the bottles very carefully with scissors. It is better not to trust this to a child, as the edge will turn out sharp.
The propeller is made of cardboard. Then a hole is made in the center, equal in diameter to the neck of the bottle. The screw is placed on the neck and pressed with a screwed cap. To decorate the boat, you can glue covers between the propeller and the wheelhouse, on the bow.
- Crafts from stones for the little ones - learning colors
- DIY helicopter craft
- DIY crafts from scrap materials
Here's how to make a submarine from scrap materials. All that remains is to cover it with paint and draw identification marks. Creating such a toy will not take you much time, but it will greatly please your child. After all, it is much more important for children to do something with you, and not just buy it in a store.
Buy on Aliexpress
Links are keywords for searching. Also select the “free shipping” and “sort by price” checkbox.
- bearings 362.5 - mr63zz
- stainless steel shafts 3mm - stainless steel shaft 3mm
- rubber sealing ring – o-ring 72mm
- brass coupling 3.17 x 3 mm – coupler 3.17mm 3mm
- rubber corrugation for rods – Waterproof Push Rod Rubber
- 40mm screw for 2mm shaft – three leaf propeller 40mm
- motor 550 series - dc motor 550
- pump – Dosing Pump Peristaltic 6v
- silicone tube – silicone tube 4*6
- speed controller - esc 320a
- servo 12kg – MG995
- servo 2.5kg -sg92r
- micro switches – kw11-3z
- power stabilizer - ubec 3a
- fail-safe - fail safe suit
- soft wires - awg 18
- pipe clamps – vacuum metal clips 6mm
At a hardware store or construction market:
- copper tube 8mm
- hard copper wire 1.5mm
- soldering acid + solder
- PVC sewer pipe 75mm - 250 rub.
- sheet porous PVC - 500 rub/m²
- Janet syringe - 150 rubles
- contacts for soft wires
- studs 6mm
DIY submarine: origami diagrams with video
Every child wants to please their dad and grandfather with a nice gift for February 23rd by making a beautiful craft. A DIY submarine could be a great idea. Such a gift will certainly appeal to men who served in the army or are interested in military equipment. This product can not only be kept as a souvenir, but also simply played with with your child. The master class will definitely come in handy for those who want to please their loved ones with an original gift.
Sketch for bluetooth boat on Arduino
Unlike the Arduino boat, where one motor with a propeller was used for movement, this project uses two motors and a paddle wheel. This eliminates the need to use a servo drive, which consumes a large amount of energy, to change the direction of movement. The boat turns by alternately turning on the motors via a Bluetooth signal.
DIY Arduino boat with bluetooth control
To make the paddle wheel, ordinary plywood and plastic were used. The diameter of the wheel should be chosen so that the blades reach the water. The blades themselves are cut out of a PET bottle, inserted into the slots on the wheel and fixed with hot glue. You can also paint the paddle wheels, protecting the plywood from swelling in water, and the foam from acetone-based paint will only corrode.
Original version
To make a submarine out of cardboard you will need:
- cardboard;
- match;
- glue;
- awl;
- cotton buds;
- black paint;
- drink can;
- sharp scissors;
- plastic ball;
- firecracker;
- rectangular cap.
First you need to empty the contents of the cracker. Then trace the deodorant cap onto the surface of the cracker and cut it out. Glue this cap to the cracker, you should get a chopping block. Make holes in the cap with an awl and insert them into the antenna or periscope using cotton swabs.
Make a cone out of cardboard so that its base is equal to the diameter of the cracker. The cone will be the stern part of the submarine.
Next you need to cut out the blades for the stern from cardboard. They will act as rudders, as well as bow and stern rudders.
Glue the cardboard parts onto the cone, make slits so that the parts stick better. Glue the bow rudders to the bow of the boat.
Cut a propeller with six blades from a tin can and bend it. Make a hole in the center and insert a match into it. Secure the propeller to the stern.
Paint the finished craft.
It is best to use an aerosol can for this; acrylic paints are also suitable. You can also paint the product with raw or green colors.
Paint the tail number with white paint or a regular corrector. You can also simply print out the numbers. The submarine is ready!
DETAIL
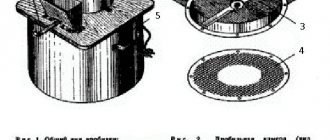
Entry into the submarine is only possible through the superstructure above the hull, called the wheelhouse (sheet 3, detail 1).
The cabin is located above the robust hull. A strong jacket connected to a strong body is always surrounded by a streamlined fence connected to a lightweight body.
There are tightly closing metal doors on both sides and in the front. In addition, ladders (vertical ladders) are installed on both sides.
In the upper part of the cabin at the front there are windows - portholes - of a quadrangular shape. In the middle of the cabin there is a cabinet attached to a durable body. It has periscopes installed.
A periscope is a metal pipe with an optical device built into it, which allows you to observe the water surface and air in a submerged position from inside the boat. There are usually two periscopes.
On the rear open platform of the wheelhouse there is an anti-aircraft heavy machine gun, and behind it there is a flagpole with a stern naval ensign.
Each board has distinctive lights:
- on the left side - red,
- on the right - green,
- and on the stand on top of the wheelhouse there is a white masthead light.
The distinctive lights illuminate the horizon by 112.5°, each on its own side, and the masthead light by 225°. This arrangement of lights helps the ship avoid collisions with ships coming towards it.
A white fire, called a stern or tail light, is installed behind the cabin. Its illumination sector is 135°.
Make the cutting from wood or tin. Strengthen handrails on both sides at a height of 10 mm from the hull deck. Make them from wire or a paper clip. Just stick them into the wood and solder them to the metal.
To the edges of the open platform on which the heavy machine gun stands, solder pins with a height of 10 mm, and to them around the entire platform there are wire-handrails in two rows: one to the upper ends of the posts, and the other in the middle.
At the bottom of the cabin on our model there are cutouts - windows, and in the deck there are holes for quickly filling it with water when diving.
Hatches (det. 2). There are several access hatches on the deck of the boat in the bow and stern. Cut them out of thin one-millimeter plywood or cardboard and stick them in the indicated places (sheet 1).
Rescue buoys (det. 3). Used to locate a sunken boat or a boat that has suffered an accident. The boom is connected to the durable body with a flexible hose, inside! which a telephone wire is laid, allowing negotiations between the rescue ship and the sunken ship! by boat. An electric lamp of high brightness is installed in the middle of the buoy to attract the attention of rescuers!
For the model, make buoys according to the dimensions of the drawing and glue them to the deck.
Paint the buoys white and red.
The anchor (det. 4) with rotating legs serves to hold the boat in one place in the surface position.
Make the anchor claws and spindle separately from wood and! then glue it together and paint it black. In the bow, make a recess in the hull on the left side according to the dimensions of the anchor. Secure the anchor with a glue pin into its place in the recess so that it is level with the side.
Anti-aircraft heavy machine gun (item 5) on the open area behind the periscopes. Make a machine gun stand out of wood in the shape of a truncated cone, glue it to a circle of thin plywood or cardboard; At the top of it, secure a bracket to hold the barrel with a pin, with a pre-made hole the thickness of the pin.
For the barrel, take a pin and stick it into a wooden block (the breech where the feeding and firing mechanism is located). Glue a piece of plywood or cardboard cut out in a curved shape on top - this is a cartridge-feeding clip or magazine. In front of the breech, wrap a wire twice as thick as the pin onto a pin (barrel) for a length of 10 mm. In the breech, carefully use a pin to make a hole according to the drawing. Then insert the barrel into place and push a pin through the brackets. Bite off the protruding end.
Thanks to this device, the trunk will rise by 90° and lower from the horizon by 10°.
Artillery gun (det. 6). It stands in front of the wheelhouse on the deck of the light hull.
For the model, make a weapon from two tubes.
The barrel is made of a tube with an outer diameter of 3 mm and an inner diameter of 2 mm, and a length of 30 mm. Make a nozzle for the barrel 5 mm long from a tube with an outer diameter of 4 mm and an inner diameter of 3 mm. Place the attachment on the barrel. Make the breech out of wood. The shape is shown in the drawing. On one side of the breech, drill a hole to a depth of 5 mm with a three-millimeter drill and insert the barrel into it using glue so that the nozzle fits close to the breech.
Make the gun stand out of wood and secure it on a special platform. Make the brackets holding the gun out of tin, nail them to the stand and, just like with a machine gun, fasten them and the guns with a pin.
The cabinet can be made from tin, rolled into a tube and secured in a specially made hole in the deck. If there is no suitable tube, the barrel can be made of paper by wrapping a strip of glue-coated paper of the appropriate width around a wire or nail with a diameter of 2 mm. Well-glued paper is durable and can easily replace copper or brass tubes.
Navigation lights (det. 7 and serve to identify the direction of movement of the ship.
Top fire (det. 8). Glue it together from thin cardboard. Instead of glass, insert half a white or transparent bead. Seal the lid on top and insert a pin head into the center. Paint the lantern dark green and attach it to the periscope stand in front.
The taillight is made exactly the same as the masthead light and differs from it only in the lighting sector.
Make the distinctive light lantern in such a way that the back and side blank walls are connected at right angles, and its outer part represents one quarter of a circle; Cover the top with a lid as well. Paint the glass and canopy red for the port side and green for the starboard side.
Install distinctive lights on special boards, glued together from thin plywood or cardboard and painted to match the color of the lantern, mounted on both sides of the cabin.
the doors (item 9) for the model from thin plywood, cardboard or thick drawing paper according to the drawing and glue them in place.
ladders (detail 10) on both sides of the cabin in front of the open area. To make them, take matchbox veneer. Clean it first with sandpaper on both sides. Using a ruler, cut several strips of 2 mm width with a knife. Two of them will be the sides of the ladder, and from the rest, cut steps and use glue to put them in place according to the drawing. When the glue has dried, cut as needed and glue the ladders to the left and right sides of the deckhouse.
Stern flag (det. I). Make a flagpole from a bicycle spoke. Sharpen one end, and solder a circle of thin wire on the other - this will be a welt. Sand it with a file. Make the flag panel from white material and color it like this: the bottom stripe is blue, the star and hammer and sickle are red.
Propeller (item 12). Cut it out of tin according to the pattern and solder it to the shaft, which is a piece of a bicycle spoke 70 mm long, so that the outer end is 8 mm. From the side of the long end, solder a small tube 7 mm long onto the shaft to the screw, or wind a wire to the same length and solder it.
Clean the end facing the sternwood thoroughly to avoid unnecessary friction.
Bend the first edge of the propeller blade away from you, and the left edge towards you. In addition, give each blade a slight roundness; you get a right-pitch propeller rotating to the right. If you bend the blade in the other direction, you will get a left-pitch propeller rotating to the left.
Rails are used for safe passage across the deck into the sea during a storm. They are reinforced on both sides of the deck from the bow to the deckhouse and from the deckhouse to the stern. Make them from thin wire or thread.
the antennas from wire and stretch them from the stop installed on the bow on both sides to the deckhouse and further to the stern stops. In the wheelhouse they should be secured at the height of the periscope stand, for which solder pins on each side of the wheelhouse.
Solder antennas, rails and other parts made from wires at the points of contact with the metal racks of the housing.
Steering device . The vertical steering wheel is used for direct control of the model. Its dimensions are slightly increased compared to the scale ones. To manufacture, copy its shape and dimensions from the drawing. Make it out of tin from two halves. Solder a rod (baler) between them, with which it should turn.
In the rear part of the hull, make a hole the thickness of the rod. On the deck, bend the rod so that its end rests against the deck and does not allow the rudder to rotate freely.
Horizontal rudders are used to immerse the submarine model to depth. To do this, when it moves from the action of the propeller, they are tilted with the leading edge down. By changing the tilt, you can achieve the immersion of the model to a certain, predetermined depth.
They can also be cut out using tin templates. Each rudder (two bow and two stern) is made of two halves. Insert a curved rod (bicycle spoke) inside them. Solder the handlebars to the ends, and bend the middle in the shape of the letter “P”.
Install the bow rudders
Installing them in place is as follows: at the distance indicated above, make a cut to a depth of 10-15 mm in such a way that the rods with rudders lowered into the cut can be easily rotated. It will be even better if you go around the parts of the rod with a strip of brass and crimp it in the form of a tube, so that the rod can turn freely in it without experiencing friction.
After this, cover the cut with a piece of wood on top.
Wrap the middle parts of the knitting needles, curved in the shape of the letter P, with a piece of tin or brass. Solder a rod made of wire to them, having previously aligned the handlebars and set them in a horizontal position.
You will give the rudders the required angle of inclination and secure them in the required position with a bolt and nut, mounted on a rod and brought out onto the deck behind the wheelhouse.
Sheet 3 shows a diagram of the horizontal rudders. The dotted line shows the fastenings of the bow and stern rudders, the rod connecting them, and the bolt and nut behind the wheelhouse, brought out onto the deck and securing the rudders in the required position.
Cardboard option
Even a child can handle making a submarine from cardboard and paper, but under the close supervision of adults. The following materials will be useful for creating crafts:
- three cardboard toilet paper tubes;
- napkins;
- cocktail straw;
- colored paper;
- glue;
- sharp scissors;
- stationery knife.
To begin work, you need to unroll the first sleeve and cover its front side with colored paper, for example, orange or red. Cut three holes in the first bushing: two small ones at the same level, and the third large one, lower than the others.
Then cover the second sleeve with blue paper. Using a stationery knife, cut a round hole in the center with the same diameter as in the first sleeve. Insert the second bushing into the first, that is, the blue one into the orange one. Align the large slots with each other. The result was a submarine hull.
Then insert the third sleeve, which was previously cut in half, into the large slot. The bushing will become the hatch of our boat. Fix a cocktail straw in the sleeve with glue so that it looks like a periscope. Wrap napkins in a blue sheet of paper. Form two bundles, the thickness should match the diameter of the boat hull. Cut out a submarine tail from orange paper and glue it to the package. Insert the templates into the body. The craft is ready!
You can also make a boat out of paper using the origami technique. To do this, simply study the diagrams in detail.
Radio controlled boat at home
Summer, heat, beach, pond... As always, the standard program. I swam twice and lie there like a seal, bored. What can you do on the beach if you come without company? You can drive a radio-controlled boat! It’s fun for yourself and fun for the children.
I thought so last year, before the swimming season. It seemed like there was nothing to do there. I pulled out the drawings from the global network; they are presented below, just for information. Normal drawings are at the link, there is also an AutoCAD file from which I built my trough. (Blueprints).
Everything seems simple. Looking ahead, I’ll say that it took me a year and a half to make the boat))). It happened.
With the drawings it’s clear that we build what we like. But the biggest stumbling block may be the radio control equipment. You can, of course, take something like a radio control from a broken Chinese car, but then long-distance voyages are contraindicated for your ship. Firstly, the range will be small, and secondly, there will be no proportional control. If you can live with the latter, the former condemns you to having fun only in a small “puddle”. Well, as they say, something always gets in the way of a bad dancer.
I have radio equipment, proportional, 6-channel. Left over from unsuccessful attempts to launch a radio-controlled plane into the sky, nothing, I’ll also launch a plane someday. In the place with the equipment there were servos, batteries and a brushless motor with a control unit.
Crafts for Victory Day, submarine
We owe victory in the Great Patriotic War and for the peaceful sky above our heads not only to the ground and air forces. The navy, where our submarines participated, also played a significant role.
Crafts for Victory Day (May 9) can consist of various materials and manufacturing techniques. You can create wonderful crafts from the most ordinary waste and seemingly unnecessary material. And the kids will happily take part in the creative process, helping to cut, glue and paint parts.
To make a submarine, we arm ourselves with the following materials:
- large Kinder Surprise egg
- cocktail straw
- eyelets
- metal shirt buttons
- heat gun
- scissors
- felt-tip pen
- plastic cap or bottle
- silver and gold paint in a can
- plastic bottle cap
- silver cord
- metal screw
DIY craft for Victory Day “Submarine”:
Use scissors to shorten the cocktail tube on both sides as shown in the photo.
We take the eyelets and insert them into the tube on both sides - as a result we will get a periscope for a submarine.
We take a cap from a plastic bottle, heat the heat gun to the desired temperature and glue the periscope in the center of the cap.
Now we need to make the fins. To do this, take a plastic cap or bottle and draw with a marker the future fins in the amount of 4 parts.
Cut out the fin details with scissors.
We glue the periscope to the Kinder Surprise egg with hot glue.
Using spray paint, we paint the vessel silver. We paint the fins and propeller golden.
We hot glue a screw to the back of the submarine and fins on the sides.
We glue the eyelets with the same hot glue around the periscope.
As a porthole, we will use gold-colored metal buttons, which we glue to the bow of the submarine with a heat gun.
We get an almost finished submarine.
All that remains is to decorate the underwater vessel a little and give it a festive look. To do this, cut off pieces of silver cord equal to the width and height of the egg.
We decorate the submarine with a cord, securing the ends with glue. Craft for Victory Day, ready!
The submarine is ready to serve in the open waters.
Layout
The boat measures 60cm in length and 7.5cm in diameter. Inner diameter 71mm. The plugs extend 2.5cm each.
Inside the case is divided into “compartments”.
- 1 - battery and receiver
- 2 - tank
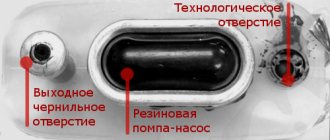
- 3 - pump
- 4 - servos and speed controllers
- 5 - main motor
The tank must be in the middle so that the boat sinks horizontally (there is no trim).
The fastening elements are made of 5mm thick porous PVC sheet. Then they are tightened on iron pins located along the body. The rear plug should also be secured to studs to ensure the rigidity of the assembly with the motor and steering rods.
Initially, stroke controllers were used to control the motor and pump. But their reverse is much slower than forward rotation, which is not convenient for the pump. During testing, I did not install a separate UBEC power circuit and used the built-in 1 amp BEC. Because I received a defective servo that jammed, at that moment the current jumped and burned the entire regulator. Maybe not all of it, but it no longer worked as expected. So I burned 3 regulators and decided to make a circuit with micro switches. It is very simple and provides symmetrical forward/backward rotation. But it’s still better to install a 3-amp power stabilizer.
The 550 series motor is redundant for a model of this size; you can get a smaller one. It is attached with screws to a special bracket to the rear plug. Connection to the shaft through a brass coupling.
It is also worth installing Fail-safe modules on the pump and motor channels. The engine is set to turn off, and the pump is set to purge the tank.
All drawings are on a separate page.