Recommendations for making flowers from cotton pads.
Most people don’t even think about the fact that such a personal hygiene item as a cotton pad can be an excellent material for needlework. With this seemingly simple thing, you can effortlessly make crafts that will become an original interior decoration or a gift for family and friends.
The best part is that in this case the person will not be required to have any special skills; the main thing is to show a little diligence and patience. And if, in addition to all this, you turn on your imagination, then in the shortest possible time you will be able to admire the most realistic flower bouquets made from cotton pads.
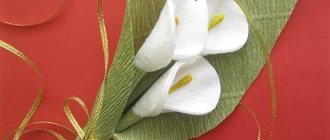
Callas from cotton pads: master class
Callas from cotton pads
Master class on making flowers
I would like to say right away that, although in the master class posted a little higher, it is recommended to put a ready-made calla lily bud on a cocktail tube, if you wish, you don’t have to do this.
If in the future you plan to use them to create an applique, you can paint the ear stick green with paints or paste it with plasticine.
Recommendations for making calla lilies from cotton pads:
- Prepare cotton pads, ear sticks, glue, scissors and a yellow marker
- First of all, we begin to make the stamens of our future flowers
- To do this, take and paint as carefully as possible one side of the ear stick with a marker.
- Next, take one cotton pad and place the pre-made stamen on it (it should lie exactly in the center)
- Lubricate the lower part of the cotton pad with glue and glue the bud, trying to give it a characteristic shape
- We wait until the glue dries and place a cocktail tube on the protruding part of the stamen
Yes, and remember, if, after connecting the opposite parts of the cotton pad, you were unable to immediately give the bud the desired shape, then wait until the glue dries, and then turn the workpiece inside out. This will help make the top of the flower a little rounder.
Necessary materials:
- three cotton pads;
- green corrugated paper;
- green plastic drinking straw;
- cotton buds;
- yellow gouache;
- brush;
- scissors;
- hot glue gun.
Stages of making a bouquet:
- As a stem, we will take a ready-made object - one plastic cocktail tube. Its color must certainly be any shade of green so that the craft looks natural and beautiful. We divide one tube into three equal parts. These will later become flower stems.
- Now we paint the cotton swabs with yellow gouache. This is necessary to give the required color to the calla stamens. To make the paint dry faster and absorb into the cotton part of the object, add a couple of drops of PVA glue to the gouache. Stir and apply the resulting mixture with a brush.
- Place one end of a cotton swab in the middle of a plastic drinking straw. Then we place one cotton pad at the bottom.
- We'll do the same with the other two blanks.
- Fill the drinking straws with hot glue to fix the cotton swabs in one position. Then glue this blank to a cotton pad. Twist at the base and apply hot glue for security.
- Then we cut out a thin strip of green corrugated paper. We wrap each plastic tube, which is the stem of a flower, with corrugated paper and fix it with hot glue from a hot glue gun.
- Cut out a large sheet of green corrugated paper. We put all the flowers together to make a bouquet. Glue the leaf to the base of the bouquet. Give the required shape.
- Now the callas from cotton pads and corrugated paper are ready.
- To add beauty, we use a thin golden ribbon.
- We wrap it around the base of the bouquet and make a bow.
Best regards, Just Crafts!
(7
Source: https://prostopodelki.ru/kally-iz-vatnykh-diskov.html
How to make a rose from cotton pads?
Recommendations for making roses from cotton pads
If you want your rose to be as close to a living flower as possible, then you will have to work hard. The first thing you will have to do is paint the future petals. Since it is very difficult to paint cotton wool evenly, using a brush in this case is undesirable. Therefore, it will be better if you dilute gouache or acrylic paint in water and soak cotton pads in the resulting solution.
After they are saturated with paint, they will need to be laid out on a flat surface and wait until completely dry. If you still want to use a brush to paint the petals, then first starch the cotton pads and only then start painting them.
Recommendations for making roses from cotton pads:
- Prepare the disks as we taught you a little higher
- Then take one disk and twist it into a tight tube
- After this, wrap it with a second disk, but not so tightly
- Adjust the disc so that it visually resembles a rose petal
- Repeat the manipulation until you get a lush bud
- Next, take a needle and carefully sew all parts of your flower
- If desired, decorate the core of your craft with a pink bead
Winter theme
Cotton swabs are often used as a material for making:
- applications;
- snowmen;
- Christmas trees;
- New Year's balls;
- snowflakes;
- snow-covered houses.
The item, available for use, is used both to create different parts in one craft, and different snow creations. By connecting several cotton swabs crosswise, we get a beautiful snowflake that will find its place on a window, a Christmas tree, or in an applique. Having spent a little more time, together with your child you can create a winter fairy tale for a crafts competition for a kindergarten or elementary school.
Bright New Year's decorations
The white color of the soft tips makes it possible to experiment not only with shape, but also with colors. When preparing to celebrate the New Year with their baby, mothers often create Christmas tree decorations and garlands with their own hands. In addition to colored paper, beads, sweets, pasta, cotton pads and swabs are also used.
Making Christmas balls
To make an original New Year's decoration you will need:
- cotton buds;
- PVA glue or glue gun;
- “egg” from a kinder (a ball of thread, a foam ball);
- threads;
- colors as desired.
There are several options for making a Christmas tree toy:
- Remove the cotton from one side of the stick and pierce the foam ball about halfway through. Any number of sticks can be used. The more there are, the more magnificent the ball.
- Glue the hygiene product with a soft tip to the “egg” from the kinder.
- If you plan to make the ball bright and multi-colored, it is recommended to dip the cotton wool in slightly diluted gouache or watercolor. In addition, a children's masterpiece can be painted using a spray paint. Using sticks of different colors, you can get a bright decoration without using paints.
- Make a loop out of the thread and attach it to the toy.
Snowflakes
Another simple New Year's masterpiece made from cotton swabs is a snowflake. The tubes, connected with glue (glue gun) several times crosswise, turn into a snowflake. Such frosty beauties are hung on the Christmas tree, windows, and combined into garlands.
Snowman
The symbol of winter and New Year, which is easy to make for a child’s hand, is a snowman. The snowy character will become a New Year's decoration in the house and a worthy representative at a crafts competition. There is enough photo and video material available in the public domain on how to make a three-dimensional product or applique. The indisputable advantage of such a craft made from cotton swabs is its heat resistance, since the snowman will delight kids and adults in a warm room and will not melt.
Snowdrops made from cotton pads: photo
Recommendations for making snowdrops from cotton pads
Creative idea #1
Creative idea #2
In principle, even a small child can handle such a craft as a snowdrop made from cotton pads. Since in this case you will need to make an applique, all you need to prepare is glue, scissors, colored paper and a green marker.
So:
- First of all, draw a snowdrop template
- It is advisable to do this on cardboard (this will make it easier to transfer the outline onto a cotton pad)
- Next, attach the template to the disk and circle it with a marker
- Cut out the snowdrop along the lines, taking care so that no marker marks are visible on the finished flower.
- Make snowdrop stems and leaves from colored paper
- Take cardboard of the desired color and use glue to fix all the components of the applique on it.
Lily of the valley
Interesting idea for a homemade flower.
What you need for work:
- cotton pads;
- green corrugated paper;
- nylon thread;
- glue;
- scissors;
- stapler;
- thick wire.
Work process:
- Assemble the disc into a “bag” and secure with a stapler.
- String the resulting buds onto a thread or thin wire.
- Using scissors, make natural denticles on the cotton wool along the edges of the bud.
- All that remains is to attach the resulting “garland” to a thick wire. It will be the stem.
It is more convenient to use thread. It will not be so noticeable under the paper.
- Then wrap the stem itself tightly with corrugated or double-sided colored paper and secure with glue.
Younger children can make an applique of lilies of the valley, as described with willow.
Chamomile from cotton pads: photo
Chamomile from cotton pads
Figure No. 1
Figure No. 2
In order to make chamomile from cotton pads you will need the following materials:
- PVA glue
- Thick green and yellow paper
- Cotton pads
- Bamboo sticks
So:
- First, cut out two perfect circles from cardboard
- Set the yellow one aside, and make a cone-shaped piece from the green one.
- Then lubricate it with glue and start placing cotton pads on it
- Place them in such a way that each next element overlaps the previous one with one side (Fig. No. 1)
- Once the entire bottom of your flower is filled with decorative material, place a yellow circle on top of it
- Wait for the glue to dry and place the bud on a bamboo stick
If you do not want to make a cone, then you can glue the cotton pads to the circle, slightly bending their lower part. How to do this correctly can be seen in Figure No. 2. Yes, and in this case it is best to starch the cotton pads in advance. This must be done so that the finished chamomile does not lose its shape after some time.
Burlap flowers
Anyone can create flowers from an unusual material - burlap. This is a very popular pastime that gives birth to unique decorative elements!
For beginners, you can start with the simplest thing, making a rose from burlap.
To do this, you will need the material itself - burlap, matching threads and a needle.
If you can use it carefully, you can replace the needle and thread with hot glue.
We cut the burlap 4-5 cm wide, approximately 1 m long. Fold the resulting strip in half along the entire length and begin to twist the rosette.
YOU WILL NEED IT
For a step-by-step process of folding a rose using this method, see the “Cross” master classes:
Rose made of satin ribbons
Basket of scarlet roses made of satin ribbons
Burlap roses look very stylish! They can be used to decorate various things in your home, for example, to make such designer lamps...
...or make this wreath decoration for the door:
Any photo frame will look more elegant with floral elements.
The simplicity of burlap will be enhanced by lace, beads and rhinestones.
Burlap can be of different colors and textures or simply bleached.
By experimenting with this you can make a vintage curtain tie.
A gift in such a package will convey more warm emotions, because it will store not only the warmth of your heart, but also the warmth of your hands...
Hand-made flowers from burlap are very versatile, because burlap goes well with any decorative elements of floristry.
There is a universal technique for creating flowers from burlap. In this case, the burlap is glued onto the finished frame of wire petals.
First, the burlap is coated with PVA glue.
After drying, the fabric will become harder and more convenient to take any shape.
We prepare a frame of flower petals from wire, wrap the wire with colored adhesive tape.
The resulting petals are placed on glued pieces of fabric and once again treated with glue on top.
The workpiece must be allowed to dry in this form for 1 day. Next, we cut out the resulting petals along the contour of the wire so that the edges are perfectly even. We bend the cut out elements of the flower in the desired direction and form a flower.
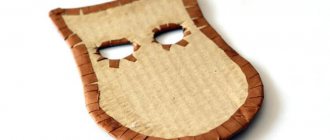
Cotton pad lilies
Cotton pad lilies
Lilies, like other crafts of this type, can be made quite simply. You need to start making a flower by preparing templates for the petals. You can do them in a completely standard way. So, take cardboard, draw a petal of the required size on it (be sure to keep in mind that you will be applying it to a very small piece of material), and then carefully cut it out.
If you are not very good at drawing, but at the same time strive to achieve maximum realism, then just find a suitable template on the Internet. When it is ready, you can proceed directly to making lilies.
Manufacturing recommendations:
- Cut out the base of your future craft
- Roll a small ball out of plasticine and attach it to the base
- Using the template, cut out the required number of petals
- Attach each petal individually to a match
- Insert the resulting blanks into a plasticine ball.
- When the flower is ready, attach a stem to it
If you want your lilies to be as beautiful as possible, then try making them in several stages. First, attach the largest petals to the ball, and then the smaller ones, and at the very end, cover the middle of the craft with the smallest ones. If you do everything correctly, then visually your flower will look like a water lily.
DIY gift for grandma for March 8th
A little earlier we talked about... I already taught you this as a holiday gift for my mom. Well, how can you leave your beloved grandmother without a gift? So, today I want to invite you and your baby to make another bouquet of flowers, but this time it will be calla lilies.
Such a bouquet will be a good gift from a little creator not only on March 8, but also on a birthday. And just any other day. After all, it will delight you with its simplicity and is not at all difficult to implement.
Using lesson materials with older children
A 2-4 year old child can make such flowers, but with your help, an older child, 5-7 years old, can already be trusted to cut out the details for the flowers and design a card. Let him fantasize here. This develops creative thinking.
Children 8-10 years old will cope with the work completely independently and will be able to make a whole bouquet of similar flowers. You just need to control a little and guide your child’s actions with advice, not forgetting to praise and approve the steps that he will take on his own.
By encouraging your baby or older child, you give him confidence and inspiration. Working in such a mood, children will again and again strive to take up creative handicrafts. Your task is only to support and encourage their aspirations.
In this way, you create a foundation for the future - the habit of work, the desire to spend time not only with modern gadgets, but also the need to create beautiful and useful things with your own hands.
And so let’s proceed to the volumetric application of cotton pads.
MK - callas made from cotton pads and colored paper
Materials required for work
- Green and yellow colored paper
- Paper or cardboard for the base
- Three cotton pads
- Pencil
- Scissors
Manufacturing stages - calla lilies from cotton pads
- Let's prepare the base. We select paper or cardboard of a color that matches the colors. The base can be in the form of sheet A4, which is folded in half. It will become a postcard in the future, where beautiful voluminous flowers from scrap material will be placed on the front.
- Then cut out stems and leaves from a green sheet of paper. They can be made the same size using a template or randomly cut directly from a green sheet of paper.
- Glue the stems to the base in different directions.
- We bend the leaves in half to obtain a central fold.
- Glue them to the front of the card between the stems of the flowers.
- Now we will make grass at the bottom of the card. To do this, cut out a long strip of green double-sided paper
- Use scissors to make fringe
- Glue it to the bottom of the future postcard
- Let's adjust the shape of the grass a little
Daffodils made from cotton pads: photo
Daffodils made from cotton pads: photo
Flower elements cut from painted and starched cotton pad
In principle, a daffodil can be made in several ways, but no matter which one you choose, remember that this flower has a rather unique core. Therefore, if you want to make the most realistic craft, then make it not from a yellow cardboard circle, but from pieces of corrugated paper.
In order to make the core, you will need to take a strip 5 millimeters wide and cut it into small pieces. And when your daffodil is ready, you will need to drop a little glue into its center, and then carefully place the shredded paper on it. As a result, you should have an airy and fluffy core.
First way:
- Make a template and cut out petals using it
- Next, cover the thick paper with a tinted base.
- Place three petals on the base and connect them with glue
- In the gaps formed between the petals we again lay out three blanks
- Cut out the leaves and stem of the narcissus from colored paper and glue them under the flower
Second way:
- Cut out the required number of petals according to the cardboard template
- We make a cardboard base from thick paper
- Using glue, attach the petals to it
- We wait until everything dries and fix everything on a paper or wooden stick
The simplest applications
Cotton pads are very easy to make, but at the same time they look impressive in simple applications.
Having drawn a tree trunk on a piece of paper, you can glue disks instead of the crown and paint them in autumn colors. This kind of work will appeal to the little man - all children love bright, colorful pictures. You can teach your child to dip part of the cotton base in red paint and the other part in yellow. You will get a beautiful yellow-red crown of an autumn tree.
Making winter wood can be of no less interest. First, together with the child, you should cut out several trunks, snowflakes and small snowdrifts. Entrust the process of painting the trunks brown and gluing snowdrifts, snowflakes and snow-white crowns to the child.
At the same time, the baby is explained how many and what colors should be in the heavenly beauty. You can also memorize a well-known phrase that will tell you in what order the colors of the rainbow are located.
Tulips made from cotton pads
Template for making a flower
Blanks for a bud
As for the tulip, it is best to make it according to the same principle as the snowdrop. That is, first make a template, cut out blanks that imitate a tulip bud, and then use them to create an original picture. If, as a result of your work, you want to get a flower that can be used to create a bouquet or topiary, then do it a little differently. Cut out not only the bud, but also the stem and leaves of the tulip from cotton pads and reinforce the resulting blanks with cardboard.
Glue two tulips together, after inserting a bamboo stick or cocktail tube between them. Yes, and remember that in this case it is best to stain the cotton pads before you start doing anything with them. If you try to paint them after the tulip is ready, then it is highly likely that the paint will not apply evenly. We told you how to paint wheels correctly at the very beginning of our article.
How to create a topiary
A little more difficult, but more interesting to make from topiary. Topiary is a small sculptural tree. Various available materials are used as a crown. To create a topiary you need to prepare the following:
- cotton pads;
- small pot; you can use different containers you like: a mug, a jar;
- a plastic ball or foam blank in the form of a circle; A piece of paper compressed into a ball is quite suitable;
- satin ribbons, beads, rhinestones, and other decorative elements for decoration;
- glue gun, PVA glue.
So, to make topiary, the following steps are performed:
- Preparing the base for the crown. Any round shape will do, even a piece of paper.
- We connect the crown to the trunk. As a trunk, you can use a plastic stick, a small branch, several wooden skewers tied together, or other elements resembling a trunk.
- We prepare small flowers from the circles. You can shape them to look like roses or lilies. Roses are glued together with glue from several cut out petals. Flowers in the shape of a lily are prepared using a stapler (a cotton circle is folded into four parts and fastened with a staple in the corner), or simply twisted to form an open bud (fixed on the narrow side with white threads). If desired, the blanks can be painted in the color you like.
- Glue all the prepared flowers to the ball. Of course, the ideal option would be a ball of absolutely even shape; gluing workpieces to it will be much easier. It is better to place flowers very close to each other, leaving no empty spaces. To make the crown look original, in addition to flowers, bows, ribbons, rhinestones, beads, and other decorative elements are glued to the ball.
- Next, you need to prepare a pot or some other container-stand for the tree. Purchase a ready-made small plastic or ceramic flower pot. You can make a pot yourself from a jar by covering it with satin ribbons, lace, fabric, and beads.
- After all the topiary elements are made, they are connected to each other. Crown with a trunk and then with a pot. To do this, gypsum diluted in water is poured into the pot. A trunk with a crown is inserted into the hardening composition. The barrel can be decorated with rhinestones, beads and other small details.
Dandelions from cotton pads
Dandelions from cotton pads
Although such a craft seems very simple at first glance, there are still some nuances in its manufacture. Firstly, in this case it is best not to use standard colored paper to make the stem and leaves. If you want your dandelions to visually look like real ones, then this part of the craft is best cut out of corrugated paper.
Secondly, when fixing the cotton pad on a cardboard base, you should make sure that it does not get very wet. If it turns out that it is heavily saturated with glue, then you will not be able to fluff it up even after it is completely dry. Therefore, it will be better if you apply glue to the disc pointwise.
So:
- Cut out the bottom of a dandelion from paper
- Carefully glue it onto the cardboard base
- Apply glue to the disk and also fix it on paper
- Let it dry a little and then remove the top of the disc
- Lightly fluff the dandelion with your fingers
Careful formation of the bud
Next comes the turn of other details imitating petals. Another cut disk is taken, glue is applied to its central section, after which the finished part of the bud is fixed there.
Now you need to glue the petals again, placing them in the same way as in the upper part of the future flower. Next, the petals need to be pressed tightly to the core of the bud so that the rose is “young” and “ready to bloom.” All the described operations are performed with the last petal cotton pad.
Glue is applied to the central part of one of the remaining disks. The finished part of the bud will be fixed here. The other two circles need to be cut according to diameter.
The straight sections of the resulting segments are coated with glue, after which they are inserted into the flower between the whole disk and the upward-curved petals. The same must be done with the remaining segments.
Lilies of the valley made from cotton pads
Application of lilies of the valley
If you want to make a lily of the valley from cotton pads, then first of all stock up on a stapler and thin but strong wire. First you will need to make some kind of triangle out of decorative material, and then fix it with a stapler. After the blanks imitating a lily of the valley bud are ready, string them on a wire (you can also use thread).
If you want to achieve greater realism, then take small scissors and cut out characteristic teeth on the blanks. After such a unique garland is ready, all you have to do is attach a stem to it and decorate it with green leaves. They can also be cut according to the drawn template. You can also make lilies of the valley using applique. You can see how to do this correctly in the figure located a little higher.
Rose for Women's Day
Roses are very popular, because they are often given to girls on March 8th. So, how to make a flower from such disks? Description of work:
- First of all, you need to paint the rims first. There are different methods for painting discs:
- Method one. Dilute acrylic paint in water, then soak the material in this solution. Next, remove and dry the cotton wool discs. After drying, you can add paint to certain areas with a brush.
- Method two. Paint the disc with paint. The petals can be sewn together with a needle and thread. In addition, you can fix the petals using a simple stapler.
- One disk must be rolled into a tube. Then add another one to it.
- Next, you will have to throw 1 more disk on top. Make petals.
- Secure the petals with glue if the flower already has a large number of petals.
- Try securing the bud to your skewer with thread or try gluing it.
- Wrap the skewer in quality cardboard.
Mimosa from cotton pads
The first method of making mimosa from discs
The first method of making mimosa from discs:
- Prepare a thick base onto which you will later stick the mimosa sprig
- Dye the cotton pads yellow and dry them thoroughly.
- Cut out the leaves and stem of the mimosa according to the template and glue them onto the cardboard base
- Cut the cotton pads into small pieces (preferably triangular)
- In the spaces between the leaves of the future mimosa, apply a thick layer of glue and sprinkle it with yellow cotton pieces
The second method of making mimosa from cotton pads
The second method of making mimosa from cotton pads:
- Cut a thin strip of paper
- Leave one part of it whole and cut the other into strips.
- Lubricate the whole part with glue and screw everything onto a bamboo stick
- Make a couple more leaves this way
- Fold the cotton pad into a triangle and cut off the sharpest part of the resulting workpiece
- Fluff it with your hands and string it on a wire
- Wrap the resulting garland around the stick and fix the finished leaves on it
Christmas tree and Santa Claus
Your favorite child runs into the kitchen and shows off the Snowman, but you still have a lot to do? We'll have to break away for about five minutes and give the kid a new task - to make a Christmas tree and Santa Claus.
The child’s “workplace” already has glue and scissors, but you should add to them:
- cone for the base of the tree;
- several dozen cotton pads;
- two saucers - one with a green solution, and the second with red paint;
- shiny tinsel;
- a sparkling star;
- several layers of newspaper for drying cotton bases for crafts.
Then the child should be explained how to make a Christmas tree.
- Dye some cotton pads in a green solution.
- Dry the workpieces.
- Glue the discs to the cone, creating a beautiful Christmas tree.
- Attach a star to the top of the New Year's tree.
- Glue glitter onto the green base of the Christmas tree.
Explain to the child that the Christmas tree, no matter how beautifully decorated it is, cannot do without Santa Claus. Then you should explain how to make a nice grandfather.
- Cut one disc in half and paint it in a red solution.
- Dry the future Santa Claus hat.
- Draw the eyes and nose of a fairy-tale grandfather on the disk.
- Glue on the red hat.
- Cut several small circles.
- Glue a small pompom circle to the hat.
- Glue the remaining small circles to the head, creating the “beard” of the welcome New Year’s guest.
After such detailed instructions, rest assured that you will have a little more time to complete all the necessary preparations for the holiday!
Carnations made from cotton pads
Carnations made from cotton pads
If you are not particularly persevering, but still want to surprise your family with your skill, then make a carnation in a quick way. To make such a craft, you will need cotton pads, scarlet corrugated paper, wire and a large dark-colored bead. So, take corrugated paper and cut out a round piece from it, the size of which exactly matches the disk.
At the next stage, take scissors and cut sharp teeth on all the elements. Next, all you have to do is string them on a wire, alternating cotton pads with corrugated paper. Decorate the top of the finished craft with a bead. Such a flower can easily be fixed on a wooden or steel stick, or you can glue it to a canvas and use it to create a very beautiful panel.
Sakura made from cotton pads
Sakura made from cotton pads
If you think that making a sakura flower from cotton pads is very difficult, then you are deeply mistaken. All that will be required of you in this case is to achieve a visual resemblance to a living flower. The same corrugated paper will help you do this, but this time you will have to find a decorative material of a delicate pink color.
You will need to cut out a small circle from it (it should be about three times smaller than the cotton pad itself), fold it into a cone and secure everything with a stapler. You will need to do the same with disks. At the next stage, you will need to carefully fluff the upper part of all the blanks, and you can insert the pink center into the upper part of the sakura bud.
If you do everything correctly, you will end up with a craft similar to what can be seen in the picture located a little higher. Yes, it doesn’t have to be glued to cardboard. You can quite easily find a beautiful twig from any fruit tree and fix the finished buds on it.
DIY products made from cotton sponges for primary school children
Older children - 6-9 years old - can be asked to make more complex products.
But you will still need the help of an adult. For example, make daisies together. To do this, stock up on cotton pads, yellow cardboard, tubes, and green corrugated paper. The workflow is very simple:
- Draw two identical circles on cardboard and cut them out.
- Fold the petals as shown in the picture, they will be our petals.
- Glue the petals onto one circle.
- Glue the second yellow circle in the center.
- Now you need to cut the green tube into 4 parts at one end and glue the stem.
- Cut out leaves from paper and glue them too.
You can make as many flowers as you want, you can even collect a whole bouquet and put them in a vase, it will look beautiful and original.
And, most importantly, such a bouquet will never wither. More diligent children can be offered to make roses. The materials you will need are the same as for the daisies. But the work process will be somewhat more painstaking:
- Twist a tube from the disk and secure it with glue. This is the middle of the flower.
- Wrap the next circle around the resulting center and also fix it with glue.
- Wrap the third one around the second petal and so on. Usually 6 discs are enough for one bud.
- Use a cocktail straw as a stem. It is inserted into the base of the flower and secured with wire.
- Cut out a sepal from corrugated paper and fix it on the flower with glue.
- Make leaves from the same paper.
You can make as many roses as you like daisies. Moreover, they can be white or multi-colored. In the latter case, the discs must first be painted and dried.
A very interesting idea is to create a real topiary. It will be a wonderful decoration for the interior of a child’s room, and this tree of happiness can also be presented to someone as a gift.
To make such a wonderful souvenir:
You will need newspaper, disks, a branch or stick (for the trunk), tape, a pot, plaster, and beads. We will make small roses. Fold the first disk to form a cone and secure with a stapler. Turn out the top edge. Prepare the blanks. Make a ball out of paper, it will serve as the base. Using a glue gun, glue the roses to it
It is important that they fit tightly and there are no gaps. Insert the branch into the ball and secure it. Place the tree in a pot. It can be built, for example, from an old can wrapped in twine.
To prevent the tree from falling, the trunk in the jar must be filled with plaster. All that remains is to make the leaves and glue them in random order.
Willow made from cotton pads
Sakura made from cotton pads
Willow made from cotton pads
In order to achieve visual similarity between cotton pads and willow, you will have to chop it into small oval pieces. It is this material that will be used as the main element of the finished craft. As for how and where to attach it, there may be options. If you want to make an applique or panel, then you will need to glue a piece of brown rope onto a piece of paper or simply paint a twig with ordinary paints.
Next, all you have to do is glue the cotton blanks onto the applique correctly. How to do this correctly is described in the picture. If you want to make a more realistic willow with your own hands, then you will have to put each piece of cotton pad on a wire, and then firmly fix everything on the branch.
Topiary made from cotton pads
Topiary made from cotton pads
If you want to really surprise your household, then make a very beautiful and delicate topiary from cotton pads.
So:
- First of all, prepare a creamy mixture from water and dry plaster and pour it into the container in which you plan to install the lower part of the topiary
- When the plaster has set a little, insert a stick into the very center of the container, on which you will subsequently fix the decorated ball
- Take a foam ball and cover it with cotton flowers (roses are best for this)
- You can put them on glue or on sewing pins
- When the top is ready, carefully place it on a stick in a container with plaster
- If desired, you can additionally decorate the topiary with beads and satin ribbons
Bouquets of flowers as a gift for mom made from cotton pads: photo
As you probably already understood, cotton pads are an excellent material for needlework and, if desired, even a small child can use them to make a nice present for his mother.
Below we bring to your attention several beautiful pictures that can inspire you and your child to further experiment with this pliable material.
Creative idea #1
Creative idea #2
Creative idea No. 3
Creative idea #4
Flowers from egg trays
Egg trays are one of the waste materials for handicrafts. Usually, egg containers are thrown into the trash, not knowing what beauty can be created from them! Hand-made flowers from egg trays will decorate your home interior, photo frames, wreaths, mirrors, etc.
To make these flowers you will need:
- egg trays (cardboard and plastic can be used);
- brush and paint (gouache, acrylic);
- scissors;
- glue;
- wire.
We cut the egg tray into separate sections, after which we use scissors to form the petals of your future flowers from each section. The height of such blanks may vary. We paint the resulting petals with paint, preferably in two layers. Further, depending on the type of flower you are making, one blank can be inserted into another, forming a bud. We fix the elements of the resulting flower with glue.
The materials and process of creating flowers from egg trays are discussed in detail in MK Handicraft Masterpieces:
We bring to your attention the most common types of flowers from egg trays. But remember that you can come up with the flower shape yourself!
The process of creating a rose from an egg tray
Tea rose
The pride of the flower world is the narcissus
Tender cosmos
Wonderful pink cyclamen
The frame of the summer wreath is also made from egg trays. A similar wreath can be decorated with daisies, cornflowers or pansies.
You can even make a small floral masterpiece from plastic egg trays!
For example, snow-white roses from plastic containers in combination with pearls and decorative gypsophila form such a delicate bouquet.
Decorative moss or fern, as well as red ribbons and beads will add brightness and festiveness to a Christmas wreath made of plastic roses.
For details on creating flowers from plastic containers, see this master class.
A personalized flower on the table will please a colleague or your loved ones:
Let's see how you can turn a simple photo frame into an exclusive one:
A simple mirror decorated with flowers from trays will look more interesting and sophisticated.
Chic mirror decorated with lush peonies
You can create an interior floral arrangement using flowers from trays in pastel pink tones in combination with dried natural roses and simple thin twigs!
Using LEDs, you can decorate the interior of your home with a flower garland.
Or make a flower lamp: