Any work that is done with your hands has a positive effect on the development of creative abilities and motor skills. Therefore, adults and children are encouraged to spend time together doing crafts. Now we have to figure out how to make a bird with our own hands from scrap materials for a competition or just for interior decoration.
Making a bird out of paper
These are the materials you will need to create a simple paper bird craft:
- Cardboard paper.
- Scissors.
- Quilling paper or strips of colored paper.
- Paper glue.
- Markers and pencils.
- Sample.
Brief instructions on how to make a paper bird with your own hands:
- Using a pre-printed template, you can make several versions of birds at once. To do this, the drawing is transferred to cardboard and then cut out along the contour with ordinary scissors.
- Next, take quilling paper, but you can use any colored strips of 0.5 cm.
- Next, you need to glue the bird’s body itself from cardboard, as well as strips, to the base. This is done using a regular glue stick.
To make the craft look interesting, you can glue the strips (which act as wings) not completely. Then, in any draft or wind, they will move. Using a marker, details are drawn - eyes, lines for the ears, etc.
How interesting is it to play around with a painting in the interior?
Birds made from yarn will beautifully complement any interior. You can even create an entire composition. Birds on a tree, on a branch, in a birdhouse.
You can simply take a frame, string a few strings (perches), and place your birds on them. Take bright threads, then the picture will be noticeable.
You can make a small birdhouse and add birds to it. Such a composition in the interior will not go unnoticed.
Use birdhouse templates for your painting. At the bottom of the frame, make a small ledge out of cardboard and place your little birds there.
You can decorate the wall in the nursery with a real birdhouse made of cardboard. Add a small branch ledge at the bottom and place your beautiful bird on it. Place several of these birdhouses randomly. So, you can easily dilute the interior of the room with bright elements.
Make a whole live composition on your table or windowsill. Place the toys on a branch that you can find while walking.
Or buy a small cage and artificial flowers from a craft store and create a beautiful, delicate composition.
Which yarn to choose for knitting mittens
How are woolen items made?
How to make a double-sided bird
This work option is suitable for the smallest craftsmen, since there is virtually nothing to cut out. The creative process must take place under the supervision of parents. Brief instructions:
- To begin with, the blanks are printed. To do this you need a color printer.
- One bird consists of 3 main circles, which will decrease in diameter from the larger one.
- Next, each part is glued to each other, after which it is folded in half using a ruler.
- You can glue wings made of felt or even fabric to the base of the bird.
Next, draw the eyes; you can glue the yellow beak separately. This craft takes no more than 10 minutes. You can make a whole garland from a number of such birds.
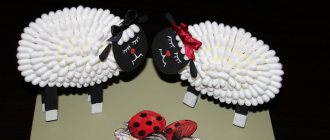
Making fragrant birds from yarn for the interior with children
The other day, under the guidance of our irreplaceable assistant Natalya Shishkina, we made aromatic birds with the guys. We share with you a master class from Natalia!
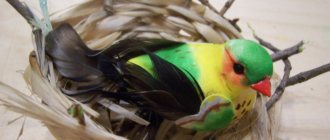
The birds remaining for the winter chirp outside the window, predicting the imminent cold and the approaching holidays. To feel the spirit of the New Year, stock up on a couple of skeins of thick thread, cinnamon sticks, tangerine zest (whatever you like) and start creating feathered fluffies from yarn.
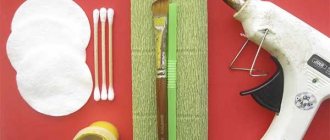
Step 1. Select threads of the appropriate color of the bird. In this case, tits. Cardboard for winding threads, padding polyester for the body, dried tangerine zest and Sweet Orange aroma oil. Since we studied wintering birds, we chose this particular scent so that the mood of the new year would be in the air. You can choose the scent that you like.
Step 2. Place the zest on the padding polyester, season with oil and roll it up, securing it with white thread.
Step 3. Wind the threads. Yellow and blue are most abundant on the abdomen and body. White a little bit (even number of threads). Black is for the wings. Cut on one side.
Step 4. Place the white threads on the blue threads.
Step 5. We tie the black threads in the middle and try them on the body.
Step 6. Place the threads crosswise relative to each other.
Step 7. Fold it in the middle and secure it with one of the threads.
Step 8. Distribute the white threads symmetrically (for this you need an even number of threads).
Step 9. We bend the secured yellow threads so that we get a bird's head and secure it with a free thread.
Step 10. Place the resulting blank on top of the black wings and body.
Step 11. Evenly distribute the yellow threads of the abdomen and the blue threads of the back so that the white body is not visible. Then fasten with loose thread.
Step 12. Fasten the black threads so that the white body is not visible. We finally fix the tail. Cut off the excess thread.
Step 13. Glue the seed-beak and beads-eyes. Enjoying the fluffy feathers and the aroma of the New Year.
New Years is soon. And these birds can be used as a Christmas tree decoration. You can tie a string and hang the bird on the Christmas tree!