A functional and convenient spice rack is a real treasure in the kitchen. Having everything at our fingertips makes us more enthusiastic about preparing complex dishes, and cooking becomes easier - no more searching for the right bag in the back of the cupboard! How to make a spice rack yourself and which model to choose from the options available on the market?
What will you read about in the article?
- Spice rack - at your fingertips!
- Spice racks - what to choose?
- Or maybe a spice rack?
- Spice rack - how to make?
- Universal shelves for spices - wooden
- Aesthetic and practical: metal spice rack
- Design is not the only thing that matters!
How to store spices
It is optimal to store spices according to their expiration date. The fresher the herbs and seeds, the more aromatic they are and contain more nutrients. It is best to take spices not in mixtures, but in their natural form - dried leaves, dried seeds, natural cinnamon bark, vanilla pods, etc. To enhance the taste, adherents of Indian cuisine roast spices in a frying pan, having previously crushed the ingredients of the seasoning.
Grinding spices is also a matter of individual choice. Some people use ground spices right away, some use a mortar, some use an electric coffee grinder. As for herbs, not many people will be able to notice the difference between freshly ground and ground a week ago. Spices like nutmeg actually work much better when grated a little at a time for each dish. Dried and fresh herbs differ in taste; many housewives store chopped fresh herbs in the freezer. The choice is yours - it's your kitchen.
The only thing that lovers of fancy dishes and ordinary cooking will agree on is that spices must be stored in a dark, dry place, preferably tightly closed. Of course, jars made of glass or metal are best, but a battery of jars does not always fit in the kitchen. If a package with a spice does not have time to open, there is nothing left there - such spices can be stored in their original bags in tightly closed boxes. Flavorful herbs and spices that you usually don't use much can be stored in jars, but do not forget about the storage time.
Or maybe a stand?
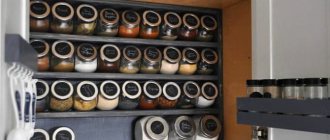
The stand is an ideal option for lovers of classic kitchen interiors. You don't have to hang anything on the wall or on the outside of the cabinet. Such a stand can comfortably “settle” on the countertop, taking up a minimum of space and ensuring maximum comfort in the culinary process.
The stand is quite convenient, since it does not need to be hung anywhere.
Most often, it is made of natural wood. This design not only makes the design convenient, but also stylishly complements almost any interior design.
Usually the stand is made of natural wood.
By the way, you can also place a spice rack on a windowsill or in a closet. The shapes of the structures are very diverse: from the classic rectangular, to round, or in the form of a pyramid.
The stand can also be placed in a closet.
DIY spice racks
A video selection of master classes in which masters show how to make a spice rack with your own hands.
Cool spice rack
Roman Forest showed how he makes the simplest version of a spice rack with his own hands. He used 5 elm boards. Tools: combination machine, surface planer, belt sander, router, eccentric sander.
DIY Vintage Tabletop Spice Rack
Oleg Kidanov, in a video on his channel, showed how he made a shelf for six 200-gram spice jars:
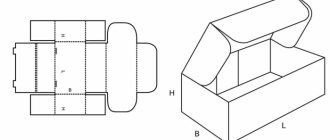
Wooden box shelf
In essence, this is a product made from thin narrow boards; the box will first have to be disassembled, all the nails removed, and the boards thoroughly sanded. A wooden pallet will also work, as long as the width of the planks is slightly larger than the diameter of the jars. The author of the idea used 6 long boards and 2 pairs of short ones, wood glue and nails.
- Between 2 long boards I installed short ones, approximately equal to double the height of the jars. Glued it together and nailed it down with small nails. The long boards are the bottoms of the top and bottom shelves, the short ones are the sides of the bottom.
- I attached 2 more long boards to the side edges of the lower long board and the lower part of the sidewalls from the front and rear, creating the sides of the lower shelf.
- In the same way, I attached 2 boards to the bottom of the top shelf and inserted the side panels between them.
- I painted it, decorated the façade with decoupage and varnished it.
The shelf is light, so it hangs on a cord. If you wish, you can take the idea as a basis and implement your own version, improving the design and assembly method. For example, make the sidewalls solid, and install the sides and bottoms between them, so it’s neater.
Tabletop spice racks
Buffet shelf
Author: Victoria Petrova
Tabletop spice rack from SpiceLuxe
One of the options is in a tabletop version, which is used for completing spice sets.
Rotating spice racks
The photo of this shelf has long been circulated on the Internet, but I can’t help but add it here, since it is very original. The original source is difficult to find due to the many reposts. Photo taken here: imgur.com/SAscjY9
Another option is with rotation. The source is also not known, but it will be indicated here when it comes across it.
Interesting new products in the world of kitchen utensils
Such a module will not take up much space, and its capacity will satisfy the requirements of any chef. Twenty containers for spices and seasonings are conveniently located, and the design of the product looks very original. The rotating drum allows you to easily get the spice you need. To do this, just turn it. Condiment containers are hung securely but are easily accessible. When using, you will not spill a single crumb, since the law of universal gravitation itself ensures the perfect balance.
This product is a worthy example of a successful combination of chromed metal and hard glass. Reliability and durability play a key role in this ensemble of quality and beauty. After all, wear-resistant materials were used for production.
The following example of the successful use of the laws of physics to increase comfort when creating delicious dishes is made of plastic and wood. The operating principle of this kitchen item for seasoning is similar to the previous one, but the design has significant differences. Wooden legs with a simple design hold the spice containers. This functional device is similar to a mill. Despite its large capacity, it will take up very little space in your kitchen.
They are in every kitchen - the most popular spices
Salt and pepper are found in every home. They are so characteristic that it is very difficult to replace them with something else. However, there are many types of these basic spices, salt is not the same, and not all peppers and paprikas are baked the same. What do they give us, besides the undoubtedly strong taste?
Unique salt
Salt is the oldest and most famous spice; in the old days it was very valuable and was even a means of payment. It was used for preservation and always perfectly emphasized the taste of cooked dishes. Today it is easily available and much abused. Unfortunately, excess refined salt in the body leads to hypertension and kidney disease, among other things.
The best versions of salt are sea salt from seawater evaporation and salt from mine sediments. This salt contains small amounts of minerals: magnesium, manganese, iron, zinc and calcium. Currently, Himalayan salt is gaining great popularity; it contains more than 80 minerals and electrolytes. It is a natural crystalline salt that has been subjected to enormous pressure for millions of years. Salt needs to be limited, but this can be done wisely. It is enough to combine salt with herbs such as garlic, herbal pepper or black cumin. We add less salt, and the flavor of the dishes remains rich.
Paprika and pepper
Paprika improves poor appetite, stimulates the secretion of digestive juice and saliva. It contains large amounts of vitamin C and antioxidants. Pepper fruits can be spicy or sweet depending on how they are cooked. To create the sweet spiciness, the walls and skin of dried peppers are removed, which contain capsaicin, which imparts its characteristic spicy flavor. The flavor of the spice also depends on the heat of the pepper itself, which is why there are many varieties of peppers on the market. Paprika will enrich the flavor of, for example, meats, rice dishes, beans and sausages, and is widely used in Hungarian and Mexican cuisine. In Poland, it is very often used to season grilled dishes and chicken. You should know that due to its pungency, this spice should not be consumed by people suffering from stomach diseases and hemorrhoids.
Pepper as a plant is a tropical vine that grows up to 15 meters, native to India, and the spices we know are made from its fruits. The spicier variety will appear when the fruit is not fully ripe and will then produce proper black pepper. When the ripe red fruits are dried, they produce a milder white pepper. Also, completely green balls are collected, which means these are tender green peppers. Pepper has antibacterial properties, has a pungent flavor due to piperine, and is commonly used on meats and vegetables. It perfectly emphasizes the taste of soups; gourmets say that it goes well with chocolate. Not recommended for people suffering from stomach ulcers and intestinal diseases.
Author: F.E. Isanova
Manufacturing process: step-by-step instructions
Before you start constructing a wooden craft, you need to make sure that the drawings are correct and the parts fit together
This is very important if you plan to make a cabinet with doors or a back wall
After the materials have been selected and verified, you can begin the main work.
To make furniture you will need a little patience, raw materials from which the craft will be made and tools.
Step-by-step instruction
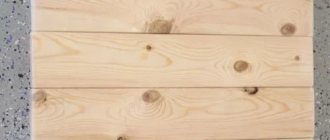
- Preparation of material.
The length of the boards must be selected based on the space where the rack will be located. The width of the craft should be rather large. A medium or large pot should be freely placed on it. To make the same distance between the shelves, you can put extra bars in the middle.
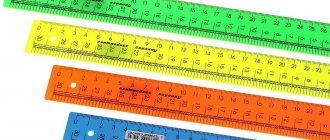
- We drill holes.
To make this craft you will need a regular drill with a large drill bit. You need to make two holes in each shelf. They should be located parallel to each other. In general, it turns out that there are two holes for each fragment. A thick rope should fit freely into the hole. If the holes are smaller, then there is a chance that the shelf will be fragile.
When making a craft with your own hands, you have the opportunity to independently choose the size, shade, design and location of the structure.
- We thread the rope
Almost everything is ready to construct the stand. All that remains is to thread a thick rope through the holes and hang the flower shelf. After the rope is inserted through all the holes, tie a strong knot at the bottom of the product. We make a loop from the top of the rope so that we can hang the shelf.
We install the structure.
After all the main work is done, you can begin installing the finished product. Since almost all the walls in houses are made of brick or concrete, we will need an electric drill for work.
To make a stand, you don't have to buy something from the store.
We make markings on the wall where it will be located. We drill holes for fasteners and install it. Firmly fix the product onto the fasteners. Now you can put pots with plants on it.
Alchemy laboratory
Probably, almost everyone dreamed of becoming a wizard in childhood. Now you can at least partially realize your dreams! Small narrow test tubes with spices and wide flasks with cereals and pasta will look very impressive on a hanging shelf.
You can also add mystery bottles of vinegar and vegetable oils. This design looks very interesting and mysterious. However, be careful not to hang it over the stove, even if your beakers are heat-resistant: constant heating does not improve the properties of the food.
An interesting technique: Containers with glass of different colors can add originality to an already interesting idea. If you decide to place vegetable oils on this shelf, make them aromatic - add herbs or berries to them. This will make your shelf look even more like the shelf of a wise wizard.
Varnishing crafts
If desired, you can transform our craft by covering it with Wood Varnish, preferably colorless. Read how best to varnish a craft. Try to choose a quality varnish. Varnishing is carried out using a special brush “For glue”. Take your time. Try not to leave visible marks or scratches on the craft.
Interesting ideas
The interior space of the shelf can be organized in different ways. Divide into many cells, each for a separate jar or box. Separate the vertical section for the bottle of vinegar. Make a couple of drawers. You will have to tinker with them, but since the drawers are small and light, you can do without roller guides and simply insert them into the cells.
There are other interesting alternatives to shelves. Some people store spices in test tubes or small plastic cylinders that are screwed on with caps (these are blanks for making PET bottles). For such thin cylinders, you can attach a metal corner or a wooden strip to the wall, in which round holes of the required diameter are drilled with a core drill. Rubber sealing rings must be inserted into the holes for the test tubes. And cylindrical jars with screw caps can be held in place due to the fact that the diameter of the lid is slightly larger. They also sew something between a bandoleer and a travel bag for plastic “test tubes.” Simply attach braid to thick fabric to form loops into which the cylinders are inserted. This product can be hung on the wall or taken on a hike. Other non-standard options:
- rug with voluminous pockets;
- lids from cans, screwed with self-tapping screws to the bottom of a regular shelf. When a portion of seasoning is needed, the jar is simply unscrewed from the lid;
- a metal sheet attached to the wall and magnets glued to each can. It is safer to store spices in this way not in glass, but in light tin or aluminum jars;
There are many ideas, some of which do not require special efforts or skills to implement.
Related materials:
Introduction to decoupage
Let's present a master class on making cereal jars using the decoupage technique.
Let's start decorating. At the bottom of the can we draw a semicircle. This is done for convenience - through such a window the contents of the jar will be visible.
We glue the rest of the jar with white napkins and PVA glue. After drying, you can cover the top of the napkins with white gouache or acrylic paint. This is done so that in the future the applied pattern will not be translucent.
From the napkins with a pattern that were selected and prepared, we cut out the necessary fragments. Carefully remove the two bottom balls of napkins from them.
You can begin the decorating process only after the prepared jar has completely dried. Lubricate the area where the fragment will be glued generously with PVA glue and carefully glue the pattern. Smooth it with a brush liberally moistened with PVA glue.
Using these sequential steps we cover the entire prepared surface of the jar.
We decorate the window. To do this, lubricate the border line with Moment glue and glue the tape.
Let the work dry completely. Of course, you can complete the decorating process here, but we suggest continuing. Using acrylic paints we give the drawing more “life” - we draw the petals and centers of the flowers, as in the photo below.
Again, wait until the jar is completely dry. We finish the work - open it with varnish, preferably acrylic, but construction grade can also be used. After the varnish has completely dried, the jar is ready for use! The lid can be chosen to match the color of the picture! We leave it unchanged, but using imagination, it can also be decorated.
You can also use tin cans of coffee or, for example, baby food for decoupage.
But in this case there is one drawback - there is no way to leave a “window” so that the contents of the jar can be seen. However, there is a way out! You can buy stickers and sign the contents. Or simply print them from the Internet. Below we provide several templates.
The simplest decor for a jar with a metal lid can be simply a beautiful decor with ribbon, braid or fabric around the neck. It will be most effective if the jar is glass. Then we paint the lid with acrylic paint. And the jar is ready!
Magnetic holder for glass jars
It is very convenient to place glass jars with spices directly on the wall using magnets and a metal sheet.
A sheet of metal is firmly attached to the wall, and two round magnets are glued to each jar, and that’s it - the most convenient solution for storing seasonings is ready! If you don’t really like the idea of decorating a wall with a sheet of metal, you can decorate it with vinyl film or vinyl wallpaper, after first checking the attracting ability of magnets through a layer of decorative material.