Peculiarities
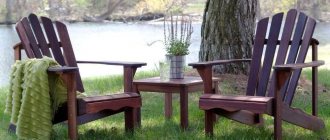
The simplest garden furniture is outdoor benches used in parks and squares. However, gardeners and vegetable gardeners often make chairs, benches, and benches designed for use in the garden, and not just on the veranda or gazebo.
Handmade, rustic furniture is much more durable than what you buy in furniture stores. In order to save money, furniture is often made from chipboard, somehow protected from moisture by an adhesive layer of film.
Sometimes wood dust is used together with plastic - scraps from other products, such as lumber. Both materials are diluted with epoxy resin or glue: for example, interior doors are cast. Establishing the production of such furniture for a summer house is not a problem: the slats and boards merged in this way have longitudinal voids inside and a box-shaped profile in cross-section.
However, natural wood, well dried and impregnated with a bioprotective composition (against microbes, fungi, mold), coated with a waterproof varnish that can last for years even in heat, frost and humidity, will last at least several decades.
An example is the same Soviet stores installed in city parks in the 70s of the last century, which in some places have survived to this day. There are no special secrets to their durability. These stores were painted with street paint every two years. Resistant to fading under conditions of annual changes in temperature, humidity and ultraviolet radiation.
Finally, making garden furniture is a test of the skills of a true owner. If you are a handyman, you can make a chair, for example, by having a dozen large pieces of wood after replacing the floors in the rooms.
Stunning constructor
And yet the bazooka is simple and friendly. There is no combustion or expansion of the flammable mixture inside its body, as, for example, in the potato cannon we built earlier. It does not need to be airtight; its task is only to protect the shooter from flash.
Coronavirus beyond the threshold: how to protect your home from SARS-CoV-2
Stabilizers made of thick cardboard will help give the rocket stability in flight. Their use will give better results than making the warhead heavier.
Happy coincidences helped us quickly assemble the gun: in a hardware store we found plastic sewer pipes with a diameter of 100 mm and a meter long - an ideal body with classic, terrifying proportions; the diameter of two-liter soda bottles almost exactly matches the internal diameter of the pipe; The diameter of the bottle necks is almost perfect for fitting onto a 20mm polypropylene water pipe. Everything “virtually” and “almost” is brought to gun-grade precision with a couple of layers of reinforced tape.
Electrodes and wires protruding from the pipe should be fixed with hot glue. The pipe must be sealed - it acts as a plug, not a nozzle.
So, the warhead of a bazooka is a simple water pipe, onto the end of which a projectile is attached. Electrodes are mounted inside this end, which are connected by wires to a piezoelectric lighter. In principle, with a certain amount of courage and recklessness, you can already launch rockets using this stick with a spark at the end.
The spark from a piezoelectric lighter is surprisingly reliably transmitted through wires over impressive distances. A long wire will make assembly more convenient.
However, showing prudence, we put three halves of two-liter bottles on the pipe, secured it all with tape and inserted it into the sewer pipe. You need to drill a hole in both pipes to bring the wires out from the electrodes and connect them to the lighter. Some lighters make excellent fire control handles, especially if you attach them to the body with an angle and screws...
It is unlikely that anyone will suspect you of making a weapon: a projectile that weighs some tens of grams is not capable of causing serious harm. The missile is more like a postal transport: the space inside the “warhead” is reliably protected from fire and wind.
What kind of chairs can you make with your own hands?
Before you start working, you need to clearly understand what types of wooden chairs can really be made at home:
- soft. Convenient option for home. For manufacturing, you will need to assemble a frame on which the soft upholstery will be attached;
- sliding An excellent option for saving space in the house. Their design is somewhat more complex than that of an ordinary wooden chair;
- folding. Just right for going out into nature. The complexity of manufacturing is compensated by its functionality;
- Kentucky. A simple construction of materials will require only bars. Wire or pins act as fasteners;
- on wheels - an option convenient for the elderly and disabled. The most critical stage in manufacturing will be the correct installation of the wheels, because such a chair should move effortlessly.
You can slightly modify an ordinary chair by attaching a high back to it. Both hard and soft models are made, it all depends on the imagination and skills of the master.
Sometimes you want to make a rocking chair with your own hands. The main difficulty here is preparing the arched base. But this problem can also be solved.
Choosing an image motif
Wooden sculptures have existed since ancient Greece and Rome. In the Middle Ages this art became ubiquitous; carved wooden figures decorated temples and palaces, and a carefully carved and gilded goddess was placed on the bow of a sailing ship.
Contemporary wood sculpture impresses with its variety of stylistically different directions. These include Japanese netsuke, fancy African sculptures, and figures decorating country, chalet and art deco interiors. The accumulated wealth of ideas can become a source of inspiration for the owner who decides to decorate his site. Wooden sculptures suitable for homemade production are conventionally divided into three types:
- Sadovaya. A garden is a place where you want to relax and communicate with nature, and a three-dimensional figurine will come in handy here. Very often, images of animals, real and fabulous, are chosen to decorate the garden.
Country style Source dachnaya-zhizn.ru
- Sculpture for home. Wooden art objects are able to demonstrate the taste and inner world of home owners; they must be conceptually unified with the interior design.
- Figures for children. They are popular as an ideal educational material for children from 6 months: they are environmentally friendly, develop imagination and tactile skills.
Figures made from different types of wood Source baza.zruchno.com.ua
See also: Catalog of projects of stone houses with a plinth
Main material
The reliability of the future chair, its stability, and ability to cope with loads and various climatic conditions will depend on the choice of wood and the method of final processing. You can use an old chair or armchair as a base, having previously disassembled it into its components, or, conversely, modify existing furniture.
- A material such as chipboard, which is used to make furniture, is not suitable for chairs, especially garden chairs. The reason for this is limited moisture resistance. In addition, chipboard is significantly inferior in strength to laminated and solid wood.
- Natural wood is an absolutely harmless, environmentally friendly material, although not the cheapest. Wood is best suited for making a chair with your own hands. Before starting work, the bars and boards must be inspected for cracks, knots and other defects. Next, the material is sanded, a protective coating is applied, and after that, assembly can begin.
Note! Among all types of wood, preference should be given to alder, ash, birch or oak.
The reason is simple - the unusual pattern of the fibers is combined with the durability and wear resistance of products made from them. It should be added that chairs made of such wood, when properly processed, do not crack over time and do not creak.
Wood is popular in furniture production not only because of its beauty and naturalness. It easily tolerates loads and shocks and is practically resistant to plastic deformation. The only disadvantages are flammability and deformation under the influence of moisture. The last problem is again solved by competent final processing.
How the tool works
The operating principle of a simple seeder can be seen in various videos on the Internet. If we describe the procedure step by step, the process looks like this:
- Planting material is placed in a special container.
- When the tool moves, holes are formed for planting, into which the vegetable cloves are placed.
- After this, the planting material is covered with earth.
Attention! A seeder, the basis of which is a motor block, works better on loose soil; in heavy soil the work will not be too easy.
Modern mechanical seeders often have a water reservoir to water the seedlings immediately after planting.
Wood is most often used for hand tools.
Simple chair for the garden
Having decided to make a chair for the dacha with your own hands from wood, having selected the drawings, you should not immediately take on complex projects. The first pancake is often lumpy, and to get the hang of it, you can try to implement the simplest options.
The simplest chair for a summer house consists of curved sides, bases, drawers and slats for the seat. Moreover, the only difficulty lies in cutting out the sidewalls. For production, plywood and wooden planks are used.
The sequence of actions is as follows:
- The sidewalls are cut out with a jigsaw from 30 mm thick euro plywood. Next, the parts are chamfered with an ordinary grinder or a manual milling cutter, after which the future spars are processed with emery cloth;
- the drawers (crossbars holding the sides together) are cut from the same plywood. The result should be 3 parts with dimensions 1200 x 100 mm. Sandpaper comes into play again;
- for a seat that smoothly flows into the back, you need to cut 35 identical strips 1200 mm long. The material will be timber with a section of 50 x 25 mm. The parts are chamfered and the surface is sanded with sandpaper;
- Next, you need to tie the sidewalls together with drawstrings. To do this, points are marked on one of them in three places, which are transferred to the second sidewall. Using an 8 mm drill, drill through holes at the designated points. Using a 5 mm drill, counter holes are drilled at the ends of all frames. Confirmats are used to connect elements;
- It's time to attach the bars that will form the seat. To do this, drill 2 holes on each side of all the blocks, and use self-tapping screws for fastening. To recess the fastener heads into the wood, the holes are pre-countersinked;
- All that remains is to treat the surface of the chair. To remove all cracks and dents, the wood is sanded. Next, the surfaces are treated with fine sandpaper, after which the wood is coated with a primer. The final stage is 3 thin layers of varnish.
Such a homemade chair for a summer house does not require much effort or complex measurements and calculations to make. However, the end result will be a truly chic piece of garden furniture. Experienced craftsmen can try making a more complex garden chair from bent plywood.
This is where both experience working with wood and a truly creative approach to the process will come in handy.
Fan manufacturing process
To make a fan impeller, a circle with a diameter of 250 mm is cut out of 10 mm plywood.
It marks the center, then divides it into 8 equal sectors. A circle with a diameter of 140 mm is drawn on the disk using a compass.
The disk is drilled in the center to match the diameter of the shaft of the existing motor. On one side, use a chisel to select a small groove in it for the locking pin on the shaft.
Use a 54 mm core drill to cut out another disc from the plywood. A large circle is placed on the motor shaft close to the locking pin so that it fits into the groove. Then a smaller disk is glued in, and the whole thing is tightened with a nut.
Also, from 10 mm plywood, you need to cut 8 blanks measuring 79x50 mm. A transverse line is drawn on them 20 mm from one edge. Then you need to cut the workpieces diagonally to it to get a pointed end.
The prepared blades are secured to the impeller disk using glue and self-tapping screws according to the sector markings. The part protruding beyond the circle must be cut off.
From fiberboard you need to cut a circle with a diameter of 250 mm with a hole in the center of 140 mm.
This blank is screwed to the impeller blades.
Then 2 sheets of plywood are folded together and temporarily twisted at the corners with self-tapping screws. After this, 2 halves of the snail body are cut out of them at a time. These parts must be larger than the size of the impeller in order for it to fit inside.
In one half of the snail you need to cut a hole with a diameter of 140 mm, like on an impeller. But in the center of the second part only a hole is made for the motor shaft. A 95mm wide strip is then cut from the sheet metal to join the halves together to form the body. First, it is screwed to a part with a small hole. The joint between them is glued with hot glue.
An L-shaped bracket for mounting the engine is assembled from two strips of plywood and jibs. If the latter has a configuration as in the example, then in order to screw it on you will also need to cut out the crosspiece. Then the motor is installed on the bracket.
The bracket with the motor is screwed to the volute half with metal sides. Next, the impeller is installed. Several spacers are placed on it to create gaps, and then the second half of the snail with a 140 mm hole is screwed to the sides.
After this, the spacers are removed. The joint between the sheet metal and the plywood is sealed with duct tape.
A switch is installed on the snail, preferably with a motor rotation speed switch. The motor is connected to it.
At the outlet, an adapter to the ventilation duct is screwed to the volute. It could just be a piece of plywood with a tube inserted, if necessary, then flattened into a snail shape.
The fan is installed closer to the work area where the most dust is generated. It is then connected to the exhaust ventilation duct. Now, when turned on, it will draw in dusty air and push it out into the street.
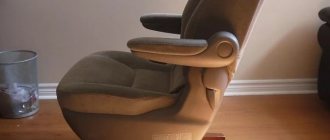
Features of a shell-type chair
When making a shell, you will need skill in using a jigsaw, the ability to transfer the dimensions of parts from drawings to the material, and experience in deforming plywood in order to bend it in the correct shapes and directions.
Note! When cutting out parts, it is important to achieve smooth movements of the jigsaw, which is quite difficult for an untrained person.
When making a shell chair without experience working with bent plywood, you can use pieces of scrap wood to train your hand for practice. To fasten the parts of such a chair, wood glue is mainly used, and clamps are used for fixation. You can use self-tapping screws as fasteners, but in this case you will have to drown their heads in the wood fibers.
Once the bent plywood shell chair is fully assembled, all bumps and chips are sanded, after which the surface is cleaned of dirt and dust. To give the product an aesthetic appearance, it is coated with several layers of varnish.
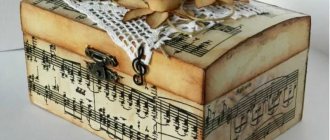
Lead cylinder
A hat for a children's party differs from the presenter's top hat not only in the material from which it is made, but also in the color scheme. For the presenter, a more elegant hat is suitable. Therefore, we suggest covering a cardboard cylinder with shiny material (silk) and decorating it with a bright satin ribbon.
To make such an elegant headdress, you will need the following:
- cardboard,
- glue,
- scissors,
- black satin,
- red satin ribbon;
- thread and needle (sewing machine).
Progress
- According to the diagram, make blanks from cardboard and similar ones from satin. The size of the workpieces must correspond to the volume of the head.
- Glue the cardboard parts of the upper bottom and the pipe.
- Sew a “bag” from fabric. Pull it over the top bottom and crown.
- Cover the bottom circle with material and connect all the parts of the cylinder.
- Sew a blind stitch inside.
- Decorate the top of the cylinder with red satin and sew the edges of the ribbon.
Now your young presenter will be irresistible in such an elegant headdress!
Application of pallets
To make some chairs, there is no need to look for drawings or practice wood processing. It is enough to take wooden products as a basis, which almost no one pays attention to. One of them is a pallet, or pallet, a rigid wooden container for transporting goods. A chair made from pallets will really look unusual and creative.
Another advantage of using this product is the high quality and strength of the wood from which it is made.
- The pallets are dismantled and all the nails are taken out. The elements of the future chair must be sanded, and then the tray must be assembled in the reverse order.
- The seat of the chair is formed by stacking pallets on top of each other to the desired height (usually 2 pieces are enough). The backrest also serves as a pallet, fixed perpendicular to the seat. By sawing the pallet crosswise into 2 parts, you can use it as armrests.
Before assembly, the parts are varnished in several layers. To ensure that the back and seat are not hard and look really chic, foam pillows in some unusual covers are placed on them.
Wizard (fakir) hat
To make a top hat for a children's party, you will need the following:
- a sheet of black cardboard (you can pre-paint white paper with black gouache);
- a strip of white paper;
- paper plate (large);
- paints (preferably acrylic or gouache);
- brush;
- paper clips – 2 pieces;
- scissors with sharp ends;
- glue (adhesive tape);
Description of work
- Take a paper plate, carefully use the sharp end of the scissors to make a hole in the middle and cut out the middle in a circle (as shown in the photo). For convenience and a straight cut line, focus on the inner strip on the bottom of the plate.
- Place the cut piece on the covered surface and cover it with black paint. Paint on top first, and after the paint has dried a little, turn it over and paint on the inside. If after drying there are still light spots, then cover the part with another layer of paint.
- Set the painted piece aside until completely dry. Next, you can begin making the high part of the cylinder. To do this, take a wide strip of black construction paper and roll it into a tube. The diameter of the tube must match the hole cut in the plate. The width of the strip corresponds to the height of the hat: the wider the strip, the higher the hat will be.
- Secure the folded strip with paper clips. You will get a hollow tube.
- Place one edge of the tube on a sheet of black paper and trace along the outline. Cut out a circle and glue it to one edge of the tube.
- Using tape, secure the free edge of the tube to the cut out plate.
- Place a strip of black paper where the edges of the tube meet. For greater safety of the cylinder, glue the joints of the parts with tape.
- Wrap a strip of white paper around the bottom of the hat in a circle, and glue a cut-out paper imitation buckle.
The result is an original top hat for a wizard's costume!
Decor options
It should be said that even for such chairs, appearance is an extremely important aspect. At the same time, it is not necessary to buy any accessories for this at an exorbitant price. To do this, you can use some old unnecessary things. For example, the same pillows and bedspreads to make the chair not only beautiful, but also soft. For example, you can cover the seat and back with padding polyester, and simply stretch decorative fabric over this material.
It is better to fasten such upholstery using the simplest furniture stapler.
Cardboard cylinder hat
For matinees, very often in kindergartens and primary schools the parents themselves are asked to prepare a costume for their child. Ready-made costumes can be bought in children's clothing stores or ordered from online stores, but the baby will be much more pleased if mommy makes an outfit for the holiday with her own hands. And those present will appreciate the parental efforts and care.
An integral element of any costume is a headdress. In the outfits of a wizard, traveler or astrologer, you will certainly need an extravagant version of the hat - a top hat. And recently, top hats have even entered women's fashion. Women often use this accessory in addition to their outfit, not only as a headdress, but also as decoration (hairpin, brooch, mini-cylinder with a veil).
In the article we offer a step-by-step description of how to make a cylinder out of cardboard for various occasions (costume element, decoration).
Recommendations
- Here are some useful tips that will make it even easier to make a chair from wood with your own hands. To begin with, let's say that before creating any structure made of wood, you should carefully think about how it will roughly look and what you want to see it as. This will allow you to at least approximately determine how much of a particular material you need.
- Another important aspect is that you should not neglect such a thing as drawings. For some reason, many people do not pay enough attention to them, which is why they end up with crooked chairs and armchairs. In this matter, everything should be thought through to the smallest detail and the parameters of each detail should be checked. It would not be superfluous to say that it would be better to use a circular saw for cutting longitudinal parts, and a jigsaw for transverse parts.
- Another important issue concerns the connection of the chair elements. Everything is quite simple here. In connections where the main load occurs, it is better to use self-tapping screws or self-tapping screws. But in other cases, you can use adhesive or chopsticks made of wood. Choppers can also be used to secure the upper parts.
- An important point will be the selection of materials for processing. But here everything will depend on how high-quality the wood is used. If it is “clean” and has no defects, then it will be enough to treat it with stain and apply varnish. But if there are stains on it and there are some defects, then you should putty them, then cover them with a primer and only then paint. Another important point is that you should not paint the wood right away. It must be pre-treated with drying oil. Otherwise, it will quickly be absorbed into the surface. Then there will be bald spots, which will ruin the appearance of the chair.
Making a magician's hat
Are you planning to make a magician's carnival costume? Then this step-by-step instruction will help you make its main attribute – the cylinder.
Once you learn how to make a cylinder out of paper, you can easily create a carnival hat. To make it you will need:
- Black cardboard;
- Scissors;
- Pencil;
- Scotch;
- Glue;
- Black fleece stripe;
- Varnish and brush;
The first step is to take measurements. Measure your head circumference using a measuring tape. Consider how tall your hat will be and what size its brim will be. When making a paper cylinder, make the bottom and crown of the hat, and glue the parts together. To make the brim of a hat, you need to attach the resulting cylinder without a bottom to the cardboard and circle it. The next circle needs to be drawn from the same middle, its size relative to the first circle will be the size of the brim of your hat. To make it clearer, take a look at the picture:
Next you need to make the second part of the brim, which will be attached to the crown of the hat. Its size is the same as the first part, but do not rush to cut it. Inside this part you need to draw a circle, the diameter of which will be 1 cm less than the diameter of the base of the cylinder. Cut out the piece and fringe the inner circle.
Glue the two pieces of the fields together.
All that remains is to grease the teeth with glue and attach the brim to the hat. Inside the crown, glue a strip of fleece equal to the circumference of the head. It is needed so that the hat fits tightly on the head. Cover the finished hat with varnish and decorate with ribbon. You can go to the carnival!
DIY rocking chair
During the manufacturing process the following will be required:
- plywood sheets;
- cardboard;
- putty;
- dye;
- pencil;
- ruler;
- tape measure;
- sandpaper
- jigsaw;
- fasteners;
- drill.
Step-by-step instruction
Step one: prepare the details. The entire structure of the chair consists of two side parts, three horizontal connecting strips and 35 crossbars (needed to create the seat).
In this design, the most labor-intensive stage is the creation of the sidewalls, so it is recommended to mark them on cardboard, then cut them out, and only then transfer them to the wood.
Step two: to make the side parts you need to take multi-layer plywood 3 centimeters thick. Then you should transfer the part from the cardboard to a plywood sheet and carefully cut it out with an electric jigsaw.
Step three: after which the side parts must be thoroughly sanded with sandpaper and their edges trimmed using a grinder or milling equipment.
Step four: from plywood of the same thickness you will need to make horizontal connecting strips 120 centimeters long and 10 centimeters wide. After which they need to be sanded with sandpaper, but you should not process the edges with a router.
Step five: you need to take a block of wood 5×2.5 centimeters and cut it into 35 pieces, 120 centimeters each. After which they should be sanded and the edges removed.
Step six: in the middle part of the outer arc of the sidewalls, at the back and near the legs, we mark the places where the horizontal strips are fixed. After which these marks should be duplicated on the other side. Then you can make holes for the fasteners.
Step seven: we make through holes on the end parts of the sidewalls, and then we connect the frame with horizontal strips using screws.
Step eight: next you need to take the bars that we prepared earlier and attach them one by one to the seat with self-tapping screws.
Step Nine: The last step will be thorough surface treatment. To do this, you must first fill all the holes and go over the wood with sandpaper. Then the surface is coated with a primer and several layers of varnish.
Fan manufacturing process
To make a fan impeller, a circle with a diameter of 250 mm is cut out of 10 mm plywood.
It marks the center, then divides it into 8 equal sectors. A circle with a diameter of 140 mm is drawn on the disk using a compass.
The disk is drilled in the center to match the diameter of the shaft of the existing motor. On one side, use a chisel to select a small groove in it for the locking pin on the shaft.
Use a 54 mm core drill to cut out another disc from the plywood. A large circle is placed on the motor shaft close to the locking pin so that it fits into the groove. Then a smaller disk is glued in, and the whole thing is tightened with a nut.
Also, from 10 mm plywood, you need to cut 8 blanks measuring 79x50 mm. A transverse line is drawn on them 20 mm from one edge. Then you need to cut the workpieces diagonally to it to get a pointed end.
The prepared blades are secured to the impeller disk using glue and self-tapping screws according to the sector markings. The part protruding beyond the circle must be cut off.
From fiberboard you need to cut a circle with a diameter of 250 mm with a hole in the center of 140 mm.
This blank is screwed to the impeller blades.
Then 2 sheets of plywood are folded together and temporarily twisted at the corners with self-tapping screws. After this, 2 halves of the snail body are cut out of them at a time. These parts must be larger than the size of the impeller in order for it to fit inside.
In one half of the snail you need to cut a hole with a diameter of 140 mm, like on an impeller. But in the center of the second part only a hole is made for the motor shaft. A 95mm wide strip is then cut from the sheet metal to join the halves together to form the body. First, it is screwed to a part with a small hole. The joint between them is glued with hot glue.
An L-shaped bracket for mounting the engine is assembled from two strips of plywood and jibs. If the latter has a configuration as in the example, then in order to screw it on you will also need to cut out the crosspiece. Then the motor is installed on the bracket.
The bracket with the motor is screwed to the volute half with metal sides. Next, the impeller is installed. Several spacers are placed on it to create gaps, and then the second half of the snail with a 140 mm hole is screwed to the sides.
After this, the spacers are removed. The joint between the sheet metal and the plywood is sealed with duct tape.
A switch is installed on the snail, preferably with a motor rotation speed switch. The motor is connected to it.
At the outlet, an adapter to the ventilation duct is screwed to the volute. It could just be a piece of plywood with a tube inserted, if necessary, then flattened into a snail shape.
The fan is installed closer to the work area where the most dust is generated. It is then connected to the exhaust ventilation duct. Now, when turned on, it will draw in dusty air and push it out into the street.
Solid wood chair
Making any furniture from solid wood at home will require a lot of time and effort from the craftsman, as well as the availability of special tools and equipment. In fact, the array can be used by beginners in their work, but the same chairs without the use of finishing techniques will look, to put it mildly, boring.
But if you decorate the products with various cuts and use wood carving skills, you can achieve a good look.
To fasten parts made from solid wood, one of two main methods is used.
- Bonding - gluing elements together with edges pre-processed on a jointer. This option is the simplest. To connect two parts, you need to form a ridge on one of them, and a groove on the other. As an option, two grooves are made into which the strip is inserted.
- The second method is docking. Wood glue and wooden dowels are used.
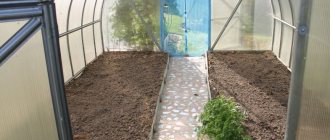
Planting garlic using tools
Of course, it is possible to plant garlic manually in the fall before winter. However, if a summer resident does not have a couple of beds, but much more, then it is better to pay attention to a device for planting garlic, which will make the process simpler and faster.
There are different tools for planting, but the purposes of their use are all the same:
- Maintaining the required depth when planting.
- There is no need to ensure that the landing is level.
- The speed of the process increases.
- Keep the same distance between the garlic cloves.
Tools for sowing garlic are easy to make yourself
The use of such tools makes the work of the summer resident easier, and as a result, planting does not take much time.
Folding design
Together with classic folding chairs, you can independently make a Kentucky-type folding chair that is simpler in design, but with an unusual appearance. It will require bars of the same cross-section, which must be cut in accordance with the selected drawing. 4 long pins are used as fasteners, connecting all the bars together in different places. The rigidity of the structure is adjusted by tightening the nuts on these studs.
In fact, the different Kentucky models are as similar as possible to each other, and most importantly, when assembled they take up minimal space.
Making furniture on your own is a real creative process. With the right amount of imagination, you can turn even old, unwanted chairs into works of art.
This exciting process also saves a lot of money. There is nothing better than combining business with pleasure.
Popular types of wood painting and their features
There are many decorative options that are used to decorate wooden parts, interior items and other interesting things. But there are the most popular painting options that have been known since ancient times and do not lose their popularity at the present time.
The main feature is the repetition of the pattern PHOTO: domsireni.ru
Gzhel and Gorodets painting
This type of painted decor appeared in the Nizhny Novgorod region and initially managed to earn the attention of artists. This painting was first presented to the public in the 19th century. It is known that this artistic motif is distinguished by the complexity of the design. At the same time, artists apply it without a preliminary sketch.
The main shades that create the background are bright tones of red and orange. Tempera paints can also be applied to a white or cream background. As an addition, shades of green, burgundy, and blue are used. In some drawings, they try to use black tones, especially if artistic objects occupy the main space in the drawing.
Mezen painting is significantly different from the rest PHOTO: domsireni.ru
Mezinskaya and Petrikovskaya paintings
This design option is suitable for painting household wooden fixtures, as well as dishes. This decorative decoration is often found on kitchen sets. The main tones that are used for coloring are black and red. Fractional patterns and repeating miniature patterns are welcome.
The main feature is that painting is done exclusively on clean, previously unprimed wood. People have long tried to paint round objects in a similar way: boxes, barrels, hand mills. This tradition has survived to this day.
The art of painting has reached our time. PHOTO: perunica.ru
They tried to use Zhostovo art exclusively for trays PHOTO: perunica.ru
Zhostovo painting and Khokhloma
Khokhloma is considered a unique work of art. It uses two contrasting shades: black and red. Golden or silver are used as additional ones. The drawings depict various birds and animals, but most often they depict three-dimensional floristry.
Zhostovo painting is performed on a black, blue or light blue background. It assumes exclusively floral motifs. The paints used for the image are bright and unlike real ones. Frames, monograms and other beautiful ornaments can be used as decoration in such paintings.
Do not confuse painting and decoupage. These are different types of decorative art PHOTO: s-nezhnostyu.ru
Materials for making a wooden chair
To make a wooden chair with your own hands, you need to select high-quality raw materials.
Main requirements for wood composition:
- the humidity level should be no more than 9-12%;
- cracks, deformations, branches, fungus on the surface are unacceptable;
- strength, dense structure, ease of processing are important;
- The amount of resin should be small.
It is recommended to buy raw materials with a small reserve, because During the furniture manufacturing process, chips and waste are possible when defects are detected.
- To create a solid wood structure, the grade is important. When creating chairs for the street (gazebo, recreation area), varieties with a dense structure are recommended. An array of elm, pine, oak, walnut, ash, larch, and rowan is suitable.
- For furniture intended for heavy loads, linden and alder wood is needed. Furniture made of yew looks impressive due to its red hue and texture with an original pattern. The dense structure of the array is difficult to process, but is more durable and resistant to mechanical damage.
- Country furniture is made from willow, alder, and rattan. To use the chair in warm climates, grape vines are used, complemented by rattan. Beginning craftsmen are recommended to use bird cherry, because... The material is plastic, easy to bend, durable.
- When preparing furniture for rooms with high humidity or installation near a pond, it is recommended to choose wood with a fine-pored structure. Oak, larch, and solid pine are optimal.
- Spruce chairs are lightweight, easy to process, but have low resistance to mechanical damage and are not resistant to chips and deformations.
Why does wood become more plastic under different influences?
It's no secret that wood is an elastic, tough, compression-resistant material. This is due to the presence in wood of a natural polymer - lignin (similar to glue), which gives the wood strength and permanent shape. Lignin binds cellulose fibers together. Lignin is located in the cell walls and intercellular space of wood.
In different wood species, lignin content varies from 20 to 40 percent.
Under the influence of temperature, water, chemicals, “natural glue” softens. And after giving the wooden workpiece the required shape, the lignin cools and returns the wood to its former elasticity and strength, without changing the shape that the master gave it.
Optimal wood temperature for bending
In order for lignin to reach the desired state and the wood to become more plastic, it is necessary to heat lumber from solid wood to 95-105 degrees Celsius. The wood must be completely heated to the required temperature, not just the surface layer.
Based on this, it follows that the thicker the part, the longer it needs to be heated. Parts of any type of wood of the same size heat up at the same time.
Please note that the workpiece should not be overheated. Because “natural glue”, once it hardens, will become brittle and ruin your product
Important! fresh wood (natural moisture) bends better than dry wood
Processing methods for bending wood
Boiling wood in water
The method of boiling wood in water is suitable if you need to process part of the workpiece (shooting bows, etc.). In other cases, boiling is rarely used, since the wooden element is moistened excessively and unevenly. Cells and fibers of wood that are oversaturated with water can tear when bent. At best, lint will form. It takes a long time to dry and stabilize the shape.
Recommendations for choosing wood
The choice of lumber is a matter of taste, provided that the product has a protective coating. Otherwise, the wood for garden furniture must be resistant to the external environment. In this case, both broad-leaved (chestnut, acacia, oak) and coniferous (false beetle, pine) are optimal.
To make a chair, you can use wooden pallets and pallet elements.
It is better to choose wood based on the available tools. Working with hard rocks without a finger knife, band saw and grinder will be much more difficult - cutting and processing of parts will be delayed and will not be of high quality. Don't forget that garden furniture has to be moved frequently, so the weight of the material is also an important factor when choosing wood.
Why bend wood?
Wood bending is one of the oldest methods, used since ancient times to make canoes, bows, sleighs, barrels and so on. How to make bent wood parts?
At a time when wood was mainly used for the construction of mobile structures such as wheels for carts and carriages, bending the material was a defining process.
We can say that bending wood is a very simple process, provided you have the necessary knowledge and skills
Wooden products such as wooden toys, spoons, picture frames, etc. can also be made using various wood bending techniques.
Decorating wooden furniture
An equally important stage in furniture manufacturing is decor. At the same time, it is not necessary to purchase expensive accessories for such purposes, because you can even use old, unnecessary things, pillows.
You can cover the back and seat with padding polyester, and stretch decorative fabric on top. Fasten the upholstery to a wooden structure using a furniture stapler. In addition, the back is sometimes decorated with buttons, which are covered with the same fabric. You can hide the marks from the staples with decorative edging or various laces.
At this stage you will have to show your imagination. You can decorate the surface using paint of different colors - this will allow you to get a unique product that suits your interior specifically.
Cardboard cylinder clip
Not only boys love to show off in elegant hats. Young fashionistas are not one step behind them, and most often even ahead. In stores you can often see all kinds of hairpins, elastic bands and headbands using hats. We bring to your attention a master class on making such fashion accessories.
The following materials and tools will be useful in the work:
- cardboard tubes from toilet paper or paper towels, tape;
- cardboard;
- scissors;
- satin fabric;
- lace;
- rubber band for money;
- glue gun;
- decorative elements: beads, rhinestones, colored decorative feathers, etc.;
- headband, hairpin or elastic band (depending on the purpose).
Let's get started
- Take a ready-made cardboard cylinder (sleeve) or roll it out of cardboard. Using a stationery knife, cut a piece 4-6 cm wide from the edge.
- Using a glass (mug), draw a circle on cardboard and cut along the contour. The diameter of the circle should be several centimeters larger than the diameter of the cut cylinder.
- Glue the cut part of the sleeve in the middle of the circle.
- Cover the top with fabric.
- At the junction of the sleeve and the brim of the future hat, pull an elastic band for money.
- Then continue to cover the edges of the hat with fabric. Fold the fabric down and glue it on the back side.
- Decorate the workpiece to your liking. You can glue rhinestones and beads, colored wooden buttons, insert feathers and small artificial flowers.
- Using a glue gun, secure the hat to the headband or glue a hairpin or elastic band to the bottom. For very little fashionistas, you can insert a thin rubber thread from two opposite edges of the hat brim.
No young fashionista will refuse such an original gift!
Frequently asked questions from beginning furniture makers
Before you start making this or that design, you should familiarize yourself with the list of questions that beginners in this business often have.
How to cut parts?
When cutting longitudinal parts, it is better to use a circular saw, and for transverse parts, an electric jigsaw.
How to connect parts of the structure?
For connections that carry the main load, you will need to use euroscrews or self-tapping screws. In other cases, the parts are assembled using wooden choppers and glue.
Paint or varnish?
The choice of materials for processing depends on the quality of the wood itself. If the material does not have any defects, it can be treated with stain and then a layer of varnish can be applied. If stains appear on the surface, the wood must first be puttied, coated with a primer, and only then painted.
How to reduce the consumption of paints and varnishes?
Quite often, during final finishing, the paint is quickly absorbed into the surface, which is why bald spots remain on it. This happens because natural wood has a porous structure. That is why professionals recommend pre-treating it with drying oil.
The story of one hat
Well, we've sorted out the geometric figure, now let's talk about fashion. At the end of the 18th and beginning of the 19th centuries, European hat makers invented an unusual hat - a top hat.
It was a tall (up to 30 cm) hat with a flat top and brim. Due to the high cost of the material from which these hats were made, wearing a top hat was considered a privilege for the upper classes. Initially, beaver felt was used to make hats, which brought the poor animals to the brink of extinction. A little later, chic silk top hats came into fashion.
Commoners also wore hats similar to a top hat, but they were made of felt and felt. When processing these materials, mercury salts were used, which are very harmful to health. Lewis Carroll's story about the mad hatter takes its roots from here - mercury vapor caused dementia in hatters. Perhaps the most famous person to wear such a hat on his head was Abraham Lincoln. And he used the top hat not only as an item of his wardrobe. It also served as a repository for secret correspondence. This headdress was also appreciated by magicians. The large size of the crown made it possible to make a double bottom and easily remove the rabbit from such a hat. Now the cylinder serves a decorative function; it can often be found at stylistic parties and weddings, and at magic shows.
Description of the design of the Bazooka grenade launcher
The Bazooka hand grenade launcher consisted of a smooth-walled pipe 1370 mm long, 60 mm caliber, a safety box, an electric ignition device, a shoulder rest, two pistol grips and sighting devices. The weight of the weapon was 8 kg.
At the rear end of the pipe there was a ring that made loading the grenade launcher easier, as well as a latch that prevented the ammunition from falling out and closed the electrical circuit. A shield was placed at the front end of the pipe, protecting the shooter from the flow of hot grenade exhaust gases.
Advantages of using bent plywood
Deflection of plywood makes it possible to add softness to its configurations. For this reason, it can be used for finishing arches, furniture, as well as forming products with curved configurations.
The products are not only visually attractive, but also resistant to mechanical defects.
The use of curved plywood makes it possible to:
- Reduce the number of fasteners used;
- Reduce the number of angles, which reduces the risk of injury;
- Gives the interior a unique, elegant, as well as modern design.
Plywood sheets are considered the best material for forming furniture, as well as construction work. Their use in a curved version reveals excellent design capabilities.
Converting a square block into a round one
We install a homemade device on the edge of the table. We fix it with a clamp (or you can secure it with bolts).
It is necessary to drill holes in the fixed and movable stops, and then screw self-tapping screws into them so that the tips of the screws peek out a little.
After this, we attach one end of the wooden block to a self-tapping screw protruding from the fixed stop. We press the workpiece with the second stop. At the same time, it should rotate around its axis.
Using a large wood plane, first cut off the sharp edges. Then we remove the main part of the block, turning it. You need to focus on the markings made on the ends of the workpiece.
We remove the finishing layer with a smaller plane.
Well, at the last stage all that remains is to go over the surface of the round timber with sandpaper.
You can watch in detail how to round a wooden block without a lathe in the video below - all stages of the work are shown there.
Source