The boxes were originally intended for storing jewelry and expensive things, so they were found mainly in the homes of wealthy gentlemen.
The variety of shapes, sizes and materials used to make the boxes was amazing. They were made of gold and silver, encrusted with diamonds and other precious stones. There were also simpler wooden boxes. Centuries have passed, but the fashion for these original and elegant products has survived to this day.
It is noteworthy that making a wooden box with your own hands is not as difficult as it seems at first glance. The main thing is to apply a little skill and use your own imagination.
Peculiarities
Wood has always been a high-quality, sought-after material, from which not only reliable buildings or pieces of furniture were made, but also various accessories. The latter include charming boxes. These products can be safely called universal, since they can be used to solve many different problems. A beautiful wooden box can be a wonderful gift for a birthday, New Year or any other holiday.
You can store rings, earrings, chains and other ladies' jewelry in it. There are many areas of application for these products.
Today in souvenir shops you can find a lot of different models of wooden boxes. Consumers can find an excellent model that will become a spectacular interior decoration. However, many people do not want to spend extra money on purchasing such an accessory, because it is quite possible to make it yourself at home.
A homemade wooden box can be absolutely anything. The shape and size of the object will directly depend on the ideas of its creator. At home, it seems possible to make not only a simple, but also a chic carved model.
The process of making plaster itself is creative - here the master can let his imagination run wild. The main thing is to show a little patience and stock up on all the necessary materials/tools.
Blocks
There are many different types of blocks. The most common foam blocks and gas blocks. Gas blocks and foam blocks have gained great popularity in the construction of private houses in a short time. They have a number of advantages, good heat resistance, sound insulation, lightweight in size compared to other materials, due to this, lower costs for the foundation. Disadvantages: quite fragile, they need to be lined as they quickly absorb moisture due to their porous structure. The cost of a house made of foam blocks will be 11,000 - 20,000 rubles. m2.
Choice of shape and size
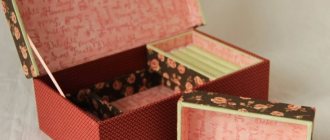
A wooden box does not have to be as simple as possible, having a standard square or rectangular shape. The product can be made more original and interesting. Everything here will depend on the wishes and project of the master who makes the accessory. Thus, models designed for various accessories and jewelry can have medium or small sizes. They often have soft inner lining.
For the latter, materials such as velvet or suede are ideal. Such additions protect expensive metals from accidental damage and scratches on the wooden surface of the box. Typically, these designs have wider compartments designed to store necklaces, beads and special rollers for fixing bracelets.
Wooden boxes designed for storing all sorts of household little things - keys, small documents and other similar trinkets can have similar sizes. Larger boxes should be made with drawers. They make a kind of mini-chests of drawers.
The size of the box being made directly depends on what exactly it is being made for. If you plan to store a lot of medium or large items in it, then its dimensions should be appropriate. If the box is made to contain all sorts of little things, then it can be made compact and neat.
The shape of a wooden box can be absolutely any. Here home craftsmen are not limited in anything. Of course, most users make classic models with a rectangular or square structure, but a more interesting option can be made.
Wooden boxes with the following shapes look vibrant and bright:
- chic options in the shape of a heart;
- elongated oval or round options (look especially interesting if complemented with carvings);
- curved options (in the shape of the letter “C”);
- in the form of an original wooden gramophone (this way you can make a music box);
- in the form of a luxurious royal casket;
- in the form of a complex mechanism with many small parts (difficult to implement options).
Today, unusual boxes with non-trivial shapes are especially popular. The accessory can be made in the form of a baby grand piano/upright piano, a safe, a book, or a treasure chest. The design of the product can be completely unexpected.
Often, at first glance, nothing in these items gives away the box - they seem to be just an interesting souvenir, but in fact the souvenir turns out to have a secret, and there is a place in it to store all sorts of things.
History of the boxes
Boxes began to be made in ancient times.
One of the first countries was Egypt. Egyptian women were very proud of these caskets, as they had an exquisite appearance. In Japan and China, these items were made from valuable and rare wood. They were decorated with carvings and hand painting.
Caskets were used to store valuables and jewelry. Clothes and large items were placed in bulky chests. It is believed that it was on the basis of the latest designs that smaller analogues were made.
In addition, caskets were widely used in various myths. So, Cleopatra kept in them not only jewelry and decorations, but also a dagger and poison. But the most famous item is Pandora's Box.
Required materials and tools
If you decide to make a beautiful wooden box with your own hands, you need to stock up on all the necessary tools and materials. In order for the casket to turn out to be of really high quality and beautiful, you should not skimp on the specified details.
Let's consider what you will need to buy to make a beautiful accessory yourself:
- you will need sheets of plywood or wood - it is recommended to select boards with a preferred thickness of 1-1.5 cm;
- cardboard;
- special adhesive composition for wood;
- loops for installing the lid of the box;
- accessories;
- selected scenery.
Depending on what particular model of box you plan to make, you can use materials such as plastic, cardboard, bamboo, steel and even marble. It is important to have not only suitable materials, but also good tools, with which the process of making an accessory will be quick, easy and hassle-free.
You will need the following tools:
- pencil and ruler;
- hand saw or special electric jigsaw;
- set of files;
- wood saw (will be needed for cutting material);
- a screwdriver, if some parts will be fastened together with screws;
- hammer;
- wood file;
- a manual router may be useful;
- sandpaper for sanding workpieces;
- paint, rollers and other equipment that will be needed to complete the final finishing of the product.
Having all the necessary components, you should not immediately rush to make the box. First, you should draw up a detailed diagram, a sketch of the future product.
It is advisable to indicate in the drawing all the dimensional parameters of the casket. Having such a plan, making the accessory will be faster and more understandable.
general information
A box is a type of container or an interior item, which is a product that has a cubic or parallelepiped shape. It can be made of various materials, including plastic, cardboard, metal, but is mainly made according to tradition from wood or its derivatives. Depending on the design, the box can have solid walls and bottom or slatted surfaces, and it can also have a lid and be either simple or decorative.
On a note! The category of drawers also includes drawers that complement furniture and make it more functional and convenient to use. Such boxes usually do not have a top lid, but their bottom is equipped with special wheels that ride on small rails fixed inside the cabinet or cabinet in the place where the box itself should be located. This makes it easier to use.
Wooden box
The history of the box itself is unknown. From time immemorial, people have used various containers for storing all kinds of household items, transporting and packaging goods, etc. Historians believe that, most likely, the first boxes appeared during the period when trade relations began to develop and were invented precisely with the aim of simplifying the transportation of goods and products , maintaining it in proper quality until it reaches the point of sale.
Wooden vegetable boxes
Nowadays, a wooden box is still used for transporting and storing goods, but at the same time it is also used in everyday life, and even in gardening. It is actively used for harvesting and growing seedlings. By the way, at one time standards even appeared for boxes for potatoes, storage of apples, etc.
At the same time, the boxes settled firmly in the house. They can be used not only as furniture elements, but also as individual products. For example, there are drawers for storing tools, small parts, sewing accessories, etc.
DIY wooden box
Serious competitors to a regular wooden box are products and containers made of veneer, plastic, and cardboard. But none of them can fully replace simple, but reliable and high-quality boxes, and therefore they continue to be actively produced and made with their own hands.
How to make a classic box
Even a teenager with minimal skills in handling woodworking tools can cope with this task. Such a box is made from multi-layer plywood, and the selected sheet should not have visible damage: knots, cracks.
At the initial stage you will need a pencil and a ruler. In order not to complicate the task, it is better to choose the correct geometry of shapes for the walls, lid and bottom, for example, a square or rectangle. On a sheet of plywood, draw the outlines of four walls: 2 side walls are shorter and 2 front walls are longer.
Note! The sides of the bottom are calculated in such a way that after gluing the sides, it is recessed inside the walls.
Then all the drawn elements are carefully cut out with a jigsaw, the irregularities are processed with sandpaper. To ensure that the end and side walls are beautifully connected to each other, small grooves can be made at the edges of the ends, corresponding to the thickness of the plywood sheet. This tip will help give the case a monolithic look and overall make the structure stronger. The walls are glued together, then the bottom of the box is placed. If the lower part enters with difficulty, the edges are processed with a file. The bottom should fit tightly.
- After this, they begin to make the lid. To make the design more original, it is better to choose not a flat, but a deep lid. For this, the scheme described above is used. A large blank is cut out, which will directly serve as the lid, end and side walls. In essence, it turns out to be a smaller copy of the casket body. All parts are sanded and glued together. The lid is attached to the body using small hinges. After assembly, the finished product is varnished or painted in any color you like.
- In a similar way, you can make a box from solid wood. A wooden board is used for this. It must be sanded and cut into pieces of the required size. It is more difficult to cut wood with a jigsaw; it is better to use a circular saw. Curly edges can be made with a router.
If you need a drawer
In general, a wooden box with a drawer is made in the same way as the classic version, but there are a number of features.
- A simple rectangular shape of the lid and bottom will spoil the appearance of the product. It is better to make the long sides of these elements wavy using an electric router. In addition, by choosing this option, the lid and bottom are not placed inside the body, but left outside.
- The walls are made of different heights. In particular, the back part and ends are made of the same height and glued together. For the front wall, cut out a die half as wide as the back part. This element is not recessed between the ends, but is installed overlapping and fixed with glue.
- The box consists of two parts: the box, which fits freely between the walls, and the front part, which is similar in size to the top die. The elements are also mounted on wood glue.
A partition is installed between the upper and lower parts, which will serve as the bottom of the upper compartment of the box. Inside the retractable and stationary drawers, you can make partitions from thin plywood, delimiting the internal space into several compartments. The lid is installed on decorative hinges, the wood is covered with several layers of furniture varnish.
How to decorate with carvings
Carved boxes look much more original and interesting, but such work requires certain skills and knowledge. For beginners who decide to try their hand at wood carving, experienced craftsmen recommend starting with simple geometric shapes and large patterns. With a certain amount of patience, even a novice master will be able to cope with such a task.
The drawing is applied to the surface with a pencil, each line is well drawn. After this, the pattern is carefully cut out with an oblique knife or chisel in strict accordance with the applied markings. Small flaws and irregularities can be corrected with a file or fine sandpaper.
Wooden box decor ideas
The textured surface of the wood suggests different types of additional decor.
The surface can be treated with stain and coated with colorless varnish. It is allowed to paint the surface in different colors and artistic painting of the product.
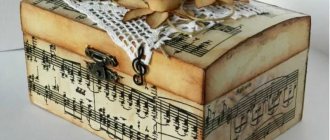
An original wooden box can be covered with fabric or the decoupage technique can be used.
You can complement the design with wood carvings and inlaying the surface with various elements.
How to put a lock
An interesting solution is a mortise lock, which will be opened with a small key, but such work is difficult to do even for an experienced specialist. Therefore, it is better to limit yourself to a padlock or a decorative hook.
To install a padlock, loops are placed in the central part of the side wall and lid, which are screwed with small screws. The location of the hinges must be calculated in advance: even a slight displacement will break the symmetry, and the box will lose its attractiveness.
Wooden boxes
To work on the box you will need some starting material. Therefore, they are often made from wood residues or its derivatives.
We recommend reading:
- DIY hairpins: step-by-step guide + instructions. 100 photos of finished hair jewelry. Master class for beginners
DIY brooch - the best step-by-step instructions with description. Photos of finished products, as well as a master class for beginners
- How to weave rubber band bracelets with your own hands - a review of the best weaving patterns. TOP 100 photos of different methods and beautiful weaving patterns
Original double-walled box
Making such a box is much more difficult, but we will help you figure it out.
Step 1. On the pre-processed workpiece, you need to draw cut lines with a pencil. And here one important point should be taken into account: when transferring the sketch, it is imperative that the longitudinal orientation of the fibers be observed!
Step 2. An even longitudinal part is cut from the workpiece (its thickness should be 1.5-2 cm). This part will serve as the cover of the product in the future.
Step 3. Next, change the inclination of the saw table. It is necessary to change the angle literally by a few degrees.
Step 4. After this, the part is cut into 2 parts and the internal waste part is cut out. Thus, a conical cavity of the product is formed.
Step 5. The halves are glued back together. Thanks to this, by the way, internal stress is also relieved and cracking and deformation of the product are prevented. The glue should be applied in a thin layer, and all excess inside should be carefully removed.
Step 6. The glued parts are placed under the clamps. In this case, you need to carefully ensure that there are no distortions or displacements.
Step 7. The table returns to the horizontal position, a couple of slices are cut from the waste part. This will be the bottom and cover of the future product.
Step 8. The interior of the box is painted. It is more convenient to carry out painting at this stage, while there is free access from both sides.
Step 9. The table returns to the inclined position, after which cuts are made along the outer contour.
Step 10. A thin layer of glue is applied to the ends of the bottom, then it is inserted into the lower part of the product (you need to press it with your fingers until it stops).
Step 11. The lid elements are glued to the workpiece, cut off at the initial stages of work.
Step 12. When the glue has dried, the main outline of the lid is outlined, after which this part is cut out.
Note! The technique described above is universal, because it makes it possible to experiment with shapes and designs, making original and beautiful boxes with your own hands.
Making a plant box
Step 1. First of all, you need to decide on the dimensions of the box being constructed. It is important to choose the place where it will stand. Based on this, you should sketch out a drawing of the box indicating the dimensional parameters and calculate how much material is required.
First you need to decide on the sizes
Step 2. Next, you need to go to the store and purchase everything you need. First of all, you need to buy the required amount of boards.
Buy boards in the required quantity
Step 3. Now you need to apply the appropriate markings to the board - mark the sides and ends of the box on it. It is better to take measurements with a tape measure, but to get even marks it is better to use a square.
Marking
Step 4. Next you need to assemble the box frame and drill holes in its sides. It is better to make several holes on each side.
Assembling the drawer box
Step 5. The boards on the sides of the box need to be connected together using self-tapping screws. You can also use nails, but connections with self-tapping screws are much stronger and of better quality.
Self-tapping screws are used for connection
Step 6. Next, you need to determine the size of the bottom of the box and cut the bottom itself from the board. It needs to be secured by drilling wooden holes and screwing screws along the bottom border of the box around the entire perimeter.
Attaching the drawer bottom
Step 7: It is important to be sure to drill a few drainage holes in the bottom of the plant box. They will ensure the drainage of excess water that will enter the soil during irrigation or rain.
Drainage holes are drilled
Step 8. It is important to sand all surfaces of the drawer so that they are smooth, pleasant to the touch and safe.
Sanding the drawer
Step 9. Finally, the box can be painted, but it is better to coat it with varnish. This will make the box beautiful and additionally protect it from moisture.
Finished product painting
Video - Making a simple box
How to decorate?
For a homemade box, it is important to think about beautiful decor so that it looks more interesting, brighter and richer. There are many ways to decorate this accessory. The most popular solution is to decorate the product with carvings. Carved caskets look very beautiful and solid.
It is not recommended for a novice craftsman to immediately begin applying intricate and complex carved patterns to structures. You should start with simple shapes or large lines. A master with minimal experience can handle such work, but you need to be very careful and patient to avoid mistakes.
To add carvings to a product, you should apply a certain design/pattern to its surface with a pencil. Each line must be drawn as accurately and noticeably as possible. Next, you need to take a special knife or chisel.
These tools carefully cut out lines and patterns in accordance with the applied design. Small imperfections and defects can be removed with a file or sandpaper.
If you don’t want to waste time carving the product, you can turn to a simpler solution - paint the casket or coat it with a special varnish. The color of the accessory can be absolutely any - it all depends on the ideas of the home craftsman. Caskets decorated using the decoupage technique look interesting and stylish.
The final design of the box can be anything:
- products are often complemented with precious/semi-precious stones and beads;
- the design can be effectively painted;
- attach a flower arrangement to the lid;
- create an aging effect using the craquelure technique;
- attach pearls (natural or imitation) to the lid.
What can a box be made from?
A jewelry case can be made from anything, if only you have the desire and imagination. If this is not available, you can borrow ideas for storing jewelry on the Internet; fortunately, there are many master classes on the Internet, for every taste and level of skill.
The box can be made from:
- wood, plywood and even wooden spatulas;
- cardboard and paper in all forms (sheets, ready-made boxes, reels);
- plastic bottles of any size;
- bamboo sticks and napkins;
- egg containers and anything else you can find in the house.
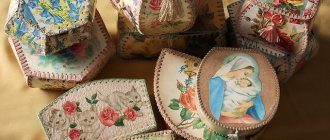
And there are countless ideas for decoration: a jewelry box can be decorated using the decoupage technique, using rhinestones, ribbons, textiles, laces, beads and even eggshells and pasta! In this case, the only limiting factor can be a lack of time or imagination.
A box of any sweets is an almost ready-made jewelry box. It only needs to be slightly strengthened and decorated to your own taste. Even attaching the lid can be neglected if desired!
Useful tips and tricks
If you decide to make a beautiful and high-quality wooden box with your own hands, then you should take on board some useful tips and recommendations.
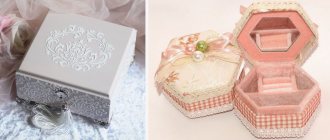
- If you are making a box for storing jewelry, it is advisable to decorate its interior with soft, velvet fabric, and glue a small mirror under the lid. With such components, accessories will not be scratched, and they will be very convenient to try on.
- If desired, you can make a casket “with a secret”, in which, for example, you can store cigars. An interesting solution is a model in which pleasant music plays when you open the lid. Such products are difficult to implement and require special tools. It is better to do such options under the guidance of a more experienced master.
- You can make a box using pieces of wood of different species that have beautiful textured patterns.
- It is necessary to cut out all the details of the future design as accurately and clearly as possible. You should not violate the boundaries of the drawn blanks, otherwise it will be very difficult to assemble the product in the end.
- It is recommended to clean small parts with fine-grained sandpaper. This item will be especially relevant in the process of decorating carved elements on the casket.
- If you are making a chest not for jewelry or small trinkets, but for sewing accessories, then it is advisable to provide several separate compartments in it, and add an easy-to-carry handle to the top part.
- If the box is made of beautiful, dark wood, then its texture can be effectively emphasized by waxing. If the model is made of lighter wood, then it is best to coat it with linseed or other oils (if you have chosen this finishing method). To experiment with colors, you should turn to high-quality, water-based stains with coloring pigments.
Features of making a tool box
Things often get lost. It's better if they have their own place. Then they won't get lost. And all the necessary things will always be at hand.
- The boxes can be made in different ways. They can have different shapes and colors.
- It's easy to do. Almost everyone can do it themselves if they wish.
- It doesn't require a lot of money to make.
- Plywood is easy to process.
- You can put heavy things. After all, it can withstand a heavy load.
- Thickness may vary.
- You can store both small and large things.
- Boxes can be of different sizes.
You can decorate them as you wish. They can be of different colors. Suitable for any interior.
Simple walnut box
A similar sequence of actions underlies the next project - a four-wall wooden box. Thanks to its unusual curved shape, its design looks stylish and modern.
Option number 4. Product with concave lid
Drawing of a box with a concave lid
Casket with concave lid
Making a simple box
Sawing a curved lid
Finishing the lid
Interesting ideas for decorating a product
The structure of the tree is beautiful in itself. You can simply varnish the product, but it will become truly original after creative decoration, for example, using the technique of relief carving. Using different techniques, you can create unique patterns or compositions on the surface:
- using a semicircular chisel you can make small dimples on the wood;
- An angle chisel will help make the grooves.
Advice! A wooden box must be coated with protective compounds. For light wood, any oil, for example, linseed, is best; for dark wood, wax. You can experiment with the color palette using water-based stains with different pigments.
How to make a plywood box with your own hands
Making a box from plywood is quite simple, you just need to be patient and approach the process creatively. Such boxes will be a wonderful gift for your beloved women.
What you need to prepare for work
To make a budget box with five compartments we will need:
- plywood 6 mm thick;
- sawing machine;
- sandpaper;
- milling cutter;
- masking tape, brush and wood glue;
- oil with a blue tint.
Detailed master class on manufacturing
- Our plywood box with dimensions (L×W×H) 14×10×7 cm consists of six parts: a bottom, a lid, 2 long and 2 short sides. Let's get to work.
- From a strip of plywood, cut 2 parts L×W 14×10 cm, 2 parts – 14×7 cm and 2 parts – 10×7 cm.
- Process all edges of the workpieces using a cone cutter at an angle of 45º
- Prepare a level strip in order to align the edges of the box. Lay all the sidewalls along it, alternating long with short. Connect them together with masking tape
- Turn the tape over with the grooves facing out and apply glue to all transverse joints, including the sides. Distribute the composition more evenly with a brush
- Place all the edges in a box and secure the last one with masking tape.
- Apply glue to the edges of the box and the blanks for the bottom and lid, then connect them together. Secure joints tightly with masking tape
- After the glue has completely dried, remove all the masking tape and cut off the cover at a distance of about 2 cm. The disc overhang should be more than 6 mm
- Sand the cut area of the body and cover with sandpaper for 3-5 minutes
- Make several partitions from plywood and glue them inside the box; small blocks can be used as temporary support
- Rub the oil into the body of the box using a soft cloth
- After the composition has completely dried, insert it on the back side of the loop.
Plywood box finishing
- After making the plywood box, we begin to decorate it.
- You can paint it with varnish. The entire box is varnished. This not only adds beauty, but also extends the life of the plywood box.
- The box can also be decorated with special overlays.
- It is also better to cover the outside of the box with color. This will give a beautiful appearance to the box.
- Before decorating the box, all holes must be filled with a special product for wooden products. The putty is applied very easily. Dries within three hours. After puttying, the box can be varnished.
- Afterwards, the plywood box is sanded using sandpaper. You can also putty a plywood box using a sanding machine.
Master class on making a decorative cardboard box
Cardboard is one of the most affordable materials found in every home. To make a decorative box, you can use ready-made boxes or make them yourself.
What you need to make a cardboard box
To make the box we will need:
- corrugated cardboard;
- glue gun;
- scotch;
- PVA glue;
- double sided tape;
- decor
Step-by-step manufacturing instructions
The dimensions of our box are arbitrary depending on what things you plan to use it for. Let's take a closer look at all the manufacturing stages.
- Cut 2 blanks of the same size from cardboard for the bottom and lid, as well as the back wall of the box. Glue it to the bottom and connect it with tape on both sides from the top
- Coat the outside of the frame with PVA glue and glue decorative paper, wrapping it inside
- To avoid thickening in the folded areas, cut off excess paper
- Glue a sheet of paper from the inside of the frame, stepping back about 1 cm from the edge
- Cut two end sides and one longitudinal side from corrugated cardboard and wrap them in decorative paper
- Coat the bottom and side edges of the blanks and glue them to the frame
- Cut a small strip of decorative paper and glue it with double-sided tape to the lid and side of the box
- Decorate the box with decorative beads
Materials for production
To create a small box, you can use waste and trimmings of wood and its derivatives.
In addition, an interesting little thing can be glued together from thick cardboard.
The original decor of various storage containers with a creative approach will allow you to turn them into original designer boxes.
You can also use the remains of various household packaging in your work. For example, a sleeve from adhesive tape.
You can get ideas for creativity on the Internet by looking at photos of beautiful homemade boxes.
How to make an unusual miniature box with your own hands from a reel of tape
If you want to please your loved ones with a small box to store jewelry or small items for handicrafts, you won’t find a better material than a spool of tape. You can make an absolutely stunning product out of it. No one will guess what served as the basis for creativity.
What you need to prepare for work
For our amazing box you will need completely accessible materials:
- a spool of tape 4 cm high;
- corrugated thin cardboard from biscuit;
- thin cardboard for the bottom;
- screw cap from a jar of suitable diameter;
- glue “Moment” and PVA;
- white acrylic paint;
- 2 single-layer decorative napkins;
- decorative paper, you can take it from a candy box;
- colorless varnish.
Master class on making a box from a tape reel
- Coat the edges of the reel with white acrylic paint. Cut cardboard from under the roll 4 cm wide and cover the inside of the reel with it. Press well so that the strips do not fall behind on the sides
- Cut the bottom out of thin cardboard according to the diameter of the reel, and you can also use the cardboard that is inside any screw-on lid
- Glue decorative paper on one side of the bottom with PVA glue
- Glue the bottom to the bobbin with Moment glue with the decorative side inward
- Glue white decorative paper to the outside of the reel and to the top of the lid
- Cut out decorative elements from a single-layer napkin
- Glue the elements with PVA glue to the inside and outside of the lid, as well as on the sides.
- Decorate the bottom and sides of the bobbin in the same way.
- After the adhesive composition has completely dried, coat the workpieces 2 times with colorless varnish
- These boxes are made from an ordinary reel of tape
Toy bags made from improvised means
Many master classes are conducted using various improvised means, for example, ice cream sticks, toilet paper rolls. The shape of the classic box allows the use of a wide variety of materials for this purpose.
Craft from a box
The easiest way to make a beautiful box is to use an old box (shoe box, doll house box, household appliance packaging).
The main focus of independent work is on decorating the craft, for which illustrated paper, shells, stained glass paints, and broken walnut shells are used.
Bright chest from a postcard
If the craftsman has a sufficient number of old greeting cards on hand, you can use them in your work.
To make a beautiful box, you need to glue or fasten postcards with metal staples, forming the walls, bottom and even an opening lid (this option is possible for double postcards).
Accessory from tetra pack packaging
Tetrapack technology has given craftsmen and creative enthusiasts an excellent basis for making various boxes and original accessories. Instructions for creating an interesting craft:
- The top part of the cardboard bag must be cut off.
- The inner surface should be thoroughly washed and dried.
- The outer walls of the future box are decorated with paints or PVC film with various images.
The main focus is on making the lid. This can be a blank made of cardboard, the dimensions of which exceed the dimensions of the main part. You can make a decorative handle on the upper contour of the lid or attach an original decoration.
Egg tray toiletry bag
Another interesting blank for creating an accessory is egg trays with an opening lid.
To work, you should thoroughly clean the inner surface of the tray, and then apply pearlescent paint or any other type of decor to the material.
You can store rings, earrings, small bracelets, and personal items in the cells.
Cardboard Core Accessories
Every fashionista will be pleased with miniature boxes made from toilet paper rolls:
- The outer surface of the bushing should be decorated with a bright pattern or original stickers.
- The next step is to prepare a lid, for example, assembled from matches or made from cardboard in the form of an accordion.
- As an alternative, you can assemble a spacious box from bushings glued together.
Ice cream stick box
For independent creative work, wooden ice cream sticks are often used. This consumable is safe, affordable, amenable to glue and can be combined with all materials.
For assembly, they use the technique of alternately laying sticks with 4 attachment points. This product “breathes” well and is therefore not susceptible to fungal infections and mold development.
Making a shell casket
Sea or river shells act as an excellent material for creating a personal toiletry case. The future craft will acquire a unique design with a marine touch. You can use ordinary boxes as a solid base, or you can choose especially strong glue for assembly.
Shells are chosen to be approximately the same shape and size to form parallel rows (as in brickwork). The only requirement for the master is to use a rigid base for the bottom of the box.
Chest made of newspaper tubes
In interior styles such as High-Tech or Loft, it is customary to use original interior items and souvenirs. A lightweight box for the mantelpiece can be easily made from newspaper tubes.
This detail fits perfectly into the style of a modern living room.
To work, they use the technique of rolling tubes from newspapers, which are then laid in rows and secured with glue.