v 26 211
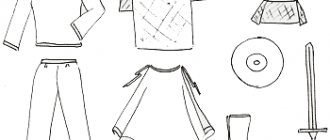
All boys, without exception, like the image of the ancient Russian warrior. A caring mother can please the boy with a real hero’s costume, which is made with her own hands. It consists of a helmet, chain mail, armor and boots. How to turn simple things into heroic surroundings?
The video in two parts contains step-by-step instructions and a detailed master class to help with this:
HERO COSTUME - Part 1 - Cutting and sewing chain mail - Carnival costume HERO COSTUME - Part 2 - Cutting and sewing pants - Defile - Carnival costume.
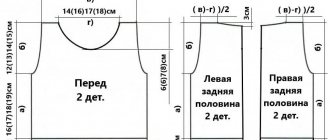
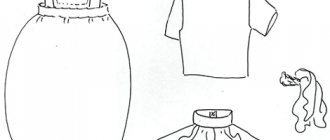
Creating a sketch of a shirt-blouse
The shirt-shirt is a large rectangle, in the center of which there is a round hole for the head. The sleeves are two smaller rectangles. Therefore, to draw up a sketch of this item of clothing, you need to take three measurements from the child: D, D and head circumference. You also need to measure the width of any child’s T-shirt.
Taking measurements
DR is removed like this:
- one end of the measuring tape is applied to the junction of the arm and shoulder, the second end is drawn along the arm bent at the elbow to the wrist.
Di is defined as follows:
- one end of the tape is applied to the base of the neck, the second end is guided through the protruding parts of the chest to the desired point.
Head circumference is measured as follows:
- a measuring tape is applied to the back of the head, passed over the ears and connected at the highest point of the forehead (usually above the eyebrows).
Sketching
Based on the obtained numbers, a diagram consisting of a large rectangle is drawn. Its length = Di value, its width = T-shirt width + 5-10 cm.
A circle is drawn in the center of the rectangle, the diameter of which is equal to the circumference of the head + 5 cm. If the shirt is fastened with a button, a mark-slit 15-20 cm long is placed near the central circle.
The sleeves are drawn. They are two rectangles, the length of which is equal to the value of Dp, and the width varies between 30-40 cm.
Sketching example
Making armor and cloak
For armor, in addition to fabric, you will need thin synthetic padding, which will make the parts more massive. The armor for the chest and back is a sleeveless vest, not sewn at the side seams. To make it, you should draw the required shape directly on the fabric, cut out the same blank from padding polyester and lining. The neck of this element also does not need to be made large. It is better to make the cut from the back. Afterwards, all three parts are folded in the following sequence: the lining and the main fabric facing each other, and padding polyester on top of the base. Before processing, it is better to pin them together with needles and stitch along the contour of the cuts, with the exception of the neck. Afterwards, the armor needs to be turned inside out and the throat treated with bias tape of a suitable color.
It is also better to make a multi-layer helmet. Its pattern is a strip of fabric around the circumference of the head with darts placed on one edge so that the product closes with the corner up.
To sew a raincoat, you should combine two rectangles of the required size from velvet and lining, stitch along the contour, leaving a small hole for turning, gather along the top with an elastic band and sew on ribbons.
Decoration
The blank blank is ready and you can start decorating.
Maybe your child wants to be like a Norman knight? Don't disappoint him - make some horns and attach them to your helmet. That's all - your child can imagine at the matinee in the image of a medieval knight from Normandy.
You can additionally decorate individual areas of the helmet with colored pencils or felt-tip pens and place them on the child’s head.
How to make a hero's sword out of paper and glowing?
For paper you will need the following materials:
- a sheet of colored paper;
- scissors;
- scotch.
Place a sheet of paper in front of you and cut a quarter from its smaller side. Roll this small piece along its width and the larger piece along its length. Place the small piece on top of the larger one in a cross pattern. Secure these two parts together with tape. Sharpen the lower part; to do this, press here on one side and the other, secure with tape. Here's how to make a sword out of paper quickly. Let's consider the second method of making it from other materials. With such a weapon, you can imagine yourself as a fantasy hero, and not just a hero. Here's what you'll need to make it happen:
- cardboard or thick paper;
- polycarbonate;
- transparent sealant;
- strip of leather;
- glowing paint;
- glue gun;
- foam board;
- scissors;
- pen.
See how to make a lightsaber. Draw on cardboard or print out the following diagram. As you can see, the sword on it consists of three parts, after copying you will just need to match them. Attach this template to a piece of colorless polycarbonate, from which you need to cut two identical blanks. Lubricate the edges of one piece with a small amount of transparent sealant, place the second one on top of it, and press to connect both pieces. Cut out two identical parts for one side and the other side of the handle, and glue them in place. Allow the adhesive sealant to dry. After this, wrap the hilt of the sword with a strip of leather. Just below it, on the top of the blade, make a small hole with a drill. This is where you will place the nozzle of a syringe or a tube of paint. Fill the sword with this glowing solution. It looks especially impressive in the dark. If you decide to celebrate a boy's birthday on the theme of animated films about heroes, then dim the lights, and the child will come out in appropriate attire, holding a sword in his hands. The spectacle will be mesmerizing.
Simple lesson
And now we will give you another item on how to make a helmet with your own hands from scrap materials.
To do this you will need a 5 liter plastic bottle, a large plastic glass, a laundry bag, silver paint, scissors, and double-sided tape.
Draw a helmet on the top of the bottle and cut it out.
Next, take a plastic cup, cut off the bottom and top edge. We form a cone from the remaining parts and secure with double-sided tape.
Attach the cone to the bottle with tape.
Cut a rectangle from a laundry bag and paint it silver.
We paint the workpiece itself with the same paint. You may need to coat the helmet in two or three coats to achieve a more intense metallic tone.
We try on the mesh, mark the places where we attach it with a marker.
Using double-sided tape, attach the mesh to the inside of the bottle.
And the plastic bottle helmet is ready.
Cutting fabric
Steps:
- The material is folded in half lengthwise (right side inward) and secured with sewing pins.
- The Di value is divided in half and laid down from the fold line of the fabric.
- The width is drawn in accordance with the sketch.
- The width value is divided in half and marked on the fold line.
- From this point to the right, down and left, a value is calculated using the formula: (head circumference + 5 cm) / 2.
- A semicircular line is drawn, on the side of which a vertical slot 15-20 cm long is drawn. It is cut only in the front, the back remains without cuts.
- On the fold line of the fabric, 2 more rectangles are drawn, the length of which is equal to the value of Dp, and the width is 15-20 cm.
- 1-2 cm allowances are added to all workpieces, and the material is cut out.
How to sew pants
Knight's pants should first of all be beautiful and comfortable. A knitted fabric such as supplex or oil is suitable here. If this is a children's knight costume, you can use cotton fabric. These are easy to sew. Construction can be done directly on the fabric. It is bent face inward along the canvas. Thus, there will be two pant legs at once without external side seams.
You just need to make sure that the fabric is 6 cm larger than the circumference of the child’s upper leg. It is this measurement that is laid down first along the fold, adding an allowance of 5 cm.
The second measurement is ½ hip circumference plus an increase of 5 cm. It is placed in the middle of the first set aside segment.
The third measurement is the height of the seat, the value of which is lowered from the fold perpendicularly along both edges of the product from the extreme points of the larger segment. The same perpendiculars are lowered along the borders of the semi-circumference of the hips.
After this, you should draw the side internal cuts of the legs and their bottom, taking into account the hem. The final stage is the design of the top of the trousers. In front, the top cut should be approximately 3 cm lower.
What to make a helmet for a hero from
A hero’s costume without a headdress doesn’t look good at all, so the little warrior will need a beautiful helmet. It can be made from simple and affordable materials.
What you need for work:
- five liter plastic bottle;
- plastic glass 500 ml;
- laundry bag or piece of mesh;
- silver or gold paint in a can;
- mounting double-sided tape;
- scissors and glue.
Progress
- From the top of the bottle we cut out the base of the helmet. To do this, draw a wide frontal part with a marker, leaving the sides even. We cut off everything unnecessary.
- We make a conical top of the helmet from a plastic glass. To do this, cut out the bottom of the glass and cut it vertically. We cut out a cone from the resulting plastic sheet and fasten it with double-sided tape.
- Next, we connect the parts of the helmet. We attach the cone with tape to the plastic helmet from the inside.
- Let's start making chain mail for the helmet. We make it from a laundry bag. This mesh is quite durable and inexpensive. You can use mosquito netting or remnants of tulle, but this material is thin and stretches a lot.
- We paint the mesh with spray paint in silver or gold.
- Next, we paint the helmet itself, applying several layers so that it does not show through. Let the workpiece dry.
- We cut the mesh and try it on the helmet. At the fastening points we apply double-sided tape, to which we attach the chain mail mesh.
We try on the finished heroic helmet on the baby. Let's start making other parts of the costume.
Kol chuga and a shirt for God, you rub your hands with me
An indispensable attribute of a heroic costume is a shirt with a Slavic pattern and chain mail. To sew a “Bogatyr” costume for a boy with your own hands, you need to stock up on the following materials:
- white loose shirt;
- a piece of border with a Slavic pattern;
- foil backing for laminate;
- glue, scissors, double-sided tape.
Progress
No. Ruba ha god you rya
You can turn a simple white shirt or nightgown into a heroic shirt. To do this, just sew a beautiful border with a pattern along the bottom of the product. Nowadays you can find almost any border on sale. The shirt for the hero is ready.
No. Kolchu ga
Chainmail can be made in several ways.
- A vest is cut out of an old knitted sweater and painted with spray paint. To do this, the vest is pulled over the back of the chair. This chain mail turns out to be quite light, but the smell of paint remains.
- You can make scaly chain mail armor. To make it, you will need rectangles of the same size, which are fastened in a checkerboard pattern. You need to start working from the bottom row of chain mail. In addition, the rectangles must be painted on both sides. The dried parts are sewn onto a thick sleeveless vest.
Important !
You can make a chain mail shell from a foil backing under the laminate, cardboard, plastic folder or other materials.
Helmets for an entire army
During the celebration of February 23, many educational institutions host concerts and performances. Preparations for the holiday fall on the parent committee.
To make the children's costumes look the same and support the overall image, you can team up and make all the helmets using one simple cardboard template.
By the way, you can get acquainted with the current CVTs in a photo of a hero’s helmet, made with your own hands. The main essence of collective work is saving parents money and spending useful time.
The template for a simple cardboard helmet is quite simple:
- He makes a drawing on cardboard. One of the main features of the helmet is its angled dome, so the ribs should be straight and pointing upward.
- For a standard helmet, 6 ribs, each 10.5 cm wide, will do.
- After this, all the links are cut out and glued together at the top with simple tape.
Then all that's left to do is just cover the helmet with wet paper to create a papier-mâché effect. After which, the dried helmet is painted in the same style as the rest.
A little tip: it is best to use packaging cardboard, which is often used for boxes. You can find them in any store; sellers usually throw away such boxes, so you can get them for free.
Master class “Bogatyr helmet”
Natalia Sheremeteva
Master class “Bogatyr helmet”
.February 23 is Defender of the Fatherland Day. Our country has had defenders since time immemorial. They have always been distinguished by strength, daring, and courage. These defenders were called Bogatyrs . “Russian Heroes” was held in kindergarten.
.
What kind of a hero without armor ? I decided to make helmets , I watched a lot of videos (all based on a ball or a five-liter bottle covered with paper)
.
But, unfortunately, there was little time left for production, so I had to come up with “quick”
option.
The main material is silver insulation, as I already wrote in other master classes , it can be bought at any hardware store. I cut it into strips to fit the children’s heads (photo 1)
.
Then I stapled the strips into cylinders, making cuts on one side (photo 2, 3)
.
To make the top of the helmet fit better , I sharpened the edges of the cuts (photo 3)
Next, I connected the top, carefully stitching it with a thread and a needle (photo 5)
.
In a store that sells curtains, I chose tulle that resembled chain mail (woven in silver-black squares)
.
I cut it into pieces of the required size and sewed it to the helmet (photo6)
.
Hero costume
As such, the special production of an epic hero’s outfit will not cause difficulties. Any wardrobe will contain:
- pants and shirt;
- toy sword and shield;
- belt and boots.
Instead of a cloak, you can throw on a piece of bright fabric, secure it with a sash and a brooch, that’s the whole outfit of a medieval warrior.
If the boy does not have a sword and shield, it is very easy to cut them out of cardboard, color them and give them to the defender of the Fatherland from enemies and mythical villains.
If there are no problems with the suit and conventional “weapons,” then making a helmet will require some effort. But even here, there is no need for any supernatural actions, special skills or the acquisition of special materials and tools.
Armor
We will need a plain T-shirt. Elements imitating metal plates will be sewn onto it. To make these elements you will need cardboard and foil. Silver and gold colors are suitable. Rectangular blanks of arbitrary identical size are cut out of cardboard. But the smaller the plates, the more beautiful the armor will look, although the longer it takes to make them and the more difficult it is to sew them on. It is better not to do more than 5x5 centimeters.
The plates are wrapped in foil so that wrinkles and kinks do not appear on the front side. No need to glue. The foil holds well if its edges, folded onto the back side of the plate, completely cover the cardboard.
We sew the made plates, starting from the very bottom of the T-shirt. The top edges of the plates are sewn to the bottom edge of the T-shirt. This turns out to be the first row. The plate of the second row is placed on the T-shirt so that its lower half covers the upper half of the first row. And so on. Based on the principle of fish scales.
Since the place where the plate is sewn will be covered, you don’t have to worry about making sure the seam is invisible. Generally, one large stitch per plate is sufficient. Accordingly, each plate is pierced in the upper corners. Thus, you can sew one row with one thread and then secure the seam. Of course, if the thread then breaks, the entire row will fall apart, but the speed of sewing increases sharply.
The topmost row of plates needs to be aligned with the collar line and sewn more carefully. If you don't like how this place ends up looking, you'll have to drape it with a cloak. As mentioned, it covers the front of the shoulders and neck. In addition, if the side edges of the raincoat are sewn to the T-shirt, then there is no need to sheathe the entire thing with plates. You can limit yourself to only the front part, not covered by a cloak. If the raincoat is not sewn on, then during movements it will move and reveal different parts of the T-shirt, then it needs to be completely sheathed with plates. But this option will look better.
The armor is secured at the waist with a sash. A wide ribbon or a thin plain scarf is suitable for this.
Boots and pants
A boy's hero costume is impossible without boots with curved toes or curly tops. You can’t find these in shoe stores, and custom tailoring is very expensive. But from available materials you can easily make fabric covers that fit over regular boots or even sneakers. Their production consists of the following steps:
- Elements of fake boots are cut out of dense fabric according to measurements taken on top of the shoes. Cutting should be done with an allowance of 1 cm.
- The parts are sewn from the inside. To preserve the shaped edge, a piece of cardboard is inserted into the boot and secured with adhesive fabric.
- The fabric cover is attached to the boot from the inside using clothing hooks or double-sided tape.
The ancient Russian warrior's pants have a "sweatpants" cut and a plain color, without patterns or decorations. So you don’t have to choose a separate item for the hero’s costume, but get by with ordinary trousers. You can even use part of a school uniform, after smoothing out the arrows.
How to choose a ring size
The smaller the diameter of the ring, the longer it will take to assemble the chain mail yourself, because you will need to connect many more rings together. The product will become more expensive because your armor will be denser. With a smaller diameter, the armor is stronger. Small diameter rings are one way to compensate for weak metal. Using several rings you will improve the strength of the product. To make them, a special device is used, consisting of a wooden base and a rod to which a drill is attached. With its help, metal wire is wound onto a rod in the form of a spiral, and then cut into individual rings.
We do design
Now let's move on to working on the chainmail part. It can be cut out of a washing bag. This material is optimal for this case, it is easy to obtain, and it is not at all expensive. And the dense mesh that is used to make it has an expressive texture that is clearly visible. Paint the future chain mail with silver acrylic from a spray can.
Do the same operation with the main body of the craft. After the first application of paint, you will notice that the workpiece has become less transparent. To enhance this effect, apply a couple more layers. Do not start working on a new layer until the previous one has dried.
Now mark on the product the places where you will attach the mesh. Glue double-sided tape to them and attach the finished chain mail. Try on the resulting headdress. This is where your work ends.
Types of chain mail weaving
There are a large number of different weaves. But in practice, not everything is valuable. One of the most valuable are “counter rows” (shell weaving). This classification of weaving involves the arrangement of rings in rows in which their inclination alternates (for example, even ones - to the right, odd ones - to the left).
The simplest armor weaving of chain mail is “4 in 1”. In this case, one ring is connected to four others lying around. This weaving method did not provide sufficient protection, so more complicated options were most often used: “6 in 1” or “8 in 1”. In this case, the protective strength and properties of chain mail increased. But at the same time, the weight, production time and cost of the product increased. The pattern for weaving chain mail “4 in 1” is presented below.
Chain mail and shirt
A New Year's costume for a hero is impossible without chain mail that reaches mid-thigh. You can do it in any of the following ways:
- Any smooth knit sweater can be turned into armor. To do this, you need to stretch it over the legs of a stool or other shape and cover it with “silver” from an aerosol can. The resulting chain mail will be light and comfortable, but it may be unpleasant to wear due to the smell.
- A scaly shell can decorate a hero’s costume, turning an ordinary warrior into a commander. To create it, you should cut out the parts in the form of a rectangle measuring 1x2 cm with one rounded side. The material you can use is very thick foil, thin linoleum, or the cover of a plastic binder.
The difficulty in making “dragon scales” chain mail is that every detail must be painted, both on the front and back sides. After drying, they are carefully sewn onto a sleeveless vest made of thick fabric. The rows of scales begin from below in a checkerboard pattern and each subsequent row is laid with an overlap of half the length.
Another element of a bright New Year’s look is a shirt that protrudes 10-12 cm from under the chain mail and is decorated with a “Slavic” pattern. Braids with similar decor can be found among craft supplies and can be turned into a regular turtleneck or a shirt into a fabulous outfit.
Materials
If we talk about the choice of materials, then historically it is correct to forge the wire yourself. The work is very painstaking; in addition, in the past, a rivet was placed on each ring for strength.
Today, for the manufacture of chain mail, ready-made wire of various sizes or ready-made engraving rings are most often used. If we talk about wire, not every wire will do. Suppose copper can be processed even by hand, so the chain mail will deteriorate very quickly. Aluminum is also not the best option, as black dust appears when the rings rub against each other. The best choice would be steel wire.
Shield and sword for a hero from scrap materials
Weapons make the outfit more impressive. As a rule, a handmade hero costume for a boy is complemented with a shield and sword.
To make a sword you will need:
- thick cardboard;
- spray paint;
- metal and plastic jewelry;
- glue, scissors.
On thick cardboard we draw a sketch of the future sword. We cut out several parts that we glue together. This will give additional strength to the finished product.
We cover the dried sword blank with several layers of spray paint to obtain an even and beautiful color. When the paint is dry, we begin decorating the sword.
To decorate the handle, you can take beads, multi-colored plastic or metal rhinestones, colored foil, etc. Decorations are glued in random order onto the handle of a cardboard sword.
The shield for a warrior is made light. In Slavic culture, the shape of the shield was simple, more reminiscent of a circle or oval. The shield for a hero consists of several parts:
- main part - 2 cardboard circles. We calculate the diameter of the circle as follows: measure the length of the arm from the tip of the middle finger to the child’s elbow;
- borders - a hoop made of cardboard about 3 -5 cm wide. The inner part of the hoop can be made curly;
- central circle with decoration: dragon head, sun or monogram.
The cardboard shield elements for the main part are glued together, then painted and allowed to dry. The border is painted separately, then applied to the main part and glued. The same goes for the central part of the shield. When the shield is ready, an elastic band is glued to the inside of it, which will fix it in the hand.
By working on a hero costume for a boy, you can give ordinary things a new purpose with your own hands. By using imagination and ingenuity, you can accurately copy all the details from ancient legends. It is important not to overdo it with decorations, because the hero is a rather strict and formidable image. Ideas for your option can be seen in the video:
Story
Since ancient times, the cherished dream of warriors of all nations and eras has been reliable protection from enemy weapons. It was she who guaranteed victory in bloody battles. Over time, warriors received such armor, one of them was chain mail, which is the prototype of modern body armor.
Such metal products were widespread both in Asia and Europe, and all thanks to the simple manufacturing method. The work required only iron, a special device that helped to pull the wire, and most importantly, patience, because monotonous work took too much time.
Chain mail was invented in the 1st millennium BC. e. However, who the inventor was is unknown. Finds of such items in Scythian burials date back to the 5th century. BC e., Celtic samples date back to the 3rd century. BC e. The Roman Empire became acquainted with chain mail during the conquest of Gaul, and from then on they were used until the advent of firearms.
Source
Working with paper
The process of forming a helmet from paper can be traced using the example of a master class.
For needlework you will need: a balloon, plasticine, a centimeter, paper, PVA, Vaseline, silver and black paint, a sponge.
Inflate a balloon approximately the same size as the circumference of the child's head (you can measure it in advance with a centimeter). Lubricate the ball with Vaseline, then draw a sketch of the future helmet on it. Now let’s take the paper, cut it into small pieces, and start gluing the ball using the papier-mâché technique. First, glue the first layer, then wait until it dries, and only then glue the second. Using this technique, the helmet will be stronger.
When we have pasted the required amount of paper, carefully blow off the ball, cut it, and then sand the uneven edges. We use plasticine to form a point on the top of the head. We glue a couple of layers of paper again and wait until the structure dries completely. Then we cover the workpiece with a couple of layers of PVA. You can mix it with white paint.
Now you need to paint the helmet. We carefully and evenly apply the first layer of silver paint, and then, after complete drying, the second layer. Before the paint dries, take a sponge, dip it in black paint and carefully nail it to the workpiece. This technique should create the effect that the helmet is old. We paint the inside of the helmet with black (acrylic only) paint. Mesh fabric can be glued to the back if desired.
You can use the same technique if you want to make a helmet out of foil. To create a helmet, instead of silver paint, take regular kitchen foil and smooth it over the surface of the headdress. You can glue the foil using PVA glue. And at the end you can decorate the headdress as you wish.
Tags
a hero's costume for a hero's costume for a hero for a hero with your own A hero's shirt for a hero from for a hero A hero's costume without making a hero's costume to make a hero's costume A BOGATYR'S COSTUME Carnival costume A BOGATYR'S COSTUME Carnival costume. Richie costume a number of costume details.carnival clown costumeNew Year's clown costume Guide to the class teacher with your own hands.with your own hands.with your own hands with your own hands with your own hands.with your own hands with your own hands sew with your own hands thick fabric for we fold the fabricHow to make a suitHow to make a suitwhat to make a helmetHow to make bootswhat to make a helmet
heroicredrussianpatternsewingthreadmychildrenbottleaccessoriesoptionsedgelet