Design Features
A grain crusher is like a coffee grinder enlarged 10-20 times.
But the difference between one and the other machine lies in some parameters.
- Unlike a coffee grinder, a grain crusher grinds grain not into a fine, powder-like powder, but into a coarse-grained substance.
- The grain crusher is capable of grinding tens of kilograms of grain in one grinding session.
- The more grain you need to grind, the longer the device works. For example, to satisfy the monthly demands of a chicken coop in which, say, 20 chickens lay eggs every day, more than one hundred kilograms of grain will be required. To grind 10 buckets of the same wheat or oats, it will take at least one and a half hours of operation of the unit.
The design of the grain crusher includes a number of components.
- Protective housing – made of metals, plastic and/or composite.
- A support that is permanently installed in a specific location or removable (portable).
- Bracket adjustable with nut and bolt.
- The second base has a softener in the form of a rubber “shoe”.
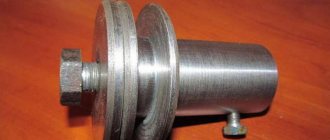
- A pair of engines and the same number of sets of pulleys with a diameter of 6 cm. They are equipped with mortise bolts and keys.
- Seals that soften vibration from motor shafts.
- Knives that chop grain and grass. Both chopped ingredients are the basis of compound feed.
- A funnel with a lid into which unground grain is poured. The second funnel allows the crushed raw materials to be poured into a previously prepared container.
- Frog type lock.
- Removable gratings that allow fractions of different sizes to pass through.
- Rubberized wheel.
Each of the above components can be easily and simply installed on an old washing machine.
A grain crusher made from an activator washing machine (or automatic machine) is a device that has the highest performance and capacity compared to similar ones made from other electrical appliances.
Components selected and/or made by hand must be compatible with the overall dimensions of the final device.
No one will install knives that are several times smaller in diameter into the tank for an activator washing machine - the operation of such a device would become extremely ineffective. A volume of grain that would normally be ground in 20 minutes would take an hour or an hour and a half with reduced knives. In other words, the homemade device is physically balanced.
Similar to the device of a coffee grinder, in a grain crusher the knives, combined with the shafts of electric motors, immediately start when the device is connected to the household lighting network. They finely chop small branches, seeds and grass. The crushed raw materials fall on a sieve, which removes husks and small debris. What has been filtered passes into the container through a funnel, collecting in it.
Pros and cons of the resulting device
This device has a number of undeniable advantages:
- saving money on purchasing ready-made feed;
- savings on the purchase of a ready-made grain crusher;
- the grinder remains suitable for further use for its intended purpose;
- using old unnecessary things in work.
A homemade grain crusher is not without some disadvantages. These include:
- very fine grinding of grain due to the high speed of the angle grinder;
- the difficulty of accurately making a hole on the knife to prevent vibration;
- dust from grinding negatively affects the service life of the grinder.
The device is ideal for those who have at their disposal an unused angle grinder, for example, of an inconvenient diameter. If there is only one high-quality expensive angle grinder on the farm, it is recommended to pay attention to the purchase of ready-made grain crushers.
What can it be made from?
Let's look at how to make different components for a grain crusher at home.
- The grinding tank is made of thin (0.5-0.8 mm) stainless steel. A metal frame with a valve is fixed next to the base. The outer part of the body is made of a seamless metal pipe with a diameter of 27 cm. The wall thickness of this pipe can reach 6 mm. Inside the same pipe there is a stator, for the manufacture of which a pipe of a slightly smaller diameter was used - for example, 258 mm. In both sections of the pipe, holes are drilled to secure the loading hopper, remove crushed grain, install a grid with the required mesh size, and hangers to secure the shipping hopper. Both pipes are mounted in such a way that they are held in the grooves of the auxiliary flanges located on the side. The latter are connected to each other using several pins. One of the flanges has an internal thread for studs. The second one is drilled in several places. Both flanges also have holes drilled through them to secure the journal bearing housings and are secured to the metal frame using bolts and nuts.
- The rotor is assembled on the basis of prefabricated metal pushers and is equipped with washers. If necessary, these pushers are reversed. After assembly, the rotor is checked for imbalance. If beats are still detected, the rotor is balanced immediately - parasitic vibration can shorten the service life of the entire device.
- The drive shaft contains feather keys and ball bearing sets. Protective washers for ball bearings are based on the requirements of GOST 4657-82 (size 30x62x16).
- The supporting frame with the table is manufactured in a welded version. The starting material is steel angle 35*35*5 mm. The valves are made of thin sheet steel.
- Having prepared the necessary materials and workpieces, we begin to assemble the grain crushing device.
Schemes and drawings
The grain crusher from the washing machine contains the following components:
- grain bin;
- frame;
- rotor;
- shaft;
- unloading hopper;
- pulley (the requirements of paragraph 40 of GOST 20889-88 are met);
- V-belt;
- electric motor;
- frame with table;
- loading and unloading valves (valves).
Drawings of analogues made on the basis of a motor from a vacuum cleaner, electric drive of an angle grinder, drive and mechanism of a meat grinder differ little from the device made on the basis of a (semi-) automatic washing machine. The principle of operation of the device is no different - which cannot be said about the type of chopping mechanics used.
Master class on making a grain crusher from a washing machine
If you have purchased a new automatic washing machine, do not rush to throw away the old type of device. It will definitely make a high-quality and productive grain crusher. You just need to develop a detailed drawing and purchase some elements.
What you need for work: prepare the essentials
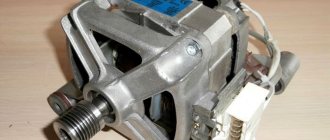
The list of materials and tools will depend on the chosen scheme. Most often, only the motor from the washing machine is used. However, if desired, you can also use a tank.
You will also need:
- rolled metal: plates, pipe sections;
- fasteners;
- sealant.
Device diagram
In terms of its design and operating principle, a grain crusher is similar to a coffee grinder. During the manufacturing process, the main attention should be paid to the knives and the hopper for receiving the finished product.
Preparation of prefabricated elements
- We begin work by preparing the grain bin. We increase the diameter of the drain hole to 12 - 15 cm to ensure sufficient performance of the device. From pipe sections we make pipes of the required size and configuration for discharging crushed grain.
- We cut three knives from durable steel. These should be plates 20 cm long and 1.5 - 2 mm thick. To make the device last longer, you can use a hand saw to make these elements. We drill a mounting hole in the middle of the prepared plates. We sharpen the parallel sides.
- We make a filtration grid that will not allow whole grains to leave the container. Its diameter should be slightly larger than the diameter of the manufactured pipe. The holes in the filtration grid must ensure the unhindered passage of crushed grain.
Attention! The diameter of the filter grid holes should be 3 – 4 mm.
We are preparing a container for crushed grain, or we are thinking about a way to secure the bag to the outlet pipe. To prevent the formation of excessive dust during operation of the device, the receiving hopper must be sealed against the outlet pipe.
Assembly of the structure
We assemble as follows:
- We install a discharge pipe into the expanded opening of the tank, ensuring sufficient tightness of the connection.
- We install the knives on the motor shaft. To avoid overlapping of the blades during operation, be sure to tighten the clamping nut after each plate.
- We attach a filtration grid in front of the outlet pipe. It should be located at an angle of 15 - 200 to the horizontal. Considering that the bottom of the washing machine tank is inclined to ensure complete drainage of water, there should be a right angle between the base and the installed plate. To fasten the plate we use bolts.
- We coat the joint with sealant to eliminate the presence of gaps and cracks through which whole grain could mix with crushed grain;
- Let's start the device. Let's check its functionality.
- If you don’t have a solid washing machine, but you still have a working engine, you can also use it to make a grain crusher with your own hands.
Required tools and materials
Making your own device for grinding grain does not require any specific materials. The key unit will be an ordinary grinder, which is found in almost every household. In addition to the angle grinder, the following materials will be required to make a grain crusher:
- An unnecessary pan with a tight-fitting lid. It is advisable to choose a pan made of aluminum. This will reduce the weight of the entire device, which will have a positive effect on the ease of use.
- To make grain crusher knives, you will need a plate of durable hardened steel. An old trimmer cutting tool works well for this.
- To attach the pan to the body of the grinder, it is advisable to use 2 wide furniture corners that have ready-made holes for installation.
- Bolts, nuts, washers.
The tools you will need are: a drill, a metal drill, a grinding wheel, a set of wrenches, a metal cutting wheel for an angle grinder, a screwdriver and pliers.
Making your own grain crusher from a vacuum cleaner
If you don't have a washing machine, look for a vacuum cleaner. It can be used in whole or in part. It all depends on which design seems more attractive to you and what skills you have. We invite you to get acquainted with a possible implementation option.
We prepare everything necessary for work
To make a grain crusher from an old vacuum cleaner, you should prepare:
- metalworking and metal-cutting tools;
- sandpaper;
- drill;
- fastening elements;
- pipe sections about 15 cm long for making an outlet pipe;
- ready-made knives or metal plates for their manufacture;
- a lattice with small cells, which is necessary for the manufacture of a sieve intended for sifting grain. If this is not available, you can use a metal sheet in which holes of the required diameter are drilled.
Attention! The above list is approximate.
Device diagram
The design of the device depends on which part is used. Most often, preference is given to options that involve the use of one engine. It is installed on the base, under which there is a container for receiving crushed grain.
Preparation of prefabricated elements
At the preparatory stage:
- we make the base using plywood, laminate or rolled metal;
- disassemble the vacuum cleaner to remove the engine;
- drill a hole in the base. Its diameter must correspond to the diameter of the motor shaft;
- If there are no ready-made knives, we make them from metal plates. With a thickness of about 1.5 mm, their length should not exceed 20 cm;
- If there is no ready-made sieve, we make it from a metal sheet.
Assembly of the structure
The process of assembling a grain crusher from a vacuum cleaner includes a number of stages, each of which deserves special attention:
- Using a nut, fix the knife on the motor shaft;
- install a sieve;
- We place a container under the sieve into which the crushed grain will flow.
Attention! Installing a tin box for loading grain will simplify the crushing process.
Fine grinder
To obtain a finer grind, a different design is used. If in the first case the cutting mechanism is located at the bottom, then in this embodiment it is located at the top. This crusher design is technically less complex, since there is no need to make a base for manufacturing. The pan is attached directly to the grinder using corners. There is one hole made in it for the angle grinder shaft.
When installing on the shaft, it is necessary to install a felt gasket. It is put on the motor shaft with force and prevents dust from entering the mechanism. The entire device is secured to the table using a clamp. The crusher is ready for use.
The disadvantages of such a grain crusher include low productivity . The advantages are as follows:
- you can get a fine grind;
- the design can be used as a feed cutter;
- beekeepers can make powdered sugar to make kandi.
To reduce dust in the room, a tight-fitting lid is necessary.
From the Bulgarian
A characteristic property of a manual electric grinder is the axis located perpendicular to the cutting disc. To make a grain crusher from an angle grinder (grinder), do the following.
- Mark and cut a rectangular piece from thick (1 cm or more) plywood.
- Cut a round hole in the cut piece of plywood - in the shape of the main structure in which the cutting disc rotated.
- Secure the plywood with the bolts and metal bracket included in the kit. The axis of rotation should be directed downwards.
- Make a cutter from a steel strip of suitable length, width and thickness. As in the previous case, the knives must be carefully sharpened and centered. Insufficient centering can eventually break the angle grinder gearbox.
- Not far from the angle grinder mounted in the tank for crushing grain, make a hole and provide it with a funnel. Through it, uncrushed raw materials are poured into the grain crusher. The funnel with a hole is placed not under the grinder drive, but above it.
- Below the drive, mount a sieve made from a used pan. It is drilled using a small drill (about 0.7-1 mm).
Assemble the grain crusher. Place it on a pallet or box. Under the lower funnel, where the crushed raw materials are poured, place, for example, a bucket. The funnel can be made from the cut off top of a plastic food bottle - the diameter of the neck is enough for the poured grain to easily and quickly pass into the grain crusher.
Assembling the chopper body from metal scraps
Now we had to think about how best to make the side walls of the case. It was decided to scald the plate with corners on three sides. The fourth must be left open, because it is through it that the chips from the ground branches will spill out. And then a large washer caught my eye, which I decided to weld in the center, reducing the diameter of the hole cut earlier. She came at the right time.
The corners were located as follows: a plate was welded on the inner edge, the second edge was directed upward. The washer is also located at the back. This is clearly visible in the photo example.
The corners and washer are welded, work is in full swing
Attaching brackets for fixing the angle grinder
Now it was necessary to think about how to fix the angle grinder in such a way that it could be removed at any time and used for its intended purpose. It turned out to be easy. For this, ordinary lock loops were used. Once upon a time I didn’t finish them, so they were left waiting in the wings. The grinder itself has holes for screwing in the handle on both sides. So it was decided to fixate with them. Having laid the angle grinder on top, I marked the locations of the lugs, after which they were welded. There is no need to be afraid that they will move a little. Subsequently, they can be slightly bent.
We weld the eyes for the lock on which the grinder will be fixed
But eyelets alone will clearly not be enough. In order to chop larger branches, more serious fixation will be required. To do this, it was necessary to weld two pieces of reinforcement, which would act as a continuation of the platform. Their task will be to firmly “hold” the handle of the grinder. They should be located parallel to the eyes with a slight narrowing, approximately diagonally across the square of the platform. This is probably not easy to understand in words, so there is a photographic example below.
This is how the pieces of reinforcement that secure the handle of the grinder will be located
The metal holding rods were thoroughly welded, after which it was possible to try the grinder on the platform. I had to bend the lugs a little to get them to fit exactly in the holes. After the bolts in them took their places, giving the structure a general appearance, it was necessary to think about how to secure the handle of the grinder to the reinforcement rods.
The fastening bolts securing the angle grinder through the eyes are screwed in
The answer came naturally - an ordinary bracket made of a hairpin with threads cut on both sides. It was welded to the reinforcement, and at the bottom there was a small plate with two holes into which these threaded edges of the bracket would go, clasping the handle of the grinder. And the nuts and washers will be tightened from below. The design is simple, but trouble-free, like a Kalashnikov assault rifle. Bringing my plans to life was a matter of five minutes - I found such a bracket with a plate, and therefore did not have to spend time on manufacturing.
The bracket is welded, now fixing the grinder on the platform is as reliable as possible
From a meat grinder
To make sure that the meat grinder will grind the grain, you can use resins, for example, hazelnuts or walnuts in shelled form. There is no need to make a knife that performs the functions of a cutter “from scratch” - it is already included in the kit. For the small fraction of grain, you must use the smallest standard sieve, also included in the delivery set.
In order for the grain to be milled continuously, it is necessary to install a large funnel above the grinding mechanics, for example, from a 19-liter bottle with the bottom cut off.
A hole is made in the lid of a diameter at which the poured grain will not pass through the neck faster than it is passed in crushed form through the crusher of the meat grinder. In principle, the meat grinder does not need to be modified in any way. The grain should not be too hard - not all meat grinders can handle durum wheat equally effectively. If you cannot use a meat grinder as a grain crusher, use a coffee grinder.
How to make a crusher mill with your own hands
Making a grain crusher with your own hands is not that difficult. To do this, you need to have on hand a motor from an old household appliance, for example, a vacuum cleaner or washing machine.
In addition, you must have some locksmith skills. By the way, when assembling such equipment with your own hands, you need to remember the safety rules. Since all engines operate on electricity, it is necessary to take all measures to reduce the traumatic risk of the assembled product.
We must not forget that fast-rotating parts are used as a working body, which can cause injury to the person working on it.
Structure of a grain crusher, design features of the machine
Manufacturers put a variety of crushers on the market, with different characteristics, productivity, etc. Most of this equipment is easy to maintain and does not take up much space. As noted above, in practice crushers are used that use rotary or hammer principles in their operation.
Rotary machines have a drum with knives. In hammer mills, hammers are used as a working tool, which are loaded inside the drum.
By the way, there is equipment that uses compressed air as an energy source. The processed raw material moves inside the drum along with air. As a result of this, the quality of the resulting product increases dramatically. In addition, in this, and in many other designs, magnets are used that select metal particles that get into the mixture.
Tags
with your own hands for with your own hands with your own hands with your own hands with your own hands with your own hands with your own hands Homemade washbasin wash your hands in you need to quickly make a knife you need to sharpen. you can make it quickly make a simple one we will make a homemade one you need to make holes for the cylinders made with your own ATV made with your own how to make a grain crusher how to make a grain crusher How to make an adjustable one to make it a rocket with your own hands Grinder with your own with your own handsmetal with your own handsreinnovator with your own handsmade with your own handswater with your own handsgarages with your own handsOki with your own hands
homemade unit drawings further washing machine size similar option plastic attached herbs
How to choose a grain crusher: expert advice
Choosing the right model
How should you choose a crusher that will meet all consumer requirements? To do this, you need to know the answers to some questions:
- Performance. A high grinding speed ensures high productivity in obtaining finished products, and accordingly, the use of such an installation will be highly efficient. Such installations can be considered the optimal solution for large farms. For home work, an installation with a low or medium processing speed of raw materials is sufficient.
- Price. The equipment must not only ensure high quality of the resulting product, but also generate certain income to recoup the investments made in this equipment.
- Grinding degree. The device must be selected based on the type of livestock and poultry the produced feed will be intended for.
- Drive station power. The greater the power of the installed power plant, the greater the productivity of the installation. It must be taken into account that the higher the engine power, the higher the energy costs.
- The company is a manufacturer. Undoubtedly, there are world-famous companies that produce shredders, but you need to think three times about how quickly the funds invested in brands will pay off.
When choosing a model, you must be guided by the characteristics specified by the manufacturer.
Crusher balancing process
Most equipment that uses rotating components as a working tool undergoes a balancing procedure. This work can be done either independently or with the help of invited specialists.
When balancing, the following sets of work must be performed:
- identifying the causes of vibrations and eliminating them;
- monitoring the condition of equipment in terms of vibration;
- balancing shafts in existing bearings;
Why is balancing necessary? The answer lies on the surface. The thing is that the presence of excessive vibration leads to failure of the bearing units, and as a result, everything can end very sadly.
Types of grain grinding machines
Based on the principle of operation, machines for the grain grinding process can be divided into several types. These include:
- Hammer machine - in this design, the elements for grinding must be mounted on a rotor, which will rotate in the receiving hopper itself.
- Impact crusher - the working chambers in units of this type are made of durable metal, which gives the machine the greatest strength and reliability. The parts for the grinding process hit the walls of the hopper, at the same time crushing the grain. With all this, the crushing parts will continue to hit the walls until the grain is completely transformed into a mixture of the smallest components.
- Disc machine - in this design there are crushing knives that will be attached to the shaft using specialized disks.
- Vadets crusher - it can perform both crushing and grinding of grain. The main element in this design will be corrugated rollers. They will only process wet material efficiently. Dry grain should be pre-moistened in water.
Grain crusher performance
The process of functioning of a rotary chopper involves the movement of the cutting knife. It is needed to crush the masses that should be fed inside the receiving hopper.
The hammer preparation can grind grain efficiently using hammers that are attached to a strong base.
- Products obtained using a hammer machine will be considered the most effective. This can be achieved with the help of a high amplitude of movement of the hammers, which are capable of crushing even individual grains of grain.
- At the same time, the impact crusher can consume much less electricity and has a high productivity factor.
- If the farm has a large number of adult livestock and poultry species, it would be best to buy an impact crusher. But in the case when a farmer breeds smaller poultry and a large number of young livestock for trade, then the optimal choice in this case will be in favor of hammer grinding of grain.
- It is imperative to test a device that you have produced yourself. It is worth remembering that the grinder engine requires regular lubrication, otherwise it will quickly break due to abrasion of the main elements in the device.
Types of grain grinding machines
Depending on the grinding method, design and location of the working parts, there are 4 types of grain crushers:
- Rotary – crushing of grain in such devices occurs due to a rotor located horizontally and moving at high speed.
- Hammer crushers - the design of such grain crushers includes a rotating vertical drum and stationary hammers located in a circle, against which the grain is crushed. When grinding in this way, the finished flour is poured down and, passing through a sieve, ends up in a container placed under the deck of the housing.
- Roller crushers crush grain due to 2 rollers located in one chamber, rotating towards each other. At the same time, the gap between them is so small that the incoming raw material is not simply crushed, but, due to high speed, is crushed into dust. The advantage of such devices over others is the ability to crush grain with high humidity.
- Millstones are grain crushers in which grain is crushed when it gets between two discs (millstones) located with a small gap. In this case, one disk rotates at high speed, and the second is stationary.
Be sure to read:
How to make an incubator with your own hands: with automatic and manual turning, types, description
Among these varieties, the most common are rotary and hammer ones - they are more productive, reliable, and easier to repair and maintain.
For homemade and factory models, the average is:
- Homemade units - up to 150-200 kg / h;
- Factory models - from 180 to 400-500 kg / h.
Moreover, in most cases, the productivity of factory crushers cannot be increased, while for any home-made unit this characteristic can be significantly improved by changing the power unit (engine) to a more powerful one.
Recommendations
To ensure that the shredder's performance is high enough, follow the advice of experts.
- Insulate the motor using an additional casing made from, for example, a large tin can. The fact is that the motor gets into a dusty environment - this dust is formed when grinding dry grain. The engine may become clogged with deposits, and its operation will slow down - a noticeable part of its useful power will be lost.
- Do not use the grain crusher at maximum speed, trying to grind tons of grain in one go. A large farm with large numbers of farm animals will require two or more grain crushers. It is better not to skimp on equipment so that it does not break down after a few days, but works for a number of years.
- Use grain collection containers with as large a capacity as possible.
- Clean and lubricate the mechanics every three months or six months. Regular maintenance - and scheduled replacement - require bearings, without which no electric motor would work.
- The listed measures will allow the user to process large volumes of grain without investing extra in repairs and without stopping urgent work.
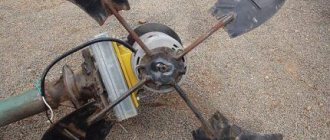
Assembling the unit
We begin to construct a grain crusher with our own hands. Let's start with something simple - install chopper knives. It will be necessary to put the knife on a 6 cm thick pulley; for this you will have to make or select a flange that would fit onto the pulley on one side and fix the knife on the other (the type of flange will depend on the specific model of the machine and the type of chopper knife).
Having put on the knife, we will have to take care that flour and grain particles do not fall into the drive mechanism of the chopper. To do this, we will cut out a patch from tin and screw it onto the shredder bushing, and we will need to put a rubber patch on top. Make sure that the patches do not interfere with the rotation of the mechanism.
Now let’s set up a funnel to drain the crushed grain. As you know, the washing machine drain is located at the lowest point of the washing tank. Let's take advantage of this and turn the drain hole into a grain outlet.
- Using a chisel and hammer, we expand the drain hole so that its diameter becomes 12-15 cm.
- Take a piece of pipe of the appropriate diameter and insert it into the widened hole
- We take the pipe to the side. Now the crushed grain will come out of the hopper and pour into the container.
Next is the most difficult stage - you need to fix the fine-grained grate at the desired angle in the bunker, avoiding gaps between the edges of the grate and the walls of the bunker, otherwise the grain will slip through the cracks and end up in the same container with the “crushed grain”. You need to do the following:
- Determine the radius of rotation of the chopper blades and make a mark at the maximum point.
- Step back a little from the mark you made and draw an even line - this is the border where you need to install a fine-grained grid.
- Now your task is to cut the grate so that it fits exactly at an angle from wall to wall of the bunker with virtually no gaps. The result will be a complex figure that will need to be securely fastened.
- Screw the grate to the walls of the bunker as securely as possible. If possible, it can be welded altogether.
- We coat the cracks with cold welding or automotive sealant and let them dry.
Now we can say that you managed to make a grain crusher with your own hands, you can move on to testing. We set the mode on the control panel that requires maximum rotation of the activator for about 3 minutes and start our grain crusher. We watch how the knife rotates and listen for any extraneous sounds. Then we check how the engine heats up and whether there is excessive friction in the drive mechanism.
Having checked all this, you can begin the first “field tests” of our grain crusher. We pour a bucket of grain into the hopper, close it on top with a standard washing machine lid and start the unit. At the same time, do not forget to substitute a container for crushed grain. That's all, we hope everything works out for you!