Motor selection and connection
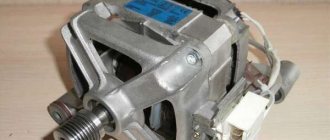
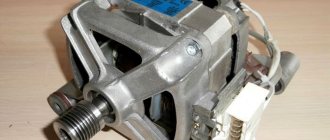
It all depends on the power of the unit. Belt-driven motors are best so that the speed is transmitted directly to the saw. If you plan to install a 35 cm disk on a circular machine, then 1 kW of energy will be required to start it. The saw, whose diameter is 17 cm, operates from 500 W. This means that motors from old Sibir or Oka washing machines are quite suitable. All that remains is to adjust the engine speed, because unstable rotation will cause the saw to “tear” the wood.
The tachometer, which controls the control module, is responsible for the number of engine revolutions in the washing machine. But since the module will not connect to the circular circuit, it is recommended to install a voltage regulator.
Connecting the electric motor is considered an important working step, and if everything is not done correctly, then you can’t expect normal operation from the circular saw.
A simple circular saw from a grinder or circular saw
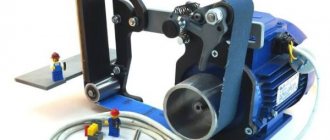
An angle grinder (grinder) is one of the most popular home craftsman tools; with its help it is easy to cut metal and clean welds. In addition, using a wood disc instead of a standard abrasive disc, the grinder can be turned into a hand-held circular saw (it is also called a parquet saw), and by making a frame with a table, it can be turned into a stationary circular saw.
Required accessories
To work you will need:
- multilayer plywood with a thickness of 10 mm or more;
- switch and wire;
- countersunk head bolts;
- screws;
- wooden block 40x40 mm.
You also need to prepare a drill or screwdriver, hammer, screwdriver, pliers, ruler and pencil. Using these tools you will have to make a circular saw with your own hands.
Of course, you must not forget the grinder itself or the hand-held circular saw. At the first stage, it will help to cut the material, and then it will take its place as the working body of the circular saw.
Sequencing
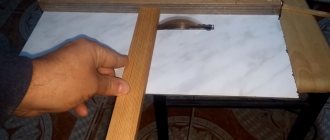
The first step is to make the body of the circular. Thick plywood is perfect for this; you can use any pressed wood boards. You will need to cut four rectangular sheets, size 40 x 80 cm. They are used to assemble a box with a square 80 x 80 cm at the base. For ease of assembly and reliability of the structure, four bars are installed in the corners.
The resulting box is closed on top with a table top. It can be made from the same plywood, but it is better to use some sheet material with a laminated coating. This guarantees the durability of the machine and ensures ease of use of the homemade circular saw.
A cut is made in the tabletop to allow the disk to come out, and holes are drilled on the sides for attaching the tool.
The grinder must be securely fixed under the tabletop. The design of the latch can be very diverse, it all depends on the configuration of the machine itself. The main requirement for fastening is that it must securely hold the angle grinder without allowing it to move.
The simplest fastening may look like this: two metal squares, a grinder is fixed between them with a steel clamp.
For additional strength, it is recommended to use the thread of the side handle; a bolt with a suitable thread is screwed into it.
Two holes are drilled in the upper shelves of the angles holding the angle grinder. The structure is secured from below to the tabletop using countersunk bolts. All that remains is to block the power button and connect the angle grinder via an external switch.
In the same way, you can make your own circular saw from a circular saw. In this case, the work is noticeably simplified due to the fact that there is no need to invent a fastening. It is enough to make a cutout for the disk, drill holes along the holes of the plate with a hand-held circular saw.
Moving parts
Having finished connecting the engine and making sure that it normally increases and decreases speed, you can proceed directly to the circular device.
Let's figure out which moving units that bear the main load we will need:
- saw shaft;
- SMA motor shaft;
- drive belt;
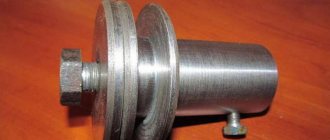
- two pulleys - from the washing machine and the circular shaft.
The drive must operate in this manner. The engine transmits rotation to a shaft on which a small pulley is pressed. The last one is wearing a belt that sends revolutions to the second pulley. At first glance, everything seems simple, but when the circular is being installed, many difficulties arise that must be resolved.
The small pulley must be sharpened. Three to four transverse grooves are placed on it so that the belt has the opportunity for a good hook.
You don’t have to use the belt from an old washing machine; just take an analogue from another unit. The main thing is that it is durable and has teeth.
A disc of a slightly larger diameter is welded to the edge of the large pulley to create a protrusion that prevents the belt from slipping during operation. It is not necessary to sharpen the serrations on this pulley; the clutch with the belt will be quite sufficient.
The shaft holding the circular saw, fastenings in the form of a washer and a nut must be reliable so that at maximum speed the saw does not become deformed and does not jump off, injuring workers. It is recommended to use the shaft and fasteners from a factory-made circular saw.
The procedure for constructing a circular saw is described for a saw with a three-hundredth blade. Many will say that the SMA engine will not pull such a saw and will stop. But here you should remember a few rules:
- you need to be able to operate a circular saw correctly;
- household saw, designed to work with small volumes of materials;
- the successful operation of such a saw is confirmed by numerous reviews.
Simply put, the saw should not be overloaded, and it is better not to work at idle speed .
Speed regulation
During the operation of the tool, it becomes necessary to work with materials of different sizes, so you need to be able to adjust the speed up or down. To do this, you can use a dimmer or trigger from a hand-held electrical appliance, because they allow you to regulate the voltage supply and, accordingly, the speed of rotation of the disk. We connect one of the coil terminals to the armature terminal, and connect the second one to power supply from the network. We connect the second armature output through a dimmer in the same way. We check the scheme and launch it.
A more complex way to regulate speed is to use a tachometer. Using it, you can regulate the rotation speed without losing engine power. Attention, you need to connect the tachometer using a microcircuit. It equalizes power when the load on the shaft increases. You can buy the required microcircuit or make it yourself. The TDA 1085 board diagram will help with this. The list of necessary parts is extensive, but with the list at hand, it can be easily assembled in specialized stores.
Useful tips
When making a circular machine with your own hands, it is recommended to provide opportunities for its repair and maintenance. Any moving part must have convenient access for lubrication. When starting all installation work, you should prepare detailed drawings and diagrams and perform the appropriate calculations. A homemade circular saw is different in size and can easily fit in a utility room.
Assembly
There is nothing complicated in assembling a circular saw, but there are some nuances. The circular saw motion module includes the following elements:
- motor shaft;
- shaft for disk attachment;
- belt transmitting movement;
- motor and saw pulley.
Important! In a simplified version, assembly can be done without the use of bearings.
The build process includes the following steps:
- a drive belt is put on the smaller pulley: rotation is transmitted to the saw blade from the shaft; to avoid the belt slipping, notches are needed on the pulley; if there are none, we make 3-4 transverse grooves ourselves;
- for better adhesion, bitumen can be applied to the surface;
- the belt can be used not only from a washing machine, but also from any equipment; it must have serrations and be of sufficient strength;
- to prevent the drive loop from slipping off the large pulley, a small protrusion is welded onto its end; you can weld a disk with a larger diameter than the pulley;
- For safety reasons, the disk on the shaft should be secured very well so that it does not come off during operation, which can lead to serious injuries;
- To adjust the belt tension, the hole for fixing the engine must be bored out.
How does the device work?
The circular saw works as follows:
- The motor starts and drives the shaft and pulley.
- As a result of rotation, the drive belt transmits speed to the circular saw pulley.
- After this, the saw rotates, due to which it cuts the material
A homemade circular saw is a useful tool to have around the house. And due to the fact that available materials are used, the cost is minimal.
Source: 2lzz.ru
What is a miter saw?
A crosscut saw is a mechanism with a cutting disc designed for sawing wood and composite materials at right or other required angles. Designed to work on a flat surface. Allowed to be moved and installed in a temporarily equipped workplace. Their appearance resembles machines for cutting pipes, fittings, and stone.
There are several types of miter saws:
Pendulum - a horizontal frame with a turning circle. A lever (pendulum) is attached to the reverse side of the circle, which is where it got its name. The saw blade is mounted on this lever. The workpieces are fed along the guide bar. To make a cut, a lever with a rotating disk is recessed into the board.
Combined - everything is the same. Thanks to the hinges, the ability to rotate the lever relative to the horizontal plane has been added.
With horizontal stroke. It resembles a pendulum saw, but allows you to cut wider parts by moving the mechanism with a rotating disk along the runners back and forth.
As an addition to all trims included:
- dust bag;
- laser illumination;
- pipe for connecting a vacuum cleaner.
How to make a circular saw drive
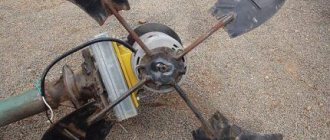
What engine does it need? It depends on what kind of automatic washing machine you have gathering dust in your storage room. It is better to take an engine, of course, with more power.
Although for a mini-circular, which is assembled in a similar way, a less strong one will do. Its difference is its light weight and the installation of the mechanism not on a stationary base, but on a wooden box. It serves as both a bed and a chip storage.
Preparing the motor
The collector motors of washing machines have several outputs. How to determine and connect the ones you need? We use an ohmmeter to test the second coil, selecting the one with the highest resistance.
We check other connections at the commutator and brush outputs.
We also find, measure and mark the speed sensor wires. They may be located inside the case, then disassemble it.
We connect the first output of the collector and one from the coil. The second one, with the remaining coil contact, is connected to the network. We are doing a test run.
Attention! When installing the unit and its operation, the risk of mechanical and electrical injuries is increased. Be especially careful and careful! Follow safe work rules!
To enable reverse rotation, the contacts are swapped.
Adjusting the speed
In order for a circular saw to process materials of different sizes, a device is needed to add or reduce the number of revolutions.
In the device from which we removed the motor, this function is performed by a tachometer operating through an electronic module. The latter will not work with our device.
The simplest thing is to use a dimmer or trigger from a hand-held electrical appliance to control the voltage supply and, accordingly, the shaft rotation speed. The connection goes like this:
- one coil terminal is terminated with the armature terminal;
- the second - for mains power;
- the remaining armature output through the dimmer is the same;
- Having checked the connection, we test it.
A more complicated option is using a tachometer. It will allow you not to lose electric drive power during operation. It must be connected through a microcircuit, which will equalize the power as the load on the shaft increases. If it is impossible to buy a ready-made one, using the TDA 1085 board diagram and the list of necessary parts, you can assemble it yourself.
Motion module
- Shaft for attaching the cutting disc.
- Motor shaft.
- Transmission belt.
- Motor pulley.
- Saw pulley.
To simplify things, you can assemble the device without bearings.
Through a drive belt placed on a pressed-in smaller pulley, the shaft transmits rotation to the saw blade. The pulley must have notches so that the serpentine belt does not slip on it.
Practice advice! Apply a little bitumen to the surface, which will provide good adhesion for a long time.
A small protrusion is welded onto the edge of the larger pulley to prevent the drive loop from slipping.
The disk must be securely fastened to the shaft, otherwise it will come off and cause injury.
Bore the holes for fixing the engine to adjust the belt tension.
Starting device
You can choose a switch for a household electrical appliance for it. It’s better to install a push-button one from a Soviet washing machine.
Its connection diagram is as follows:
- At the input it is powered by two contacts, and inside one wire bifurcates.
- Of the three outputs, one will be phase, the second zero.
- The third, through a capacitor, will give a shifted phase.
This connection will provide better launch. But after it it is necessary to disconnect the capacitor.
For a welded frame, a rectangular twenty-millimeter profile is suitable.
The drive and motion module are securely attached at the bottom. This design leaves the upper platform free.
According to the testimony of the craftsmen who made such machines, they spent about six months on it. But we are quite satisfied with the equipment. So go for it too!