Hi all! And again we will create! Today my little one and I are faced with the task of making a snow globe with our own hands. And you know, we are already rubbing our palms with pleasure in anticipation of a miracle! And we will do this Miracle ourselves! I invite you all to be witnesses and accomplices. Let's create everything together!
What will we talk about in the article? First, I will voice some details regarding the necessary tools and material. Then the subtleties of making the ball. And at the end I have prepared a master class for you.
The program is extensive and designed with the help of little ones in mind! It seems that everything is so serious that there is nothing to trust them with.
But I think that you and I will find something that the kids can do too! Here we go?!
Necessary material for making crafts
When you hold this ball in your hands, it seems that the only thing needed to make it is magic. They shook it a little, and suddenly everything crumbled into a charming snowy day. A real mystery! And really, this riddle can be done at home? Yes! Can! And it is necessary!
For this we need:
- Jar
- Water - 5 parts
- Glycerin - 1 part
- "Snow"
- History in the plot
Will any jar work? Will any material become snow? And which story to choose? Let's answer these questions!
Jar. We need everything in the bank to be clearly visible. Therefore, plastic or a jar with any design, pattern, sticker or edges will not work.
Water. Of course, without water everything will be much easier. But our goal is for the snow to swirl and fall slowly. Therefore, water is needed. Can’t do without her! But how can we prevent the snow from floating on the surface and settling slowly? This is why it is worth making a solution from glycerin.
Glycerol. There should be a lot of it, then the snowflakes will swirl. Ideally, the proportions of glycerin and water should be 1 to 5. Without glycerin, you can make a ball, but the snowflakes will quickly fall to the bottom.
The speed of rotation of snowflakes will depend on the amount of glycerin; the more of it, the slower they will spin.
Many people are interested in the question: is it possible to make a snow globe without glycerin just using water? We answer, no, without glycerin the snowflakes will immediately fall to the bottom.
"Snow". What's suitable? Glitter, cut pieces of thin plastic or foil, artificial snow.
The story is in the plot. This is something worth thinking about. Firstly, what should the plot be about? It's best if it's themed. After all, the ball can be made for any occasion as a gift. You can take plants as decorations, figurines as heroes, etc. The ball with a photo inside looks original. But the photo should first be laminated or covered with tape.
You can even give it as a gift - a keychain with flying snow.
Tricks to help you make a cool snow globe
Now I will continue the topic I started. I’ll just show you how you can make a “ball” in different versions.
First of all, who said that you need pot-bellied jars? They can be of any shape and size. The main condition is that in order for the toy to look beautiful inside the jar, the container must be either slightly convex, and/or must be 2-3 cm higher than the figure.
Our New Year's story assumes that there will be snow. I offered several options to choose from. But these are mostly ready-made products. How to make artificial snow with your own hands at home? Yes, you can cut, as I already said, plastic.
But you can also grate a candle or hard soap on a fine grater. Only in one case or another the water will become cloudy very soon. There are 2 more options for making snow yourself: eggshells, which were dried and then crushed; or diaper filler.
It should be taken out and moistened a little. And it is indistinguishable from natural snow.
And I will immediately answer a question that may have arisen in your mind. Is it possible to make a ball without glycerin? Easily! It is replaced with very sweet syrup or Vaseline oil. Some people take refined vegetable oil instead of glycerin. Take note of this idea too.
And one more nuance. For complete sealing, you need silicone tape or thin rubber; you can use a medical glove cut into strips.
Without glue, the structure will fall apart! Find glue that is not afraid of water. And it is desirable that it hardens quickly.
Last thing. The lid itself does not look presentable or elegant. It should be “disguised”. How? Ribbon, bow, paper strip.
Let's prepare a New Year's craft together
Since the holidays are approaching, my baby and I decided to make a snow globe for the New Year. At first we wanted to buy figurines of holiday heroes. But we went through everything we have and found everything we needed. Therefore, they did not postpone the creative process while there was time and the right mood.
A set of materials and tools for making crafts:
- Jar with screw cap;
- Figurine of a frog-Santa Claus with a red hat and on skis;
- Sprigs of Christmas tree and juniper;
- Rain;
- Glue "Moment";
- Silicone tape;
- Scissors;
- Water;
- Glycerol;
- Ribbon;
- Cork;
- Styrofoam;
- Foil balls.
First of all, we make neat holes in the cork of a 5-liter water bottle, and insert plant decor into the holes.
Afterwards, when we fill the entire lid with glue, the structure will become completely stable. But even now it’s worth trying to keep the holes small and the plants to fit deeply into them.
Fill the lid with glue and install the “Santa Claus” figurine, lay out “drifts” of foil balls. And in the spaces between them we glue pieces of foam plastic.
The structure is ready. We fix it on the lid of the jar. Apply glue along the bottom of the lid. And when we put it in place, we additionally fix it with drops of glue on all sides.
- Cover the side of the lid with tape.
We are preparing the water. First fill it halfway, then add glycerin. If necessary, add more water, but remember that our structure will take up some space.
It is not always possible to completely remove air from the jar. And there is no particular need to do so.
We cut the rain into “snow” and lightly crumble the foam. This last one - my little one really liked it. I liked it so much that without him noticing, I had to catch part of his “work” and remove it from the jar, otherwise everything would have been covered in snow up to the very beginning.
Before connecting the lid and the jar, we will take care of complete sealing. Cover the thread with silicone tape.
All! The last step is to screw the lid on and turn the jar upside down! And we really like him!
- The snow is spinning
- And it settles.
Our glass New Year's snow globe is ready! The baby and I are happy! Still would! Your own snow! We want to make a snowstorm, we want to just admire how bright and beautiful everything is!
Snow globe with a snowman - step by step photo
That's all! Every fairy tale ends, even the most beautiful one. Today we learned how to make magic with our own hands, and gave our kids the belief that they can do this magic, they can do it themselves!
That's all for today! I'm sure this won't be our last creative evening! And we will try to do something similar again as soon as the opportunity arises. Therefore, stay tuned for new articles. To make this easier, subscribe. I invite you and your friends to share how you managed to make a fairy ball!
Goodbye! Waiting for your comments.
Source: https://daynotes.ru/podelka_snezhnyj_shar_svoimi_rukam/
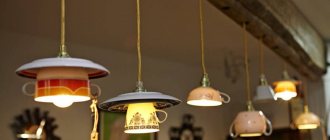
New Year's stands for kitchen utensils
So that the spirit of the holiday can also be felt in the kitchen, where culinary masterpieces will be created for the New Year's table, make festive stands for various kitchen utensils out of jars. With such decorative elements, the dishes will turn out even tastier, because you will cook in a cheerful mood.
You can paint the jars with paints, decorate them with winter paper applications, or make these cozy covers out of old sweaters.
Do-it-yourself glass ball with snow or how to make a snow globe with your own hands
Hello, dear readers! We all know factory-made glass balls with liquid and a beautiful composition, which, when shaken, “activate” snowfall inside the container, but not everyone knows that a similar item can be made independently.
That is why today we will tell you how to make a snow globe with your own hands, practically from scrap materials.
We recommend involving children in the process of creating such a wonderful item; it will be very interesting for them to observe and perhaps even participate in its recreation.
DIY glass ball with snow
What you will need:
- A small jar with a screw cap (you can specially buy a glass jar with baby puree).
- Nail polish.
- Polymer glue or Moment.
- White tinsel or artificial snow.
- Scissors.
- White and silver glitter.
- A suitable figurine is clay, ceramic or plastic (sold in any souvenir departments).
- Glycerin (can be bought for about 8 rubles at absolutely any pharmacy).
- Purified water (distilled or purified with a home water filter).
Some more ideas for inspiration
Select several jars of non-standard shape, come up with different “plots” for the “snow globe” and create your own masterpieces: exclusive, original and soulful. And all your household members will be in a pre-holiday mood!
Based on materials from the sites www.futurahomedecorating.com and www.blog.etsy.com
DIY snow globe
The snow globe is one of the most popular Christmas souvenirs around the world. Inside the glass toy there are usually some figures - snowmen, small Christmas trees, elegant houses or other traditional characters.
As soon as you shake this simple composition, a fairy tale comes to life: artificial snow or sparkles slowly swirl and gradually settle. You can easily make such an interesting craft and a memorable gift with your own hands and at home.
How to make a snow globe?
To make the snow globe bright, add glitter, but not too small. If you are not sure about the quality of the sparkles, which may contain gold dust instead of small grains, then you can use regular tinsel, which is finely cut with ordinary scissors. You can also use artificial snow or beads.
You will also need:
- figurine (any suitable size and that does not dissolve in water, you can even a laminated photograph or picture),
- a beautiful jar with a well-closing lid (I used a half-liter one, but you can even use baby food jars, the main thing is to find a figurine that is the right size),
- universal glue moment,
- liquid glycerin at least 1/3 of the volume of the jar (the amount also depends on how slowly you want the “snow” to fall; the more glycerin, the slower. The main thing is not to overdo it, otherwise the “snow” will hang in the air all the time ),
- water (either filtered, boiled, or distilled. If you take plain tap water, your snow globe will become cloudy over time),
- glue gun
If you are decorating a jar or making a decorative stand, like me, additionally prepare:
- satin ribbons, decorative twigs, flowers, etc. for decorating a jar,
- cardboard (but not hard),
- scotch,
- scissors,
- self-adhesive film – gold,
- PVA glue,
- dry glitter - gold,
- thin brush,
- Well, and, already listed, a hot glue gun.
So let's get started!
Wash the jar, lid, figurine and all additional decorations well so that the water does not become cloudy over time. I treated everything with boiling water, as for preservation.
I have already used tinsel, sparkles and beads to imitate snow.
I'll tell you how to make a snow globe with sparkles, as there are some subtleties here. There are no such problems with tinsel and beads.
We take a clean jar, in my case a half-liter, and fill it with 150-250 ml of glycerin.
Fill the rest with water (we don’t fill the jar to the brim, because we still have a figurine that will fit in there, which will displace a certain amount of water).
Add glitter and mix with a clean spoon.
Even if the glitter is large, there are particles that did not settle to the bottom of the jar. We must definitely collect them, otherwise they will subsequently always float on top, and this, frankly speaking, does not look very good. This can be done with a small spoon or the tip of a clean waffle towel.
Now, very carefully, preferably over a plate, we immerse our composition in the jar, twist it a little so that there are no air bubbles anywhere. Screw the lid tightly. You need to try to close it so that there are no air bubbles left in the jar. Since we didn’t glue the lid inside, it can be remade if necessary.
When the lid is screwed on, for insurance, you can go over the joint from above with universal glue (if you have it, it can be waterproof). There have never been any problems with such jars, so the glue, in principle, only serves to secure the lid so that no one accidentally opens it.
Our snow globe is ready! Let's decorate it a little to hide all traces of the lid and jar.
You can make a durable stand from several strips of cardboard and cover it with gold self-adhesive film. The diameter is equal to the diameter of the cap. We decorate with all kinds of ribbons, twigs, it all depends on your desire and imagination!
I added a little sparkle curls and used them to hide the carvings on the bottom of the jar and all sorts of unnecessary numbers. To do this, dilute 1:1 water and PVA glue, generously add dry glitter to this mixture. I painted the curls with a regular thin brush.
- And here's what I got!
- And with flying sparkles...
Dye
With the use of paint in decor, the scope for imagination opens up simply enormous. If you plan to use the jar as a candle holder, it is very important to leave the window unpainted. To make it, you can use stickers or decals of different shapes.
By the way, windows in the form of leaves for autumn decor or in the form of snowflakes for winter look great. Cut out the stencil and stick it to the jar with double-sided tape, paint the jar with paint (you can use several colors), wait for it to dry completely and remove the sticker.
Sets of several banks, which are decorated in the same style and in the same color scheme, but with slightly different techniques, look great. We take three cans. We paint one completely, partially cover the second with sparkles, and on the third we draw hearts, circles or stripes.
Another amazing trick is to use fluorescent paint that glows in the dark. You don’t even need to come up with special designs: just spray paint on the surface of the jar. In the dark it will look like a fairy tale item. The children will be delighted!
Those who are interested in the theme of space will definitely like the idea of reproducing cosmic distances on a jar. You will need paint of different shades and an unnecessary sponge for washing dishes. Dip it in the paint, and then blot the jar. And so with different colors - they should overlap each other. The star effect can be created with white paint splashed with a brush or an unnecessary toothbrush.
One technique that can be used is decoupage. You will need napkins with a beautiful pattern and glue. The technique requires patience and skill. If you want a faster result, you can randomly wind the twine around the can, paint it, and then remove it. The very option when beauty is in simplicity.
Crafts on the theme of winter - beautiful and unusual ideas
On winter evenings, children can spend hours making crafts with their mother. What to get them excited about? Build a winter landscape on a sheet of cardboard, make funny little animals from pine cones brought from the forest. And if you add a homemade spruce, a little cotton wool and imagination to them, you will get a wonderful composition. You can safely take it to a winter crafts competition in kindergarten or school.
When working with kids, choose an easy technique for making crafts. With older children they build complex compositions. To do this, use jars, permanent paints and glue.
This short review presents several crafts of varying complexity to suit every taste. They don't have to be copied. It is more interesting to implement your own project. And the ideas...
they float in the air like snowflakes. Put your hands up and catch it!
A semblance of the popular ball can be made from an ordinary glass jar with a lid. Place in the center:
- small Christmas tree;
- finished figurine;
- small house.
You will need glitter or artificial snow and glycerin (available in pharmacies), aquarium glue or other moisture-resistant composition. Progress:
- A jar with a lid is selected according to the size of the figurine. It will fill with liquid, so you need to immediately check to what level to fill it. A mark is made on the outside with a felt-tip pen.
- A toy or souvenir is fixed to the lid with a few drops of glue.
- The jar is filled with a mixture of glycerin and water in a 1:1 ratio.
- Artificial snow or small sparkles are poured onto the bottom up to 5 mm thick.
- Glue is applied to the jar in the thread area.
- The lid screws on tightly. After a couple of minutes, you can turn the jar over and check the tightness of the jar.
An amazing souvenir is ready.
Tabletop composition or diorama
Panoramic works look advantageous. A 3-D stand is made for them: a base and two side walls. Large cardboard boxes are used for this. If they are brown, they are covered with colored paper of the desired color.
Another option is to paste ready-made drawings with the sky, clouds, outlines of trees or bushes. The following are used as construction materials:
- salty dough;
- pasta;
- foam used for stuffing soft toys;
- cereals;
- plasticine;
- air-hardening plastic;
- branches;
- cones;
- cotton wool;
- cotton pads;
- felt;
- padding polyester;
- colored cardboard;
- paints;
- decorative elements;
- much more.
For example, let’s imagine a Christmas tree surrounded by animals against the backdrop of snowdrifts; they seem to come out of the background; they are built last, when the composition is ready. Cotton wool is convenient for masking small flaws in crafts.
Christmas tree made of pasta
A Christmas tree made from curly bows looks original, but feather pasta will look organic in a composition with animals. They will be glued to the cone with PVA glue or “Universal Moment”.
First, a narrow, long cone is made using thick cardboard. Its diameter should not exceed ¼ of the height. For stability, a dense bottom is glued to it. The lowest row of mascarons is attached to it. They are attached perpendicular to the tree. The rest are glued at an angle, with the beveled edge towards the cone.
The distance between the rows is equal to half the length of the pasta. When the top is ready, the tree needs to be painted. For this, regular gouache or acrylic paint is used. Older children can use spray paint, but keep in mind that it is very toxic.
Animals made from pine cones and plasticine
Plasticine funny animals would be appropriate for a winter diorama. They are easy to make from pine or fir cones using colored plasticine. All you have to do is:
- eyes;
- nose;
- ears;
- beak, if it is a bird, or tongue;
- paws;
- tail.
It is better to choose dense cones, with scales that have not fully opened. The paws are needed to tightly fix the figures on the stand.
Eyelashes and mustaches are made from pieces of wire or bristles from a hard brush for cleaning clothes or shoes. If you have pieces of wire, you can use them. All parts are carefully attached to the cone.
For the durability of crafts, plasticine is replaced with air-hardening plastic.
Such crafts are not afraid of transportation. They will not be wrinkled if accidentally dropped.
Soft applique
The landscape will become more voluminous if you use fleece, felt or ordinary cotton pads to create it. To make an urban winter landscape, you will need:
- base: a rectangle or square made of thin plywood or a lid from a large cardboard shoe box;
- colored cardboard;
- cotton pads;
- ruler;
- pencil;
- markers;
- PVA glue with a pointed nozzle;
- white table napkins of standard size;
- scissors.
Work order:
The work is done from a sketch of a template: houses, trees. Marking the base is done with a colored pencil so that the excess can be erased.
Cut out from colored cardboard:
- large rectangles - houses;
- smaller – windows, doors, chimneys;
- triangles - roofs;
- tree trunks.
- Small snowflakes are cut: the napkin is cut into 16 parts, each folded to form 8 thin ribbed rays; complex patterns are not made on snowflakes.
To make the parts look more voluminous, a soft backing is made from pieces of disks under each one.
- Snowflakes are glued on top, and snow caps made of disks are glued to the roofs and trees.
- The work ends with drawing the details:
- street poles;
- wires;
- benches.
The landscape can be supplemented with small contour figures of people and animals. They are made as flat as the rest of the parts.
When it gets dark outside and there’s still a long time before you go to bed, it’s time to get creative. In an old shoe box you can make an amazing three-dimensional collage or diorama with New Year's characters.
In such packaging it will be convenient to transport it for participation in the competition. Give your child the joy of joint creativity and inspire him to create interesting crafts. Make magic together.
Good luck and inspiration!
Photos of homemade winter crafts
Source: https://podelki.guru/podelki-na-temu-zima
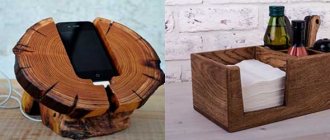
Night lights made from cans
Children will be delighted with these night lights-candlesticks made from small jars. On the outside of the jars, stick templates of winter landscapes and New Year's characters cut out of paper, and place candles in the middle.
How to make a Christmas tree or a snowman in a jar (see photo)?
- For the New Year, as a gift, you can make an original jar with your own hands with a Snowman or Christmas tree inside it.
- You need to think about the composition, how the item will be placed inside the jar and select the glass jar itself.
- This can be any jar with a screw cap left over from vegetables, baby food, cosmetics, etc.
We thoroughly rinse the jar and find a Snowman figurine or a Christmas tree. You can make a snowman or a Christmas tree yourself from available items: polymer clay, salt dough, polystyrene foam, etc.
We place the Snowman or Christmas tree inside the jar, placing the lid on the back inner side and gluing it. As decoration, we take rain, shiny tinsel, grated foam, artificial snow and other New Year's decorations and also place them in a jar.
Once glued, turn the jar over and screw the jar tightly. Wonderful craft!
To have snowflakes inside, like a New Year's magic ball with snow , you need to pour sparkles, glitter, artificial snow, chopped rain or something that will act as snow flakes inside, then fill the jar with glycerin in half with water 50/50.
Be sure to take waterproof glue, for example, sealant, floral glue, and glue a snowman or Christmas tree made of polymer clay to the inside of the lid. The craft must be made of polymer clay so that it can remain in water for a long time. Screw the lid on and glue it with glue.
When it dries, the craft is ready. You can shake and watch the snow flakes slowly sink to the bottom.
Before closing the jar forever, you need to shake it and pay attention to the rate at which the “snow” flakes settle: if necessary, you can add glycerin to make them settle more slowly or water to make them settle faster.
- Who likes crafts with Olaf the Snowman from the cartoon “Frozen”, you can make crafts from a glass jar with snow with this character.
- New Year's jar with Anna from Frozen
Source: https://www.bolshoyvopros.ru/questions/1326976-kak-sdelat-jolku-ili-snegovika-v-bankesmotrim-foto.html
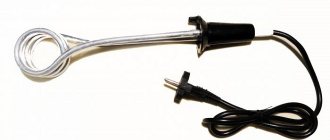
Christmas tree made from cans
A Christmas tree in a small apartment runs the risk of being knocked over or hit. But such a DIY Christmas tree made from cans will create a holiday even in the tiniest room. Fill six jars with small Christmas tree decorations, arrange them in a pyramid, decorate with a garland and a Christmas star. Your unusual Christmas tree is ready!
Can of snow
Creating new crafts for the New Year holidays is a joyful and exciting activity that will delight the whole family. Making a fabulous souvenir is quite simple, the main thing is to follow the master class. In this article we will look at: how to make a jar of snow with your own hands.
Jar with snow
You will need: a small glass jar with a lid, a glue gun, glycerin, a piece of foam plastic, a small toy (we have a white bear), an artificial spruce branch, scissors, small pliers, glitter.
Master Class
- Glue foam plastic as a snowdrift and a spruce branch to the lid, then try it on the jar so that everything fits.
- Glue the bear (or other toy) to the snowdrift.
- Fill the jar with glycerin.
- Add glitter and foam balls to the jar.
- Close the jar with a lid and turn it over.
The jar of snow is ready! I recommend watching this video!
Snow globe with snowman
You will need: a glass round jar with a lid, glycerin, distilled water, a glue gun, glitter, a snowman toy.
Master Class
- Glue the snowman to the lid.
- Pour distilled water and glycerin into a jar in a 1:1 ratio. The jar should not be completely filled.
- Add a teaspoon of glitter.
- Close the jar tightly and invert it.
The snow globe with the snowman is ready! I recommend watching this video!
Snow Bank
You will need: a small glass jar with a lid, a glue gun, waterproof white glue, a brush, glycerin, distilled water, foam, a toy, glitter, 2 small Christmas trees.
Master Class
- Glue a piece of foam to the lid as a snowdrift using a gun.
- Apply a layer of glue to the foam and sprinkle generously with glitter, then wait until it dries.
- Glue the toy and 2 Christmas trees to the shiny snowdrift with a gun.
- Pour distilled water and glycerin into a jar in a 1:1 ratio. The jar should not be completely filled.
- Add some glitter.
- Close the jar tightly and invert it.
The snow jar is ready! I recommend watching this video!
As artificial snow, you can use polystyrene foam, glitter, coconut shavings, tinsel, neon sticks... If you fill the jar completely with glycerin, the snow will fall very smoothly, and if in a 1:1 ratio with distilled water, the falling process will be faster. A jar of snow will not only be an excellent holiday decoration, but also a delightful handmade gift.
Loading…
Source: https://svoimirukamy.com/banka-so-snegom.html
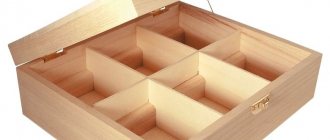
Vases made from glass jars
For the winter, replace ordinary vases with beautifully decorated jars. You can put spruce or pine branches, or winter flowers in such improvised vases with your own hands to fill the house with beauty.
\
New Year's souvenir - DIY snow in a jar
Last year we bought my daughter shower gel, on the bottle of which a cute Cinderella posed in a glass ball. I don’t want to repeat myself, and besides, the very idea of a man-made winter is attractive, so I collected information from the Internet and today I am sharing it with readers.
I planned to call the article “New Year’s ball with snow,” but I came to the conclusion that it was difficult to make one at home due to the lack of transparent balls.
But cylindrical glass jars are found in every kitchen, and it is they that craftswomen use to create homemade winter-themed decorations.
The figures are glued to the lid, dried, then “snow” is poured into a clean jar and filled to the top with “winter air”. All that remains is to connect the two parts of the product and conduct a test: whether snow falls, whether the contents leak out.
Which plot to choose for the craft?
In tall jars, slender fir trees look impressive, next to which children and animals walk; in low jars you can also place one item each: a snowman, Santa Claus, the animal symbol of the year, a resident of the North; tree, winter house, etc.
Beautiful and touching Christmas compositions with angels and Christ's nurseries. Sometimes it is appropriate to use a background cut from a postcard.
In order for the craft to acquire a complete design, it is worth decorating the lid-base: with paint, fabric, self-adhesive film, bright tape, a bow, varnish.
What materials are needed for snow in a jar?
- Actually a jar with a tight screw-on lid.
- Small toys that are not afraid of moisture. Ideal - penguins, bears and princesses made from chocolate kinder eggs.
- Supermoment glue for attaching toys to the lid.
- Artificial snow or glitter, crushed rain, foam balls, grated white paraffin candle.
- Transparent liquid filler. Filtered water, a mixture of water and glycerin, or pure glycerin from a pharmacy will do. The higher the density, the slower the snowflakes fall down - it’s more interesting.
What may not work
Often the creative process can be overshadowed by ridiculous mistakes during work. It’s good if they can be fixed, but it’s better to know in advance what might go wrong:
- Using low-quality glue will result in the decor not sticking.
- Inappropriate placement of pictures or photographs. An example would be using a cropped photo that shows only the child's head.
- Too much decor. Decoration should be in moderation; the product should not be overloaded with unnecessary items.
- Liquid filler leaking.
- Fingerprints on an undried layer of paint or varnish will ruin the craft.
Options for decorating jars.