Hardware stores and gift wrapping departments stock many beautiful boxes of varying sizes and purposes. Small wardrobe items, cosmetics, threads and household items are stored in boxes.
Gift boxes are also used to beautifully present gifts for holidays and memorable dates. But you don’t have to buy boxes if you really need them - you can make them yourself from cardboard and thick paper.
Heart gift box
What do you need
- Sample;
- White paper;
- scissors;
- pencil;
- thick paper;
- glue gun.
How to do
Print the template on plain white paper. Cut and fold along the lines. On a narrow part you need to make a horizontal cut along the line indicated by the arrow.
Frame: Sarah Johnson – Pugdemonium / YouTube
Trace the templates onto construction paper and cut out. You will need two hearts and two stripes of each type. Follow the fold lines with scissors, without cutting through the paper, and fold it.
Frame: Sarah Johnson – Pugdemonium / YouTube
On all four long pieces, make many vertical cuts before the fold. Glue the wider pieces to the smaller heart so that the cuts are on the back side. Details are shown in the video.
Frame: Sarah Johnson – Pugdemonium / YouTube
To get the box lid, make the same vertical cuts on the narrow parts. Glue these parts to another heart so that the cuts are on the inside. Close the box with the resulting lid.
Frame: Sarah Johnson – Pugdemonium / YouTube
What homemade boxes can be useful for and what is needed for crafts
Homemade boxes are multifunctional. A practical solution would be to use them for various small items, since they do not have a very large mass, and the cardboard can withstand the load.
If the cardboard is reliable, then the structure made from it can be thoroughly loaded with all kinds of small household appliances and items.
Books are being displayed less and less often. To keep them compact and neat, it is better to use a box for them. It will be not only convenient, but also beautiful. Cardboard products will help bring order to a children's room, where toys are scattered everywhere. It is easier for a child to put all his property in a homemade container than to look for a personal place for each item.
You can come up with different uses for a hand-made product, it all depends on your needs and imagination. Any type of cardboard is suitable for creating crafts, but if the strength of the structure is important, then it is recommended to choose a dense material. For example, packaging of household appliances.
You can “repurpose” shoe packaging, etc. The larger the “homemade” product, the denser the cardboard should be.
For small gift items, thin multi-colored cardboard, which is sold in stationery stores, will also work. In addition to this type of thick paper you will need:
- templates that will help you understand the principle of folding a box;
- sharp scissors;
- pencil (useful for making marks before cutting out templates);
- glue or double-sided tape;
- finishing materials.
Polygonal gift box
What do you need
- Thick paper;
- compass;
- ruler;
- pencil;
- scissors;
- glue;
- bow.
How to do
Draw two circles with a diameter of 5 cm on paper. Without changing the pitch of the compass, make six marks on the circles at an equal distance from each other. Connect these marks with straight lines inside each circle.
Draw lines on the outside of each corner as shown in the video. For one figure they should be 4 cm long, and for the other - 2 cm. Connect these lines so that you get six rectangles. To the right of each of them, draw a small detail with a beveled top.
Cut out the shapes along the lines. Using scissors, draw along the sides of the polygon inside the circle and along the line of the piece with the beveled top. Bend the shapes along the marked lines and glue each of them. Place a lid on the box and decorate it with a bow.
For such a craft, you can make a voluminous lid. It looks very original. By the way, the box itself in this video is made using a different, more intricate technique:
DIY cardboard box
A cardboard box, which can be made at home, should adapt to the gift that will be packed in it. The larger and more unusual it is, the more difficult it is to make packaging.
To begin with, it is recommended to learn from standard rectangular or square boxes, and only then move on to curvy shapes. You can also make decorations with your own hands, or buy them in specialized stores for needlewomen.
Basic materials
The main material for the craft is cardboard.
You can choose any:
- new or used;
- durable or soft;
- thick or thin;
- color or standard.
If you don't have cardboard on hand, you can use regular thick paper. To make the structure durable, use several layers or strengthen the frame with a stapler.
Tools and fasteners
To make a box you will need not only cardboard, but also:
- ruler and pencil to draw the shape;
- scissors to cut out the base for the future product;
- glue in any form. It is more convenient to use a glue gun, but others will do;
- double sided tape;
- stapler, if you need to strengthen the structure, make it more stable.
Decoration materials
The cardboard box itself does not look the most attractive. Therefore, it needs to be further decorated.
For this purpose materials are used:
- wrapping paper;
- artificial flowers;
- other decorations that do not add much weight to the structure;
- beads, beads, pearls;
- ribbons, bows.
You can use ready-made items from stores as decorations.
Square gift box
What do you need
- Scissors;
- thick paper;
- ruler;
- pencil;
- glue;
- bow.
How to do
Cut out a square measuring 20 × 20 cm from paper. Draw two vertical and two horizontal lines on it, stepping back 5 cm from each edge. In the middle you will get another square.
Use scissors to follow the marked lines and make grooves without cutting through the paper. Bend it along these indentations. Cut along short lines, bend the resulting parts and glue them together as shown in the video.
Cut out a square measuring 16 × 16 cm from paper. Draw two horizontal and vertical lines on it, 3 cm away from the edges. Then cut, bend and glue in exactly the same way as the previous piece. Place the lid on the box and glue a bow on top.
Instead of a regular lid, you can make two triangles that fit completely onto the box:
How to make boxes from paper and cardboard?
Giving gifts in bags, cellophane wrappers and paper wrappers is no longer attractive and is considered a sign of “bad taste.” Your gift will look much more impressive in a paper or cardboard package that you glue and decorate yourself.
IMPORTANT: The size and shape of your box depends only on what exactly you will be giving. Heavier gifts require thick cardboard, but for small and light ones you can even glue a paper box together.
Boxes made of cardboard and paper, different templates:
Simple Rectangular Box: Template
Hinged Lid Box: Template
Triangular box: template
Simple square box: template
Box-pouch: template
Pyramid gift box
What do you need
- Scissors;
- thick paper;
- ruler;
- pencil;
- plate or disk;
- hole puncher;
- yarn or ribbon.
How to do
Cut out a square from paper. Using four lines, divide it into nine parts. Make a mark in the center of each side of the large square. Inside the squares adjacent to the marks, draw triangles as shown in the video.
Place a plate or disk on the sides of the triangle and trace. Cut out the shape along the marked lines. You should end up with something like a flower.
Bend the figure along all straight lines and connect the pyramid. Make holes in the tops of the triangles, thread yarn or ribbon through and tie.
Such a pyramid can also be made using the origami technique:
What is needed to make a surprise box?
This photo box tutorial is ideal for those who want to give, in addition to the album, a small gift - a gift card, money, jewelry (like a ring) or any other memento. According to reviews, the size of the product can be any. Many even use ready-made corrugated boxes. If the product is made of cardboard intended for handicrafts, prepare everything you need and get to work!
Gift box clamshell
What do you need
- Pencil;
- disk;
- thick paper;
- ruler;
- scissors;
- ribbon.
How to do
Trace the disc on paper. Draw two perpendicular lines through the center of the resulting circle. Place the disk so that its edges touch the beginning of the lines at the top right and trace. Divide the new circle in the same way as the first.
In each part, trace the disc as shown in the video. Then deepen the lines.
Cut out the piece along the outer contours and bend along the deepened lines. Place the gift inside, fold the box and tie it with a ribbon.
Gift box with flip lid
What do you need
- Ruler;
- pencil;
- thick paper;
- scissors;
- glue.
How to do
Draw two lines on the two narrow sides of the sheet at a distance of 1.5–2 cm from the edge and fold the paper along these lines. Bend and straighten the sheet as shown in the video. You will get two folds in the middle.
Draw lines on the long sides of the sheet at the same distance. For clarity, draw the bends made in the middle. Make cuts down to long horizontal lines. Glue the paper together as shown in the video.
The hinged lid can be made from a separate sheet:
One-piece heart box
Another box in the shape of a heart can be made even from one sheet of paper in one continuous piece, but keep in mind that the size will be appropriate. Carefully transfer the diagram, make all the necessary cuts and trace the folds with a non-writing pen. Assemble the box, glue all the joints and let it dry thoroughly.
Photo: joy-jeans.ru
Photo: novamett.ru
Gift box-chest
What do you need
- Sample;
- thick paper;
- scissors;
- stationery knife;
- glue.
How to do
Print the template, cut along the solid lines and cut along the bottom dotted lines. Fold the shape along the remaining dotted lines. Glue it together as shown in the video. Connect the top pieces and thread them through the holes to close the chest.
You can leave the box as is or cover it in the middle with paper of a different color and decorate it with a bow.
Required tools and materials
To make boxes at home, you will need simple tools: a stationery knife, tape (painting and double-sided), glue and scissors.
Material for work is taken from stores or used in large used cardboard packages. Depending on the functions of a particular box, the density of the material—cardboard—varies.
Gift box-bag
What do you need
- Thick paper;
- ruler;
- pencil;
- scissors;
- disk;
- glue;
- yarn or ribbon.
How to do
Fold the wide side of the sheet, moving 5 cm from the edge. Fold the resulting strip and cut off the remaining paper along the edge. Bend it back once.
Make one mark at the top and bottom, stepping back 5 cm from the narrow edge. Fold the edge along these marks, then fold the entire piece like an accordion.
Unfold the paper completely and make cuts along one wide edge of the sheet to a horizontal line. Cut off the narrow part, folded into an accordion, at the top and bottom. It should remain in the middle.
On the other wide side, mark the middle of the resulting squares with a pencil. Take a disk or some other round object and connect the center marked points of the squares with the corners opposite.
Fold the paper along semicircular lines. Glue the box together as shown in the video. Punch holes at the top, thread yarn or ribbon through them and tighten the bag.
Round box
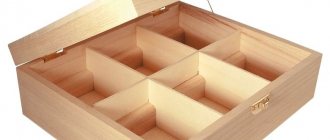
The product can be classified as practical and beautiful. There will always be a use for such a box. It stores:
- costume jewelry;
- materials for needlework;
- cosmetics;
- clippings;
- photos;
- fabrics.
This packaging will be an ideal gift solution.
Making a box is easy. While these packages cost a lot of money in specialty stores, you can design them yourself.
Take cardboard and a template. Transfer the diagram to the material and cut out the blanks. Connect them with glue and you're done.
The round box has its own peculiarity. By cutting it out according to the template, you can change the size, but all the details and elements must remain unchanged, otherwise making the box will not work.
Gift bag with bow
What do you need
- Paper;
- glue;
- ribbon.
How to do
Fold the piece of paper in half crosswise so that a mark appears in the top center for clarity. Fold both sides of the sheet to this mark, slightly overlapping one another, and glue them together.
Fold and glue the bottom of the bag as shown in the video. Fold the long sides over so that the bottom touches the seam at the bottom of the bag. Open the bag and fold it again along the side lines so that it is straighter and more beautiful.
Place the gift inside and fold the top of the package into an accordion shape. Press it in the middle and straighten the edges of the resulting bow. Tie the bag with a ribbon.
If it is more convenient for you to make boxes using ready-made templates, use the website templatemaker.nl. There are many boxes of different shapes collected there. Moreover, their parameters can be calculated automatically. Promo You will find even more interesting ideas for New Year's gifts on the marketplace of the Multibonus loyalty program for VTB Bank clients. There are more than 240 thousand products for every taste: books, gadgets, household appliances, certificates from popular stores and much more. Connect the loyalty program to your bank card in VTB Online and select the appropriate option for accumulating rewards. Now “Multibonus” is holding a holiday sale with discounts of up to 50% on products of popular brands, and for purchases from program partners in the “Accumulate” section you can get cashback of up to 30%. If there are not enough bonus rewards, just pay extra for the order in rubles. Find gifts for loved ones
Video instruction
The author of the video demonstrates a master class on making an original gift - how to make a box with photographs that opens several of the same boxes.
Now, dear readers, you know how to make a box with photographs with your own hands, which can serve as a chic surprise for a Birthday, Valentine's Day or any other holiday. Perhaps you have your own ideas - how to make the box even more interesting and beautiful? We are waiting for your feedback and advice.