3.9/5 — (30 votes)
Good afternoon
Everyone probably made paper boats in childhood, which they then happily floated along spring streams? Now we have already grown up, but we can share the best impressions of our childhood with our own children.
In this article I will show you several master classes showing how to make such toys from various materials. Yes, yes, contrary to the title, we will use not only notebook leaves.
We will talk about several techniques. More precisely, about origami, appliqué, and we will also consider how to make a three-dimensional boat from waste materials.
All the ideas presented here are quite simple, so they are suitable for implementation with children of preschool and primary school age. Well, if you want to make something more complicated, just take them as a basis and improve them at your own discretion. As usual, I will definitely show you examples of exactly how this can be done.
Paper boat from childhood - the simplest and most popular diagram from A4 sheet
For work, take colored or office paper A4 with a density of 80-160 g/cm2. If the sheet is not double-sided, then bend it so that the colored surface is on the inside: this will make it more beautiful.
Paper boat diagram
How to make a boat from A4 paper - description of the process with photos:
- Fold the rectangular sheet along the long side. Turn so that the fold is at the top.
- Grab the top corners. Pull both down, connecting along the central axis to form a right angle.
- Fold the free lower strips of the sheet upward, first on one side, then on the other.
- You will get a triangle. Bend small side protrusions that disrupt its shape inward to the opposite side.
- Open the workpiece. Align the corners to create a square with a pocket.
- Bend its free edges upward on both sides to form a triangle.
- Place the corners together again to form a square.
- Gently pull the corners, being careful not to disturb the middle. The paper figure will open up and turn into a small boat.
- Run your fingers along the folds to make the outline of the craft clearer.
Before you send your boat on a voyage down the creek, decorate it. Cut out the anchor and round portholes with scissors and glue them to the hull. Or decorate the boat with markers, make a navy flag or a pirate Jolly Roger. If you have small toy soldiers or Lego figures, you can make them sailors on a boat.
Step-by-step instructions for making a boat using origami technique
If the previous option seemed difficult for you, then try making a toy like this. And take not a white, but a blue sheet of paper, so the product will sparkle in a new way.
This craft is easy and quick to do, so you can do it with kids in kindergarten too!!
Manufacturing process:
1. Take a square piece of paper.
2. Fold it in half diagonally.
3. You should end up with a triangle. Bend the bottom corner of the triangle upward.
4. Now along the fold line, bend the bottom corner up only to the middle.
5. You can bend or cut off the upper sharp corner, or leave it as is.
Making a sailboat out of paper
If you want the boat to have a beautiful sail, you will need a square sheet. Also prepare pencil glue.
Scheme of a sailboat made of paper.
To make a sailboat out of paper with your own hands, proceed as follows:
- Pre-fold the square in the vertical and horizontal directions. This will help you find the folds in the future.
- Fold the right and left edges to the vertical axis. Bring the top and bottom to the middle horizontal line too.
- To make the sides of the boat, spread the corners of the workpiece. First, unscrew the corner on the top right. Iron the bottom fold diagonally. Then go over the top of the figure.
- Open the bottom corner on the right in the same way. Repeat the above manipulations with the left half of the workpiece. The result will be the sides of the future sailboat.
- To turn the workpiece into a boat, carefully take its halves with your fingers and pull: the right one towards you, the left one in the opposite direction.
- Turn the remaining protrusion at the bottom to the right and leave it in a horizontal direction.
- Run glue along the bow to attach the port side to the starboard side.
An origami paper sailboat is ready to travel along a spring stream.
How to make a sailboat out of paper with your own hands, see the video below.
Rose from a napkin
You can also make flowers from a regular paper napkin.
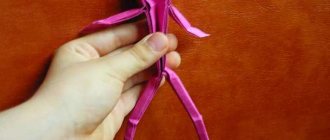
To do this, you need to measure a strip almost 4 centimeters wide at the top of the napkin and bend it. Next, you need to bend the upper left corner of the napkin with your ring finger and little finger, and roll the napkin around your middle and index fingers. This must be done in such a way that the part that is bent remains on the outside. The rolled napkin should be quite close to your fingers, but there is no need to wrap it too tightly. Then you need to grab the corner of the napkin and bend it to the right and down. With your right hand, take the napkin tightly just below the part where the fingers of your left hand are located, and, starting from this place, you need to twist the napkin downward, slightly short of reaching the very bottom. Next, you need to carefully bend the lower outer corner of the napkin upward and tightly hold the napkin in the area where you finished twisting it.
Using this method you make a leaf on the stem of a rose. Then you need to twist the napkin tightly again to the very bottom.
Boat - a simple diagram for preschoolers
Origami masters offer several ways to make a boat out of paper. A simple option that a preschooler can handle in 10 minutes is given below. For work, prepare a paper square and stationery scissors.
Paper boat diagram.
How to make a paper boat step by step:
- Bend the square along the horizontal and vertical axes to obtain working marks. Open it up.
- Bring the edges to the horizontal axis on the side opposite the main fold so that it looks like an accordion of 4 parallel lines.
- Fold the edges. Move all corners equally to the central horizontal axis. Then bend the corners again, focusing on the vertical axis.
- Having folded the workpiece, open it. The result is something like a boat, but without clear lines yet.
- To make the boat smoother and more beautiful, bring the bow and stern to the main axis. You will get a hexagon, press all its folds with your finger.
- Bend the opposite corners of the hexagon equally, retreating about 5 mm.
- Open the workpiece. Bend the sides on both sides towards the main axis.
- Gently go over the inside corners on each side with your finger until they become clear, so that the bottom of the boat can be outlined.
- Open the finished craft. Straighten the sides if they are wrinkled.
Double boat - catamaran
An ordinary boat is a completed stage, and have you also learned how to make a steamboat? Do you want to continue? Now you can master the assembly of the catamaran. The only materials you need are paper and scissors. First of all, cut out a square from an A4 sheet. Then, step by step, follow the step-by-step description, check the result with the pictures and remember that the clarity of the folds is the key to a neat and beautiful craft.
- Fold the square in half and unfold. You will be left with a fold line. Then fold each side in half towards the fold line.
- Rotate the resulting rectangle 90° and repeat the folding procedure.
- Unfold the workpiece. It turns out to be divided into small squares. Now fold the opposite sides of the square towards the center again.
- Grasp the bottom corners of the sheet and move them apart. Fold 2 inner squares diagonally - you get a blank for one boat.
- Repeat these steps on the other side of the rectangle.
- Fold the layout in half and open it, giving it volume. The catamaran is ready to sail in search of adventure.
Steamboat
Several generations have known how to make a cute paper steamer. Teach this easy craft to your children. The design of the boat is simple and interesting. You need a square sheet of paper.
Paper steamship diagram.
How to make an origami paper boat:
- Fold the square diagonally on both sides to create a center mark.
- Bend all 4 corners to the mark.
- After turning the future steamer over, repeat the manipulations.
- Turn it over again and also direct the corners to the center mark.
- Turning the workpiece over for the last time, open the opposite corners. You will get large steamer pipes.
- Gently bend the resulting boat, simultaneously turning the other two unopened corners into triangles.
The ship is ready to sail.
Origami instructions on how to make a steamship from A4 paper.
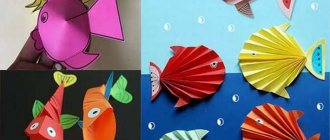
Butterfly
Since we decided to make a whole bouquet of tulips, let's make butterflies too. In addition, you can make a garland from these bright butterflies and decorate your room with it.
This airy butterfly can be a wonderful decorative element for a postcard or gift box.
The main feature of this craft is that we will need scissors to make beautiful rounded wings of our butterflies. If your child will collect the butterfly on his own, it is better to help him with cutting the wings or use special children's scissors with rounded edges.
Paper yacht
Making a yacht out of paper is as easy as shelling pears, a task that preschoolers of the younger age group can do. The craft can be used as an independent decor or as an element of appliques.
Paper yacht diagram.
To make a paper boat with your own hands , you will have to spend very little time:
- Bend a square piece of paper diagonally to form a triangle.
- Bend one edge so that it coincides with the central fold. You will get the sails of a yacht.
- Fold the bottom strip of the workpiece obliquely. This will be the hull of the boat.
A simple way to make a yacht out of paper is in the video below.
Boat folding schemes for beginners
A classic paper boat using the origami technique - the simplest option - is folded according to the following scheme:
- A rectangular sheet located vertically is folded in half.
- The resulting blank is placed with the fold point facing up, and both upper corners are bent to an imaginary center line vertically, so that a narrow unused strip remains at the bottom.
- The bottom strip of the top layer of the workpiece is bent upward, then the rectangle is turned over to the other side and the second strip is bent.
- By bending the corners, the folded strips are fixed in one position.
- Then the workpiece is opened from the inside and folded into a square by placing its parts on top of each other so that the initial fold becomes the diagonal of the resulting square. After folding, the corners straighten.
- Now the top sheet of the resulting square blank, lying in the diamond position, is bent diagonally to align the opposite corners.
- The workpiece is turned over to the other side, then the same action is performed. At this stage, the square turns into an isosceles triangle.
- Next, the triangular blank is opened from the inside by combining opposite corners and again turns into a square.
- The ship unfolds from a square blank - to do this, the upper corners are pulled in opposite directions at the same time.
- The middle straightens out, and a simple paper boat can be launched into the pond.
There is another option for folding a boat for beginners, it is the simplest, and as a result of five minutes of work you get a yacht:
- A square sheet of paper of any color must be folded horizontally diagonally.
- Now the “valley” fold is performed vertically.
- An imaginary line is drawn in the lower triangle, as shown in the diagram, along which the fold occurs.
- The bent part of the triangle bends, returning to its original position. Once the folding technique is mastered, steps 3 and 4 can be simplified into one by simply folding the desired part of the triangle.
- Now, along the marked lines, you should make “valley” bends, carefully straightening the right angle, which is located below the marking.
- Using glue, the 2 parts of the yacht are connected to each other, then the bottom and hull are carefully straightened so that the product becomes stable.
If we complicate the previous diagram a little, we might end up with an ocean liner:
- On a square sheet of paper of any color, you need to make 2 bends diagonally, thus outlining 4 triangles.
- Then you need to bend the upper corner of the square blank, arranged in a diamond shape, towards the center.
- Now the same corner is bent again, only in the opposite direction.
- And once again the corner, only this time smaller in volume, needs to be folded back towards itself. When the technique of folding the boat is mastered, steps 2-4 are simplified into one step, folding occurs with a triple zipper.
- Next, the left side of the workpiece is folded so as to cover the right side.
- Now you need to mark an imaginary line, as shown in the diagram, for folding the lower parts of the workpiece into a “mountain”. Then very carefully straighten and bend the corner located below the line. After this, the parts of the workpiece indicated in the diagram need to be bent along the intended line “mountainwise”.
- The bent corner is carefully smoothed out, and the workpiece is turned in the desired direction.
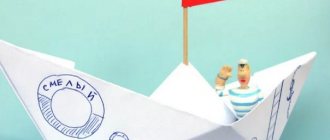
Multi-colored boat with a flag
Beautiful boats are obtained not only from origami style patterns. For a primary school student, a more complex task will be more interesting, for which you need markers or gouache, canapé sticks, a ruler, stationery glue, a set of thick colored paper, and scissors.
How to make a boat out of paper - step-by-step instructions:
- First make the hull of the boat. Take blue paper, cut out two strips 18 cm long and 3 cm wide.
- Using a ruler, divide the strips into 3 equal parts, make appropriate marks, and bend the paper in these places. Glue the strips together.
- Then make the deck of the boat. Cut out a rectangle from blue paper. On the sides, retreat 15 mm to make it easier to glue later.
- Fold the rectangle along the marked lines. Glue between the sides.
- Next, make the sails. Cut out two rectangles of different sizes from yellow or white paper. Punch holes in them to thread a cooking stick through, which will be the mast.
- Insert the stick into the center point of the deck, after punching a hole in it.
- Cut out a flag fluttering in the wind from red paper. Glue it onto the tip of the stick.
- Use markers or paints to complete the elements of the boat: portholes, folds of the flag.
Manigami
From two bills you can make a sampan boat, a type of flat-bottomed boat that is widespread in China. These small boats amaze with their versatility, depending on the needs of the owners, turning into housing, a mobile shop, a fishing “trawler” or a workshop. A sampan made from banknotes will remind you of travels to exotic countries, and it itself looks very unusual. You can also make a sampan boat from paper, focusing on the proportions of a dollar - 15.6x6.6 cm.
Step-by-step instruction:
- Place the bill with the long side facing you. Fold in half from bottom to top. Let's reveal.
- Fold the bottom and top edges towards the center.
- We bend all corners towards the center line.
- We repeat the action again. We make sure that all folds are precise and neat.
- We bend the corners again. The edges should lie evenly along the center line.
- Now fold the triangular flaps at the top and bottom towards the center.
- We push all the folds along the horizontal axis.
- Carefully turn the workpiece inside out until the inside becomes a convex bottom.
To make a canopy, just fold another bill in half twice. We insert its ends into the side edges of the boat.
Another traditional Chinese vessel is often assembled using the origami technique. This is a sailing ship known as a junk. Light and maneuverable ships with two or more masts first appeared in the early Middle Ages and have survived almost unchanged to the present day. They can often be found on the rivers of China, as well as neighboring Vietnam and Korea. The junk has unusual sails, which are mats stretched on bamboo yards. They can fold up like window blinds.
A Chinese boat made of paper floats no worse than its real prototype. You can easily verify this by making it yourself, step by step, following the video tutorial:
How to make a paper boat not sink
If you float a paper boat along a stream, it will soon get wet and fall apart. You'll have to make a new one. But there is a way to make a paper boat impervious to water.
Light a regular candle. When the wax begins to melt, tilt it over the craft. Let the wax drops fall onto the paper, gently smear them with your finger on the outer surface of the product. Don't overdo it, otherwise the heavy ship will sink. It is enough to lubricate the bottom and sides with wax.
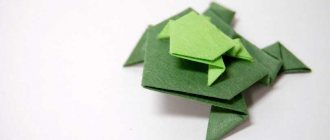
Princess Frog from a plastic bottle
Plastic bottles are an excellent consumable material from which you can make unusual and beautiful decorations for the garden or just a toy for a child.
Required material:
- A couple of large plastic bottles;
- Small plastic bottle;
- Copper wire;
- Glue;
- Stationery knife;
- Watercolor paints.
The work is not difficult, but painstaking, so you will have to spend several hours.
- Cut off the bottom of large bottles.
- Glue them together.
- We cut out the legs from the remains of the bottle. They are attached to the frog's body using wire.
- We cut off the bottom of a small bottle and cut off the top, but not too much. We make the rays of the crown and curl them a little.
- Using wire we attach the crown to our frog.
- Decorating our frog. For this we will need watercolor paints. The frog's body should be green. The crown is golden. Paint the eyes and mouth with black paint.
How to make a ship out of wood with your own hands
A wooden boat is every boy's dream. Together with your dad or grandfather, you can carve the simplest version of a boat.
To preserve the wood longer, you can paint the top or varnish it.
Origami boat with step-by-step folding photos
- Take a piece of paper of any size and make a square out of it by folding it diagonally and cutting off the excess paper. Your square should be folded into a triangle.
- Fold one corner of the triangle toward the opposite side at a slight angle. This will be the top of the boat.
- Open the square and fold it in the opposite direction to create the sides of the boat. At this point your boat is ready.
- You can decorate it with paints, sparkles if desired, write a name, etc.
Easy option
Making a sailboat is easy, so you can get kids involved in the work. It will be educational and exciting for them. Having mastered the easy technique, they will quickly learn how to fold boats according to complex patterns.
- Cut out a square, bend it in half, double again, then diagonally and straighten it.
- Next, bend all the corners to the intended middle to make a square.
- Next, bend the top corner to the middle and then bend it again.
- Turn the workpiece over to the wrong side and lower the upper triangle at the bottom.
- Tuck the top left corner inward and fold it back.
- Fold the top and bottom corners towards the middle.
- Fold the entire workpiece along the central axis, work out the folds and straighten.
- The ship with the sail is ready.
Scheme for creating a sailboat from paper
To make an origami sailboat colorful, make it from colored single-sided paper in yellow, green, red, etc.
Cardboard ship: how to make it yourself
Children and parents are often asked to bring joint crafts to school on a given topic. It’s not difficult to come up with a cardboard craft on a marine theme. The ship can be made in one evening, taking an old equipment box.
Materials:
- Thick cardboard - old box
- Scissors
- Pencil
- Glue
- Scotch
- Colored paper
- Decor
Print or draw a template. Transfer it to cardboard
Cutting out parts from cardboard
Assembling the ship using glue and tape
Dilute the PVA glue with water, tear the paper into pieces and soak it in the glue. Glue the pieces to the ship blank
You can paint the ship and cover it with colored paper.
Also make a mast from a plastic tube or wooden skewer. Don't forget that every ship must have a flag. Make sails out of cardboard.
And if you recently bought a refrigerator or other large household appliance, then you can make a large ship out of cardboard to the delight of any boy.
Ship made of cardboard and paper
Cardboard is a very convenient material for crafts, and colored paper will help make the craft bright and attractive. In order for the work to turn out beautiful and neat, use good scissors that will not tear the cardboard, but will make a beautiful and even cut. If it is too early for a child to use sharp scissors, then parents can do it for them.
Toilet paper rolls are also actively used in crafts due to their shape.
Paper boat model peregrine falcon
It’s not difficult to fold such a paper boat with your own hands, just do everything as shown in the step-by-step photos. The hardest part is turning the valve inside out. Before this you should see four small triangles, two on each side. Add all four. Then draw the hypotenuse of the right triangle to its base. Do this on all four sides. Both sides will intersect and it will feel like it's wrong, but it's right. The piece of paper should look like the second photo in the gallery. Now fold the area where it overlaps just a little so that it forms a flat line instead. To turn it out, leave the middle flap alone. Hold each side on the outside with one hand, and do your best to push it inside out. Then you can simply lift the roof, the paper boat is ready!