Quickly and from scrap materials.
Let’s not argue about the benefits of order and trust the wisdom and experience of people of different eras and generations:
It is necessary to restore order while there is still no turmoil. - Lao Tzu
Order saves time. – Johann Goethe
Order frees thought. – S.P. Korolev
It is impossible to put everything in order, let's start with ourselves. Many of us spend most of the day at our desk with a bunch of necessary and unnecessary junk. We are literally entangled in wires, chargers, adapters and other electronics. Why not organize it all?
To solve the problem, I suggest making a simple organizer. Each of the available means can do it. You may have to buy something extra, but spending a penny is not comparable to the benefits that our product will bring.
The basis
1. First you need to decide on the size of the future organizer. I recommend making it so that it fits easily in a drawer or on a specific shelf.
We are looking for a place for the future organizer, measuring the length and width of the space.
2. Now we need a base that will fit in the allotted space without any problems. As a frame, you can use a board, a very thick piece of cardboard, chipboard/kragis/plywood. A metal plate or plexiglass will do; you can use a DVD box or an old vinyl record (cutting a square out of it) as a base.
There is only one condition for the base - it must ensure the rigidity of the structure and not bend. For example, I found a suitable piece of galvanized steel in the pantry.
3. To make the finished product look beautiful, I covered it with black tape (to match the color of the rubber bands used). Those who are not interested in the aesthetic appearance of the organizer can skip this step.
The final touch
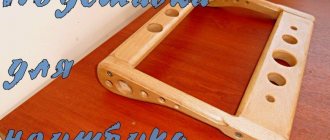
Attach the holder as shown below. Usually they stand up without problems, and there are a lot of them included in the kit: you can make several hanging covers at once!
That's all, the hanging phone case is ready! Whether you use it yourself or give it to your friends, it will last a long time in any case and save you a lot of headaches with finding a place to charge.
It is quite possible to deviate from the instructions for needlework: it is not very complicated and can satisfy the needs of a person with any device or interior. Nevertheless, this is a very useful, and most importantly, easy-to-make thing. Enjoy it for your health!
Found a violation? Report content
Rubber
4. Most likely, you won’t have the required amount of elastic at home; you’ll have to go to a fabric store to get it.
There you can choose a ribbon of any color and width. Calculating the required length is very simple:
- divide the length of the base by the width of the tape - we get the number of vertical stripes (we take into account only whole stripes);
- multiply the number of stripes by the width of the base and multiply the resulting length by two (the stripes will encircle the frame on both sides);
- Now we similarly divide the width of the base by the width of the tape - we get the number of horizontal stripes (we take into account only whole stripes);
- multiply the number of stripes by the length of the base and multiply the resulting length by two (the stripes will encircle the frame on both sides);
- we add the two numbers that were obtained in the second and fourth steps and get the required length of the tape.
5. Now the elastic band needs to be cut into strips (vertical and horizontal). We have already counted the number of stripes, the length of the vertical ones is equal to twice the width of the base, and the length of the horizontal ones is twice the length of the base. In other words, each strip should encircle the frame without overlapping.
6. The most painstaking process is sewing rings from strips. Pre-singe the edges of the tape on the fire and you can start making rings.
We make a small overlap of 3-4 mm. and sew the ribbon together with a ring. You can ask your wife for help, especially if she has the skills to operate a sewing machine.
Get to work!
The first step is to cut the fabric and fleece to size. Place fleece material on the back of a piece of fabric for the pocket and for the base of the garment. Fleece gives softness, and the fabric can be easily chosen to suit your taste and fit into the interior.
Smooth and fresh skin: dermaplaning, or why a woman needs to shave her face
A student at the Vietnam Police Academy shared how she takes care of her facial skin.
Rare shot: Viktoria Isakova showed her grown-up daughter from Yuri Moroz (new photo)
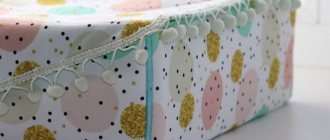
Sew two pieces of pocket fabric along the top (wide) edge as shown in the photo below. After this, fold and secure with tape.
Sew the ribbon a centimeter from the top edge along both sides of the ribbon for a secure fit. Using additional ribbon, you can sew a bow for beauty. Sew it in the middle.
The pocket is ready. Place the pocket on the front side of the main piece (the one with the fleece sewn on the back) and line up the sides and bottom edge. They don't have to be exactly the same size if done correctly. The top of the pocket, where the ribbon is sewn, is slightly wider. It is normal if it protrudes noticeably, the main thing is to sew the bottom and sides of the pocket exactly to the size of the main part.
If there is little snow, there will be no harvest: December 16 is Ivan the Silent Day
Women's jeans: before you buy them, you need to pay attention to one detail
Lost weight: what Sofia Tarasova sacrificed for the sake of “VIA Gra” (new photos)
Weaving
7. When all the elastic rings are ready, we begin to put them on the base.
First we put on all the vertical stripes. 8. Now we begin to put on the horizontal ones one by one. They need to not just be put on top, but threaded through one vertical one.
Each subsequent strip is threaded in a checkerboard pattern.
9. The result is a beautiful checkered organizer.
What is an organizer
The design is a set of sections, stationary or mobile, made of different materials:
Stationary. They are constantly located in one place on the cabinet door or wall. There are floor-mounted and suspended. Serve for storing shoes, construction tools, spare parts and other small items;
Mobile (portable) ones are very convenient if there are small children in the house. They hang on a hook, double-sided tape and hold a lot of useful things.
Fill in
This product can be filled with any small items stored in the table. Place wires, adapters, batteries, memory cards and flash drives, chargers and headphones in the organizer.
All the elastic bands stay in place quite confidently, but you can additionally stitch them around the perimeter. This process is quite painstaking; I would not recommend starting it right away.
While the elastic bands are not sewn on, you can try to change the shape of the organizer so that not only small objects, but also large ones fit into it.
To do this, in a certain place when weaving the elastic, we skip the required number of intersecting rings. The size of such loops is determined by the dimensions of the device that we will carry in the organizer.
A few days later, when the final weaving pattern has been approved, you can sew elastic bands around the perimeter or glue them with Moment glue. If the organizer will not be used in the most active way, you do not need to stitch or glue the elastic bands.
DIY phone stand on the table from scrap materials
Smartphone holders made by yourself have certain advantages and disadvantages that you need to know about before you start creating them.
Advantages and disadvantages
High creation speed
Full or partial financial savings
Original and unique design
Development of creative skills
Often lower quality compared to finished products
Availability of additional tools in some cases
Cheap look
Unreliability
A telephone support device is often required in the following situations:
- Search for a smartphone. Most popular phones are small in size, which makes them easily lost not only in the workplace, but also at home. To prevent this from happening, the device can be left on a special stand, removing it as needed.
- Car driving. With the help of a well-designed and well-made holder, you can quickly view your map, answer important calls and view your favorite photos while stuck in traffic.
- Content consumption. This is the main reason why device users resort to buying special stands or making them themselves. It is much more convenient to watch a video, scroll through a news feed, or read correspondence without touching the phone. Using a supporting accessory, the owner of the gadget can place himself in the most comfortable position.
Without complicated skills or abilities, anyone can create a functional phone holder. Materials such as wood, paper, cardboard, wire, bottle, plastic and many other materials can be used as a base.
Before making a phone holder, you need to find out complete information about the weight and dimensions of the device. Based on these characteristics, the material and creation method are selected.
Knowing how to properly make a stand with your own hands can help the user out in difficult times. In just a few minutes, you can create a functional holder for any modern phone.
From the cassette case
Having an old cassette case at home, you can make a simple phone stand. To do this, you need to remove the cassette and paper insert from the case. Then open the cover completely and install it upside down.
A distinctive feature of this method is the ability to view both horizontal and vertical content. The phone is well supported by the stand, so the user does not have to worry about a sudden fall. The stand looks quite laconic and neat due to its transparent body.
Pencils and erasers
If the owner of a modern gadget needs a stand, but doesn’t have anything similar at hand, you can use regular pencils and erasers. To do this you need to perform a number of simple steps:
- Take 6 simple pencils and 4 erasers.
- Assemble a structure resembling a triangle. Two pencils are used as a holder and base - the rest are positioned to create a fulcrum.
- Use rubber bands to secure the stand.
To make the design more reliable, it is first recommended to assemble the base, where you first attach two pencils with the rods facing up. After this, you can add a fulcrum.
To create a stable stand, it is recommended to take pencils with an eraser at the end. This will prevent slipping on a smooth surface, protecting the device itself.
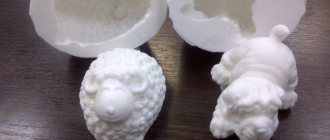
Toilet paper roll
You can create a multifunctional smartphone holder using a used toilet paper roll. To do this you need:
- Cut the bushing in half at a slight angle.
- Make a small horizontal cut in the middle of the cut part.
- Add thumbtacks or soft inserts to the bottom for better stability.
In addition to toilet paper, you can take a paper towel roll. The used cylinder should be placed on a flat surface and a small cut should be made in the center, based on the width of the device.
Using a paper towel roll not only effectively holds your phone, but also increases the volume of your speakers. To do this, add one plastic cup to each side of the cardboard cylinder, making holes in them in advance.
From Lego
With a rich imagination and the necessary amount of LEGO parts, the user can create a rather original and convenient stand for his smartphone.
Step-by-step steps to create a holder from a constructor:
- Place the flat piece on a flat surface.
- Add an impromptu wall of several elements to it.
- First place the phone on the support to adjust the width.
- Install a second row of low parts to hold the device in front.
This method is distinguished by its versatility and the opportunity to show your creative abilities. If you really want to, you can create a full-fledged docking station, a phone holder for your car, or an interesting stand-case.
The main feature of this method is the ability to disassemble the constructor and reuse it. Versatility is achieved by a wide variety of shapes and sizes, which is why the user can make a stand for any size.
Using LEGO elements allows you to change the angle of inclination by adding or removing parts. With its help, you can quickly move from a vertical position to a horizontal one, and vice versa.
DIY wire phone stand
Using ordinary wire, you can quickly and easily fix the phone in the desired position. All you need to do is twist the aluminum thread into any convenient design.
While creating the stand, keep in mind the even distribution of the weight of the phone and the lightweight wire design. To avoid falling or instability, it is recommended to add a small weight to the front or attach a support to the rear. To increase stability, the lower part of the wire can be wrapped with a rubber band.
The advantages of such a stand are: small size, the ability to create structures of any shape and quickly change the shape in accordance with the dimensions of new devices. More complex and original designs can also be made from wire.
How to make a phone stand out of paper
A paper smartphone holder is quite simple to make; you don’t need any specific skills or knowledge to do it. Just follow the step-by-step steps carefully:
- Cut a square of 20 cm in size from an A4 sheet.
- Fold the square in half vertically and horizontally. Then return the workpiece to its original position.
- Fold both edges to the middle, following a symmetrical arrangement. Smooth out the curves using a ruler.
- The upper and lower corners on both sides are sequentially folded and unfolded. Smooth out the resulting bends in the same way.
- Bend the corner in the upper right part slightly diagonally and compress the structure in the form of an accordion. Carefully smooth out any folds that appear and tuck them under the folded part. Perform similar actions with the left corner.
- Turn the stand over and fold its edges inward to the middle.
To better understand the technique, you should use a photograph. Before creating a holder, it is recommended to open the origami diagram on another device or print it in any convenient format.
You can decorate the paper stand using watercolors or gouache, apply a small amount of varnish, or make beautiful patterns with a regular stationery knife.
DIY cardboard phone stand
To create a convenient cardboard holder, you need to have the following available tools: a ruler, a small sheet of micro-corrugated cardboard and a stationery knife. A printer and paper will not be superfluous.
The first thing you need to do is print a blank from a photo or draw it on paper. Next you need to follow the steps below:
- Press the template firmly onto the cardboard.
- Using a utility knife and ruler, carefully cut out the outline of the stand.
- Connect both parts of the holder by inserting them into special grooves.
- Fix the stand on the table, choosing the best bend.
The resulting design can be decorated using fabric and ordinary paper clips. A distinctive feature of the cardboard stand is its stability on any surface, as well as a quick and simple execution technique.
When creating a cardboard smartphone holder, it is not recommended to use scissors due to the large thickness of the material. Otherwise, the cut out contours will be uneven, scratching the phone and causing visual inconvenience.
Bottle models
The plastic stand made from a bottle is made in the form of a hanger, so you can conveniently hang your phone while charging by securing it to the block. To make such a device, you need to take ordinary scissors and any container for a drink, shampoo or cosmetic product.
The first thing to do is to wash the plastic bottle from any remaining soda or any other liquid. After this, you need to cut off the neck and front part to the center. A small hole is cut out in the resulting back for the charger.
To use the contraption, you need to put your phone in the inside pocket, insert the charger into the hole and secure it to the socket. In order to simplify the creation process, it is advisable to draw the boundaries of the future “bag” in advance.
This version of the stand can be perfectly decorated using paints, markers, fabrics or regular prints. If desired, you can attach an additional pocket for the cable from the charger.
If you need to create a classic stand for a table or any other surface, the bottle is cut almost to the very base. Small cuts are then made at the bottom, the thickness of which corresponds to the device. To increase stability, sticks or adhesive pads are glued under the bottle.
Stationery binders
If you need to fix the device in an office in a vertical position, you can use the simplest method of creating a stand. Regular office binders, also called paper clips, are suitable for this.
Such office supplies are made of two parts: a plastic clip and a metal clip. To fix the gadget, you need to take two binders and connect them to each other. After this, one clip is pushed forward, which allows you to create a stable backrest.
Wine corks
To make an original and simple stand, you need to take 20 wine bottle caps. The material should be glued together using a glue gun or using any other adhesive mass.
First, the back wall and tray are formed, after that the front wall with a small recess in the central part is formed. For convenience, the bottom can be glued gradually, applying one cork at a time.
Interesting designs are often assembled from wine corks: a human hand that holds a gadget, a knight's throne, steps and much more. The main thing to remember is how to secure the phone.
In addition to gluing several pieces, you can use one cork for the stand. To do this, a small hole is made in it at an angle, into which the phone is then installed. With a view to l
For better fixation, you can attach a small backrest.
Bonus
Our organizer can be stored not only in a desk drawer, it will perfectly cope with its functions on the road or travel. Determine the size of the product in advance so that it can then be placed in a bag or backpack.
This is how we stretched our hands in an hour, amused our wife and children by involving them in making the organizer, and added a little order to our daily lives. When family members see the finished product, they will definitely want one for themselves.
( 3 votes, overall rating: 5.00 out of 5)