We have all been accustomed to Christmas tree decorations since early childhood. The combination of “Christmas tree balls” has long been an integral attribute of New Year celebrations. At the same time, you can decorate your apartment or Christmas tree not only with standard shiny balls, but also with beautiful paper crafts made by yourself. The master classes presented here will help you create your own New Year's paper balls for home decor.
Tips and experience
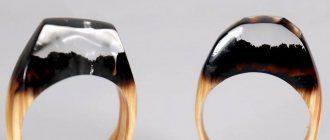
Any job requires certain knowledge and, of course, experience and skills. To work with epoxy resin, you need to carefully listen to the advice of those who already have the skills to work with this interesting material. Therefore, for the first craft, it is best to choose something not too complicated. And the ocean wave will be just such a job.
It is simple in that it provides a huge field for self-expression, because, like the real ocean, this work can be very different, the way you see it and can bring it to life. Epoxy crafts can be made in two versions - with and without backlighting. Where you stop - decide as you work. Whatever you choose, it will be awesome!
Paper balls using kusudama technique
New Year's paper balls can be made using the kusudama technique. Schemes of such work are provided below. The kusudama technique is wonderful because it does not require any additional tools other than paper, however, decorations for the finished toy can be created from scrap materials - the same beads, threads and much more. The resulting ball will look great on the New Year tree with its volume both outside and inside.
We hope you liked our selection of ideas! Happy holiday and enjoyable New Year!
What you need to prepare for work
To start working on creating the “Wave” interior decoration from epoxy resin, you will need:
- protective equipment for the workplace and clothing;
- epoxy resin for creativity;
- a template drawing of your future craft (to visualize the work);
- hard foil (the thickest food grade, but better technical foil, which holds its shape well);
- sheet of ethylene vinyl acetate foam (EVA foam);
- stretch film;
- ice cream sticks or plasticine stacks;
- disposable containers in which you will mix and paint epoxy resin
- scissors;
- clear vinyl film;
- pliers;
- universal adhesive in spray form;
- alcohol-based dyes for epoxy resin;
- sparkles, rhinestones;
- office cutter;
- scotch;
- hot glue gun and sticks for it.
If you decide to make a backlit decoration, then you will need a base for LED bulbs and the LEDs themselves.
Paper balls made from small shaped pieces
To create such toys you will need:
- paper;
- scissors;
- glue;
- thread and needle.
The photo below shows several variations of crafts. For example, a New Year's craft can be made from several semicircles.
No less beautiful balls are made from paper accordions.
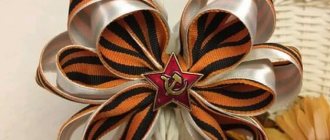
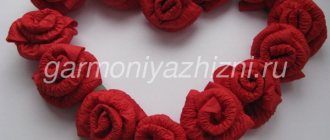
Flowers with five petals can be excellent starting details - the ball will turn out to be more diverse in volume.
For a large ball:
For the middle ball:
For a small ball:
Toys made from circles folded into triangles will also look quite bright, especially if you choose paper of an unusual color for them.
For a large ball:
For a small ball:
New Year's toys made from rectangles glued together at the corners look very beautiful and stylish. The photographs show the oriental version, but no one bothers to use another color or theme in the same way.
Triangles in a circle, with curved sides glued together - this is a kind of classic. It’s not difficult to make such a ball, but it will delight you with its appearance no worse than factory toys.
For a large ball:
For a small ball:
Creating a mold
Why do you need a mold when working with epoxy resin? The answer is in the name itself: to give the liquid resin the required shape during the process of hardening. Today you can buy various silicone molds - moldings. But if you haven’t decided yet whether creativity based on epoxy resin will become your permanent hobby, and you can also make moldings yourself to save money. You can create a convenient reusable mold for the “Wave” craft quickly and without much difficulty.
So, take two sheets of EVA foam: one thicker - as a backing and one thinner - it will create a relief. Place the foam pad on the table. Lay thin foam on top, equal in size to the unfolding of your future craft. Here a paper template will come in handy, from which you need to roll up the conditional figure that you want to get.
Cut a piece of thin foam to the size of the template plus 5-7 centimeters for the seam. Cut a piece of foil the same size. If it is thin, fold it in several layers, it is best if you glue them together using universal glue. Place the foil on the backing and use a popsicle stick, the back of a spoon, or a play dough stack to form an uneven surface that resembles a flowing wave. Apply spray adhesive to the surface of the formed foil and, repeating all the bulges and depressions, glue the foil with thin EVA foam.
Such a multi-layer cake will well hold the mass of epoxy resin that you will pour. Place stretch film on top of the foil. This will allow you to remove the mold for later use. Roll the resulting sheet into a round shape and fold the edges in with a lock - fold them so that one edge is visible from under the other, tuck the protruding edge up, clamp it with pliers, then turn the three layers up again and crimp them with pliers again as tightly as possible . Secure the top edge by folding it twice. Form a wave shape from the resulting volume, being careful not to smooth out the ribbed surface.
It’s good to wash often: myths about shampoo and hair care that only harm
A Brazilian travels 36 km by bike every day to take his loved one home.
Women's jeans: before you buy them, you need to pay attention to one detail
You should end up with something that looks like both a bag and a frozen wave. Fold the edge that you closed at the top so that it resembles the crest of a wave.
Place the resulting rigid mold in a tall container to hold it upright.
How to make an applique balloon with a basket: master class, patterns, photos
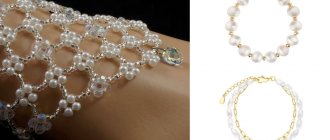
Very often, the appliqué technique is used to make a ball with a basket. Actually, this option is also ideal for preschool children. It also helps develop fine motor skills and handle stationery.
Instructions:
- You need to cut out two ovals of the same size. After this, fold it in half lengthwise.
- Next, glue these two parts onto one strip of glue. It is necessary to make this ball three-dimensional. Now you need to glue the ropes.
- Use a rectangle of colored paper to imitate a basket. It can also be convex, voluminous or flat.
- After this, connect the threads to the basket and decorate the applique. Can be decorated with white clouds. A background made of thick blue cardboard looks best.
Sources
- https://podelochkin.ru/novogodnie-shary-iz-bumagi
- https://kaksdelat.guru/kak-sdelat-shar-iz-bumagi/
- https://daymam.ru/novogodnie-shary-iz-bumagi.html
- https://igrad.su/z-bumagi/kak-sdelat-shar-iz-kartona-shema-shary-iz-bumagi-svoimi-rukami-krasota-dostupnaya-kazhdomu.html
- https://hobbitex43.ru/drugoe/kak-sdelat-shar-iz-bumagi-svoimi-rukami.html
- https://karamellka.ru/novogodnie-shary-svoimi-rukami.html
- https://camodelkin.ru/podelki/shariki-v-share-kak-sdelat.html
- https://tvoitrener.ru/sar-iz-bumagi/
- https://MobileLords.ru/iz-bumagi/kak-sdelat-krug-iz.html
- https://mochishe.ru/bumagotvorchestvo/kak-sdelat-shar-iz-bumagi.html
- https://svoimirukamy.com/shary-kusudama.html
- https://heaclub.ru/podelka-igrushka-applikaciya-dekorativnyj-vozdushnyj-shar-s-korzinoj-svoimi-rukami-idei-shema-foto-kak-sdelat-vozdushnyj-shar-s-korzinoj-iz-pape- mashe-bumagi-sshit-iz-tkani-svyazat
Resin preparation
Epoxy resin is a two-component substance. When two liquid forms are combined, it gives a mass that hardens fairly quickly in air. Whatever company you choose this material for your creativity, be sure to carefully read the instructions before mixing and using. The temperature of the room where the work will be carried out is very important. Use only special dyes to color epoxy; they are made with alcohol, which increases the volatility of the liquid phase. Add paint to the resin in small portions, mixing thoroughly to capture the desired shade.
Rare shot: Viktoria Isakova showed her grown-up daughter from Yuri Moroz (new photo)
If there is little snow, there will be no harvest: December 16 is Ivan the Silent Day
Why French children behave well: eight ways to raise them
To obtain the effect of a white translucent wave foam, the epoxy will need to be quickly and vigorously beaten, then it will be filled with air bubbles and the desired effect will be obtained.
If you decide that your craft should glow in the dark, then add special luminous powders to the resin you are preparing, you can add sparkles or even pearl beads. Be aware that while the resin is curing, all these components can sink to the bottom of the mold, that is, in our case, to the crest of the wave. This is a bit unwise, so if you decide to use sparkles, beads, pearls, then they will need to be added in the last layer of mold filling.
Filling the form
To achieve realism when making crafts with a foam wave effect, the work must be carried out in several stages. First prepare the clear resin - just a little, as it will form the very edge of the foam. Pour it into the bottom of the mold. Then foam the resin with a small amount of white dye. Try to do this. so that there are more bubbles in the mass. Pour the mixture into the mold again.
The next step is to pour turquoise blue resin, where you can add glitter or pearlescent sand. Add them very little so that the craft retains its transparency. You can pierce the liquid resin in several places with a sushi stick - this will allow the colors to mix, which will make the craft even more natural.
The last layer will form the base of the wave. Here you can add a few pearls to the liquid mass. Leave the entire composition to harden for the time specified in the instructions for the material you have chosen.
A student at the Vietnam Police Academy shared how she takes care of her facial skin.
Lost weight: what Sofia Tarasova sacrificed for the sake of “VIA Gra” (new photos)
Smooth and fresh skin: dermaplaning, or why a woman needs to shave her face
Another manufacturing option
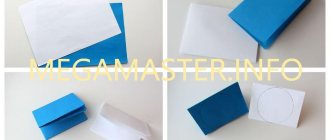
The next option for creating a circle from accordion-folded paper is slightly different from the previous two. In order for you to understand the work more clearly, take a close look at the photo below. It shows that two papers with a blue pattern are folded like an accordion and laid with their side planes facing each other in the center of the craft. Their edges are connected with glue.
Next, prepare “accordions” from paper with a brown pattern and attach them on two opposite sides of the blue blank. Then you need to determine the central point of the craft and tie a knot with nylon thread around the entire pack. All that remains is to glue the outer strips on one side and the other to each other.
Result of work
So, the time for the epoxy resin to cure has passed, and the work can be removed from the mold. Remember that we tried to make a reusable mold, so handle it carefully. Remove all work from the support container and place it on the table. Carefully turn the folds first along the top edge, and then the side seam. A stretch film, which can be easily removed, helps free the epoxy from the cocoon.
Level the uneven bottom of the work using a grinding machine. Work very carefully, remembering to put a mask or respirator on your face to protect yourself from dust.
After treating the epoxy figurine, rinse it with running water and wipe dry with a clean cloth.
DIY decor
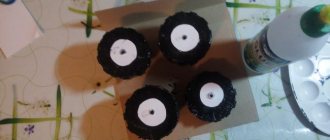
Now you can add a few decorative elements to make the craft even more natural and elegant. To do this, use transparent granules and a glue gun. By the way, granules can be obtained from the hottest glue if you simply drip it onto a piece of foil and remove it after cooling.
Glue the clear beads to the wave crest until you achieve the desired look for your craft.
Tricky boat
The design of this boat is called "Tricky boat", which sounds a little like the word "trick". The name can indeed be translated as “cunning, tricky, confusing.” Well, it’s not for nothing that it got such a name! After sitting over the diagram for a good half hour, the author was still unable to fold the boat.
(Click on diagram to enlarge)
Fortunately, a video was found on the Internet, and the complex immediately became simple. We must warn you, for the first minute and a half the piece of paper is simply crumpled and smoothed in all directions (apparently this is a necessary condition for performing an ingenious trick), but then the real magic begins!
Glowing wave
If you have a desire, you can install a wave made by yourself on a special illuminated platform. You can use a cosmetics box with a transparent lid for this. Cover the bottom and sides of such a box with black paper or self-adhesive film so that light does not leak out from it - only the top of the lid should be transparent. If the area of your craft is smaller than the area of the base, then do this:
- draw the outline of the base of the craft on a sheet of paper;
- cut out the outline;
- measure the dimensions of the base cover;
- draw and cut out a piece of self-adhesive film for the lid;
- draw the contours of the craft on this film according to the prepared template;
- Using a stationery knife, cut a hole in the film, stepping back 1 millimeter inward along the contour to allow for error;
- Cover the lid with black film with a hole.
Make a hole in the box through which pull the wire to connect the lamp to electricity. However, you can use batteries to turn it on. Place a special LED craft kit inside the box, which can be purchased at a specialty store, or ask a knowledgeable person to help you make an electrical connection system for your work. Glue your wave to the base cover using clear all-purpose glue.
Turn on the lights and enjoy your piece of the ocean in your home.
Found a violation? Report content
DIY cardboard spaceship
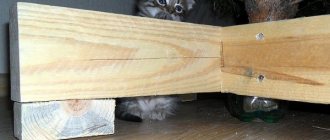
We suggest using a fairly simple option that will allow you to literally create a 3D model. To do this, you need to cut out several identical parts from cardboard, but of different sizes. The parts need to be fastened together, but either a thin piece of foam rubber or a small piece of thick paper must be placed between them. It will look something like this:
An entire space station can be made using cardboard rolls from toilet paper and tape.
Use silver foil, a compass, a black marker and a pencil to give the spaceship a realistic look.