Making paper balls for decoration and decoration
When considering the topic of how to make an interesting three-dimensional paper ball, you probably thought about interior decoration. The ball does not have to be perfectly smooth. Let's look at some interesting instructions.
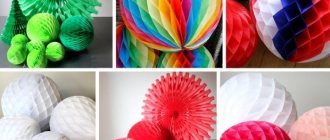
Volumetric ball of two colors
This ball model can be considered as a future Christmas tree toy. You can use different colors.
Execution process:
Ball of two colors (Step 1)
- take two sheets A; different color;
- You need to cut circles of the same size from each sheet;
- first we work with one shade, fold the cut-out blanks until a figure with an acute angle is formed;
(Step 2) - glue the shapes together with hot glue (if you don’t have it, use double-sided tape);
- the outer circles need to be glued together to form half a ball;
- from the second color we form the second part of the ball in a similar way;
(Step 3) - We string the upper and lower parts of the toy onto a thin wire and fix it with glue.
The ball is ready. For festive decorations, we also recommend decorating the balloons using the decoupage technique. The technique is more complicated, but the result will be magnificent! We described the decoupage technique in a separate article.
What kind of chocolate is suitable
An edible chocolate ball at home is made from varieties without filling and synthetic fillers. The best decoration is made from Belgian chocolate and domestic varieties with a high content of natural cocoa products.
Milk and white tiles without filling are also useful, although they are more capricious in operation. It is important to maintain the exact temperature conditions and recipe.
Delicate ball of napkins
This ball can decorate the interior; its decorative qualities are amazing. Before making such a paper ball, prepare:
- packaging of napkins;
- stapler;
- scissors;
- round stencil;
- thread and pencil.
Let's get started:
Delicate ball of napkins (Step 1)
- From a pack of napkins, take about ten pieces. The volume and airiness of the finished craft depends on the quantity taken. Place all the napkins in a stack.
- Using a stencil, mark a circle on the top napkin. We trace the contours on the material and cut it out.
(Step 2) - Find the center of the top circle and connect all the pieces with a stapler. In the resulting figure, you need to make cuts along the edges with a length of no more than three centimeters.
- Divide the napkins into two parts. We bend each layer of the napkin (one up, the other down) so that the figure has volume.
For manufacturing, you can use a denser base. To make the craft shimmer, it can be made from colored paper and decorated with shiny varnish.
If you need to hang the craft, thread a thread with a knot at the end through the center of the finished ball. Attach a paper clip to the other end. You can hang one balloon, or make many crafts and combine them all into one gorgeous garland.
Hastily
Modern ladies are too busy to spend precious time in the kitchen. Let's whip up a cake with small chocolate balls for the holiday. For this, ready-made, lightweight balls, like Nesquik, are useful.
Consumables:
- favorite chocolate – 120-140 g;
- cream – 70 ml;
- ready breakfast – 1 package;
- confectionery, coconut flakes.
We cook simply.
- Break it and heat up the chocolate.
- Add cow's cream and stir. The composition is uniform and shiny.
- Cool to 30 degrees. heat.
- We throw balls into a bowl with a solution, bathe them, remove them, and place them in a colander so that the excess solution drains.
- Before the shell hardens, decorative balls can be decorated with coconut flakes, waffle crumbs, and colored cocoa sprinkles.
- Place the glazed balls in the cold to harden.
We will arrange the delicious balls on the cake in picturesque groups, in a snake, in a wave, in circles, it will not be difficult.
It’s useful to know, read: – Chocolate for the confectioner – which is better: tips on choosing for tempering, baking and decorating.
Ball of multi-colored stripes
When preparing a colorful holiday, you can’t do without a bright accessory. Do you want to decorate the room? Then you need instructions on how to make a three-dimensional ball out of paper and multi-colored stripes with your own hands.
Ball of multi-colored stripes
For work we will prepare:
- ruler;
- pencil;
- scissors;
- thick multi-colored paper;
- glue;
- duct tape.
Let's look at the work step by step:
- Divide a sheet of paper into equal strips. The length of the strips will determine the diameter of the future ball, and their thickness will determine the density of the finished product. To make one ball you will need six strips.
- Take one of the strips of any color and roll it into a ring. Secure the ends with glue. We put the workpiece aside; we will need it later. Now let's take the remaining five stripes and intertwine them.
- We place the resulting plexus in the center of the previously made ring. Tuck each strip inside the workpiece. To make the product even, do not forget to hold it in the middle. Glue the ends of the strips together with tape.
If the work was done correctly, the finished product will look like triangles and pentagons flowing from one to another.
We described another version of the original ball using the kusudama technique in a separate article.
A few secrets from famous confectioners
- If the filling includes almonds, they must first be peeled. To do this, soak in hot water for 30 minutes. Then the kernels are fried in a dry frying pan or in the oven.
- Nuts, along with cookies or marshmallows, are passed through a meat grinder.
- When we fill the hollow pieces with filling, we sometimes hide a whole almond or another nut in the middle.
- American chocolate is more difficult to melt than domestic chocolate.
- It is dangerous to overheat the white analogue so that it does not delaminate. Therefore, a steam bath is used.
- To create colorful patterns on the decorative balls, before the chocolate mixture is poured into the mold, the round grooves inside are smeared with dye. If you smear the grooves with stripes and specks, you get a fantasy pattern.
- We buy cream for the composition with a fat content of 33% or more.
Ball according to the scheme for mathematics
Scheme for a volumetric geometric ball
Before making a ball out of paper, you need to take:
- paper;
- scissors;
- PVA;
- sample.
We have already prepared the required template, you will not waste time searching for the required sample.
Ball making work:
- print the template;
- cut it along the indicated contours (don't forget to cut out the labels);
- start gluing, connect each strip in a clockwise direction;
- when the body is assembled, leave the ball to dry;
- After drying, apply PVA to the “lid” of the ball and carefully press it against the previously made workpiece.
It is advisable to perform gluing in parallel.
The ball is ready. Now you can decorate it as you wish. Draw the contours of a sports ball or planet.
Concrete hemispheres - parking limiters
Concrete hemispheres are devices that prevent vehicles from parking in areas where cars could pose a hazard.
They are installed in courtyards where children play or in other places where a car should not be parked, such as areas near supermarkets, business centers, and hospitals.
Thanks to the concrete hemisphere, it is possible to protect others from large concentrations of vehicles, exhaust gases and excess noise. The installation of hemispheres can be permanent or temporary; the limiters are easily dismantled and do not wear out.
Purpose
Concrete hemispheres are used in areas with heavy traffic to limit the flow of vehicles. Unfortunately, there are not many convenient parking lots, so vehicles are not always able to comply with parking rules. Car parking is provided on children's playgrounds, lawns, flower beds, near public catering establishments, and shopping centers.
To prevent vehicles from interfering with the movement of pedestrians, restrictive devices have been invented. The road limiter can look like flowerpots, flower beds, columns or benches; concrete hemispheres are installed. These anti-parking devices can be massive, which are used on a permanent basis, or smaller ones, installed temporarily.
Advantages
Parking lots with concrete hemispheres have the following advantages:
- more resistant to damage and will not simply break without a special tool;
- in the event of a collision with a heavy vehicle, the protective element will not be damaged;
- a hemisphere made of concrete mortar has a long service life due to the strength characteristics of the material;
- due to its massive size it cannot be easily moved;
- ease of installation;
- do not pose a danger to others due to their rounded shapes;
- can serve as a decoration for outdoor interiors;
- It is possible to increase the standard height and thereby prevent large vehicles from entering.
Installation
Installation of concrete hemispheres as parking limiters.
Concrete hemispheres are installed on asphalt pavement, dirt roads, lawns and paving slabs. Installation of concrete anti-parking systems should only be carried out on a flat surface.
Due to the weight of the road barrier element, reliable and durable fixation is ensured. If a concrete anti-parking lot is relatively light in weight, it is additionally equipped with steel rods.
A metal pin to strengthen the object is installed in the base at the stage of laying the concrete solution into the mold.
To install a concrete hemisphere, follow these steps:
- Installation of the structure begins with the preparation of the road surface. You need to make sure that the surface of the area is smooth and free of debris.
- They begin to install the form, for which they make a hole in the road base using a hammer drill and the necessary equipment.
- The pin can be walled up in concrete, but then the structure will turn into a stationary one, and it can only be removed by breaking it down.
- To install temporary restrictive spaces that are installed during sporting events or for other functions, then anti-parking areas should be installed on the road section and aligned along the line.
Maintenance and care
The concrete barrier element to prevent the passage of vehicles is made of high quality concrete. It is important to find manufacturers with a good reputation who use purified alluvial sand and high-quality cement to prepare the solution.
Conscientious manufacturers use additives, plasticizers and other compounds that can increase the technological characteristics of concrete.
All kinds of additives improve the properties of the solution and increase the ability to withstand aggressive environments, mechanical stress and adverse weather conditions.
If you plan to install hemispheres as a decorative element, they are painted with facade paints that are resistant to precipitation. Concrete fencing structures do not require much maintenance.
Periodic cleaning of dust and dirt is enough for them. The surface is cleaned with a stiff brush, which is moistened with soapy water.
In order for the hemisphere to serve for a long time and not lose its characteristics, the surface of the element should be painted every few years.
Molds for concrete hemispheres
Hemisphere diagram.
Hemispheres can be made with your own hands in the quantity needed to fence a road section or purchased from manufacturers. Making anti-parking barriers is not difficult and anyone who wants to make one can do it themselves.
To make a hemisphere yourself, you should purchase a concrete mixer, a mold for the product and the necessary materials. The anti-parking mold is made of high-strength plastic with a thickness of 0.2-0.3 centimeters.
Molds for spherical structures can be used repeatedly. Manufacturers make spherical structures of different sizes. The most popular shapes are with h 250 millimeters and d 500 millimeters.
The weight of this design reaches eighty kilograms.
Making a mold yourself involves preparing a concrete solution. To do this, mix sand, cement and crushed stone in the required proportions and fill it with water.
You will need enough water until the consistency resembles thick sour cream. The prepared solution is poured into molds and left to stand for 24 hours. After a day, the products are removed from the mold and left to dry.
The solution will reach its maximum strength characteristics after 28 days.
Conclusion
Concrete fencing structures are used if it is necessary to protect a section of the road from vehicles. They are installed near playgrounds, shopping centers and other places with heavy pedestrian traffic.
Concrete road hemispheres can be purchased ready-made or, if desired, made with your own hands. In order for anti-parking road structures to last for decades and at the same time maintain their characteristics, periodic maintenance of the surface of the products should be provided.
Production using the papier-mâché method
Almost everyone knows how to make papier-mâché. If you forgot, we will remind you of the preparation process for this process.
Before making a paper ball, you need to prepare a special adhesive solution. This is flour and water in a ratio of one to five. To prevent mold from forming on the product in the future, add salt to your glue.
How to make a three-dimensional ball from papier-mâché paper step by step
Mix the ingredients in a small container, heat over low heat and stir constantly. The entire manufacturing process takes no more than five minutes, and the consistency can be considered ready when it becomes jelly-like.
Well, while the glue is cooling, let’s prepare the materials:
- inflatable ball of the required diameter;
- newsprint, napkins, cut into pieces;
- glue;
- brush;
- gloves.
Let's get started:
- The first step will be to create the basis for the future ball. Take a balloon and blow it up. If the “tail” of the ball has a bulge, don’t worry, during the process of pasting with paper. You will give the finished product the correct shape.
- Start covering with newsprint. Dip the strips into glue, remove excess and apply to the ball. We repeat this action until the base is completely covered with paper. Try to distribute all stripes evenly. For a high-quality result, we recommend applying several layers of newspaper. When the glue begins to harden, carefully adjust the shape of the ball.
(Step 2) - Let the workpiece harden. This will take a lot of time, but there is no need to rush. It is advisable to leave the future ball overnight. Once the first few layers are completely dry, take some tissue paper and apply a few more layers on top. Leave to dry again.
The work is finished. When the material is completely dry, you will get a durable ball that can be covered with acrylic paints or gouache.
By the way, if you make several circles of papier-mâché of different diameters, you can construct an excellent snowman! Such a snowman can’t hold a bucket on his head, but a paper cone can.
We described in detail how to make a cone in another article.
Roll chocolate balls with cookies in your palms
A cake with homemade chocolate balls for a girl will give her great pleasure on Angel's Day. Sister and brothers can roll unusual candies themselves with clean palms.
You will need the following products:
- “Lemon” cookies – 300 g;
- dark chocolate – 180 g;
- cow butter – 60 g;
- cane sugar – 100 g;
- milk – 100 ml;
- coconut shavings for decoration.
We sometimes add chopped almonds and other nuts to the recipe. Replace fresh milk with condensed milk. For dessert for adult guests, we add a couple of tablespoons of Amaretto liqueur, rum, expensive cognac, and a strong coffee solution for flavor.
Sometimes we mix the base of the balls with cottage cheese or apricot jam. Marzipan, dried apricots and ginger root go well with white chocolate. This is how you get homemade, round candies with different flavors.
Manufacturing stages.
- We crumble the cookies.
- Melt chocolate and butter over steam.
- Add boiled milk and sugar to the mixture and mix.
- Pour the cookie crumbs into the mixture and knead the soft dough.
- Roll the prepared mixture into balls in your palms.
- Roll the sweets in coconut flakes and place them in corrugated paper bowls.
- Place the finished treat in the refrigerator.
8. Frame sculptures
For those who have already practiced a little in making concrete figures, there are more complex options that require sculptor skills and spatial imagination. We are talking about frame products made of concrete. Using fittings, you can create any composition - from an angel to a fairy-tale castle.
First you need to weave the contours and base of the future composition from wire. The more accurately the frame is reproduced, the more accurate the final figure will be.
Read also: What can be turned on a lathe
Monolithic works of art are made by applying cement directly to the frame. And to obtain a hollow form, the frame is wrapped with construction mesh and covered with cement.
After the first layer of cement has been laid, you will be able to formulate the general appearance of the future composition. The main textured elements are face details, turrets, lines, etc. formed when applying the second layer. if the elements are complex, a third layer may be required for the smallest details. When the statue dries, it can be painted in any color or the necessary shades can be added.