How to make a teddy bear from a towel
Such a wonderful teddy bear will be a beautiful and practical addition to a gift for a newborn baby.
You needed: a medium-sized terry towel (approximately 50x80 cm), a ribbon 2.5 cm wide, two narrow ribbons, a thin elastic band.
1. Lay out the towel on the table and fold one edge along the short side to the middle (photo 1).
2. Rolled the long edges of the towel up to the center transverse line (photo 2). I pressed them with my palm so that the structure did not fall apart.
EVERYTHING YOU NEED FOR THIS ARTICLE IS HERE >>>
3. Visually divided the resulting workpiece crosswise in half. I took it by the thinnest edge (without a fold), turned it around once and laid it on top of the other part of the rolled towel. Carefully straightened the fold and slightly turned the top rolls from the center (photo 3).
Articles on the topic (click to view)
- Chintz: what kind of fabric is it, pros and cons, application
- Textiles in the interior
- Photo curtain for the kitchen
- Kitchen interior with black and white curtains
- Photos of beautiful curtains with eyelets
- Photo of voile curtains for the kitchen or living room
- Photo of a bedroom interior with beige curtains
4. Placed an elastic band on the small top of the towel to create the bear's head. I formed the ears and secured them with thin ribbons (you can use small rubber bands) (photo 4)
5. I tied a bow from a wide ribbon around the bear’s neck, hiding the elastic band.
A simple recipe for slime made from water
This recipe will help you make a slime that, in its consistency and characteristics, will be as close as possible to store-bought toys.
Ingredients and equipment
- 2.5 g of boric acid powder (you can buy the component at the pharmacy);
- 30 ml of regular transparent glue;
- 5 g of any dye. You can use both regular food and natural vegetable juice (beetroot or carrot juice);
- 200 ml purified water;
- 2 deep cups.
Process of creation
- Pour warm water (100 ml) into one of the bowls. Send boric acid powder there and mix thoroughly until the component is completely dissolved.
- In a second container, dilute the remaining water with glue and a few drops of dye.
- Now pour the solution from the first bowl into a container with dye and glue. Mix all the collected ingredients thoroughly.
The end result will be a stretchy slurry that all the kids will love. Since sodium tetraborate was used in the process of making the slime, you need to warn children that it is strictly forbidden to taste the toy!
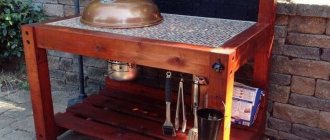
Bear made from a towel: photo
© Author: Natalya Telnova, Moscow. Photo by the author
TOOLS FOR CRAFTSMAN AND CRAFTSMAN, AND HOUSEHOLD GOODS VERY CHEAP. FREE SHIPPING. RECOMMENDED - 100% CHECKED WITH REVIEWS.
Below are other entries on the topic “How to do it yourself - for a homeowner!”
Subscribe to updates in our groups and share.
Let's be friends!
1 Comment
DIY balloon crumble This favorite cartoon character is easy to make and even a child can make it. 1.
We inflate 4 balls of the same size with a pump and tie them together - these will be the paws of the crumb (photo 1) 2. For the body, inflate one balloon larger than the previous ones and tie it to the paw blank.
3. Two narrow long balls - for the ears (photo 2).
We bend them in half and glue them with Rubber Moment glue to the top of the body. We hide the place of gluing by wrapping the workpiece around the ears with the same long ball. 4.
Expert opinion
Smirnova Ekaterina Anatolevna
7 years of experience in interior design, professional architect
We form legs from two inflated small balls and glue them to the body. 5.
We cut out eyes and a mouth from colored paper and fix it to the workpiece with glue. 6.
Instead of a nose, glue a small red ball. Smart Krosh is ready!
What will you need?
Only at first glance it seems that for a towel bear cub you will need only one thing - in fact, the towel itself, but this is not so.
- You need a ribbon or ribbon. You can choose any of them to suit your taste. They must be at least 1 meter long and reach 2.5-3 cm in width. The color is selected depending on the color of the towel. It is best to take a contrasting one, but compatible with the color of the towel.
- Scissors.
- Rubber bands. It is best to purchase stationery erasers for this “master class”. They are invisible and at the same time durable.
- Double-sided tape or glue.
- Any decorations at your discretion - buttons, decorative doll eyes, a toy bear nose, stickers in the form of eyebrows.
- Finally, the towel itself. The aspect ratio of the towel should be 2:3. A small towel 40 x 60 cm is best suited, but you can choose another one with similar parameters. The color of the towel can be any. It can be multi-colored with polka dots, the color of a pleasant cappuccino, white, blue and pink.
Do they give towels: superstitions and reality
No matter what anyone says, towels are often given as gifts, despite the widespread superstition that such a gift brings discord, enmity, separation and parting.
After all, in fact, superstitions are a specific phenomenon, some people believe in them, others don’t think about them. As you and I know, thoughts are material and most often it is not superstitions themselves that do their job, but our emotions and fears. So if you don’t believe in such signs at all, you can safely choose a towel as a gift for the hero of the occasion. But do not forget to take into account the attitude towards such superstitions of the person who receives this gift!
The easiest way to wrap a towel as a gift is to decorate it in the form of candy:
Instructions
Below are step-by-step instructions on how to quickly and easily make a bear from a regular towel.
- We lay out the towel on a flat surface, it can be a table or a bed.
- Visually divide the towel into three parts and fold one part lengthwise so that its edge is in the middle of the product.
- Now turn the towel over so that the wrapped part is on the right. We begin to twist the towel to the middle and temporarily secure it with a heavy object.
- We do the same with the other part of the towel - we roll it into a tube. We fix it in this position (you can do it manually).
- Next, you need to turn out the free edges and twist them. At this stage, it is important to roll the product carefully so as not to spoil the rolled “legs” of the teddy bear.
- The middle area is straightened out.
- The upper part – the bear’s head – is immediately visible. We fix it with an elastic band.
- Afterwards, you need to fold the towel on your “head” in the form of two ears. We secure them with an elastic band, just like the made head.
- To make the elastic band invisible, tie a ribbon or braid around the bear's neck. The ends must first be treated with a lighter so that the ribbon does not unravel.
- Decorate the product to your taste.
- The teddy bear is ready.
Romantic figures
For a loved one, you can make a figure out of a towel, symbolizing love, fidelity, sympathy. Traditionally it is a heart, a swan and flowers. Below you will find master classes with diagrams.
Heart
There are two ways to give a towel a heart shape.
First way:
- Place the product vertically, fold both edges towards the center.
- Roll one end to the middle.
- Then do the same with the other end.
- Secure the rolls with a pin.
Second way:
- Place the product horizontally in front of you.
- Twist its edges into diagonal tubes to form a triangle.
- Fold the edges in to form a heart.
- Use a pin to secure.
- Level the inside.
Swan
They make a swan figure like a heart:
- The product is laid out horizontally in front of you.
- Roll the edges diagonally into tubes close to each other and beautifully bend the narrow side upward.
- For a better effect, place a few more towels on top in a stack or in waves.
It is better to form the figures of a swan and a heart directly on the bed of the gift recipient. If you try to move them, the shape will suffer.
Flowers
To create a flower, a thin and small towel is suitable, for example for the face or hands:
- Fold it in half diagonally to form a triangle.
- Starting from the wide part, roll up the rope. Leave a small triangle.
- Now roll the tourniquet into a roll. Secure with a rubber band.
- Lift up the triangular “petals”. You will get a rose like this:
If there are a lot of small towels, you can make a whole bouquet. To do this, wooden sticks are inserted into the middle of the roses.
How to decorate?
First, of course, you will have to glue the eyes. They can be made from large decorative buttons, or they can simply be cut out of paper.
Another original option is to buy artificial eyes at a sewing store just for such crafts. Paper eyes can be glued with weak-hold adhesive (so that they can be easily removed afterwards) or with double-sided tape.
An artificial nose can also be purchased at a sewing store or replaced with a small black button.
The bear's mouth, as strange as it may sound, can be neglected. For a towel bear, this is not such an important detail, unlike the eyes. In extreme cases, it can be made from two light stitches of thread.
In addition, originality of design is also welcome. This can be either clothes for the bear or various hats. For a “bear-boy” you can sew a small bow tie, and for a “bear-girl” you can sew a felt hat or veil.
Small knitted scarves look great on these bears.
By the way, such a towel toy can be presented along with a hygiene product in a gift box. The set will look neat and beautiful.
The gift does not oblige both parties to anything, but will only bring pleasure.
Crafts of this kind are perfect for beginners in this business, since the process is carried out step by step, step by step, quickly and easily. To do this, you don’t need to have any special skills and it’s quite possible to make a bear in one evening.
Some of the most obvious advantages of such a craft are the low price and availability of materials. It's easy to do it yourself.
A visual master class awaits you in the next video.
How to assemble a cake from towels with your own hands: choosing color and texture
How to make a hare from a towel. do-it-yourself towel bunny: master class with step-by-step photos do-it-yourself towel bunny First of all, you need to decide on the color scheme of the towels and their texture. It is worth saying that this is the most creative part of the process. When choosing colors and decorations, you need to be guided by information about the gift recipient (gender, age, tastes) and the occasion of the holiday. For example, for a birthday, you can make the cake look like a birthday cake: stick candles, put “roses” made of soap on top instead of cream. It is better to make a wedding cake made from towels in white or pastel colors and decorate it on top with figures of the bride and groom. But a cake for children should be bright.
You need to use all your artistic taste to choose the right color scheme. A short reminder on color compatibility will be an assistant in this matter:
- White and black are universal colors that go well with almost everything else.
- Blue color harmonizes with yellow.
- It is preferable to pair dark brown or pink with red.
- It's best to be careful with orange. It is best to combine it with green shades.
- Green, in turn, looks good with yellow, light green and gray.
- Using pastel colors is a win-win option for a towel cake.
- Lilac shades are best combined with white and gray colors.
The list can be continued endlessly, because these are not all possible variations. You can choose one of the mentioned combinations, or you can give free rein to your imagination and choose something of your own.
Materials
To wrap a gift in an original way or make a cute surprise in the form of a teddy bear, you will need the following:
- A terry towel measuring 40 by 60 cm. The color can be any, but white, brown or cappuccino are better for cubs.
- Satin ribbon 1 m long and approximately 2.5 cm wide.
- Stationery erasers in the color of the towel or transparent.
- Scissors.
- Double sided tape.
- Buttons or ready-made eyes and nose from a craft store.
How the soft toy Huggy Waggy took over the Internet
The main character of the horror game Poppy Playtime, Huggy Waggy, has conquered the Internet. He became not only the hero of the “Grandma Huggy Waggy” and “Where did the blue Huggy Waggy” memes, which Medialeaks wrote about, but also the most popular toy in online stores. Plush versions of the monster and his friend Kissy Missy have become coveted gifts for children and adults.
Mofushko
She left the room saying, “Good morning, I still want the Huggy Waggy toy.”
Toys Huggy Waggy and Kissy Missy
Posts are increasingly appearing on social networks, the authors of which boast about their toys. In the videos, the blue monster from the viral game becomes a part of reality and delights young fans.
Shock. Huggy attacked me while I was petting him.
While some Internet users are content with their “pet” monsters, others flood the comments with questions about where to buy a Huggy Waggy toy.
Where can I buy a Huggy?
Huggy Waggy and Kissy Missy can be found in the online stores OZON, Wildberries or AliExpress. The best-selling product sells like hotcakes and costs from 700 rubles, taking into account discounts.
Huggy Waggy and Kissy Missy on OZON, Wildberries and AliExpress
However, not all parents and adult fans of Poppy Playtime were ready to spend money on the blue monster. Therefore, many social network users began to make Huggy Waggy on their own.
Decorating the figurine
Now you know how to make a bear out of a towel. You can decorate the figurine as you wish. The nose and eyes can simply be cut out of paper and glued to double-sided tape.
If you want to make a gift for a child, it is better to use buttons. Sew buttons of matching color and size instead of the eyes and nose. For the bear, you can sew a tulle skirt or pajamas. Instead of a towel, you can use pieces of felt or faux fur. The child will certainly like this toy very much.
Decoration crafts
You can make beautiful crafts from towels not only with your own hands. Invite your child to make himself a beautiful and soft toy made from a towel of his favorite color. From the materials, take the towel itself, a ribbon, decorative eyes and nose, as well as three elastic bands used to wrap money.
Everything is done very simply. A rectangular towel is placed on a flat surface, the middle is determined, and then the edges of the towel are tightly curled towards the center. Once the edges are rolled into rolls, you need to flip one side over the other so that the face of one roller faces you and the other faces the floor.
The main advantages of crafts of this kind include low cost and availability of materials.
To make a bear figurine from such material, you need to prepare the following:
- A towel whose aspect ratio should be 2:3. The best choice for this purpose would be a product 40 x 60 cm.
- Ribbon or decorative braid at least 1 meter long, reaching a width of 2.5 - 3 cm.
- Thin elastic bands. The best option is stationery ones, since they are quite durable and at the same time almost invisible. You can also use those rubber bands from which children love to weave bracelets.
- Glue or double-sided tape.
- Scissors.
- Buttons or pieces of felt to decorate the nose and eyes.
You can “revive” this towel figurine a little (photo). To do this, you need to glue button eyes and a felt nose to the face of the made bear using double-sided tape. If desired, the eyes and nose can be made from colored cardboard.
For a girl teddy bear, you can sew a tulle skirt.
You can make a lot of different original figures from ordinary terry towels.
You can creatively decorate a gift for February 23rd.
Sometimes you really want to diversify the usual symbolic souvenirs and give something that is so simple at first glance, but at the same time quite spectacular.
It’s always a pleasure to visit them, regardless of the occasion, and going to them with sweets and nice little gifts is doubly pleasant. You can surprise your hospitable hosts with anything, but what will definitely amaze and delight them is a miniature bear made from a towel.
Making a terry bear cub is quite simple. Auxiliary materials will include rubber bands, ribbons, a foam ball, ready-made eyes for a toy, pieces of felt or foamiran. It is better to take soft, velor or terry towels for a funny animal, then the bear will cause even more affection. We've done an extensive search online and found three different options for you on how to make a bear out of a towel.
The second option is also interesting. Here the bear is obtained without any special anatomical details, but it is very easy to fold. The master class is in Spanish, but the movements are understandable in any language. To hold the towel in the right places, you will also need elastic bands and beautiful ribbons. The nose is made from a piece of felt, add eyes to taste
Making a bear's face out of a towel
The second option is to make not the entire figurine, but only the face of the bear cub. This option is suitable if the towel is very small.
- Lay the towel with the pattern on the table, with the wrong side facing you. Mentally divide the fabric into three parts in width and 4 in length. We place gifts inside, closer to the center.
- We fold the towel overlapping first from the right to two-thirds, then from the left.
- Fold one quarter of the towel towards the center. And then fold it in half again. The bear's head is almost ready.
- We fix the nose and ears on both sides with an elastic band and glue the nose and eyes. When you fix the ears, you need to grab both the front and back of the figure so that the face does not fall apart. The result is a charming bear with a wonderful surprise inside.
You know two options for how to make a bear from a towel. Choose the one you like best and get creative! And after the bear, you can move on to more complex figures. Swans and cakes made from towels look very beautiful.
Jacket and tie
Here is a step-by-step description for beginners on how to create such a product. The first step is to lay a black towel and a white one on it so that they lie edge to edge, corner to corner. The next step is to take a ruler and strongly press the top towel along its entire length so that a mark remains.
Next, fold the top towel with its ends towards the middle, which was just pressed with a ruler. You will end up with a rectangle that needs to be folded in half again. Next, carefully turn the corners of the towel so that you get two triangles, one of which will be the collar, which is what you need to pin with a pin so that it doesn’t move anywhere.
After that, it is important to turn back the edges of the jacket, insert the sharp end of the tie there, and then fold the jacket again. Unscrew the tie, secure everything with pins and the craft will be considered complete.
Master class “Teddy bear made from a towel”
Yulia Zelenko
Master class “Teddy bear made from a towel”
Master class “ Teddy bear made from a towel ”
In the modern world, it has become fashionable to create different figures from towels , decorating hotel rooms with them or for small gifts. And I propose to teach this to older preschoolers. And children will appreciate the idea with dignity and curiosity. After all, it’s one thing to receive a ready-made toy, another thing to make it yourself.
Expert opinion
Smirnova Ekaterina Anatolevna
7 years of experience in interior design, professional architect
My article describes how to make a bear cub from a towel , everything is simple and accessible to everyone. I conducted my master class for teachers of preparatory groups in my garden.
I offer step-by-step instructions for implementation in the following photos.
towel .
twist a tight tourniquet from both sides to the middle, as in the photo.
Next, bend the workpiece in half, as in the photo. Approximately mark the center, turn one side over.
Next, we form the head and tie it with an elastic band.
And with the help of small rubber bands for weaving we form the ears.
This is such a wonderful bear we got!
“Polar Bear Umka” DEPARTMENT OF EDUCATION OF THE CITY OF MOSCOW State budgetary educational institution of the city of Moscow “School with in-depth study.
"Towel Decoration" Summary of a lesson on appliqué based on national ornaments (senior group) Goal: the formation of multicultural competence in children of senior preschool age. Objectives: 1. Instill respect and love for the native land.
Team work “Teddy Bear” made from buckwheat and rice The level of speech development is directly related to the improvement of fine motor skills. Creative activities can serve well in this area.
Application made from cotton pads “Panda Bear” Good evening, dear colleagues. I present to your attention an application made from cotton pads “Panda Bear”. The idea for the app came.
Applique in the preparatory group “Teddy Bear” Topic: “Teddy Bear” Goal: mastering a new applique technique - gluing the silhouette with finely chopped threads, conveying the effect of fluffy fur.”
Towel Day in the younger group (photo report) Every year since 2001, on May 25, fans of the work of the British writer Douglas Adams celebrate Towel Day. In its world.
Master class on making crafts from a disposable plate “Teddy Bear” Nina Butova Master class “Teddy Bear” for middle group children To make it you will need: - paper plate - glue stick - paints.
Master class on drawing for children and parents “Bear cub and winter” (drawing on fabric with putty and gouache) Master class on drawing for children and parents “Bear cub and winter” Conducted by: teacher Samtsova I. A. Topic: Drawing on fabric with help.
ECD for acquaintance with nature “Teddy Bear and Winter” Objectives: Educational: 1. Expand children’s ideas about winter. 2. Intensify the use of cognate words. Developmental: 1. Develop.
"Striped towels for forest animals." Summary of direct educational activities Educational field: artistic and aesthetic development. Integration of educational areas: speech development, social and communicative.
Pack of towels in the shape of a bear
March 8 is just around the corner, and the usual gifts are soap, gel, cream for mothers, girlfriends, colleagues, right? Some people pack them in baskets, some in bags, but I decided to combine two gifts into one. What goes well with the soap and bath assortment? Of course, a towel! In fact, you can pack anything you can think of this way: candy and theater tickets, a diamond ring and money, cutlery and a wristwatch.
The main thing is small.
So, two options for how to fold a towel so that you get a package for a small gift - in the shape of a bear!
- towels (or you can take any other fabric, but dense and thick);
- gifts for packaging;,
- bank elastic bands (they are also stationery, they are also “for money”, but they can also be used for hairstyles);
- rubber bands for weaving (small);
- something for the eyes (running eyes, self-adhesive film, circles of paper with double-sided tape, buttons with pins - I took small black crabs, convenient);
- something for the nose (self-adhesive, paper, tape or other).
Tip: it is better to choose elastic bands that match the color of the towel or close to it.
Option 1.
Take a hand towel - the fluffier it is, the better. And if the color is bearish, it will be absolutely reliable. I have a red towel and one with frogs on it, I put the towel with the wrong side up and turn the edge with the applique inward about a quarter of the length of the towel, where the legs will be.
Roll the towel into two rolls from the edges to the middle along the long side. We hide a gift in the middle. I recommend practicing a couple of times before the final packaging so that everything goes exactly where it needs to go!
We fold the towel across the long side, about 2/5 on top of 3/5, exactly above the gift, while twisting the towel, that is, if we folded it simply, we would see the front side and the absence of rolls, but we turn this part over so that the rolls came to us - these will be pens. It should look like in the photo.
We check where our surprise is and put a small addition as in the photo - under the top layer. A small addition is, in my case, a tiny “sample” of soap, maybe a gel or a jar of lip balm, or a jar of cream, the main thing is that the size is small, 4-5 cm. This will then be the muzzle.
We fix the neck with an elastic band, making sure that the surprises hit the “head”. If it’s not tight, you can pin the handles with pins - I didn’t need to.
We straighten the towel on the “head”, make it more rounded, and form the rudiments of the ears.
Expert opinion
Smirnova Ekaterina Anatolevna
7 years of experience in interior design, professional architect
We use small rubber bands to form the ears: we grab the corners of the towel in the right place and pull the rubber bands on them - it’s more convenient to take those that are positioned “for weaving bracelets,” they are small and you don’t need to twist them twenty times.
Now we feel for our little surprise and squeeze it with an elastic band (that is, we pull the elastic band around it over the towel) - we get a muzzle.
Next we decorate - add eyes and nose. We tape or sew or pin. I marked the eyes with crabs and the nose with double-sided tape. You can also tie a bow around your neck for a festive occasion.
And you can also stuff the bear additionally: put mascara, pencil, lipstick, comb, perfume, forks, hairpins in its paws - anything for your soul