For many, matches are just a household item that starts a fire. This is far from true. For decades now, this type of handicraft, such as creating crafts from matches, has been gaining popularity.
Real masters of the craft create truly masterpieces. This is a painstaking activity, but interesting and accessible to everyone.
Recommendations for Beginners
Beginners in any business should first familiarize themselves with the basics in order to avoid mistakes in the future.
Also here there are nuances and subtleties, the understanding of which comes with experience.
Creating a sketch and diagram
On paper, first of all, they draw a model of a house (with a pipe, without a pipe, with doors or with a cut off roof). Based on the availability of materials and their characteristics, sizes are selected.
These parameters (height, width, presence of additional buildings in the model) are transferred to the diagram. Working with a drawing will allow you to avoid errors during the assembly process.
What types of matches are there?
- Classic. Regular matches that can be found in any store. Used for most crafts, comfortable, but not long enough.
- For the oven. The length is already 8.5 cm (regular ones are 5 cm). Suitable for large models.
- For lighting fireplaces. Length 10 or 20 cm. Thanks to them, large-sized doll houses, castles, cars, etc. are created.
Notes for the future jeweler
Small objects in a child’s hands help develop motor skills, and therefore the brain. Any work requires attentiveness and accuracy. During the construction of turrets and houses, children develop their imagination, creative interest and aesthetic taste.
Exercises with matches develop perseverance, patience, and accuracy. These are the qualities that the future dentist, jeweler and surgeon will need.
Craft glue
Many jobs require the use of glue. However, not all are convenient and safe.
- PVA is a universal glue. Low price, and also suitable for gluing materials such as wood, paper, cardboard, so it will be an excellent choice.
- Moment Joiner is a more advanced version of conventional PVA. Provides instant drying and setting of parts.
- Instant installation instant grip - instantly glues any type of wood. No additional fixation required.
Step-by-step actions
The whole job is very simple:
- the picture is pasted onto a base (thick paper or cardboard);
- all drawings are sealed with available material of the required size;
- You should make sure that the matches fit snugly against each other.
When the glue dries, the child can take up the usual work - carefully paint all the figures in the picture with gouache or acrylic paints.
The resulting piece can be decorated with colorful leaves or other natural materials.
Some tips for beginners
- When creating figures from matches, do not glue a large number of elements at once. The glue needs time to dry, otherwise the whole craft will fall apart.
- If the craft is without glue, then you should take into account the distance between the elements. It is equal to the diameter of one of them. This way the structure will be stable, and other matches will easily be inserted further.
- In the process, you can help with a toothpick, pushing the matches and moving them.
We are building a “railroad”
- We use long matches to lay a narrow-gauge railway. We glue the short ones from below - they will serve as sleepers.
- In one of the boxes we make holes for the headlights of the train.
- We fasten the boxes together with thread.
- The wheels will be old round batteries. You can use buttons instead. The wheels are attached to the “cars” using glue.
- We put the “train” on the rails.
It depends on the child’s wishes what cargo will be transported on his “railroad”. Let him choose small soft toys and place them throughout the carriages.
match tree
Having learned how to make such a tree, you can easily create an entire forest that can be populated by the same homemade animals.
You will need:
- matches;
- plasticine;
- hot glue;
- skewer.
Stages:
- The base on which the tree will be formed is formed from plasticine.
- A skewer is inserted and secured into the base.
- The perimeter of the skewer is covered with matches in levels. For strength, 2-3 layers are done.
- Once the trunk is ready, the crown is made. Matches are glued to the lower tier at an angle. Closer to the top they already diverge to the sides.
- The crown gradually expands. New ones are glued to the matches.
- For splendor, everything is supplemented with halves of matches.
Let's get started
Now you are 100% ready to start your creativity.
Our small master classes are in order: from the easiest to the most difficult. As with any other activity, we recommend that you start with the basics and gradually move towards the top, making the task more difficult step by step.
Mill with bridge
Process:
- The first step is to assemble the mill walls. To do this, identical parts from matches are glued together. For strength, a pair of beams are glued to the wrong side.
- When everything is dry, the body is assembled. For strength, reinforcing beams are glued again.
- Roof gables are made according to the principle of base panels. Holes are also made for attaching the wings.
- It is easier to make wings according to a drawn sketch. Then you can glue a match, toothpick or skewer to the structure as a fastener.
- gables are installed, wings are inserted. The roof deck consists of two identical parts. These are two sheets of tightly glued matches.
- The roof is glued to the rest of the structure.
A river is drawn on a sheet of cardboard, near which a mill is installed. For the base of the bridge you need two arches, each with 3 pieces. Between them a flooring is made of several matches. This bridge is located over the river.
The simplest figures
Using plasticine as an auxiliary material, you can captivate your child with work and make together with him not only flat, but also three-dimensional figures.
By fastening matches with bright plasticine balls you can assemble:
- original houses;
- various pyramids;
- funny animals;
- of people.
All of the listed figures can be placed vertically on cardboard and get a wonderful composition.
Well
The simple design can be done even by those new to this art.
Process:
- The base is made up of 4 matches lying in the same plane.
- Next, another 10-12 rows are assembled.
- Supports are being prepared for the roof. Two matches are glued to the opposite walls on the inside.
- The supports need to be increased by adding two more matches to each.
- The roof frame is assembled and installed on prepared supports.
- Matches are placed in a dense “shield” on the frame.
Locomotive
To work on the manufacture of the railway you will need:
- large match boxes;
- old button batteries or buttons;
- scissors, thread;
- glue;
- regular and “hunting” matches.
The process itself is simple and even the smallest child can do it.
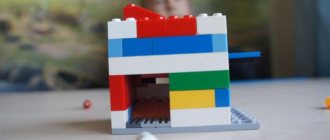
Matchstick house
There are many options for matchstick houses. These include the simplest, one-story ones, and palaces or castles. Or maybe it will be a real doll house.
You should start by preparing the workplace. Firstly, the table must be stable. Secondly, the lighting must be good. Thirdly, there should be no drafts or vibration in the room.
To create the product you will need the following:
- matches and boxes of them;
- glue;
- scissors;
- thick cardboard;
- scissors or art knife;
- decor
Match house without glue
One of the basic models that can be assembled from this material. The main feature is already hidden in the name - such a house will be assembled only from matches, without the use of other tools.
The house can hardly be classified as an easy matchstick craft, but its assembly is not a difficult process.
You will need:
- a lot of matches.
Work process
- Two matches are placed parallel to each other. The distance between them is less than the length of a match. 8 more pieces are laid out perpendicularly on them, the heads pointing in one direction.
- The second layer of 8 matches is perpendicular to the previous one. All parts are at an equal distance from each other.
- Now we need to assemble the walls. A certain “well” is assembled from 7 rows. The match heads go in a circle.
- The top flooring should be similar to the bottom. It also consists of 8 pieces.
- For the second top layer, take 6 matches. 2 more are added around the edges later.
- To keep the structure stationary and the matches not to move, place a coin on top.
- To strengthen the house at this stage, vertically stick 4 things in 4 corners between the floorings. The heads are directed upward.
- After strengthening, more matches are stuck along the walls around the perimeter. Then the walls shrink a little and the coin is removed.
- To level the craft, squeeze the perimeter matches. As a result, the heads should touch the flooring.
- Now it is more convenient to assemble the product in your hands. The walls need to be laid out in 2 layers vertically and horizontally. First vertically on one side. The same should be done with the remaining 3 sides.
- Afterwards the walls are laid out horizontally. Heads alternate with ends for a beautiful appearance.
- Once all 4 walls are ready, the horizontal layers are pressed in.
- To create a roof, you need to insert matches into the corner holes, while the vertically located ones are slightly pulled upward.
- The roof tiles are laid perpendicular to the layers of the decking. It’s better to start from the edge and alternate directions.
- To lay “tiles”, several pieces are inserted between vertical matches, creating the appearance of flooring. The heads lie towards the middle. The resulting “tile” is pressed against the top by pressing with your fingers.
- If desired, you can make additional elements - windows, pipes, doors, etc. Also try painting the house in the colors you like. Here the flight of imagination is not limited.
Match house using glue
Another version of the match house, but with glue.
Process:
- For a floor made of cardboard or thick paper, lay out 2 matches without sulfur heads in parallel.
- Second row - matches are laid perpendicular to the first layer.
- All layers are laid in this way until the desired height of the building is achieved. In the process, you need to add a drop of glue to each of the “nodes”.
- As soon as the base dries, you should move on to the ceiling. To do this, a match coating is laid out on the top layer.
- Now a gable roof is being made. It consists of two parts, which are assembled from several matches glued together. Afterwards the parts are joined together with PVA.
- After fastening the parts and drying, the roof is installed on the base of the house and glued.
Volumetric images
Another interesting area of working with matches is the creation of three-dimensional images. Through painstaking work, experienced craftsmen obtain original paintings that have a certain volume effect.
- The work uses matches that have different colors and shades of sulfur heads. Such creativity is built on the play of colors.
- A useful practice in this direction for beginners would be making snowflakes on a cardboard base.
- The next step could be simple and schematic images with smooth geometric lines.
- Having created a base from blank fences with 16 matches each, it is easy to apply any image on it using a stencil, and then trace it along the contour and color it with a soft simple pencil.
- Gradually you can move on to more complex images using colored match heads.
- The main condition for success is the gradual mastery of this art.
- Failure to solve a difficult task due to a lack of skill can discourage you from working with matches.
- To create a color three-dimensional image, you will need a base of matches and a stencil, according to which a picture will gradually be formed from sharp parts of different colors.
A unique product will serve as a worthy reward for tedious and monotonous work.
Ideas for creating various layouts from matches and three-dimensional images can be gleaned from real life. The amazing works of experienced craftsmen will serve not only as a clear example, but also as an impetus for inspiration.
Decorative panel
A simple panel is made from readily available materials.
You will need:
- matches;
- glue;
- ruler;
- varnish;
- ruler.
Process:
- 16 squares are drawn on paper or cardboard, with a side equal to one match.
- In the first square, the matches are arranged vertically. They need to fill the entire area.
- The next sector is filled horizontally.
- This alternation must be done with the remaining 14 squares.
- The completely dried panel is secured with a varnish coating.
- You can decorate with flowers or decor in the form of beads, rhinestones or beads.
All that remains is to insert the panel into the frame and the original gift is ready.
Anyone can make crafts from matches, even a child. Over time, having understood how and what works, you can complicate the work and bring it to perfection.
Workplace
The place where you will create should be well lit and spacious. To do this, you can sit near a window or use a good lamp.
It is best to work on a table so that you can move your hands freely and additionally place all the necessary materials nearby.
"Tick-tock - clock"
This craft, at first glance, is easier, but in reality it is somewhat more complicated than the sun.
- Mark the middle on the circle cut out of foam. Determine the location and mark 12 divisions - this is perhaps the most difficult part of the work for children.
- To complete it, you will have to use rulers and pencils, and clearly follow the teacher’s step-by-step instructions.
- Insert shortened matches, heads up, into the middle and at the points marking the location of the divisions.
- Take one whole and one slightly shortened match, apply a little glue to them and glue them to the center, with the heads away from it, so that the resulting arrows form an angle - indicating the time.
You can complicate the task a little by indicating to each pupil what time his watch should show.
Applicative techniques
Don’t think that applique is only for kids. A serious artist can create a true masterpiece in this way, drawing on his imagination and experience.
However, its acquisition is a process that does not tolerate fuss, requiring painstaking work, starting with the most basic things.
Wooden wheel
This option will allow you to do without glue. The craft becomes strong due to the tension and friction power concentrated in the wheel.
There are different schemes for making the wheel: with a layout through 1 main match (it has 15 upper parts and 105 pieces of matches are useful for the job), through 2, 3 and 4 supporting parts in proportion to each other.
Laying out the wheel through 2 matches that serve as support. The craft includes 95 parts and has 19 vertices. Features a small diameter.
Layout through 3 supporting matches. The size of this product is even smaller. The wheel has 21 vertices and is made using 84 parts.
Layout through 4 supporting matches. This homemade product is the most difficult of all. Here the wheel has the smallest diameter and it can fit inside the match wheels. The product has 22 vertices and consists of 66 parts.
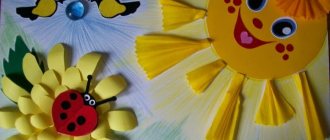
"The sun came out"
The task is designed for kids. Completes quite quickly. May have design options.
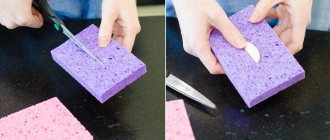
- To work, you will need a circle cut out of foam plastic, the thickness of which is at least 5 mm.
- Matches are stuck into the end of the circle with the head facing outwards until the “solar circle” is closed.
- It is desirable that there be more or less the same distance between the matches.
- The sun and matches can be painted yellow or orange.
- You can also draw a face or leave the sun not animated.
- The eyes, nose and mouth are drawn with paints or a special marker.
- But you can also shape them using shortened matches, sticking them into the foam, like mosaic pieces.
"At random"
No, this is not about experiments in which the result is achieved through numerous trials and errors. This is about crafts created by sticking matches into a three-dimensional base.
These can often be found at exhibitions of children's crafts. Plasticine figures, fruits and vegetables are used as the basis here.
And the most popular character in both cases is, perhaps, the hedgehog.
- To make it into a plasticine ball with a formed elongated muzzle,
- Matches are stuck into a potato or pear,
- Imitating hedgehog needles.
- Then the nose is shaped and the eyes are glued on.
But in the same way you can make a porcupine or a dinosaur, and imitate the fur of any animal using matches of different lengths.
Interesting and varied crafts of this type are obtained using a foam base. For example, a cone and matches will make a wonderful Christmas tree! A foam circle (not a ball!) can turn into a sun, a wheel, a clock. For work, you can use both whole matches and shortened ones.