4/5 — (12 votes)
Hello to all my subscribers and guests of this blog! Ekaterina is in touch with you. As I promised in one of my articles, today I will share with you patterns for felt toys. The selection will not be too large, I offer you only what I liked most, what I found on the Internet.
Remember my previous note, from it you can also take some ideas and ideas on how you can sew these wonderful, and most importantly beautiful, unique felt toys on different themes. If you are not into needlework, then perhaps you like to crochet such a beauty in the amigurumi style, then follow this link and knit the most important symbol of the coming New Year.
Toys for 6 month old babies
It’s a great time to start sewing for those who have never done it before, because toys of this period should be large with large expressive eyes, preferably in bright colors.
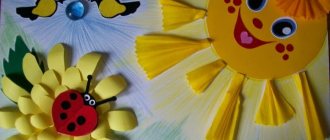
There is no need to make small details; a child at this age focuses on color spots. Sew a sun and clouds with faces and hang them on the rim of the stroller. These images don’t even require a pattern and are sewn very quickly.
For the sun, cut out two circles with a diameter of 10 cm and 16 strips. Fold the strips in half to form a loop and distribute them evenly in a circle like rays. In the process of sewing the circles, we also sew the strips at the same time.
When a small hole remains, fill the sun with holofiber and sew it up. The face can be embroidered, or drawn with acrylic or permanent marker. Make several clouds in the same way. Don't forget to attach a loop for hanging.
What should a children's mobile be like?
Basic requirements that a children's mobile must meet:
- Safety . All toys and fastenings must be firmly sewn, glued, and tied. The baby can pull the mobile with its arms, it should not fall on the child. The same goes for toys - all buttons, beads, decorations must be firmly sewn on
- Environmental friendliness . What makes a homemade mobile so valuable is that parents can choose environmentally friendly materials for its manufacture. The pendants in the children's goods store are certainly bright and beautiful, but one cannot be one hundred percent sure of the good quality of the plastic.
- Brightness _ Many parents choose bedding and mobiles to match the interior of the children's room. Most often, wallpaper and curtains in a children's room are pastel shades. Therefore, toys on mobile phones can be found in gray, beige, and peach colors. But scientists say that toys in pastel shades do not develop a child's vision. Bright and saturated colors are much better: light green, yellow, blue, crimson
The mobile must be bright
Toys for children 1-2 years old
At this age, the child is assiduous and can pay attention to small details. In addition, you can begin to train fine motor skills.
Searchers
These are toys with a transparent window, filled with cereals or beads, in which small objects are hidden. The child must sort through the cereal to find the given item. In this way, several skills are trained at once:
- memory and concentration (the child must remember what exactly he is looking for and not get distracted in the process)
- fine motor skills
- ability to analyze and compare objects.
To sew a search engine you need PVC film, it is thick, soft and durable, you can use packaging parts from other toys. We choose an image, preferably something round: an apple, a turtle, a bear’s belly. We cut out a round window in the center and sew on the film.
Then we sew the top and bottom. When a small hole remains, fill in the filler and objects, then sew it up. You need to make a card with similar sample objects so that the child understands what exactly to look for.
Puzzles
Puzzles are made on the same principle as pages for a book with appliqués, only you need to cut the design. First, make puzzles from two parts, and as your assembly skill improves, increase the number of parts.
Finger Theater
At this age, role-playing is just beginning and finger theater is simply necessary. Templates for heroes can be easily found on the Internet. Adjust the pattern to the size of your child’s finger and sew the character you like.
Finger theater is great for training hand coordination.
Lacing
This toy trains fine motor skills and concentration. First you need to come up with a plot or download a ready-made template from the Internet. It could be a hedgehog with berries, a tree with fruits, or a man with clothes.
Decorate the top, for example the face of a hedgehog, then you need to sew the top and bottom layers. When you have sewn the berries, place them on the hedgehog and mark the holes. Each berry should have two holes.
They can be sheathed by hand, but it is safer and more accurate to decorate them with eyelets in the nearest studio or buy a special manual installer for eyelets.
Windows
These are image matching games where you need to select colors that match the animals. Prepare cards with the image of an animal, with a hole in place of the body, and cards with a color for each animal.
Books
Books for this age, as a rule, already have a plot and are filled with a large number of small details. When making a book, felt, fabric, various beads and buttons, and many other materials are used.
If you are new to needlework, it is better to buy detailed master classes with patterns on the Internet, and you are guaranteed to be able to sew such a book.
To make a toy fox we will need:
- - white felt;
- - orange felt;
- - yellow felt with white polka dots;
- - padding polyester;
- - green ribbon;
- - black beads;
- - scissors;
- - needle;
- - threads of orange, white, yellow and black colors;
- - paper;
- - pencil.
The procedure for making a toy fox
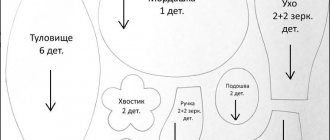
1. Let's start making a fox with a pattern. The fox pattern consists of 8 parts - head, ear, nose, dress, tail, tip of the tail, front and hind legs. All of the listed parts must be cut out of paper, observing their proportions and size.
2. When the paper blanks are ready, you can start cutting them out of felt. First, cut out the parts from orange felt - tail (2 pcs.), head (2 pcs.), front paws (4 pcs.), hind paws (4 pcs.).
3. Now you need to cut out the white parts - two ears, one nose and two parts for the tip of the tail.
4. It remains to cut out two parts of the dress; we will cut them out of yellow felt with white polka dots. If you don’t have such felt, you can take plain yellow felt or felt of some other color.
5. Now all the parts for the toy fox are ready, you can start sewing them together. First, we sew the details of the dress with yellow threads using a blanket stitch. We will leave an unsewn area at the bottom of the dress.
6. Now take the orange parts of the tail and use white threads to sew the white ends of the tail to them.
7. Put the tail parts together and sew with orange threads, leaving a small hole on the side of the tail.
8. Let's start sewing the head. Let's take one part of the head and use white threads to sew the part of the nose to it. At the top we will sew the white ear pieces.
9. Sew the prepared head piece with the nose and ears sewn onto the second head piece using orange threads, leaving a hole at the bottom for stuffing.
10. The paws also need to be sewn with orange threads, leaving small holes for stuffing them with padding polyester.
11. To give volume to the toy, all parts need to be filled with padding polyester, pushing it into the holes with a thin stick or knitting needle.
12. Use orange thread to sew up the holes on the paws and tail.
13. Attach the fox’s head to the neck and carefully sew it on with a hidden seam.
14. We left an unsewn area at the bottom of the dress; now we need to put the hind legs into it and sew it with yellow threads, sewing up the unsewn area on the dress at the same time.
15. Sew the front paws on the top sides of the dress.
16. Turn the fox figure over and sew the tail to the back of the dress.
17. Let’s turn the fox figurine over again with its muzzle up, thread black threads into a needle and sew on the fox’s black nose and eyes using small beads.
18. To make our toy fox even more elegant, take a green satin ribbon and tie it around the fox’s neck in the form of a bow. We trim the ends of the ribbon and cut them at an angle; in addition, they can be burned with a lighter so that the bow remains neat longer and its ends do not unravel.
The red toy fox is ready. Now the child can use it in their games or simply put it on a shelf to decorate the room. If you sew a loop of thin ribbon onto it, the fox can turn into a Christmas tree decoration or a backpack pendant.
Easter toys
The variety of felt colors is perfect for making decorations for Easter.
By adding different buttons and lace to the felt egg base, you can make very elegant Easter eggs to decorate your home.
Don’t forget about the appliqué method, which can be used to make pictures on an egg-shaped base. Schemes of Easter scenes can be found on the Internet or drawn yourself.
Easter crafts are easy to make and can be done together with children.
How is a children's mobile useful?
- A crib mobile is a pendant with various toys (dolls, animals, balls, etc.). Most mobile phones have a winding mechanism, they produce a pleasant melody or songs
- It is difficult to equip a mobile made with your own hands with a rotating mechanism with music. But instead, you can sew bells into toys that will ring pleasantly when you touch them with your hand, and other elements
- A children's mobile is not just fun for a baby. This is a useful educational toy. With the help of bright toys, the baby’s vision improves, he gets acquainted with the world around him, and develops tactile sensations
- There is no point in hanging up your mobile phone from birth. Due to its physical development, a newborn will not yet be able to become interested in it. A child will be interested in such fun starting from 2-3 months of age
Thanks to the hanging above the crib:
- The baby can be busy for about 10-15 minutes, thereby giving the mother some free time
- The child's tactile and visual skills develop
The mobile introduces the child to the world around him
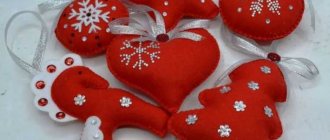
New Year's toys
Recently, New Year's toys made of felt have been gaining popularity. Thanks to the use of sequins and gold threads, they look no less elegant than traditional toys.
They have a great advantage - they do not break, and at the same time they are beautiful and original, just like glass toys. Some manufacturers have even started producing felt with glitter or New Year's patterns.
To sew a toy in the shape of a Christmas tree, you need to cut out two parts of the silhouette of the Christmas tree and sew them together. When sewing, you need to insert a ribbon loop for hanging. You can fill the Christmas tree with holofiber for volume or leave it flat.
Then it needs to be decorated. To do this, you can sew a garland of beads and rhinestone balls, or you can decorate it with embroidered ornaments made of gold threads. In a similar way, you can sew other simple toys: a mitten, a Christmas star, a ball.
You can also sew an Advent calendar from felt, which will appeal to a child of any age, because every pocket hides a pleasant surprise!
Christmas felt boots will help create a festive and cozy atmosphere in your home. The pattern can be downloaded on the Internet or you can buy a ready-made kit for creativity.
Brooch
A fox brooch is a small decorative item, the creation of which is a quick and simple process.
Flat fox
To create a brooch in the shape of a flat fox you will need the following materials and tools:
- a small piece of hard orange felt;
- small pieces of white felt;
- a small piece of black felt for the nose;
- soft simple pencil;
- scissors;
- white, black and orange threads;
- needle;
- brooch fastening element.
Master class on making a fox brooch from felt:
- First you need to cut out the parts (transfer their images onto felt using a pencil or marker and cut them out):
- main part (the whole figure of a fox, orange color) – 1 pc.;
- body (orange) – 1 pc.;
- muzzle (orange) – 1 pc.;
- cheeks (white) – 2 pcs.;
- tail brush (white) – 1 pc.;
- nose (black) – 1 pc.
- Then you need to sew the body to the base with orange threads.
- Now you should sew the cheeks and nose to the head, and also embroider the eyes of the animal.
- Next, the head is attached to the body and sewn.
- At the end, the brooch fastening element is glued to the base.
Volumetric fox
A felt fox, the pattern for which is presented below for a brooch, can turn out to be voluminous if a small amount of filler is placed inside the head and tail.
To create a brooch in the shape of a voluminous fox, you will need the following materials and tools:
- a small piece of hard orange felt;
- a small piece of soft orange felt;
- small pieces of white felt;
- button (bead) for the nose;
- bow or flower;
- white sequins;
- soft simple pencil;
- scissors;
- black and orange threads;
- needle;
- safety pins;
- brooch fastening element;
- hot melt adhesive.
Master class on making a voluminous felt brooch:
- The first stage is cutting out the parts. It is necessary to transfer their images onto felt using a pencil or marker and cut them out. You should get the following set of parts:
- body (orange) – 2 pcs.;
- muzzle (white) – 2 pcs.;
- center of the muzzle (orange) – 1 pc.;
- ear (orange) – 2 pcs.;
- inner part of the ear (white) – 2 pcs.;
- tail (orange) – 2 pcs.;
- tail tassel (white) – 1 pc.
- The second stage is assembling the base. Both round orange parts must be folded together, secured with safety pins, and sewn with orange threads with a looped seam over the edge.
- The third stage is the design of the tail:
- you should glue a white tassel to one of the parts of the tail;
- Next you need to embroider the tail with sequins;
- then you need to sew both parts of the tail together with orange threads using a looped seam over the edge;
- Closer to the tip, it is necessary to leave a hole for stuffing, after which it is sutured.
- The fourth stage is the design of the head:
- the inner parts of the ears should be glued to the outer ones;
- then you need to embroider the inner parts with sequins;
- now you need to sew the center of the muzzle to one of the white parts of the head;
- then the nose is sewn on and the eyes of the animal are embroidered;
- Now you can sew the decorated head part with another white part using a looped seam over the edge, after inserting the ears between them;
- leaving a small hole, you need to place a little filler inside the head, and then continue the seam.
- The fifth stage is assembling the product. The head and tail are glued to the body, and a flower (bow) is attached near one of the ears.
- The sixth stage is the final one: you need to glue the brooch mount on the back of the product.
Popular articles Options for original sweet gifts with your own hands
Decorations
This is a great theme for moms of girls. You can make a wide variety of hair decorations from felt. For example, sew a butterfly and attach it to a hairpin or elastic band. If you make roses from felt and decorate a hoop with them, you will get a fashionable and original decoration.
Small figures are suitable for brooches; all you need to do is sew a pin on the back.
Organizers for hairpins and elastic bands look very nice. They will not only decorate the interior, but also help maintain order in accessories.
Felt little fox
To make a little fox you only need felt and thread. We make a muzzle from the material of the desired color. Glue on the eyes, nose and white part. We sew on the ears. We embroider the mustache, mouth and eyebrows with black threads, and the highlights on the eyes with light threads. We sew the body, paws and tail together and stuff it with stuffing. We do the same with the head. Now we sew the head to the body and everything is ready.
Just cute toys
You can also sew simply cute and cuddly toys from felt. Small toys can be used as keychains or bag pendants; you can use them to create themed garlands for the holidays.
Personalized panels with the child’s date of birth look especially cute. It’s easy to make such a panel yourself using diagrams from the Internet.
Felt is a wonderful material for creativity that will allow you to bring your ideas to life! Let your work bring comfort to your home and contribute to the development of children!
We wish you creative success!
Making a frame
You can make a children's carousel entirely with your own hands, or you can purchase a store-bought model, and then remove the figures and replace them with homemade ones. The difficulty in making it yourself arises precisely at the stage of solving the problem with the frame. While felt animals are easy to make, the base on which they will hang is a more labor-intensive task.
The surest option for a completely manual cradle is to make a frame out of wood. You can hang the figures on embroidery hoops or branches, if they fit the interior and are properly processed. A circle can be easily made from available materials and covered with fabric or knitting threads. Another option for the base is a cross and bracket. Rarely in stores there are ready-made pendants on which you can place your figures.
Homemade frame
Photos of felt toys made by yourself
Classification of electric jigsaws by power and application
Felt mouse: 160 best photos of DIY felt mouse + simple and quick instructions for beginners Despite the fact that today the line between professional and household tools has noticeably blurred, this has not affected the classification of jigsaws. Let's look at what groups such equipment is divided into. The main ones can be called:
- Professional corded jigsaws;
- Professional rechargeable;
- Household network;
- Household battery equipment;
- Industrial devices.
You need to understand what the difference is between these groups.
Most jigsaws allow you to set the cutting angle in degrees
Corded and cordless professional jigsaws and their features
Network equipment is more powerful than battery equipment. After all, if you imagine the power of the battery, comparable to the electrical network, then it will be heavy and bulky. A logical question arises: “Why such a battery then?” The only disadvantage of network equipment is its “attachment” to the outlet. If you need to do work outside, you will have to pull an extension cord, and this is not always convenient.
Professional equipment is distinguished by expanded functionality, settings for the position of blades (files), power and endurance (the ability to work in aggressive environments and a rigid rhythm).
If you need to install a sink in the kitchen, a jigsaw is what you need
Household electric jigsaws of mains and battery type
Household equipment has less power. But it is enough for housework. Research has confirmed that such equipment with a power of 350 W is capable of sawing boards 70 mm thick. And household jigsaws offered by the manufacturer today consume 600÷700 W. Draw conclusions.
A household jigsaw, despite having sufficient power, is only suitable for short-term work. A home workshop, where the owner works with wood “for the soul,” is their element. But if you are planning a large-scale construction project, a household jigsaw will not work. Here you need a professional device capable of working 7–8 hours a day.
The laser cut indicator on the jigsaw will not allow you to leave the mark
Industrial jigsaws: differences from professional ones
Industrial devices are stationary. They are machines. The wood on them is sawed differently than with an industrial jigsaw - it is not the device that moves, but the material.
Such machines are installed in workshops and rarely move. They are used in the furniture industry and can work up to 24 hours a day. A home craftsman, regardless of whether he is involved in woodworking, has no need for such units - their cost is significant.
Industrial jigsaws are expensive
Having summarized the information presented, we will answer the question of which is better to buy a jigsaw for the home like this: if there are no plans for construction, and a jigsaw is only needed periodically, the option with a household tool will do. For construction or small furniture production - professional.
Properties and advantages of felt in making crafts
Benefits of felt for DIY crafts:
1. Easy to sew and glue 2. Large color palette 3. Uniform 4. Identical in structure and coloring on both sides 5. The cut is smooth, does not crumble and does not require additional processing
Felt is obtained from thin soft hair or fluff of animals (rabbits, goats). Synthetics or artificial additives are added to modern materials.
Felt is sold in the form of sheets and rolls.