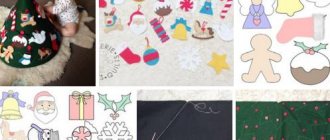
Felt is a thin non-woven material created by felting. Felt was originally made from wool, but today it is made from synthetics or even recycled plastic, making the material cheap and accessible.
In addition, the material is quite dense and is produced in various colors, which allows needlewomen to create unusual and interesting felt crafts with their own hands.
Anyone can make a craft from this unusual material; no special skills are required, just desire.
Ladybug
For the beautiful ladybug, wool blend fabric is suitable. Felt, consisting of wool and synthetics, has flexible properties and looks good thanks to a wide variety of colors. There is only one drawback: the fabric cannot withstand high temperatures. Prepare:
- scissors, red and brown threads
- beads of two colors white and dark
- dark brown and red fabric
- glue with a gun.
Instructions:
- Draw a large circle and a smaller semicircle, it will be the head of the insect.
- You will also need a small circle - four spots on the back of the ladybug. This is the whole pattern.
- Now place a circle and a semicircle together on brown felt and cut out the bottom part of the product. They need to be cut in two
- On the red one, circle and cut out a small triangle at the bottom, as in the photo above. Do the same for two parts
- Place four identical brown spots on the back.
- Now sew two brown parts for the lower part of the ladybug and two upper parts, stuff them with padding poly for volume.
- Cover with beads. Glue the spots on top. Then connect the parts with a glue gun.
Classification of felt by appearance
The unusual non-woven material has fibers. High-quality felt does not fray at the cut points, and pellets do not form on it. The felted fibers hold on well, slightly fluffing on the outside.
These fluffs can be almost invisible on smooth felt and quite long on pile felt:
- Suede (small fibers up to 0.5 mm).
- Short pile (0.5 – 1.5). For example, castor.
- Velor (soft vertical pile 1.5 - 2.5).
- Long pile (horizontal 3 – 12).
The production of practical material is being improved. New technologies are increasing the number of its types.
Materials for work
Before you begin, you should acquire the necessary materials.
Required:
- Felt of different densities and colors. You should select the material based on the end result: if you want to sew a toy, it is better to give preference to thin options, and if the craft is based on appliqué, you can choose thick sheets.
- Threads to match the selected fabric.
- Needles of different thicknesses.
- Pencil for marking. You can get by with an ordinary pencil or a bar of soap, but sewing stores sell special markers for cutting that disappear from the fabric upon contact with water.
- Scissors. be sure to choose spicy ones.
- Decorative elements: these can be beads, beads, buttons, etc.
Felt qualities
Environmentally friendly material that does not contain toxic impurities. Natural components provide high thermal conductivity. Felt items retain heat well.
- They have antibacterial properties; harmful microorganisms and mold do not form inside.
- Lightweight, wear-resistant, especially wool and polyester.
Often felt products have openwork untreated edges that do not crumble and look very beautiful.
To create something new, you can choose a material of any color, thickness, density.
Composition of buttons
A panel of buttons looks very beautiful and unusual. It is recommended to involve children in making crafts, since this is a useful activity for them. It develops fine motor skills and creative imagination of the child.
Required materials and tools:
- thick cardboard;
- flat buttons of different colors and sizes;
- beads of round and oblong shape;
- pencil;
- PVA glue or glue gun.
Master Class:
- Draw a deer on cardboard.
- Apply glue to part of the design and place buttons on it, alternating different sizes and colors. Continue gradually gluing buttons, filling the entire pattern. The gaps must be filled with beads.
- Apply glue to the drawn horns and attach beads.
List of materials for the master class felt toys “Spring Bouquet Panel”
- Sheets of felt in bright colors.
- Cardboard, office paper
- Holofiber or padding polyester.
- Cotton batting.
- Sewing threads, floss threads.
- Colored beads.
- Tailor's chalk.
- Safety needles (pins with a round tip).
- Decorative elements for decoration (beads, rhinestones, seed beads).
- Scissors.
- Compass.
- Decorative tape or braid.
- Glue gun.
See also:
- Felt: what is it and where to start
Application of felt textiles
Felt fabric should be used when making items that are planned to be worn for a long time. Today it is widely used for furniture upholstery, parts, and seals in the automotive and mechanical engineering industries. Unfortunately, this fabric is not very common in the manufacture of clothing, except for all kinds of hats, coats and hats.
You might be interested in what Ramie fabric is: full description
For your information! Felt was skillfully mastered by needlewomen. Thanks to its pliability and ability to retain its shape for a long time, felt material has a well-deserved place in the manufacture of crafts of any degree of complexity, as well as soft toys.
Tools
How to cut and sew a felt panel yourself
Sheet felt has recently appeared on the market, but is already enjoying great success. People who do handicrafts appreciated it. It is dense, holds its shape well and has different colors, and will be the same shades on both sides. Felt does not wrinkle or deteriorate, so when creating a picture you do not need to waste time deciding which material to choose.
Felt panel “Seasons”
A DIY wall panel made from fabric is easy and quick to make.
Painting "Seasons"
Materials for work:
- cotton;
- upholstery fabric;
- velveteen;
- double sided tape;
- compressed seal.
The elements will require:
- sheet felt;
- flannel;
- household napkins;
- padding polyester;
- decorative braid;
- buttons and yarn;
- scissors, thread, needles, regular pencil.
Draw tree trunks on the upholstery fabric and cut them out. Apply double-sided tape and cut to shape. Also cut out tree tops. To create the ground, you can take corduroy and cut out small hills so that each corresponds to one of the four seasons (summer, autumn, winter, spring). The parts should be sewn with a zigzag on a machine and padding polyester should be inserted into them.
To frame the panel, strips 6 cm wide and 50 cm and 60 cm long are cut out. They need to be sewn together at right angles and sewn to the base. Four strips of 2 cm each, 45 cm and 55 cm long, are cut out of the seal. This is necessary to form the frame. Sew the strips so that the seam is on the inside, then turn the frame inside out. Then you can insert the cut seal. The side is sewn by hand, and loops are sewn on the back side.
White and pink flowers, 8 orange, yellow and green leaves, 5 red apples, 1 green and yellow leaves are cut out from sheet felt. Then you should cut out white circles - these are snowflakes.
Note! Apples are glued onto the finished picture. The sun is cut out from a napkin in several layers and glued together. The clouds are made from blue felt or flannel. The picture is ready.
Children's room decoration
This is a simple fabric panel for a children's room.
Necessary materials:
- felt of different colors (pink, white, beige, coral);
- synthetic fluff;
- satin ribbons of the same colors as felt;
- rhinestones;
- buttons, needles and threads;
- scissors;
- hot glue;
- fabric glue;
- self-disappearing marker.
Note! First you need to make a pattern. You can draw it by hand and make blank balls.
There should be six yellow balls, seven light yellow balls, seven light pink balls, seven beige balls, eight pink balls and seven coral balls. There are 42 parts in total.
Panel for children's room
It is recommended to start sewing the balls from the right edge using an overcast stitch. There is no need to sew the tail of the ball.
Note! When most of it is sewn, the element is filled with synthetic down.
Having reached the end, two stitches are made with a simple running stitch to the place where the ball was originally sewn and tightened. You need to make two turns around the base and finish.
The balls should be arranged according to color. The same colors should not stand next to each other. Next you need to glue the balls together. You need to start gluing from the top so that the balls are layers on top of each other. But you can’t squeeze them too hard so that they don’t lose their shape.
For the cloud, cut two parts from felt. Also sew and fill them.
Next, you have to cut out the letters of the name from felt; the color is taken to match the color of the balls. The size of the letters is 3 cm. If the name is long, then the size can be reduced, but then the craft will be lost in the interior.
Use glue to attach the letters to the cloud.
To cut out the booties, you need to draw them by hand. Carefully sew the back of the slippers, and sew the sole with a blanket stitch. For volume, the booties need to be filled with synthetic fluff.
Now everything comes together (balls, cloud and slippers). This can be done using satin ribbons, sewing a bow from them at the base. You can add rhinestones to the booties. The product is ready.
Personalized panel ring made of felt
This felt panel is a little more complicated to make with your own hands. First you need to cut out a ring with a diameter of 45 cm, and then, according to the same pattern, two rings from fabric with an allowance of 5 cm. The example describes a panel for a boy, so cars, ships, etc. will be used. To do this, you will need to cut out templates of the corresponding toys.
Personalized work
Now the base is made - the ring. Fabric cuttings are folded on the wrong side, and a decorative braid is laid between them. First, you should sew around the inner circle, and then turn it right side out. Then put a ring of cardboard inside and sew the remaining sides, also filling the ring with fluff. At the end, the letters of the name and toys are sewn on. The panel is ready.
Step-by-step description of making a felt panel “Autumn” with children
Necessary materials:
- wooden frame;
- blue felt for the background;
- felt in red, green, yellow colors for leaves;
- colored paper in yellow, brown and green colors;
- rhinestones;
- glue (since children are involved in the work, it is better to use PVA glue).
Panel "Autumn"
Step-by-step description of the work.
- Using the stencil, draw and carefully cut out the leaves. If it is not there, you can trace and cut out living leaves, which you first collect with your children on the street. This will increase interest in the work.
- Attach leaflet templates to colored paper. But they should be a little larger in size than the felt leaves, because the next step is to glue the paper leaves onto the felt in layers.
- For the background, cover cardboard with felt and secure with a frame. It is advisable to entrust this work to an adult.
- Glue a felt sheet of the same shape, but smaller, to a sheet of paper on top. Draw leaf veins on felt.
- Place the leaves on the background as you wish: around the perimeter, in the center, in a circle, after asking the children what would look best in the picture.
- At the end, decorate the picture with rhinestones. The panel is ready.
Panel paintings made of felt
Necessary materials:
- felt;
- fabric glue;
- pins;
- needle and thread;
- details for decoration (beads, rhinestones);
- It is advisable to take embroidery threads in the same color scheme, but in a slightly different shade to obtain a contrast with the color of the fabric.
Floral panel
To cut flowers, you first need to make patterns. You can find them on the Internet by choosing any template, or you can make them yourself.
Note! If the flowers are made using several layers of felt, the same or different colors, then they will look even more original.
Felt flowers
The edges of the leaves can be decorated with a beautiful stitch of embroidery thread or left as is. Fold each part of the flower, starting with the largest one, making a bud, and pull the center together to form the core. For it, cut out a small circle from felt and glue it in the center. You can glue a bead into the middle of the flower. You need to cut out leaves from green felt and glue them to the flower.
How to decorate a teenager's room
Necessary materials:
- colored paper;
- scissors;
- PVA glue, brush;
- thin felt for the base;
- big heart template.
Heart for a teenager's room
A large heart is glued to the base. Next, you need to cut out three hearts of different sizes from colored paper and glue them to the felt. First large, then medium and finally small. The decoration for a teenager's room is ready.
Application "Flower Garden"
Flowers are relevant everywhere and always. The photo shows a wonderful example of felt applique. A child can easily make this for his mother or grandmother for his birthday, March 8, Mother’s Day.
- Cut 18 petals from felt using a template or yourself.
- Place the petals as shown in the diagram on thick felt or cardboard.
- Sew the side petals in two threads with a chain stitch, and the middle one with a darning stitch. Attach all 6 flowers in this way (you can change the number if desired).
- Draw a stem and leaves in the shape of stripes on the base with a pencil.
- Embroider the stems and leaves using a stem stitch using four threads.
Such applications for children, especially in schools, are popular because they are simple to do and look beautiful.
Peculiarities
A decorative panel is a painting that allows you to decorate the interior of any room. Its sizes can be very different, ranging from mini to large dimensions. The panel as a decorative design is relevant in any season. However, special interest in it is shown in winter, when it is necessary to create a festive interior for the New Year.
To create panels you can use a variety of materials and tools. There is no need to run to the art store, just look around. It’s another matter if the work is done by a highly qualified craftsman for personal income
It is extremely important for him to use specialized high-quality materials
The New Year theme for the panel involves using a variety of images as a sketch, ranging from an ordinary snowflake to a complex composition of a fairy-tale setting. This decor can be used to decorate walls, ceilings, windows, doors and any other part of the house. The main thing is to take measurements first and decide on the material of the painting.
Video material
https://youtube.com/watch?v=4r-bml8pvys
From our article you learned what felt is and how to make original paintings from it with your own hands. Agree, it is very easy and inexpensive. In this matter, the main thing is the idea and a well-developed imagination. Volumetric, soft paintings can decorate both an adult’s room and a children’s room. Remember that we ourselves create the world around us. If you have never tried making such cute pictures, then it's time to start! Be creative and your small beginnings will turn into big ones!
Panel ballerina
The bright composition will perfectly decorate the room of a girl of any age. The image of ballerinas in light, floating positions visually increases the space. The panel can be made in any colors. The main thing is that it contains motifs that symbolize fragility and tenderness. It is necessary to think through the basic concept in advance, choose a picture and suitable materials.
To make a panel you will need:
- thick cardboard;
- acrylic paints;
- volumetric mesh or pink organza;
- pink satin ribbons;
- needle and thread;
- decorative decorations.
Master Class:
- Choose a template. You can paint it yourself on thick cardboard using acrylic paints. If you don’t have artistic skills, then it’s better to use a ready-made image. Finding it on the Internet is not difficult. The panel is performed on a plain background of pastel colors. The most suitable colors for a dancer's silhouette are white or black.
- Make a skirt. To do this, cut out a suitable piece of fabric (depending on the size of the ballerina). Then collect the upper part of the skirt and tighten it with a needle and thread. Cover the seam and edges with tape. Using glue, attach the finished skirt to the ballerina's waist.
- Decorate the panel with decorative ornaments. Using glue, attach flowers or beads to the hair, and glitter to the skirt. You should also glue wavy ribbons, starting from the dancers’ hands.
You should not make the panel too large. Measurement is important here. A small painting with such an image has some piquancy and attracts interest.
Application "Sun"
Children should really like such a simple and bright craft as a sun. It will be easier for those who are familiar with a needle and know how to sew.
If you can’t draw the templates yourself, you can use the patterns from the photographs below.
- First you need to cut out blanks from yellow felt using templates.
- Arrange the parts so that the lower rays look out from under the upper part, the circle is in the center.
- Thread a yellow double thread into a needle and connect the parts using a darning stitch. The picture clearly shows how it should turn out.
- Decorate the lower rays with a stem stitch of 6 threads. Orange threads are suitable for this.
- Decorate the central circle with a chain stitch in the form of a spiral.
- The resulting sun can be attached to a base made of thick felt or cardboard.
- In the first case, it is better to use a heat gun or a corner with thread; in the second, regular PVA glue will do.
Other ideas in the photo
In fact, felt products are popular and often used in interior design. In a children's room, a personalized panel is appropriate, which is usually sewn immediately after the baby is born.
Another option, also for a child, is owls on a branch.
A stylish panel made of felt and wood - a pink flamingo - is suitable for a teenage girl's room or living room.
It can also be made in the form of a picture in a frame.
Felt products can be made by the whole family, then everyone will put a piece of their soul into it. Joint creativity promotes unity between children and parents.
- Author: juliasivakova
Rate this article: (1 vote, average: 5 out of 5)
Magnet "Heart"
From felt you can learn to make not only various applications with your own hands, but also decorative items, for example, refrigerator magnets.
For the “Heart” magnet, you will additionally need padding polyester (sold in fabric or craft stores).
- Cut out two heart-shaped blanks of any color of your choice.
- Applique one part as shown in the photo.
- Connect the felt hearts with a loop seam, placing a padding polyester between them.
- Glue a small magnet to the back.
This product can also be made flat if you use only one heart-shaped piece. The seam along the edges in this case will be simply decorative.