At all times, women have tried to keep up with fashion trends and at the same time emphasize their own individuality. One of the most reliable ways to achieve this goal was to make unique jewelry. Such a thing helped to look fashionable, and besides, a quick glance was enough to see in the originality of the product the imagination, ingenuity and hard work of the owner of the jewelry.
This article will tell you how to make a necklace with your own hands, and also show several options that are elegant and simple at the same time.
How to make a necklace from beads or pearls with your own hands
Faux pearl jewelry looks beautiful in almost any setting. A light, airy necklace of small width is suitable for the office; for an evening out, you can make a necklace of garnet and pearls or combine pearls with small beads. Creative thinking and a harmonious color scheme will allow you to isolate the image, set it apart from the crowd and focus attention on a beautiful neck or well-groomed décolleté area.
Silver necklace with pearls (go to SUNLIGHT catalogue)
Making a simple pearl necklace with your own hands is not difficult; it is important to have the necessary materials available. It can be either the same type of pearl or a variety of pearls. Beginners can start with the simplest techniques and patterns, and then, expanding their horizons, replenish their piggy bank with more complex weaving patterns, creating new interesting jewelry. By analogy with pearls, you can make a necklace from beads with your own hands.
You can find a wide variety of master classes of varying degrees of difficulty online. The selected version of the training material allows both a novice craftswoman and an experienced craftswoman to create a beautiful product. By changing the width of the decoration upward, you can create a more complex version.
Master class on making a pearl necklace with your own hands
The image shows that the necklace consists of several patterns, the weaving is done from top to bottom, but can be complemented by an “inner” and “top” pattern. Inexperienced needlewomen can limit themselves to the option of a thin necklace consisting of 1-2 rows. More experienced ones are allowed to add new, more complex weaving options. The number of beads, seed beads, and fishing line varies depending on the individual size of the product.
Necessary materials:
- Czech beads of light shades;
- beads with a gold or silver core;
- beads with an offset center;
- artificial pearls with a diameter of 4 mm;
- fishing line of a suitable color;
- a ready-made lock of a suitable color (gold or silver);
- a needle having a smaller diameter than the holes in beads and pearls;
- pliers.
You can independently select brighter monochromatic or contrasting beads and pearls.
Prepare the necessary materials: sort the beads and pearls into shallow containers, cut the fishing line with some reserve. If you are working with light beads and pearls, use a dark-colored fabric or craft mat for the work surface and vice versa.
First stage
Legend : white color - Czech beads of light shades; yellow color - beads with a gold or silver core.
- Place eight white beads on the fishing line, starting from the element with the core, and close them by threading the end of the fishing line into the beads with the core, forming a ring.
- Continuing the set, add two Czech beads to the fishing line, one with a core and two Czech beads (five elements in total). Close the beads into a ring, passing the fishing line through the second bead of the previous cycle (see diagram). You get two adjacent closed loops.
- Next, collect five Czech beads and pass the line through the element with the core, closing the second lower loop, as shown in the diagram.
- Repeat the operation from step 2 until you create a chain of eights of the required length.
Second phase
New symbols have been added: small red - Czech beads of light shades; red large - artificial pearls with a diameter of 4 mm.
You begin to form the bottom row with pearl pendants.
- On a separate fishing line you collect three Czech beads, one pearl, one bead with a core (5 elements in total). Fasten the bead to the core (see diagram).
- Then you collect three Czech beads and secure the resulting pendant loop to the seventh Czech bead of the top row, as shown in the diagram.
- Repeat the operation along the entire bottom of the previous row.
Before work, you need to correctly calculate the number of eights of the base row (see point 1) so that the pendant pearls are symmetrically located in relation to the ends of the product.
For beginners, you can finish the job here by securing the finished lock.
Those who want to complicate the course perform further more complex weaving.
Third stage
New symbols: small lilac - Czech beads of light shades; lilac drop-shaped - beads with an offset center.
The top row of the product should be supplemented in accordance with the arrows indicated in the diagram.
Fourth and fifth stage
The last two stages are designed for experienced needlewomen and are performed according to the presented schemes. Below is a breakdown of the new designations.
Small blue – Czech beads of light shades; blue large - beads with a gold or silver core.
Green small - Czech beads of light shades; green drop-shaped - beads with an offset center.
Sixth stage
We decorate the ends of the product with a ready-made lock. It is important that it harmonizes with beads that have a metal core (silver or gold).
Materials for assembling a choker around the neck:
— Velvet ribbon. We will take black tape 25 mm wide, art. 387-010. — Two types of connectors for jewelry. We use connectors 081-531 and 081-499. — Glass pendant in the form of a drop. — Two types of chains made of surgical steel. We use one with a large link as a carabiner clasp, and the second thinner one for the central element. — Base for a bracelet with an extension chain. — A pair of connecting rings with a diameter of 5-6 mm (we use them in the clasp). — Beading needle art. in-02-02. These fine needles have a fine eye and are great for sewing through small holes.
Amber necklace
Baltic transparent or matte amber is beautiful in jewelry, emphasizing the national color of the Baltic peoples. Combined with metal trim or other ornamental stones that match in color and size, it conveys all the beauty of the Baltic nature and also has healing properties.
See all amber necklaces in the SUNLIGHT catalog
Of course, this type of necklace cannot be made by an amateur; the hand of a professional craftsman is required. But even novice needlewomen can make simple necklaces from natural stones with their own hands.
We offer you several options for easy-to-make products.
Necklace “Amber Tale”
Necessary materials:
- Czech beads in beige color;
- amber transparent beads with a diameter of 4 mm;
- fishing line;
- ready-made lock;
- needle;
- pliers.
The technique of making a necklace is similar to the making of beads and pearls described above. It is important to choose the right weave pattern. Varying the width and color of the necklace will allow you to create an exclusive product.
Necklace “Amber drops”
Silver necklace with amber (go to the SUNLIGHT catalog)
Required materials:
- processed plates of opaque amber of similar size with through holes;
- amber or artificial beads, similar in color, with a diameter of 3-5 mm;
- fishing line;
- needle;
- ready-made lock;
- pliers.
A plate of amber + 1 bead is sequentially put on the fishing line, alternating, until the required length of the product. Attach the lock and the decoration is ready!
Since amber is a soft material, it is recommended to use plates with ready-made holes.
Without certain skills, experience and special tools, you should not make holes yourself; you can split or damage the plate.
Necklace "Lime"
See all amber jewelry in the SUNLIGHT catalog
Required materials:
- small multi-colored plates of amber;
- several metal flat hollow beads with a hole equal to the diameter of the double cord;
- lock to match the color of the beads;
- special polymer lace;
- pliers.
Decorating in ethnic style can be done yourself quickly and easily.
- We measure the required length of the lace and fold it in half.
- We string the plates in any order or alternating colors and sizes.
- We put metal beads on both ends and lightly clamp them to fix the position of the amber plates.
- We repeat step 3, placing the fixing bead clips in the middle between the ends of the lace and the amber plates.
- We install the lock.
Features of making handmade jewelry
You can make a necklace with your own hands from such simple and affordable materials as beads and seed beads. With the help of such a necklace you can create a sophisticated evening look and emphasize your individuality.
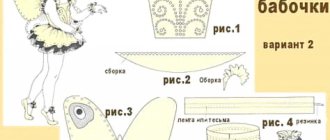
DIY leather necklace
This type of neck decoration goes well with other leather accessories (bag, gloves, belt) and looks beautiful both on a white shirt-type blouse (office option) and on a turtleneck.
Complex multi-component floral or other patterns can only be made by professionals who have certain skills in working with leather.
In order for a beginner to make a necklace with his own hands, you need to use an easy-to-make ready-made template.
Necklace made using stained glass technique
Necessary materials:
- a piece of thick genuine leather of the required size and color;
- small but sharp scissors;
- decoration template on thick paper;
- leather glue "Moment" colorless;
- 2 blocks;
- 2 rep or satin ribbons of the required length, 2 cm wide;
- marker;
- awl.
Before you start working, practice translating the diagram and working with leather.
Transfer the template to the wrong side of the product using a special marker or chalk pencil.
Starting from the center, start carefully, without making unnecessary cuts, to cut out the design. Start from the inside and end with the outer outlines.
Use an awl to make two holes at the upper ends of the necklace and insert the blocks. Thread the ribbons through the holes.
Carefully secure the ends of the ribbons in the blocks on the wrong side with glue.
The decoration is ready! The necklace is tied with a bow at the back.
Shoe decor
At first glance, the idea seems rather strange - well, what kind of whim is it, really, to decorate shoes with pearl beads? However, look how stylish this material looks on black! How beautiful, noble and soft! Maybe it’s not such a whim, but just a desire for something unusual and interesting?
How to decorate a heel with pearls - an idea from Blissmakes
Tatting schemes
Tatting is a type of lace that is made using a special shuttle and a hook/needle with a blunt end.
Beads, beads, pearls, and natural stones can be used as additional materials in necklaces made using the tatting technique. The technique is difficult to master and will require perseverance and patience from the beginning needlewoman. You need to start getting acquainted with tatting with simple knots and patterns, gradually complicating the task.
Patterns for creating handmade necklaces can be found in large quantities on the Internet, on specialized websites and forums. Printed publications will also tell you in detail and step by step all the stages of the process on which weaving a necklace is based. Below, as an example, are diagrams of a tatting necklace with a description. But this information will only be understandable to experienced lace makers.
It is better for beginners to master the basics of technology with the help of video master classes or special literature.
By creating necklaces using this technique, you will always be irresistible!
Start of the process
Personally made items have always been distinguished by their unusualness and extravagant design from their purchased counterparts. Today, every needlewoman can afford to assemble a necklace from almost any material. The necklace can be leather, wood, plastic or any other.
On the vast world wide web you can find necklace patterns that allow you to create jewelry of any shape and size. Below we will consider several options for this jewelry made from different materials.
Making a necklace with your own hands in Boho style
The Boho style is characterized by complete freedom in the choice and combination of materials: textiles, stones, wood, beads, etc. It would seem that the combination of incongruous things should introduce disharmony into the image and openly show a lack of taste and sense of style, but this is not true. Massive voluminous neck jewelry is perfect with clothes and other accessories that match the texture and overall style.
Necklace “Pearls on the Sand”
Beginning craftswomen can make a simple necklace in the Boho style using ordinary rope, pearls and their own imagination.
Necessary materials:
- beige pearls - 16 pcs. large, diameter 4 mm;
- beige pearls - 15 pcs. small, diameter 2 mm;
- rope;
- scissors.
Prepare 13 identical threads from a rope equal to the length of the necklace + 10-15 cm. Form a large loop from 12 rope threads and process it with the 13th thread, as shown in the photo.
On 6 of the 12 threads, place 1 pearl of different sizes in random order, then secure the section with a knot. Complete 5 sections, leaving the fifth open. The sections should be approximately equal in size.
Make the last large knot, leaving the ends of the threads 3-4 cm long. You need to put a large pearl on one of the remaining threads and then tie all the end threads with another knot under the pearl. We received the opposite end of the fastener, which will be threaded into the loop.
Beach necklace "Lagoon"
You can make a boho shell necklace. It will be appropriate both on the beach and during a summer cocktail party. Varying, combine shells with beads or use only natural material.
Neck decoration with shells (go to the SUNLIGHT catalogue)
To make jewelry, cowrie shells are used, which are pre-coated with colorless varnish.
Necessary materials;
- cowrie shells with or without through holes;
- thin leather lace or strong thread similar in color;
- ready-made lock.
“String” shells onto a string, passing it through an internal cut along the entire length of the shell. Connect the ends of the lace with a lock.
Knitted beads
Needlewomen skilled in crocheting and knitting can knit beads. For these purposes, it is better to use melange threads with lurex. They are used to knit narrow, tightly knitted fabrics, which are then woven together or twisted into plaits. You can also use combinations of threads, playing with the contrast of their thickness.
A variant of knitted beads are products in the form of a braided braid. To do this, take threads of different colors (contrasting or similar shades), secure them at the base in bunches and intertwine them into a braid. This braid must also be secured at the end, and the remaining length must be supplemented with a ribbon, which is tied in a bow at the back. Along with threads, wire, beads and strips of fabric can be woven into beads of this type.
How to make a scarf necklace
An elegant neck decoration worn over a summer coat, cardigan, jacket, or blouse adds style and completeness to the look. The product, made in mixed technique, combines natural stone, pearls, beads, metal elements with fabric (silk scarf, light cashmere stole, etc.).
An interesting design of a scarf/shawl is complemented by ready-made or self-made sections made of stones, beads and other materials. Using special clips, they are fixed at the ends of the product or dominate, located in the center.
When creating a scarf-necklace with your own hands, it is important to focus on the clothes with which it is intended to be worn, the shape of the neckline, and additional accessories. The combination of the material structure of the scarf-necklace and the clothing is also important. By experimenting with additional elements, colors and texture of the scarf/shawl material, you can create a large number of different looks.
Handicraft in the field of creating neck jewelry from a variety of materials allows each representative of the fair sex to become one and only, to stand out from the crowd. Dare, create, create a wonderful image with your own hands!
16.04.21
What are chokers and what types do they come in?
Today, both stars and fashionistas wear ribbon chokers. This decoration fits tightly to the neck and looks feminine and sophisticated. The word choker came to us from the English language and means “strangler”, and it took root because the decoration does not hang on the neck, but fits it. Other options for the names of this jewelry: velvet necklace and collar necklace. There are several types of neck chokers. They are woven from fishing line and rubber bands, and sometimes from headphone cord. Young girls make such jewelry to look informal. They are called choker tattoos and perhaps we will tell you how to weave them in another master class. And in this article we will show you how to make a choker from a ribbon with your own hands.
Duration of work
How long does it take to weave a beaded necklace? The work of making jewelry is painstaking work that requires attention, perseverance, and patience, so the question of the duration of the work is relevant, especially for beginning craftswomen.
The duration of beading directly depends on the complexity of the work. The more intricate and complex the scheme, the more time it will take to implement it, and the more beautiful and original the finished product will be.
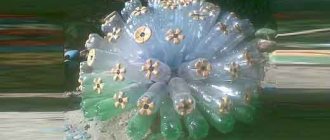
Souvenir soap “Shell with pearl”
I would like to show you how I make the “Shell with a Pearl” souvenir soap. With a simple plastic shell shape, you can make an exquisite souvenir as a gift or for yourself, which will decorate any bathroom.
In this work, I used the well-known method of layer-by-layer filling of the shell, but I made my own changes to the coloring and technology.
To do this you need:
- transparent soap base - approximately 130 g;
- white soap base – 30-40 grams;
- base oil (2/3 teaspoon);
- flavoring or essential oil (15 – 20 drops);
- brown organic pigment;
- plastic mold “Shell”;
- alcohol;
- disposable plastic glasses, water bath containers, plastic spoons, scales, fork or chopsticks, pipette or syringe.
In my work, I used English soap base without sodium lauryl sulfate, avocado oil and the Sea Breeze scent.
We cut half of the soap bases (the other half will be used to make the second shell) and put them in a water bath to melt.
From a small part of the melted white soap base (which has cooled slightly), we form “pearls” - balls about 1 cm in diameter.
Approximately 30 gr. Pour the transparent melted soap base into a plastic cup, add a little base oil, fragrance and brown pigment. Mix thoroughly. Spray the mold with alcohol and pour a small amount of base into it in a thin layer. Turn the form from side to side so that the base spreads over the entire form in a thin layer.
You can then (if you wish) make slits along this layer with a fork or a sharp stick.
Liquid white soap base (remembering to add base oil and aroma) is also poured in a thin layer onto the brown base, previously sprayed with alcohol.
We place our form on a stand in a stable position.
Take the remaining melted transparent and part of the white base, add base oil, flavor and a little brown dye. Mix thoroughly. Spray the “Shell” mold with alcohol and fill it with the prepared mixture to the top.
We make the second half of the shell in the same sequence. However, when pouring, the narrowed edge of the “Shell” shape should be slightly raised. This is necessary for better fastening of the shell halves.
We do not remove the second half of the shell from the mold. It is important! Using alcohol and a transparent soap base, we attach a “pearl” to its middle.
Then we spray the edges of the shell halves with alcohol, carefully place the first half on the second and, using a pipette or syringe, glue both halves together with a melted transparent soap base.
shell with pearl
My friends, a master class for those who love sophistication on their table (or a homemade gift for a loved one). You can create a pearl in the belly of shells directly from chocolate.
I’m not giving a recipe by grams, because each of you will have a different size shell - from small to giant. Instead, I suggest proportions. (after all, “extra” ingredients in my business are easily eaten during tea).
First, find a large shell (flat but wide). You need to take dark chocolate* and melt* in a water bath. There are two important points here: 1) *the chocolate must be real and without impurities (I even use Colombian Luker for candies, but you can take Belgian, French, German or Italian) and 2) *melt and temper it, otherwise it will stick to the shell and will smear all over your hands at the first opportunity (you can temper in several ways that are available on the Internet - choose the one that is more convenient for you).
So, prepare the shell for work: wash it, grate it. Fill a parchment cone or pastry syringe with tempered chocolate. The hole should be small. Next, as your imagination runs wild, cover the shell with patterns: intensively pour sticks and curls onto it! Do not skimp on the chocolate: the mesh should be dense enough to strengthen its natural fragility.
After this, the shell should be placed in a cold place for 30 minutes (make sure that there is no open jar of sprat, a saucepan with rich borscht and other foreign odors nearby. Chocolate, tea and coffee are ingredients that absorb all foreign odors).
By the way, I do the process twice in order to eventually glue together (with tempered chocolate) a full-fledged shell-inside. You will also need to glue it with tempered chocolate, running it along the seam between the two shells.
Meanwhile, prepare some real white chocolate (see point 1)* above) and melt it over a double boiler. Dip half of a selected large walnut in it, then half of a pecan. Leave in a cool place to harden.
Now you need to prepare the filling. In this recipe I suggest using marzipan. Still, chocolate and nuts go perfectly together and do without sweet caramel or jelly-like fillings.
I prepared my own marzipan: 67% ground cashew nuts and hazelnuts with 30% powdered sugar. Devide into two parts. To the first, you can add a pinch of cloves and star anise, and a drop of aged red wine. Add white chocolate (simply melted in a water bath) to this mass in a ratio of 1:13. You should get a pinkish, very thick mass. Carefully line the walls of the sink with it, in an even layer, thick enough.
You can add a pinch of white pepper or grated ginger to the second part of the marzipan. And add white chocolate (like the previous one). This layer needs to be laid on top of the first one, inside the shell so that there is a small place left for the pearl.
Actually, the pearl is two halves of nuts in white chocolate. They don’t have to be glued together with chocolate (this is only a positive thing for later food). So, they folded them together and carefully placed the pearl in the shell. If you have some marzipan left, you can lightly veil the pearl with a layer.
The final stage of truly jewelry work (and don’t forget to place a piece of your soul inside) is sprinkling with sesame seeds. Moreover, you need to keep an eye on literally every grain when you work on the entire body: you will need to glue them, carefully pressing them, in the cracks between the chocolate plexuses of the shell, the marzipan can be seen more clearly. And, of course, the most extensive part of the marzipan is the front part, behind which the “pearl” is hidden.
To put it in a box, foil or something else is entirely your task. The main advantage of this gift is that it can be stored in a cool place for up to 4-5 months. (although such things do not stay with the one to whom this gift was given for a long time)
And finally, this master class will allow you to stop working as a chocolatier, ordering handmade sweets or buying in specialized stores. You yourself will become a Chocolatier and will be able to learn all the nuances, appreciate the ingredients, time, patience and unique work in this business. Go for it!
Salted play dough
To ensure that the craft is preserved for a long time, it can be used for games or for decorating paintings, the dough for work is chosen to be salted. We will give the simplest recipe for such a batch to novice masters. You will need to work in equal quantities of fine table salt “Extra” and white wheat flour. Only use ice-cold water for kneading salt dough. The amount of liquid is half as much. So, if you took 1 whole glass of flour and salt, then you need to take half the container of water.
When preparing the dough, first mix the dry ingredients in a bowl, then add water and mix well so that there are no lumps. Before working with such a test, check your hands for wounds or scratches. Salt may cause burning and redness. If you are injured, it is better to wear gloves or postpone making the craft to another time.