2/5 — (3 votes)
Good afternoon
I decided to go with a boyish theme today. Yes, really... What kind of things are there? Probably, hahaha. For me, all this technology, especially military equipment, is not something, well, I would say difficult. My son himself and they constantly ask their mother to buy them cars.
Since February is approaching and exhibitions and craft competitions will soon begin again in kindergartens and schools on February 23, I remembered that perhaps someone would want to make a tank on their own. Or perhaps on the threshold of May 9, and there, too, the boys are starting to do just such “stuff.” But what can it be made from? I think that using improvised means you can build a bunch of such simple and uncomplicated works. Both preschoolers and schoolchildren can cope with them, and adults even more so.
I decided to wander around the Internet and collect such products, and then show everything that I found to you, my subscribers and guests. I hope you will be incredibly happy about this. And be sure to share the information you find on social networks and write me a short review below.
Among other things, don’t forget that with the guys you can learn poems for dads or just on a military theme. Design wall newspapers and sign them with beautiful congratulations and wishes cards. So, go for it, because that’s what the holiday is for.
DIY tanks made from scrap materials for children
First, I want to show simple ideas of what, in principle, you can build military equipment at home, called a tank. And after that, certain waste materials will be examined in more detail. So, I wish you good viewing. I hope some idea will give you a new creation.
So, the first option is to use matchboxes.
You can also build a machine from shell casings.
From the most common material that everyone has in their kitchen, these are washable dish sponges.
Or you can make an edible tank.
Believe it or not, such military items are even made from chicken egg cases.
Or use a regular box with thick cardboard, and make the wheels in the caterpillar from the lids.
You can also decorate the craft using the quilling technique or modular origami.
And here is another product made from metal flasks.
Or use plasticine.
Plywood is our everything
The most durable toys are made from plywood. The latter should be of the first or second grade, so that the wooden tank does not emit an unpleasant odor. The process of making such an exhibit is as follows:
- A sketch must be drawn and a drawing drawn;
- Next, sheets of plywood are cut out according to the drawing;
- The tower and the body are assembled from sheets (it is better to assemble using short screws and glue, and you will have to make holes under the screws with a drill, and the ends of the fasteners must be blunt);
- A hole is made in the tower into which a plastic pipe or a tube from a ballpoint pen is inserted;
- Holes are made in the body for the chassis;
- A tower is attached to the body, as well as wheels from an old toy or caps from plastic bottles;
- The tank is painted and varnished if necessary.
The finished exhibit is good for both exhibition and battles. By the way, a themed toy can be supplemented with an electric motor and a movement mechanism.
How to make a paper tank easily and quickly
As everyone knows, paper is the most affordable and popular material from which you can make anything, and in this regard, a tank is no exception. You can make an applique with children first.
To do this, you will need stencils to use for this craft.
A more serious option is toys made using the origami technique. Here, of course, you will need the ability to correctly and beautifully fold paper step by step. To do this, I recommend that you read this manual.
First we will make a simple tank, and the second master class will be with a rotating turret.
1. So, take a full sheet of paper, preferably double-sided colored paper.
2. Now with a slight movement of your hand, nothing complicated, fold the leaf in half horizontally and smooth it with your hand.
3. Then find the top corner from below and fold it like this as shown in the picture (that is, fold the top corner to it).
4. Do the same with the bottom corner.
5. The folds should be criss-crossed.
6. Next is the important work, we will make the flaps: bend the corner from the right side downwards.
7. And the bottom side will have to be divided into two equal parts. In this case, do not touch the first one, but bend the second one like this, to the lower right corner:
8. Do the same on the other side.
9. Thus, you should get something like this “frog” or a regular triangle.
10. On the opposite side, do the same work.
11. Now bend the paper on each side, look at the drawing and see what needs to be done.
Do everything carefully and smooth the lines with a ruler, preferably a metal one, if available.
12. In order to assemble the tower, you will need to bend the corners on each side (where the triangle is) (but only on one side, do not touch the second triangle).
13. And then close the parts to the center of the craft.
14. And thread what you rolled into the inside of the large triangle.
15. Then bend the ends from the triangle, as if into the inside of the product.
16. This is the kind of miracle that should come out.
17. Next, make a barrel out of plain paper of a different color, take a rectangle and twist it into a tube.
18. Well, then insert it into the hole. Congratulations, you have done the job, now your tank is ready and can delight your child, both boys and girls will love it.
Now let's consider a more complicated option, although there should not be any particular difficulties, since everything is shown in detail in the pictures, every step is right, wrap the sheet as well and you will succeed.
A plastic bottle is also good
There is definitely a lot of plastic bottles in the house. Moreover, green containers with a capacity of 0.35-0.5 liters are perfect for making a tank body. However, you shouldn’t limit yourself to one bottle. The master will have to perform the following set of works:
- Cutting a hole in a matchbox;
- Inserting a paper barrel or juice stick into the hole;
- Connecting three boxes to each other so that the box with the barrel is in the middle;
- Attaching the tower to a plastic bottle;
- Using a hot awl to poke holes in four to eight bottle caps;
- Shortening two to four kebab sticks;
- Inserting sticks into the bottom side of a plastic bottle;
- Threading kebab sticks into the holes of the plugs.
The result is a do-it-yourself tank suitable for movement. It can be covered with themed stickers like a red star.
DIY tank from T-34 cardboard (diagram and step-by-step instructions inside)
It turns out there are quite a lot of types of tanks. To be honest, I didn’t know about this, well, the boys know better, they will always understand this topic better than us. It's still military equipment. I propose to stop at T34-85, and then consider other options that I managed to find on the Internet.
Important! The tower in this model is movable, that is, it rotates (spins).
We will need:
- paper density 220 - 7 pcs.
- ruler
- glue gun
- dye
- scissors
- glue
- templates or stencils in PDF format, print in advance
Stages:
1. Friends, I was not able to upload not all the layouts here to the blog, so if anyone is interested in this thing, write to me and I will send it to you by email (you will need to print 7 sheets on a printer) and cut them out.
2. Well, then, as you already understood, fold everything along the fold lines and glue the parts together with glue or use a glue gun.
3. Take paint of any color and paint the finished product.
4. This is a fun toy you can make too. I wish you good luck and creative success. Surprise everyone with your talent.
Friends, here are some samples of ready-made designs for you, download and create.
After you print out the T-34 pattern and cut out all the parts, you will need to find and walk along the fold lines. Bend where necessary and iron with a ruler. And only after that proceed to gluing.
First glue the main body for the tank; transparent PVA glue is well suited for this job. Then glue the cannon, and then the caterpillar.
The next model is IS7, keep a layout of the parts. True, a very experienced master can do it.
Crafts using ready-made templates
There are many ready-made models carved from wood or metal that only a high school student can assemble. You can find ready-made drills for making military equipment with your own hands. They need to be printed, cut and glued. This way you can collect a whole collection of different tank models.
Beautiful tank made using origami technique
Yes, the most favorite and simplest technique is origami crafts. Children and even some adults love them. In this chapter, you will find folding diagrams that any beginner or even a student can understand.
And here is another toy, called Abrams, a little prettier than the previous one. Catch and use these tips, everything should work out.
It is recommended to use a scale of 1:43
To simplify the task, it is better to cut out all the details without exception according to the 1:43 scale familiar from childhood, which was used for the legendary souvenir models of cars and trucks.
Stock paper for unexpected modifications
Careful adherence to dimensions will significantly simplify the assembly of the tank and make it 100% similar to the original. However, the child’s bold imagination can intervene at any moment in the cold design calculation.
It is possible that he will require lengthening the gun and adding a couple of additional fuel tanks. Anticipating such a development of events, you need to have a couple of spare sheets of colored paper on hand.
Master class for beginners Candy tank
And for those who love souvenirs and gifts, they can congratulate their beloved men on the holiday of February 23 in a rather original and non-trivial way. Or such a masterpiece can be made for a competition or exhibition in a kindergarten or school. In addition, you can use this idea for May 9th.
To begin, make a trapezoid-shaped tower from a cardboard box. Use a glue gun. I found this work on YouTube.
Here are some more ideas.
Corps formation
You should begin assembly by bending a sheet of paper in half. Next, you need to mark all the fold lines that are indicated in the drawing, which explains how to assemble an origami tank step by step for beginners. The workpiece is folded along the lines outlined in this way.
A similar method is used to bend the other side. Then you should form the sides of the workpiece so that they have an inclination towards the center.
Plasticine craft in the form of a military tank
For the youngest children, preschoolers and elementary school children, I recommend making another craft in the form of a tank from plasticine or special clay (dough) for modeling. Diversify your children's leisure time, or use this type of work in labor lessons or art classes.
Besides, this process is so exciting and you definitely won’t get bored, it’s better than surfing the Internet or watching cartoons at home.
Take soft plasticine and tear off a piece from it, roll it into a ball, then flatten it into a washer, make six of these things. Moreover, each should differ slightly in size from each other. In the picture, you can see this.
These blanks will be needed to design the caterpillar.
And so that the caterpillar doesn’t run away, ahah, hide these “wheels” in a long strip of plasticine.
In a similar way, roll up the second track product. Use a stack to create the outline of the wheels.
Now mold a box out of plasticine; it should be rectangular in shape.
Attach the chassis to the resulting car.
Next, start making a tower, roll out a puck of the same color as the body.
As you can see, it is better to make it not from a small piece of plasticine.
Next, complete the craft with a cannon; if you want, make a machine gun and fuel tanks.
And even make the headlights a different color, just like real tanks. Good luck, friends!
Using plasticine is a good start
The easiest way to make crafts is from plasticine, tanks and more. Thematic material, under the pressure of your fingers, easily takes on the desired shape and generally comes apart easily. The main thing is that the plasticine is for children, and the child is 6 years old. The following products meet these requirements:
- "Gamma";
- “Ray” – Modeling Clay;
- "Colibri";
- "1Veresnya";
- "Fantasy World";
- "Olli"
- "Color".
The listed brands produce safe plasticine without a strong chemical odor.
How to make a tank from beer in cans
Another holiday idea, or gift, whatever you want to call it. But, on the day of defenders, you can afford to build a tank from beer bottles and present it to men. Just such a present, which you make with your own hands, will be an excellent solution if you are still puzzled by the question of what to give on February 23rd.
We will need:
- corrugated paper
- scissors
- cans of beer in tin containers - 4 pcs.
- cardboard sleeve
- a pack of kirieshki, or nuts, pistachios
- double-sided tape
- super glue or glue gun
- box cover
Stages:
1. Glue double-sided tape around the perimeter (or at least as shown, make two horizontal lines) of the box lid.
2. Tear off the paper until the tape becomes sticky. Attach beer cans.
Also put tape on the jars of alcohol, and then put a sheet of paper.
3. Then wrap it with green corrugated paper and connect the ends with glue.
4. Now cut out a strip from dark green paper; its thickness should be approximately 3 cm.
6. It will be useful for decoration; glue it on top of the caterpillar body. Then build a tower from the box and a barrel of its own (the bushing will come in handy).
7. Accordingly, to make the craft beautiful and not scary, also decorate these parts of the car with paper.
8. Next, according to the plan, glue the tower and the barrel with a glue gun, and then glue this whole miracle to the caterpillar. And the gas tank will be a pack of goodies.
World Of Tanks
The popularity of tanks was enhanced by the popular game World Of Tanks, a simulator in which the creators tried to bring the conditions for controlling and surviving a tank in battle closer to reality. In it you will find models from different countries.
There are both famous Soviet tanks T-34, KV-1, IS-3, and German “tigers”, “panthers” and “leopards”. You can also use models that never participated in real battles due to the fact that the war ended, or they were too heavy to be transported to the battlefield under their own power or by train, for example the German "Maus", the largest, heaviest and armored tank of the Second world.
The audience is growing, and there are more and more fans of this game. Now there are many accompanying products, such as clothing with the game logo, pillows, mugs, notebooks, notebooks, briefcases, computer mice and rugs.
Metal tank models are also in use. Each avid gamer has his own preferences in the game. Some people like self-propelled artillery units, which allow them to wait for the moment and cover enemy equipment with an accurate shot. Some people like anti-tank installations, kind of snipers, not very mobile, but with a long range and damage. With heavy tanks everything is simpler: thick armor, inactive, but in order to penetrate one, you need to try. Light ones are excellent for reconnaissance; they can quickly bypass the enemy, go to the rear, and detect artillery. Every player will be glad to have a beautiful metal model of a Tiger tank or another favorite tank on their table.
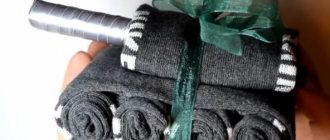
Sock tank for February 23rd - step-by-step instructions for beginners
I’ll show you several descriptions at once, and you can decide which one you like best. All of them are so elementary that any boy or girl can figure it out even without words. It’s impossible to accumulate a year’s supply of accessories for a man. But five or six pairs of socks are quite possible.
You can make a tank either with a bottle (in this case it will act instead of a barrel), or without it. I decided to show all the models.
So, here is a ready-made master class in pictures, take it and create.
The next product is simpler; you will also need men's socks, plus a satin ribbon, scissors, colored paper, and an elastic band.
Twist three pairs of socks into a tube and secure with an elastic band.
Next, decorate with another sock and decorative ribbons.
Roll the turret and barrel out of socks, do as shown in the picture.
For brightness and festivity, glue red stars.
Well, now, as promised by a couple of new products this year, take your pick, maybe you’ll make just such a beautiful tank.
Application for kindergarten
For kindergarten children, the option with applique is perfect. For this you will need colored paper, an ordinary A4 sheet or a cardboard base if you are making a postcard.
You will also need a ruler, pencil, scissors and glue of any format.
- All the details of the future tank are scattered on colored paper.
- Next, they need to be cut out; if the child is very small, this should be done in advance by an adult.
- All that remains is to glue all the parts of the tank in their places.
- When making a cardboard postcard, you need to bend the sheet in half and glue the tank to one of its sides.
- Congratulations are written on the inside.
This applique will please and delight any man.
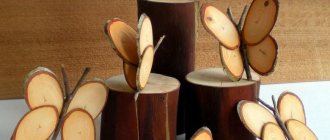
Car in the form of a wooden tank
Well, now I suggest you familiarize yourself with the handmade work that I found in the Country of Craftsmen. Perhaps young craftsmen will want to invent such military equipment. I suggest using sketches and diagrams.
The sequence of actions is presented below in these screenshots. Unfortunately, I couldn't find better quality.
This is the article that came out today, if I find something else, I’ll be sure to add it. Well, for now I say goodbye to everyone and see you again.
Best regards, Ekaterina
Active leisure and means of education
The art of origami is notable for the fact that it is not only of an applied nature. Making paper figures is an excellent form of active leisure that promotes the development of spatial thinking, imagination, memory, patience, fine motor skills, ingenuity and accuracy.
The sight of handmade crafts and playing with them instills confidence in one’s own abilities, forms attitudes towards creativity and creation, and distracts from everyday routine worries and worries.