If you are into DIY projects and have a lot of unnecessary waste paper at home, turn it into a useful thing. From literally nothing you can make an original paper pot that will suit any flower. In such improvised flowerpots you can grow indoor plants and also use them for summer terraces.
Features of the pots
A flower pot and a regular flower pot are somewhat different from each other. Typically, a flowerpot is understood as a flowerpot that has a non-standard design. It can be used alone or as a beautiful shell for a pot.
There are no drainage holes in the flowerpot, so it can serve as a decoration not only for the garden or home window sills, but also become a decorative element for bedside tables, shelves, furniture walls, or hang from the ceiling, becoming the highlight of the interior.
Master class on weaving flowerpots without a bottom
The technique of weaving from newspaper tubes has existed for a long time, because it is so similar to the traditional weaving of baskets and boxes from wicker, differing only in more accessible material. Flowerpots and baskets in both cases can be woven with or without a bottom. The newspaper bottom should not be exposed to excessive moisture, and the plant needs to breathe. Breathing and watering of the flower is ensured by any pot that has holes in the bottom and a saucer for water. Thus, the pots are designed not only to decorate the plant’s habitat, but also not to interfere with its growth, which means that decor without a bottom is the best option.
Required tools:
- newspapers;
- knitting needle or wooden skewer;
- PVA glue;
- cardboard;
- needle and thread;
- flower pot - the future owner of the flowerpot;
- acrylic varnish, paints, stain - to choose from.
It is very simple to carry out the work step by step, because all the steps in it are repeated, however, it is important to follow the algorithm
We cut sheets of newspaper into strips 7-10 cm wide; on average, 70-80 tubes are required to decorate one pot, so you will need a lot of strips.
We take a knitting needle or a wooden skewer and apply it to the corner of the strip, after which we begin to twist the tube
It is important that the tube is uniform and dense. We secure the end of the twisted tube with PVA glue and carefully remove the knitting needle from the resulting structure.
The tube should be tight, however, one edge will be slightly wider than the opposite, since to extend the “newspaper rod” the end of the new tube will be stuck into the previous one. After the preparatory work is completed, you can start drawing the circle
To do this, you can circle the bottom of the pot.
We draw a circle on cardboard and divide it into equal sectors using a compass or ruler. Our future flowerpot will be made using the herringbone technique, so the number of sectors in the circle should be odd (27 equal parts). We put a newspaper vine on the lines of separation of sectors. Since it is thin and tight, we put two tubes on each line. Note that the tubes at the base do not intersect, so they should be placed a little further from the center of the circle.
A needle and thread will help secure the structure. We wrap the tubes with thread in two or three places, without flattening or piercing them. When each of the tubes is secured, place the pot in the center and bend the newspaper sticks upward, not forgetting to secure their ends along the edge of the pot with clothespins. We will begin to braid the pot using the “rope” (wave) technique. This method will provide increased strength to our creation. In order to start weaving with a rope, you need to take four tubes, two of which will pass in front of the base tubes, and two behind it, after which an overlap is made. The ends of the tubes are secured and glued into the base. We continue to weave 1-2 rows with a wave, gradually moving to the herringbone pattern.
“Herringbone” begins with removing one pair of tubes from the weave. To do this, we tuck it into the “rope” of the first row.
We wrap the remaining pair around the racks: two adjacent racks are behind it, two in front of it. Each subsequent row is gradually shifted by one vertical post.
We complete the weaving with a “rope”. We hide the remaining ends in weaving and cut them off.
Turn the flower pot over and cut the threads, remove the circle and insert the ends into the weave. We cover the finished structure with PVA glue.
Types of flower pots
With the help of flower pots you can add greenery to any room and create an amazing corridor.
Large flowerpots make beautiful floor decorations for the garden or large rooms.
Smaller pots will take up space on shelves and bedside tables.
The smallest plant houses can be placed on walls or hung from the ceiling, freeing up surfaces and accommodating a large number of plants indoors.
Hanging planters help create cozy green walls, quickly replace plants as they fade, and provide the most comfortable conditions for green pets. Plants hanging from them will help cover up wall imperfections.
Flower pots made from clothespins
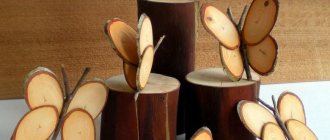
Such a pot can be made from scrap materials with a minimum of effort. The finished product will fit perfectly into the Scandinavian or eco-style, since the decor for it is made of natural wood.
Tools and materials
To make a flower pot you will need:
- Wooden clothespins.
- Tin can.
- Thick colored cardboard or paper.
- Plant.
Step-by-step instruction
- We distribute clothespins along the walls of the jar. For strength, they can be secured with hot or all-purpose glue.
- The result should be a pot like this:
- We plant the flower inside: some plants will need a jar, while others will need an additional pot.
- We decorate the craft with a heart cut out of cardboard. You can also decorate the pot with cord or ribbon.
In the photo, another option for using the craft is to use it as a candlestick.
Plastic buckets
Instead of a bottle, you can take a mayonnaise or ice cream bucket. You won’t have to cut it and sand the top edge, which will significantly speed up the production of an elegant pot. Yes, and there is already a handle for hanging.
Note!
- Macrame: diagrams, interesting projects and detailed descriptions of making crafts
- Crochet amigurumi - examples of how to make a beautiful toy with your own hands (75 photos)
Coffee topiary: step-by-step master class on how to make a small decorative tree from coffee beans
Floral arrangement from a vintage suitcase
An item that has served its useful life easily becomes stylish and useful when it falls into the caring hands of a craftsman. We'll talk about how to turn a suitcase into a pot in the next master class.
The photo shows a transformed suitcase, which has become the highlight of the interior.
Tools and materials
To work you will need:
- Old suitcase.
- Primer, acrylic paints, brushes and varnish.
- Film.
- Scissors.
- Furniture stapler.
- Expanded clay, earth and plants.
The photo shows tools and materials for creating a composition. The film can be found at a hardware store. The number of plants depends on the size of the suitcase.
Step-by-step instruction
Let's get started:
- We wipe the suitcase with an alcohol solution. If necessary, remove the cover. We cover the surface with primer in two layers, and after drying, paint it in any color. To make the item last longer, it should be protected with parquet varnish.
- To prevent water from ruining the suitcase, we line its bottom with thick film. We fix it with a furniture stapler along the top edge.
- We fill the bottom of the suitcase with expanded clay and soil and plant the plants. To make the composition look harmonious, we place taller flowers in the background and lower ones in the foreground.
- Plants should be unpretentious and easily get along with each other.
- The garden in a suitcase is ready!
The photo shows a duet that always looks picturesque and harmonious.
Unusual flower pots from a bottle
Instructions on how to make a beautiful flowerpot from plastic bottles can be very varied. But one is the most popular. To implement it, the bottle will have to be cut, as in the first option. You just need to use the top along with the cork.
The workpiece is turned over from top to bottom and glued to a strong stand. All that remains is to coat the future flowerpot with paint and place a pot of flowers inside.
For a garden plot, pots made from bottles in the shape of funny pigs, bright bumblebees, unusual cats and dogs are more suitable.
Master class “Wicked plant pot with volumetric folding”
To work you will need:
- acrylic varnish;
- PVA glue;
- white paint (if you want to apply a patina);
- clothespins;
- side cutters;
- scissors;
- awl;
- tubes (I have gray working tubes made from newsprint, but I took the tubes for the stands from office paper, they are stronger, just right for stands);
- We also need a shape, here we focus on the size of the pot for which we are weaving a flowerpot, you can use this pot. Perhaps even a bucket of nail polish will do.
How to twist tubes and the main types of weaving can be found here.
Bottom
We take four tubes for the stands and fold them two at a time, as in photo 1.
We fold the working tube in half (I remind you that we weave with wet working tubes), apply it to the bottom pair of posts and weave with a rope. Photo 2.
Before weaving the second row, we separate the racks using an awl - photo 3.
Now we braid each stand separately, also with a rope - photo 4. We weave two rows like this.
We wove only three rows. Now we add one additional rack to each rack - photo 5.
We continue to braid the paired racks with a “rope”. We weave two more rows. Then we disconnect the racks (photo 6). Next we will braid each stand separately.
And we weave according to the size of the bottom of our form, so that approximately one row of weaving protrudes beyond the bottom outward. Photo 7.
We tie the shape to our bottom. Photo 8.
Walls
We lift the racks and fix them with clothespins, as shown in photo 9.
Add a third to the two working tubes. Photo 10.
We weave one row with a “rope of three tubes”. Photo 11. And cut off the third working tube at the end of the row. We glue it.
We weave one circle with “chintz” with two tubes at once, where one “catches up” with the other. Photo 12.
Add one more tube to each working tube. Photo 13.
We continue to weave with chintz using double tubes. We weave one circle. Photo 14.
Once again we add working tubes. Photo 15.
And we weave with triple tubes “calico”. So we weave almost to the end. We cut and glue two tubes from each bunch (marked with a red marker in photo 16).
With the remaining two tubes we continue to weave with a “rope”. Photo 17.
And so we weave the last three rows. Photo 18.
Bending
We cut off the posts. They are thick and will not be suitable for bending. We take the wet working tubes and insert them into the cut posts, after adding glue to the hole. We insert three tubes. Photos 19 and 20.
We bend each three posts over the next one. Photos 21 and 22.
Now it’s more convenient for me to turn it over and put the pots down.
Next we weave, as shown in photos 23 - 26. We bend the first bundle of tubes first under the next one (photo 23), then over the second (photo 24) and the ends under the third. We do this with each bundle of tubes. We make sure that they are laid evenly in the bends.
Close the fold.
We reached the first bent posts (in photo 27 they remained marked with a red marker, as in photos 23 - 26). We braided the ends of the green bundle, and they already remain under the red bundle. There are two more intact bunches – yellow and blue.
Now we draw the yellow bundle under the blue one, then it will lie above the red one, and we will thread it under the red bundle. In photo 28 you can see that I use an awl for this - I put the tube on the awl and push it together with the awl under the red bun.
Photo 29 – here the yellow bundle has already been threaded.
We fill the blue bundle of tubes as shown in photos 30 – 32.
This is what the finished bend looks like. Photo 33.
Here you can completely coat the bend with glue or add glue to the places where the ends of the tubes pass. Photos 34 - 35. When the glue has dried, use side cutters to cut off the ends of the tubes sticking out from under the bend.
Popular articles Home decoration for New Year 2022 - DIY decor ideas
Product coating
First, prime the product with a 1:1 solution of water + PVA glue. Leave to dry well.
If there is a desire to apply a patina, then at this stage we will do just that. You can make a white patina, I added a little black color to the white paint, it turned out to be a light gray color. Apply patina to the product using a sponge.
The patina has dried. We coat the product with varnish.
Cement plant pots
A unique device for placing pots can be created from cement and a large rag (a piece of tablecloth or towel).
A master class on making flowerpots will show the ease of making such a decoration, and photographs will demonstrate the variety of shapes.
To create an unusual object, you will have to stock up on cement, a container for stirring it, a bucket or any other object that will become the basis for giving shape.
Cement is diluted in a basin and the selected fabric is immersed there for 5-7 minutes, ensuring that the entire surface is hidden in the composition. After the rag is completely saturated, it is taken out and hung on an inverted bucket. You can make the product asymmetrical or add fluffy folds. It all depends on the desire of the creator.
After the cement has completely dried, the bucket is carefully removed, and an unusual vase for a flower pot appears. It can be painted or left in its original form.
Requirements for containers for flowers
The most important function of a flower pot is not to decorate the interior, but to protect the root part of the plant from external influences and create a certain “island” of soil in which the bush will feel cozy and good. When choosing pots and flowerpots for house plants, you should not focus on their appearance, although this is certainly a very important factor, no matter what. But if caring for plants comes first (after all, they are also living), then it is important to pay attention not only to the appearance of the container , but also to its other features - how suitable is the pot for growing plants in it? In order not to make a mistake in choosing, and also to make a suitable and correct pot with your own hands, you need to know what the right pot for a plant should be.
DIY flower pot decor Original flower pots
When choosing containers for plants, you need to focus on:
- shape;
- size;
- material of manufacture;
- practicality;
- appearance.
There are a number of criteria for choosing flower pots
Attention! Any pot should not only be beautiful, but also be suitable for the plant being replanted, taking into account all its requirements for growing conditions.
Idea for beautiful decor of flower pots Unusual flower pots made of wooden clothespins
In order to choose the right container, first of all you need to study the literature regarding the flower being transplanted. Some plants prefer large and spacious pots, while others prefer small and cramped ones. There are variations with wide diameter but low pots, as well as, conversely, narrow and tall ones. All advice regarding containers will be specified in the recommendations for the growing conditions of a particular plant.
Original DIY flower pot decor
The basic requirements for flower pots can be studied in the table below.
Table. Requirements for pots and flowerpots.
| Requirement | Description |
| Presence of drainage holes | There should be a drainage hole in any pot, and it does not matter which plant is being transplanted - a moisture-loving one or one that prefers dryness. In clay pots there is usually only one hole and is located in the middle of the bottom. Plastic ones may have several holes across the entire bottom area. And some plants even need drainage on the sides of the containers. |
| Easy to clean | Often, when a plant grows out of its pot, the container, after replanting the previous resident, is “inherited” by another, smaller flower. Here, before planting in an old pot, it needs to be thoroughly cleaned and rinsed. It is bad if the material cannot be thoroughly cleaned of old soil, and doubly bad if a diseased plant lived in it before. |
| Volume, shape, size | The pot can be of any shape, although it is preferable to choose square or round. As for volume and size, they are selected depending on the plant being planted. Regarding the size, you can focus on the parameters of the root part - it should not be cramped, otherwise the roots will not develop correctly and will no longer fully perform their functions. |
| Sustainability | In any case, the pot should be as stable as possible. If it accidentally falls, the plant may lose its above-ground part, and then there is a high probability of death of the green pet. Moreover, for plants with a large above-ground part, it is very important to take stable pots and preferably with a wide bottom. |
| Material | From time immemorial it has been known that the best material for making a pot is ordinary clay. But any breathable porous material will also work. The roots of the plant must be able to breathe; they also need air. In some cases, you can use metal or plastic pots, but this is not always a good option. |
Photos of DIY flower pots Spectacular and unusual flower pots
Hanging flower pots
Wooden flower pots
A unique home or garden flower bed can be made from an ordinary wooden box. You can ask for it at a fruit store, or make it from leftover boards.
The finished product is sanded and painted, and small pots of flowers are placed inside.
You will get an even more original flowerpot if you fasten ropes around the edges of the box. Such a structure can be hung on a tree or a special bracket on the wall, or fixed on the ceiling.
An unusual flowerpot would be a stump or a thick piece of wood. To create such a unique product, you will have to hollow out the middle, place a pot of flowers there or fill it with soil and plant a small plant.
You can braid an ordinary pot with light soft branches, turning it into a unique basket. And ice cream sticks will decorate a fairly large pot. Instead of sticks, you can use colored pencils; they don’t even have to be adjusted to the same size. The asymmetry of the craft gives it additional charm.
Large wooden blocks will be used to make a beautiful lattice planter. Nails or screws will help connect individual elements, and bright colors will complement the decoration of an ordinary pot.
How to crochet flower pots, and from what threads: diagrams with descriptions
Eye-catching flowerpots are preferably made of bright yarn, and there are no restrictions in the choice of texture. It is desirable, however, that it be acrylic or thin cotton.
Popular articles Bouquet of soft toys
The following scheme will do:
Pattern for knitting flower pots
So, if you still need a bottom, then you should start knitting with it.
If not, then you should start with a chain of air loops that matches the length of the bottom of the pot. This chain needs to be closed, after which, following the pattern, continue knitting upwards. In this case, you need to add loops in every third row.
A cross with a dash means that the hook is inserted exclusively under the back or front wall of the loop. You will get a nice finish at the bottom and top of the plant pot.
These are the kind of pots you can knit
Fabric plant pots
Burlap, felt, and felt can also become an exquisite decoration for a flower pot. To do this, you will need to cut out suitable blanks and sew them together.
Sometimes such pots are left without a bottom, so the fabric will retain its attractive appearance longer.
The difference between a flowerpot and a pot
Many people believe that a flowerpot and a pot are the same thing. In fact, these are two different concepts. A flowerpot is a decorative container, usually decorated in every possible way . And you don’t even have to put soil in it - you can simply place a simple pot of suitable size with soil and a plant inside the flowerpot. Typically, such containers are used only for interior decoration.
Flower pots
As for the pot, it can be either simple and unremarkable or very beautiful. And just inside it is placed the soil for the plant.
On a note! The pot must have drainage holes, while the flower pots may not have them.
Decorating with pebbles Decorating a pot with beads
Unlike a pot, the materials of which are subject to special requirements, a flower pot can be made from anything. The main thing is that the material is non-toxic and does not release substances hazardous to the plant into the air. Flowerpots can even be woven from branches or elements made of paper and fabric can be used to decorate them.
Pots from gift bags
One of the advantages of using pots without drainage is the ability to water flowers without worrying that water will flow onto window sills and furniture after watering. However, it is important not to forget that when irrigating the plants, you need to empty the pots of accumulated water. You need to remove liquid from it 15 minutes after watering. If this measure is neglected, there is a risk of root rotting.
Miniature pots made from wine corks
Most often, plant pots are made with your own hands. Let's see how you can make a container using available materials.
The ability to make something original and new out of unnecessary or ordinary things is very valuable when decorating a home. Decorating flower pots with your own hands - photo Flower pots with children’s faces
Unusual flowerpots
Old unnecessary things can also play the role of a unique home for plants. Most often they become old buckets, pots or basins, but unnecessary teapots or graters will look no less interesting.
Such crafts can even be placed on the kitchen table; they will not take up much space, but will add summer charm and natural beauty to your home dining room.
Flower pots made from an old suitcase or an unnecessary bedside table will look beautiful and unusual. They just have to be additionally protected from moisture.
For a small room, you can make a flowerpot from a thick book or a stack of unnecessary magazines.
Original flower pots can be made from any material, the main thing is to come up with a placement and beautifully design the future craft. Photos of non-standard flowerpots are intended to help in choosing.
Tips from needlewomen
Paper is a fertile material for creativity. This is a safe, flexible, affordable way to occupy the leisure time of all family members. It’s also beneficial to get rid of unnecessary junk - old newspapers and magazines, containers.
Using the simplest models, you can practice your skills and instill a love of needlework in children
The woven product itself is a fascinating and interesting reward after a long, rather complex and not always pleasant process of making the required number of tubes, and to weave one flowerpot you need from 50 pieces. They must be done in advance.
After twisting, the tubes are ready for weaving. If you paint them before starting work, the product will look neater than when painting the finished product. Any paint will do. You can even take gouache, diluting it with a mixture of water and PVA glue. When finished, it is recommended to coat the craft with any wood varnish.
To make the paper vine pliable, it is advisable to slightly wet it before weaving. It is enough to spray the newspaper blanks from a spray bottle, or lower them into water for a couple of seconds.
It is especially important when weaving to ensure that your hands are slightly damp. When working, your fingertips must be periodically moistened with a sponge or rag soaked in water.
Photo of DIY flower pots
Preparing the pot for decoration
Old flower pots and new flowerpots must be carefully prepared before decorating. The process consists of the following steps.
- Cleaning the surface from dirt and limescale – preference is given to the dry method; if necessary, you can wash the container. After this, it is allowed to dry.
- Removing the glossy layer is done using fine sandpaper or an abrasive block. The treatment increases the adhesion of the decor to the flower pots.
- Degreasing the surface involves wiping the work area with alcohol-containing products. The easiest option is medical alcohol.
- Primer coating - the composition increases adhesion between the finish and the base.
Many people are concerned about the question: is it necessary to remove the plant and soil mixture from the pot? This operation is not required if there is no need to replant the flower or replace the substrate. The specifics of the chosen technique are also taken into account. The decorating process of some techniques does not allow working with a filled flowerpot. Of course, it is more convenient and faster to perform manipulations with an empty container. But a living organism should not be subjected to stress again.
If there are pathogenic microflora in the soil or on the plant itself, disinfection procedures must be carried out. To destroy pathogens or pests, it is recommended to use fungicides.
What materials are best to use?
Floor, table, wall or unusual hanging planters can be made from many types of materials. The most important thing is that it is strong enough and lasts as long as possible.
Flowerpot decor
You can make them from:
- sand and cement with the addition of liquid glass
- alabaster
- cerenzite: products from a solution prepared on the basis of calcium and aluminum salts are not only original, but also unusually durable
- wood: you can use both thin slats and massive wooden blocks of suitable size, in which the central part is removed
- vines: a wicker flowerpot-basket will fit perfectly into the decor of a room decorated in country style
- plastic: you can imitate weaving from plastic cut into thin strips or twisted plastic bags;
- heat resistant clay
- papier mache
- felt
- yarn, braid, twine, strong synthetic threads: they are coated with glue and wrapped around containers of a suitable size
For decoration, burlap, cotton fabrics of original weaving, twine, colored stones, nut shells, grain, tree bark, dried flowers, fur, paints and enamel, etc. are used. More massive flowerpots for garden flowers are made from rubber wheels.
Original decor of flowerpots using wooden clothespins.
Do not forget that the shape of the container should be combined with the outline of the plant. After all, even the most unusual flower in an unsuitable flowerpot will look ridiculous.
Planter under a wooden bucket
It’s not hard to figure out how to make such a pot: just use an old wooden bucket as a mold. You can put together something similar yourself. After the concrete has set, it needs to be decorated. Wood grains will not appear immediately; they need to be created using a cutter. The overlay imitating a metal ring will also have to be applied separately. Finally, holes are made in the concrete for the rope.
It's a bit heavy to carry 10 and 20 kg pots. To make the structure lightweight, foam should be used as a second filler. This tip can be applied to any design.
Tree
You can simply get a unique floor pot from a piece of simple wood. Both stumps and thick branches or pieces of logs are suitable for work.
Wooden flower pots
The very idea of creating flower pots is simple, like everything ingenious. To obtain a flower house, the core is removed from a wooden blank. The resulting hole is cleaned and thoroughly polished.
Original floor pot made from a stump
You can even decorate flower pots with your own hands by removing the bark. A layer of varnish will help highlight and fix the natural beauty.
Rods
Another original answer to the question of how to make a flower pot. Fans of eco-style will like this pot made of twigs. The weaving process cannot be called easy for the uninitiated, but the effort spent will be duly rewarded.
If you can't weave something like a basket or a bird's nest, look for a simpler option. For example, how do you like this idea of weaving flower pots, like simply tying them with twigs? Almost everyone can try their hand at this.
In addition to a supply of straight twigs, you need to prepare:
- a ball of twine;
- a piece of burlap;
- cylindrical tin can;
- glue.
Place one of the twigs in the base jar and cut it to its height, making a slight allowance. Based on the resulting workpiece, you will need to trim the rest of the branches.
Next, work on the flower pot with your own hands will continue with the actual weaving process. Lay out the twigs in one row and begin tying them together with a thick thread so that you get a mat-type fabric.
A wicker flower pot is not difficult to make with your own hands
The cylindrical base is covered with burlap. After drying, the jar is wrapped in a mat, which is secured with several turns of twine. You can add picturesqueness to the product. The simplest decoration of flower pots with your own hands is done with colored jute cord, which replaces twine.
Clay
There can never be too many flower pots, so we will make our next project from clay. For these purposes, you need to purchase a special one that does not require firing. Such mixtures are sold in stores that sell art supplies.
Decorative clay product
This type of clay hardens in air within 24 hours without any firing.
Papier mache
If the collection of flowers is large, purchasing flowerpots for each of them is quite expensive. When using improvised means, you can not only save a lot, but also get the most unusual decorative products. An original papier-mâché floor or hanging planter can complement a collection of flower pots.
Papier-mâché cups
Paper-adhesive mass is an excellent material that is easy and simple to work with.
But it is better to use a painted and varnished product for planting flowers that are not irrigated with water.
So, let's describe the process of creating papier-mâché flower pots:
1We will glue the plastic container so that moisture does not dissolve the paper over time. You can use a mayonnaise bucket.2 The container must first be degreased, and then coated with a primer for better adhesion (you can use regular glue).3 First, prepare the paste. For half a liter of cold water you will need a large spoon of flour. Brew it to a boil, remembering to stir so that lumps do not form.4 We tear thin paper or newspapers into pieces measuring 4x4 cm. It is not recommended to use scissors and cut them - only with your hands.5 Carefully mix the paste with torn paper.6 To strengthen it, you can add carpentry to the solution glue. A more homogeneous mass is obtained by adding chalk to the paste.7 You can also mix the composition with gypsum, clay or sawdust.8 When using cardboard, it must be torn into smaller pieces and first soaked in plain water, and then mixed with the paste. The resulting mass is first squeezed out by hand, dried and ground on a grater.9 We begin to slowly, pressing tightly, apply the solution to the jar. We do not touch the bottom.10 Our product will take several days to dry.11 Using papier-mâché, you can simply decorate any container using the decoupage technique. To do this, blanks in the form of flowers or figures are prepared from paper and glue. Then they are glued to the flower pots and varnished. The gaps between applications can be decorated with decorative paper napkins. 12 Paint the work with watercolors, gouache or acrylic. The final stage is varnishing to impart water-repellent properties.13 The flowerpot in the shape of a stump looks very original. To do this, dried papier-mâché is painted first with black paint, and then with a second layer of strokes of ocher dye.
Finished papier-mâché work
Flower pots made of wood look very original. But, since such material will quickly begin to rot upon contact with moisture, it is better to make a larger container in which you can “hide” the plastic plant pot.
Gypsum
For work you will need 8-10 spoons of dry rotgypsum
The technique is similar to the technology for working with cement mortar.
- To ensure that the finished product can be easily removed, the mold must be pre-greased with oil.
- It will be more convenient to remove a dried pot from plaster if you cut the plastic jar-mold in advance with a knife, and then temporarily glue both halves with tape.
- We will need two containers, one slightly larger than the other. We will insert them into each other, pouring a solution between them.
- First, pour the gypsum mixture only to the bottom of the container. The solution needs to stand and get stronger, and only then continue working.
- We insert the second container inside the first and fill the gap between them with the solution.
- The work can be simplified if you pour the gypsum mixture into the bottom, and then press it with a second container so that the solution comes out to the very edge of the pot.
- We compact the solution with a wooden stick so that no voids form inside.
- Leave the finished pot until completely dry for a day.
- If desired, you can use a tool for cutting the cuticle of nails or a thin stick on a partially dried product (it must first stand for 7-8 hours) to cut out various patterns.
Original plaster pots
When making flowerpots, do not forget about the drainage holes that are made in the bottom of the container. Otherwise, the water in it will stagnate and the roots of the plant will quickly rot.
Concrete
Laying around yogurt cups, plastic buckets and bottles can make excellent molds for homemade concrete pots. Such products will be an original addition to an interior in a loft or minimalist style.
The photo shows flower arrangements made of concrete, made by yourself.
Pouring a gypsum or cement container
The most suitable and affordable materials for making a pot yourself are gypsum and cement mortar.
Mixing the main components is carried out according to general rules in recommended ratios.
- Immediately before starting work, prepare the form. You can use ready-made molds (silicone, plastic, old metal utensils coated with a layer of polyethylene), or you can make the mold in advance with your own hands.
- Pouring cement or gypsum mortar is done only after thorough stirring, which allows you to remove all air bubbles from the mixture.
- During hardening, concrete products regularly moisten the surface with ordinary water.
- This approach prevents the formation of cracks in the concrete and gives the finished pot sufficient strength.
Painting or other decoration of finished containers is done according to a general scheme (acrylic paints or gouache).