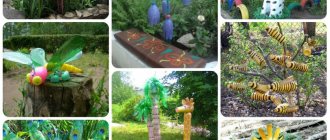
The peacock can rightfully be called one of the most beautiful birds on planet Earth. This bird fascinates with its amazingly beautiful and luxurious tail.
Frame: CraftISH Corner/ YouTube
In this article we would like to invite you to make a beautiful Peacock craft from colored paper with your own hands. And detailed and understandable master classes and video master classes will be an excellent assistant for you in this.
Frame: Fahima's Craft And Art World/ YouTube
Making a peacock from paper
A colorful paper peacock will decorate the interior of your home, an exhibition of children's works, or can become an original gift for friends or family.
In the process of working, the child learns to interact with cardboard and paper, to fold it in a certain way.
Such experience helps develop imagination and reveal creativity. The child gains communication skills while working with other participants in the master class.
Feathers for the product
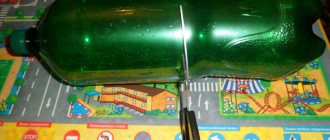
Make long and short feathers from a two-liter bottle by first cutting the bottle. The result should be eight long and six short feathers.
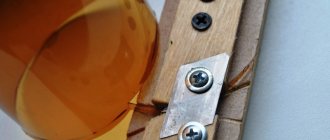
Attach the feathers evenly to the body. For the upper legs, it is better to choose milk bottles, cut off the top, roll them up and attach them to the frame of the bird.
Cover the frame with feathers on the bottom and sides.
Product front view:
Basic manufacturing options
Depending on the age of the child and the aesthetic preferences of the participants in the creative process, you can make the craft in various versions: in the form of a cardboard base with an accordion tail, using the origami or quilling technique, make an applique.
Folded like an accordion
School students can independently create a paper craft in the form of a peacock with an accordion-folded tail. Young children will cope with this task together with their parents or teacher.
Teachers of fine arts and other subjects of an artistic and aesthetic nature can also adopt this idea.
1. Take a template of a peacock’s body with cooking and a characteristic crest. It can be made by drawing the silhouette of a bird on cardboard or using a ready-made blank, then carefully cutting it out along the contours.
2. Place the template on a sheet of colored paper, trace it with a simple pencil, and cut it out. We cut in two places to insert the tail. The length of the oblong slot is about 1 cm. We draw eyes on both sides using a felt-tip pen or glue ready-made ones.
3. Let's start working on the most spectacular element of the craft - the bird's bright tail. Using a glue stick, we connect three strips of different colors together. We apply and glue them horizontally. We make two such multi-colored blanks. We take the resulting striped sheet of paper and begin to fold it in the form of an accordion. We also make bends of 1 cm.
4. We place the finished corrugated workpiece horizontally in front of us on the table and fold it in half. We insert the accordions one by one into the slots and glue them at several points to combine them into one fluffy tail.
5. Draw ovals of different sizes (1, 1.5 and 2 cm) and colors on paper, cut them out, glue medium and small ones onto large ones. These are the eyes for the tail. We paste them in random order.
Origami technique
The art of origami allows you to create incredible shapes by folding paper according to patterns. Let's make a figurine of a peacock using this technique.
- Let's start working on the tail: draw patterns on it with felt-tip pens. We make the bird's eyes and beak, and paint the wings. The plumage on the head can be made from thin strips of colored paper. We create curls from them and paste them on the head.
You can make several figures of different shades and sizes to hone your skills.
Using quilling technique
Quilling or paper rolling is an art form of creating paper works by folding strips into spirals. Compositions can be flat or three-dimensional. Spirals can be given different shapes. Such blanks are called modules.
The king of birds, the peacock, made using the quilling technique, will look impressive and colorful.
- cardboard for the base,
- scissors,
- tweezers,
- double-sided colored paper,
- PVA glue,
- yellow paper
- pencil.
Read also: How to make a car lock with your own hands.
Let's look at a simple master class on creating a peacock using paper rolling.
1. Draw a bird on a sheet of cardboard or trace a prepared template. We draw patterns on the tail, crest, wings and beak.
2. Cut the paper of the desired colors into long strips. Apply a thin layer of glue to the contours of the body, head and beak, and glue strips of paper edgewise. We twist the strip into a tight spiral using a toothpick. This will be the eye. Fix the inner hole with glue.
3. Glue strips along the contour of the crest. We twist and fix the spirals on the wings.
4. We will make the ornament on the tail using a more complex paper rolling method: we make a tight blue curl, add blue around it and then yellow. We complete the blank with a yellow layer in the shape of a drop, paste it on yellow paper and cut it out.
5. Create a lot of these drops to decorate the tail. We add several strips of emerald and blue colors to each blank. We fix each folded element with glue. We distributed it along the tail. The peacock using the quilling technique is ready.
Application
You can make an applique in the shape of a peacock together with a preschool child. Older children will cope with the task independently under the guidance of a teacher or parent.
1. Create a template of the peacock’s body from cardboard and cut it out.
2. We cut thin strips of 0.5 cm from colored paper of several shades. We make loops from paper pieces and glue them onto a sheet of cardboard in a semicircle in the form of a tail in several layers.
3. Glue a cardboard template of the body on top, cut out and glue the legs also from cardboard or paper. Draw/glue on the finished eyes and beak.
Metal wings
For the wings you will need a metal mesh. In front, the mesh is rounded and gives the appearance of a wing. We must not forget about the tail. Cut out a triangle, quite large in length.
Side view of the bird:
At the next stage, the robots should make feathers for the wings. The width of the feathers is 5-6 centimeters.
For feathers, it is advisable to take a container with a volume of 30 liters, but such containers are difficult to find, so a lot of two-liter bottles will be enough.
Screw each feather one by one along the edges of the mesh.
To construct the 2nd row of feathers, you will need 3-4 one and a half liter bottles. Screw this one in the shape of a circle.
In total, you will need 30 containers for feathers.
This is what the finished wing should look like:
Tips and tricks
When working on a craft, you need to remember about safety precautions: watch how children use scissors or cut out the blanks in advance.
In order for the result to please all participants of the class, during the master class you need to show patience, accuracy, and use your imagination.
As examples, you can select ready-made successful works and try to recreate them, adding individual features.
A paper peacock created by a child’s hands will decorate the interior of a home, an exhibition of children’s works, or can become an original gift for friends or family.
In the process of working, the child learns to interact with cardboard and paper, fold it in a certain way, master new techniques and improve his skills.
Such experience helps develop imagination and reveal creativity. The child gains communication skills while working with other participants in the master class.
You can work on such a craft at home together with parents and older children.
In the process of creating a bird, a child may have new ideas for design and decoration. The task of parents and educators is to encourage children's initiatives and allow them to express themselves through creativity.
DIY head
For the head you will need a piece of thick foam. Cut out the outline of the head and make buttons for the eyes.
For aesthetics, sand the head.
Make a feather tuft for your head from the rest of the bottles.
Make holes on the top of the head, fill it with glue and insert the finished feathers.
Cut out a triangular beak and attach with a tool.
Bird neck – 2 rolled up 5-liter bottles.
Make paws and fingers from a 1 liter bottle.
The last rows of feathers are glued to the head.
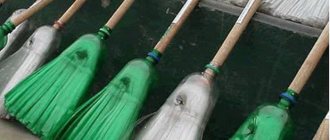
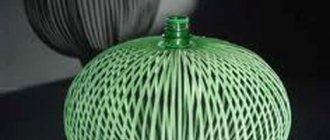
Make the tail from green bottles.
Paint the work with enamel paint and cover the top with paint from a can.
This peacock will be an excellent garden decoration.
Using the same scheme of work, you can construct a white peacock.
DIY paper peacock. Master class with step-by-step photos
Today I want to show you how you can make such a peacock out of paper with your own hands , which will delight you or your loved ones. We will use old newspapers as paper to make the peacock.
- newspaper
- threads
- light colored napkins
- cardboard
- glue
- small box for casting our bird
- chicken or goose feathers
- gouache paints
- clothespins
- cement and sand
- newspaper tubes
- vinegar, water, green and blue food coloring.
- cold white porcelain
DIY paper peacock master class.
Let's start our business. We take a newspaper and crumple it. Use thread to give the paper an oval shape.
We use paper to make this shape.
We bend our figure and make an egg-shaped head.
Now we take cardboard and cut a triangle 3.5 * 3.5 * 2 cm.
We insert the beak with glue and secure it with paper and thread.
Now we take 4 newspaper sticks and twist them together in a sheet of newspaper - these will be our legs. We insert them into the body of our bird, cutting a hole with scissors.
Read also: How to make garden beds beautifully with your own hands.
Now add newspaper to the legs and secure with thread.
Now we take PVA glue and grease our entire bird and wrap it with a white napkin or, like mine, a yellow one.
We glue it with napkins in several stages so that the newspaper is not visible. Now prepare the mixture for hardening. Well, here, as you wish, you can use cement or gypsum. I mixed cement with sand, prepared a small plastic box, into which I poured the mixture with water.
Let's sand a little and insert our bird into the mixture and support it with something for even hardening. Now it's time to prepare our feathers. Since the feathers are still white, they need to be colored. To do this, you must first degrease with any dishwashing detergent.
Then add our feathers to a saucepan and pour a little water, then add a little vinegar and green food coloring and boil until the feathers are colored for several minutes, then carefully dry the feathers one at a time using a hairdryer. Thus, we paint it blue and light or dark green.
When we have prepared the feathers, we begin to imitate feathers with newspaper tubes. To do this, take white newspaper tubes.
and make a drop, securing it with glue, and fix it with a clothespin.
Now you can attach one to the second droplet to form a tail.
Let's go back to our bird for now and color it black.
We form a frame for the tail measuring 13*12cm.
We will cover the beak with porcelain and glue balls to the place of the nostrils, in which we will make a small depression and make grooves with a stack or a knife.
We wait until the beak dries, and then we paint our beak brown. Now that the beak is made, let's make the eyes. We mark the place where the eye will be, and use PVA glue to glue a ball of mass, which we will slightly flatten.
Next, we roll a thin stick, which we attach with an arc at the top of the eye.
Don’t forget about the second eye and don’t touch them for now and let the mixture dry a little. When the eyes are dry, paint the eyes black and the eyelids brown. Immediately cover your eyes with clear nail polish to make your eyes shine. Now, if desired, we will make white stripes around the eyes (you don’t have to do this). Around the eyes, apply glue to the upper and lower arcs of the eyes.
Now let’s take a stick of thin mass and glue it onto the arc and use a stick or fingers to blend it a little.
Let it cool a little and move on to the tubes again. Let's make a tuft on the head from our tubes. Take the tube and divide it in half. Now we twist one half of the tube, leaving just a small tail, and from the second half we make the same craft, we need 4 of these twisted tubes. You can immediately paint them on all sides with black gouache and let them dry.
Now the time has come for the remaining droplets, which will need to be painted on all sides and allowed to dry.
Now let's take blue, yellow and brown or dark red gouache and color our future tail. We paint it in the middle with blue paint, and on different edges with yellow or brown paint.
You can only paint on the front side.
Now that our sticks have dried, we can attach the tail. To do this, take clothespins and our droplets. Lubricate the tubes with glue and, using clothespins, first glue them under our cardboard.
Let it dry and adhere well. Then, in a checkerboard pattern, we glue other ones under the bottom of our existing tubes.
We make a larger protrusion where there is a smaller one, here as your imagination dictates.
Don’t forget to make the shape of a drooping tail, while also capturing the sides.
This is how beautiful a peacock's tail turns out.
Read also: How to make wooden gates with your own hands.
Let's move it to the side a little so that the tail can grip more, and paint and fold our tuft. For the tuft, you need to glue all the sticks together, as shown in the photo.
Now we will glue the tuft and secure it with a thread around the peacock’s head.
Let's paint our tail a little more with a semi-dry brush.
Here our crest is glued and the eyes are beautiful.
When we have already glued the droplets and made a tail, we will deal with the feathers. We fold the feathers in different colors and glue them a little, simulating the wings that our bird will have closed.
Glue the wings on top and add a little on the tail. Now let's return to the form in which the bird is filled. Lubricate the upper part of the cast mold with glue.
and lay out a napkin moistened with a little water.
Let it dry and paint it green.
Now let’s decorate our stand a little with a ribbon.
Now we see an empty space in our casting mold we will make a peacock egg. To do this, make an egg from newspaper and coat it with glue and glue it with napkins so that the newspaper is not visible. Let's wait until it dries a little and paint it with light brown paint with a semi-dry brush. Next, we glue it into our form and decorate it with artificial leaves, attaching it to the form with glue.
Well, now our work is done, I hope I didn’t bore you. This is the peacock I made from paper with my own hands . Let's twist our paper craft - a peacock - a little so that everything is visible. Good luck in your creation and good mood.
How a strange bird settled in our yard
I think everyone has seen peacocks in pictures in textbooks, on the Internet, and on TV... I saw them too.
“Yes, the male is certainly handsome,” I thought, but nothing more. And so one of my daughter’s trips with her class took us to the zoo in Lipetsk. Seeing this handsome guy in person, I couldn’t take my eyes off it, fortunately it started to drizzle, scattering both visitors and guests))) Handsome peacock
Admiring the beauty of the unique tail, I began to scour the Internet for garden decor that would replicate this beauty. It turned out that I was far from the only one who wanted to place a peacock in my garden, and there were a lot of different photos and master classes. Inspired by one of the master classes, I started creating.
To begin with, I began to collect white milk bottles and, on long winter evenings, carefully cut out future plumage from them. The base for the tail was supposed to be made of linoleum, but neither I, nor my friends, nor my neighbors had a suitable “unnecessary” piece, so it was decided to attach the plumage to a shiny thick substrate. I fastened it with a construction stapler, placing small circles cut from champagne corks on the back side. (How I collected these champagne corks from all my friends and from all the feasts is a different story). To make the plumage more expressive, I drew circles with a regular marker. Unfortunately, I was so carried away by the process that I remembered about keeping a photo chronicle already in the middle of the tail)))
Tail, beginning)
For the body, I glued together shipping foam from some household appliances and, using an ordinary stationery knife, began to adjust it to the desired look. I also used a stapler to secure the plumage and wings, and glued the beak and the “crown” on the head.
Still legless and eyeless Rear view Front and side views
Then all that was left was to draw the eyes, decide on a place to live and wait for spring.
Since there is a huge layer of crushed stone in front of the house, on which even weeds don’t really want to grow, but I want flowers pleasing the eye out the window, it was decided to make a bulk flower bed with annuals. The remains of corrugated sheets were chosen as fencing. In the center there is a bowl for a fountain, purchased from a well-known Chinese website, powered by a solar battery, and the main accent should be a handsome peacock.
The flowerbed is ready, waiting for the “guest”
I selected annuals in blue-lilac and a couple of white accents to match the peacock.
Flowerbed
The petunias were accompanied by lobelia and brachycoma.
From a different angle
Well, the finishing touch is that a handsome peacock and three multi-colored lanterns were finally installed, which made it possible to admire the composition even in the dark.
Settlement results
At the end of the season, a point for improvement was noted. The tail still needs to be changed to a heavier base, since in a strong wind it swings from side to side and the “feathers” are torn off. But in the overall picture, I am happy with the homemade peacock; its presence delighted both me and the neighbors.))) Now I am planning to make a friend for the handsome white peacock in green tones - for company...
Source
Do-it-yourself voluminous paper peacock
We have made a paper peacock more than once, and now I propose to make a three-dimensional peacock from colored paper with your own hands. An excellent craft for schoolchildren and their parents. We will not need very many materials, labor, perseverance and diligence. Be sure to follow all the steps described. This craft will take quite a lot of time, since we will be making an exclusive and original craft.
1. Paper of different colors, 2. Scissors, 3. Pencil, 4. Glue, 5. Ruler, 6. Brush and paint, 7. Half beads, 8. Foam half balls, 9. Glitter, 10. Cardboard, 11 Ear sticks .
These items can be purchased at any stationery store.
We take a piece of cardboard and draw on it the body of a swan, which is very similar to a duck.
We also cut out two strips of cardboard and assemble the body, making it slightly voluminous.
We cut out similar shapes from blue paper.
Now cut out a large semicircle from a rectangular cardboard base. This will be the peacock's tail.
We make many paper cones from identical colored pieces. And glue them in an arc onto the cardboard.
Next, take another color and perform similar steps.
In total I got five rows of multi-colored cones.
Leave for 20-30 minutes for the glue to dry.
This step is not required, but if you know how to create in this area, then why not decorate our creation. We use the quilling technique to make these drop-shaped parts.
We make a small incision in the center of the peacock's body.
We decorate our peacock with semi-spherical foam molds.
We paint the ear sticks and use them as head decorations.
We attach the beak, eyes, paint and decorate the peacock’s body and this is how it should turn out.
Bird's body
For this craft you will need the following materials:
Cut a piece from the top and side of the canister, then attach the tools, slightly moving it back.
Next, you need to bend the wire, which will be the frame of the future product. Plastic pipes are put on to make legs for the bird and placed on a stand.
To form the body of a wire product, you need to attach the container to the frame. Connect the parts of the legs and torso and make the peacock stand. To make the work more stable, secure the legs with wire.
LiveInternetLiveInternet
How to make a peacock from plastic bottles. Author Alena Zinovieva.
It took Alena Zinovieva (Lipetsk, Russia) only 10 days to make such a handsome peacock! Alena describes in detail what materials will be needed and the manufacturing process itself. Master class by Alena Zinovieva “How to make a peacock from plastic bottles.”
Photo 1. For the PEACOCK you will need: polystyrene foam for the head, welded metal mesh, strong wire and plastic tubes for the legs, two 5 liter bottles (preferably round), brown and green plastic bottles of different shapes and sizes (more details below), a bottle of - with draft beer.
Photo 2. Bend the wire so that the back of the bird lies on the bend (top of the canister).
Photo 3. The canister is cut from the top and back, the cut strip is slightly shifted and secured with self-tapping screws or wire, forming the body.
Photo 4. By connecting the legs and body, we give the necessary position to the future bird. We fix the legs on the canister in several places with strong wire.
Photo 5. A dark 2 liter bottle is cut into 8 long feathers, and from the bottom - another 6 short feathers. In total you will need about 60 bottles.
Photo 6. We begin to screw the feathers row by row. For the tops of the legs, cut off the smooth part of the milk bottles, roll them into a ball and screw them to the body.
Photo 7. We cover the chest, belly, and a little side with feathers.
Photo 8. Front view
Photo 9. We bend the mesh to the shape of a canister, using wire cutters we make wings and a tail (narrow near the body, gradually widening towards the bottom).
Photo 10. Tail length as desired.
Photo 11. Cut out the middle part of the bottle, cut it into feathers 5-7 cm wide, 7 pieces each. on each wing.
Photo 12. We screw it to the mesh, shifting each next feather relative to the previous one, trimming as necessary.
Photo 13. The second row of the wing is made from 1.5 liter dark bottles, which are cut into 6 feathers. You need 3-4 bottles.
Photo 14. We also arrange the feathers in a semicircle.
Photo 15. All subsequent rows of the wing are laid out with feathers from 0.5 liter bottles (4 feathers from 1 bottle). About 30 bottles will be required.
Photo 16. We place the feathers close to each other.
Photo 17. Finished wing.
Photo 18. Head made of foam plastic, eyes from an old soft toy or bead.
Photo 19. The shape and position of the head depends only on your desire and imagination.
Photo 20. Tuft from a bottle strip.
Photo 21. Fill the hole in the head with glue and insert feathers.
Photo 22. The beak needs to be strengthened. Cut a triangle out of the bottle, bend it in the center and glue it onto the beak. Self-tapping screws until the glue dries.
Photo 23. A neck made from two 5L bottles. We roll them up into little balls and connect them together.
Photo 24. Screw the feathers in a circle.
Photo 25. We cut out the paws from a 0.5 liter bottle (for example, from an energy drink)
Photo 26. First fitting.
Photo 27. The last rows of feathers are attached to the head with glue.
Photo 28. Color the body.
Photo 29. Tail feathers made from green bottles. The middle part is folded lengthwise, it is given the shape of a feather, the top is fringed. From 1 bottle you get 1 large or 2 small feathers. The blanks need to be painted with green paint - they are all the same color and will become opaque.
Photo 30. We begin to screw the feathers from the bottom of the mesh, arranging them in a semicircle.
Photo 31. We connect the parts with self-tapping screws. The fastening is quite strong - even an eagle with OPEN wings calmly survived the hurricane.
Photo 32. I will lengthen the tail, but that’s it for now (not enough material). In addition, feathers must also be screwed to the bottom of the tail, but without eyes, so that the mesh is not visible. A few light feathers on the sides for brightness.
Tags
We hold the origami peacock with the colored side by choosing the color of the paper.
colorsrowresponsemodularmastersdiagramsneedtechniquespapertorsowhitewillthisthenmoreeveryfirstcommentwillbeclassesyellowpatternmakingarticlesmaterialsonesoaponestep-by-stepdevelopmenttriangledetailsworkbeginsredfurtherorangerepeatturnsouttobechildrendetailsmeneckallphotosnumbergreenbasebluesiteends rownow cornersstandothersonlythank youtoygamemanyhandlescirclelikenapkinspigeon
LiveInternetLiveInternet
1. We have already made a stork from plastic bottles with our own hands. But many people often ask how to make a peacock bird for the garden from plastic bottles, I have now tried to explain to you in detail. I filmed the entire process of making it. But try not to copy it down to the smallest detail, try to make your own unusual bird. I’ll just give you the principle of operation, and how you do everything depends only on your skills and yourself.
2. For the PEACOCK you will need: a 10 liter canister for the body, strong wire and plastic tubes for the legs, a welded metal mesh 45 by 150 cm, thick foam for the head, plastic bottles of different shapes and sizes.
3. I cut off a strip from the top and side of the canister and, moving it back, secure it with screws or wire.
4. I bend the wire for the frame, put on the tubes and place them on the stand. The wire needs to be bent so that the back of the bird is on the bend; this will be the top of the canister.
5. I attach the canister to the base using wire, pulling it through the punctures with an awl to the legs, thereby forming the torso. Let's connect the legs and body, give the necessary position for the future bird. The legs need to be secured in several places with wire.
6. A dark two-liter bottle is cut into eight long feathers, and from the bottom - another 6 short feathers. In total we will need about 60 plastic bottles.
7. We begin to screw the feathers, row by row. We cut off the smooth part of the milk bottles; this will be used for the top of the legs, roll them into a ball and begin to screw them to the body.
8. I cover the bottom of the body and a little on the sides with feathers.
9. Front view
10. I bend the mesh along the canister, “round it” at the front and give it the shape of a wing. I also cut the tail into a triangle with the apex at the body. Tail length as desired.
11. This is what it looks like
12. I cut the flight feathers from a 30 liter bottle. Width 5-7 cm. Can be replaced with 2l bottles
13. I screw the feathers to the edge of the wing, shifting each feather relative to the previous one, trimming as necessary.
14. For the second row you will need 1.5 liter bottles which we cut into 6 feathers. You need 3-4 bottles.
15. I screw it in a semicircle
16. I make subsequent rows from 0.5 liter bottles (4 feathers from 1 bottle). We will need about 30 bottles.
17. Also in a semicircle, overlapping the previous row by half.
18. Finished wing
19. I cut out the head from foam plastic (with a regular knife). Eyes from a soft toy.
20. Sand with sandpaper until smooth.
21. I cut out the feathers for the crest from strips from a bottle. I bend it lengthwise for strength.
22. I insert it into the hole in the head, pouring glue there (for example, “Titan”)
23. I glue my eyelids. I also glue a triangle from a bottle onto the beak and secure it with self-tapping screws (later you can remove them, but I leave them as nostrils)
24. Neck made from two 5L bottles. I roll them up and connect them together
25. Then I screw the feathers in a circle
26. Paws from 0.5l bottles
27. Trying on
28. I glue the last rows on the head
29. I paint with regular enamel, since the paint from spray cans is very translucent and smudges are visible in the sun. I first paint with regular enamel, and then go over the top with a spray can, in this case it smooths out the unevenness and gives a certain velvety feel.
30. I cut out the feathers for the tail from green bottles. To do this, I bend the middle part lengthwise, round it and cut it into a fringe. Usually one large feather or two small ones come out of one bottle. For a beautiful tail you will need at least 60 pieces. The circles on the feathers are painted with enamel.
31. I screw the finished colored feathers from the bottom in a semicircle, each next row overlaps the previous one by half.
32. A few feathers from light green bottles will revive a bird.
33. And now some photos from the buyer. I liked it, I suggest it to you
Source
Conditions of detention
Making a florarium with your own hands: step-by-step instructions for beginner florists
To accommodate these birds, it is necessary to build or remodel existing aviaries and poultry houses, the latter must be insulated. Both in the walking yard and indoors there should be the following things:
- feeders;
- drinking bowls;
- perches;
- awnings;
- heaters;
- sand baths.
Experts are still arguing about the content. According to some data, when in captivity, females lay fewer fertilized eggs, which can later be used to produce offspring. Based on this, it is recommended that the peacocks have a large, spacious walking area, where they will feel as if they are free.
Walking enclosure
The walking space is equipped in a dry area in the southern or eastern part of the site. There will be more light in these places.
Best examples
PVC glue can be used between the modules for gluing and stability. It should be a simply magnificent decoration and a wonderful gift for children. The main thing is to follow the instructions and assembly diagram. You can see in the photo how all the origami elements are put together from triangular modules.