Tram made of cardboard. Craft from a box
Elmira Safina
Tram made of cardboard. Craft from a box
Tram made of cardboard . Craft from a box .
How to make a tram out of a box ?
In my master class you will find simple solutions that will help diversify your leisure time with your child, and will also teach you how to create crafts from cardboard . This is a craft that can be done with children for independent play, or done in kindergarten instead of homework.
To create a tram from cardboard you will only need to spend half an hour.
Many people have all the materials at home; if something is missing, it can be easily replaced.
Handmade toys can instill in a child a love of creativity and help develop imagination, ingenuity, accuracy and fine motor skills.
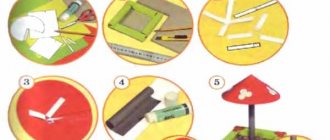
To create a tram from their box you will need :
1. Toothpaste box.
4. Printout of a drawing of a tram .
6. Markers or paints.
If you have any questions, write them in the comments!
“Flashlight for the Gnome” is a cardboard craft. (Master class) “Flashlight for a Gnome” - a cardboard craft. (Master class) The New Year is approaching and we are preparing for the matinee: learning poems, songs, dances. Master class: craft from a candy box “Ornate Christmas tree” The fragrant Christmas tree, The fluffy Christmas tree, The elegant Christmas tree, You are so cute! The New Year holidays are in full swing and in severe frosts we have no time to be bored. Master class: crafts from the box “Magic Chest” “Master class “Magic Chest” Hello, dear friends and colleagues! Once again I present to your attention my new work. Master class: cardboard craft “Mouse” Little mouse voles, having spent the winter in holes, come out into the sun in the spring and quickly acquire little mice. Materials: Silver cardboard. Master class: cardboard craft “New Year's deer” New Year's deer is in a hurry to visit us! He has branchy horns and very fast legs! He is carrying a cartload of gifts. And who gave them? Father Frost. Master Class. Craft from paper and cardboard “Bouquet as a gift” Hello, dear colleagues and guests of the page. A charming, warm autumn has arrived. It is full of its fragrant and colorful flowers. New Year's craft made from cardboard and ribbons “Christmas tree-stomper” Beautiful Christmas tree The kids really like it! The lights sparkle on it, They want to give a fairy tale. The New Year is knocking on the window, Wait a little longer.
Source
In the modern world, where there are two cars for every person, compliance with the law of streets and roads is very important. The road is a source of danger. Traffic rules are written by people and for people. They begin to study them in kindergarten.
Teachers use crafts to enhance learning. This method affects both visual and sensory perception. Various thematic performances using crafts made by the children are a great help. This is also how the emotional consolidation of the correct skill occurs.
DIY children's toys
As the study of the literature of the past and the century before last shows, our ancestors devoted a lot of time to the comprehensive development of the child. Specialized publications were published teaching children the basics of gardening and horticulture, the basics of carpentry and turning, the art of photography, dancing, stagecraft and all kinds of handicrafts.
Today we will focus on a book that tells in detail how to make children's toys with your own hands. The publication is intended both for parents or teaching staff of children's institutions, and for children who know how to hold scissors and other simple tools in their hands. The materials used to make homemade toys are cardboard, colored paper, bright scraps of fabric, ribbons, eggshells and other available materials. The author suggests using the resulting homemade toys both for their intended purpose and as original Christmas tree decorations.
Practical tips for making homemade toys easier
- For toys made of cardboard, it is advisable to choose a material of medium thickness, because a thick sheet will be very difficult to work with and inconvenient to glue, while thin cardboard rolls into a tube and is often deformed when gluing;
- If you don’t have glue on hand, then the safest and most convenient option is to use a paste. It can be prepared from potato starch or any flour by diluting them with a small amount of cold water, and then gradually adding boiling water while continuously stirring. To make the flour paste stronger, it is advisable to cook it for a while over low heat. It should be remembered that for toys made of cotton wool it is better to use starch paste, and for paper toys it is better to use flour paste;
- To prevent ink from smudging on low-quality paper, paper sheets are coated with medium-thick wheat or rice paste, left to absorb, and the excess is removed with a soft cloth. After the paste dries, the paper becomes smooth and elastic;
- If you plan to make Christmas tree decorations and various decorations from cotton wool, paper, fabric and other flammable materials, care should be taken to protect the crafts from ignition. To do this, the materials are soaked in very salty water, and after drying, they begin to make toys. You can also impregnate the materials with silicate (liquid glass);
- when decorating toys with glitter in the form of powder or, as our parents often practiced in Soviet times when making children's carnival costumes, when using finely crushed fragments of Christmas tree decorations as glitter, it is convenient to use a paper pound. The required ornament is drawn on the product, carefully coated along the lines with glue, after which a pointed pound is made from paper and its tip is cut off so that a hole is formed, the size of which coincides with the desired thickness of the pattern line. Sprinkle glitter into a bag and apply it on top of a layer of glue - the line turns out uniform and neat;
- many homemade toys - fruits, flowers, birds, silhouettes of animals, etc. look much more impressive if painted not just with a brush, but by spraying. It is most convenient to use a spray bottle, but if you don’t have one at hand, you can apply the spray with an old toothbrush, dipping it in diluted paint and running your finger over the bristles. You should first take measures to protect your clothes and desktop from paint splashes.
DIY toys. Templates, diagrams, descriptions
Of course, rarely do any homemade toys do without the manufacture of transport and military equipment. Let's see how you can make a bus, tram
,
snowmobile
and
icebreaker
with your own hands. Of course, all toys will be made in retro style. Pictures can be enlarged by clicking on the image.
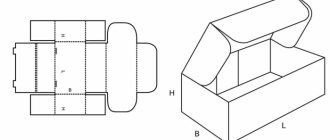
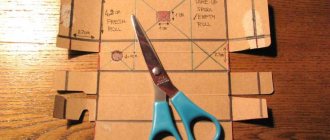
The toy template is transferred to a sheet of thick paper, first the body is cut out, the part is carefully folded along the lines and glued. To make the fold line clear and straight, you can help yourself with a ruler by applying it to the fold line and drawing a knitting needle, a screwdriver, an empty pen rod or other hard object along this line. When doing this, you need to be careful not to tear the cardboard.
Also at this stage it will be convenient to cut window openings: to imitate glass, the holes are sealed with mica, transparent tracing paper, or - in modern realities - with pieces from thick plastic folders.
The next stage of making the bus is gluing the bottom, adding a motor and wheels.
The tram diagram is transferred to thick paper and all the details are cut out along the contour. First, the box-shaped body is glued together. Window openings are cut out and sealed with any transparent material, as in the manufacture of a toy bus. When the body is dry, it is placed on the bottom part, coated with glue and a tight connection of both elements is ensured.
Road signs
"Crosswalk"
Children must know the correct places to cross the roadway. Although the Pedestrian Crossing sign is blue, we will also need a white cardboard sheet for it. Blue with a triangular window at the top of the sheet is glued onto white cardboard. From black paper we cut out the figure of a pedestrian and a “zebra”.
We use the complicated version for role-playing games. We do it according to the following scheme.
Crafts using reflective elements are impressive. Stickers, tapes, iron-on transfers - quite a huge range.
Adhesive-based tapes are very good. They are cut into geometric shapes of the required sizes.
After we stick it, the upper part of the protective film is removed. Now the craft will glow in the dark.
Intersection model
The main task facing teachers, parents and educators in teaching traffic rules is to create the skill of safe behavior in the road infrastructure. To do this, we use crafts on the topic “Transition”. This is a traffic light, a pedestrian crossing and a themed road sign.
You can make a model of an intersection on the territory of a school, yard or kindergarten. We are looking for a flat, straight surface (so that water does not accumulate in puddles there). Using a tape measure and chalk, we mark the places where traffic lights are installed and where the pedestrian crossing intersects with the improvised roadway. Using a meter and chalk we draw a pedestrian crossing. Then, using acrylic paint, we draw curbs and a pedestrian crossing from top to bottom. We remember that there should be a traffic light at each corner of the intersection.
Traffic lights
There is more than one method for making traffic lights. The simplest one is made from plastic bottles. Take a 2-liter dark bottle. Two or three (depending on which traffic light we need - for pedestrians or drivers) windows are cut into it.
We install light bulbs opposite the windows. They are connected to batteries and equipped with power buttons. Then we close the windows with colored glass (red, yellow and green, respectively). You can use color film for this. The button puts the traffic light into working condition and lights the signal necessary to perform a certain action.
The traffic light can be installed on a tube that is dug into the ground or is portable.
Passenger car made of cardboard - TT scale (1:120)
“Dedicated to the crazy people”
If your desires to build a model railroad exceed the capabilities of mass production, it’s time to think about making your own models. There are different materials and technologies - here we consider manufacturing from cardboard.
First of all, you should stock up on everything you need.
First you need good white cardboard (preferably 0.35 - 0.5 mm - determined by eye using a ruler).
You also need the right tools:
- mechanical pencil with a 0.5 mm lead,
- PVA glue,
- ruler 30 cm,
- corner,
- eraser,
- threads (preferably not very fleecy),
- transparent plastic, double-sided tape,
- two types of emery (coarse and fine),
- paper knife, regular scissors,
- manicure scissors,
- clothespins (preferably plastic with flat surfaces),
- and also some other little things, which will be discussed below.
And most importantly, you need a sincere desire to make a layout!
Here we will consider the production of a model on a ready-made chassis. As a donor, you can use cars from the TT-model or VTTV.
When producing any model, reference materials are required in the form of drawings and illustrations of the modeling object. To save time, I also used the DMV from the TT model.
So, let's begin. If a drawing is used, then all dimensions must be recalculated to the appropriate scale, in my case - 1:120. Next, on a sheet of cardboard, you should draw a basic layout of the car WITHOUT a roof (the result should be an elongated parallelepiped without a floor) ( Fig. 1 ).
On it we draw everything that should be on the walls of the car, i.e. windows, doors, lines where there should be stiffeners, etc. After everything is drawn, we cut through all the windows with a knife.
Now it is necessary to increase the rigidity of the future body - on the back side you need to glue a second layer of cardboard with already cut windows onto the walls so that the windows coincide with each other ( Fig. 2 ).
Since cardboard has a bad tendency to swell when wet, you don’t need to spread a lot of glue, but quickly and thinly spread one side and immediately press it firmly and put it under a press.
Now let's deal with the stiffeners. They are made from threads that are glued along the drawn lines: first, an adhesive strip is applied, onto which the thread is then applied and pressed with a finger. The idea is to saturate the thread with glue and remove excess glue from the surface. Once all the ribs are glued on, it's time to outline the doors. To do this, cut a thin groove along the contour of the door with a knife. After this, we coat the cut out contours of the doors and the already glued threads. When everything has dried, you need to carefully walk over the surface of the threads with fine sandpaper and coat it with glue again. During all coatings, we try to leave as little glue as possible so that unnecessary irregularities do not come out later. Handrails are made from thin strips of cardboard.
Now it's time to start assembling. We press down the folds on the reverse side with scissors. Then we cut it out, carefully bend it and glue it together ( Fig. 3 ).
Carefully sand the rough protruding cardboard in the gluing areas.
Roof. To get the roof of the desired shape, you first need to create a parallelepiped from layered cardboard, the height of which is equal to the height of the roof itself (usually painted gray). The width and length should be 1 and 2 mm greater than the width and length of the car blank, respectively (these are approximate figures). This is necessary so that after gluing the roof (by the way, it is also advisable to glue it using a press), it can be sanded on the sides and thereby adjusted to the size of the car. Next, the roof needs to be given a convex shape - to do this, draw the roof profile from the ends and cut off the excess longitudinally. After this, we sand first with coarse sandpaper, and then with fine sandpaper. After this, coat the roof with glue and wait until it dries. We process with fine sandpaper and repeat the operation. Now you can glue the roof. If you can find something to hold it down with while it dries, that will be good. If the original has stiffening ribs on the roof, they are made in a similar way using threads. We coat the junction of the roof with the body with glue. After this, air intakes can be attached to the roof. We glue cardboard at the ends of the car to hide the joint, although, depending on the situation, you can do without it. Using toothpicks, transitional soufflés are made ( Fig. 4 ).
Let's talk a little about the insides. First you need to make a floor from 2-3 layers of cardboard. Next, we mark on it a diagram of the partitions, which, after cutting, we “put” on glue. The total height of the interior with the floor should be selected taking into account the height of the chassis. We glue the upper shelves to the walls, but the lower ones will most likely have to be glued to the floor. After this, a strip of cardboard 1 cm wide and 2 cm long less than the length of the car is glued on top of the partitions.
Now you can paint. It is advisable to use water-indelible paints. You can use aerosol, regular oil or special model paints. Next we use tape and brushes of different sizes to obtain the desired color.
When everything is dry, we glue strips of transparent plastic on the inside of the walls of the car using double-sided tape. From the inside, we stick double-sided tape onto the roof, and then press the insides of the car to it. We again glue double-sided tape to the floor of the car from below and press the chassis to it ( Fig. 5 ).
The car is ready!
Watch also the video on how to make a freight car out of cardboard:
- paper model
- carriage model
- coach
- TT scale
- 1:120
- with your own hands
- for beginners
Mini city
A mini model of the city can be made by parents with a child. Or it can be used as project work in the elementary grades of school or the senior group of kindergarten. Take the lid from the box. The larger and wider it is, the better.
Master class on creating a microdistrict
To test your knowledge of traffic rules, you can create a portable game.
Old cardboard tram
Between 1996 and 2004 I was involved in large-scale rolling stock modeling.
It’s a stretch to call your first crafts from 1996-1997 models, but since 1998 the quality of workmanship, technology and compliance with the prototype have been improved. Since 1998, the scale was finally determined to be 1:66. Models in this scale were made individually in the period from 1998 to 2004 for a personal collection, the collection of the former museum at the Tulgorelektrotrans MCP, and one model of the T-3 tram car was sold to a private collector in Moscow. The scale of 1:66 was determined for the reason that for the first model made in this scale, the BF car, the drawing was borrowed from the magazine “Technology for Youth”. The magazine contained a series of drawings of Moscow transport exactly on a scale of 1:66. Therefore, the model of the BF carriage was the first model made in this scale. The next model turned out to be a model of tram car X. The prototype for the model was a tram car, preserved as a museum at the Tulgorelectrotrans MCP. Drawings of parts for the tram car X had to be developed by myself, having meager data on its technical characteristics. An additional problem at that time was the lack of an Internet network, from which it would be possible to obtain background information and prompt communication with fellow hobbyists from other cities. Therefore, these very meager data plus photographs of the tram car were taken as the basis for the drawings, including strictly directly to determine the proportions of body elements, etc. It was necessary to measure the distances between the necessary points with a ruler in the photograph, for example, the width of doorways, windows, etc. ., and then recalculate it into real sizes, and then reduce it by 66 times. Knowing the total length of the car, as well as the length of the car shown in the photograph, it was possible to calculate the conversion factor for all the parts from which the model was assembled.
Source
Wall newspaper
This is an incomparable visual aid. It is issued together with children at school by the teacher who supervises work on traffic rules. To keep information up to date, it is recommended to release it once every two weeks. Here you can create various sections, reflecting information about traffic rules competitions and the work of the team of Young Traffic Inspectors. You can place a certain historical educational program on traffic rules.
The history of flicker, traffic lights and road signs will certainly attract the attention of many. Young intellectuals may be interested in a crossword puzzle or a chain word on traffic rules. Photos of non-standard road signs from other countries will inspire you to become more familiar with your own. The main thing is to involve children in learning and observing the Rules of the Road. And for this, all means are good!
Master class on making wall newspapers. It can be stationary with changing sections or completely changing. Let's consider the stationary option.
Such a wall newspaper can always be easily updated. And if it is published on a schedule by a changing editorial board, then readers will never get tired of it with its sameness. And if you hold a competition of similar wall newspapers between classes at school, then the work on studying traffic rules will be in full swing all year, which will affect the reduction in accident rates. After all, where traffic rules are taught in this way, children get into fewer accidents! Making traffic lights, signs, and wall newspapers can be combined with learning poems, songs, reading stories, and watching cartoons on traffic rules. This way information is remembered much faster and better.
Source