Published: 01/28/2021
- Homemade engine tilter
- Requirements for the tilting stand
- Stands for assembly - disassembly
- Working with the stand
- Engine tilter price
- Homemade engine tilter
- Features of the engine stand design
- Why does the engine break down?
- Outboard motor trolley
- How does a boat motor trolley work?
- Review and cost
- Drawings and photos of tilters for VAZ engines
- “Trade in” or changing the car “key to key”
- Working with the stand
- Do-it-yourself disassembly and assembly stand for engine repair
- Drawings and photos of tilters for VAZ engines
- Primary requirements
- Do-it-yourself disassembly and assembly stand for engine repair
Homemade engine tilter
Many car enthusiasts repair their car engines on the garage floor or on a workbench. This is always inconvenient, associated with constant lifting of weights, tilting a bulky cylinder block or cylinder head. All these factors lead to excessive fatigue of the car mechanic and a decrease in the quality of engine assembly. To make their work easier, craftsmen have developed many homemade tilter designs for the engine.
Options for homemade tilter designs
There really aren't many options. In the West, complex and bulky home-made structures are known, like a crane beam, almost with hydraulic drives.
In domestic conditions, car enthusiasts assemble the simplest structures from what is at hand. Of the homemade tilters for the engine, two-support and cantilever versions are known. The last design is the easiest to manufacture. Its characteristics are sufficient to carry out major repairs of almost any passenger car engine weighing from 150 to 250 kg.
Before starting to manufacture the unit, it is necessary to study in detail the existing samples of stands for engine repair. The sample is selected to suit the immediate needs of an amateur car mechanic. The availability of materials and dimensions for ease of work in a small garage are assessed. The permissible load weight is calculated in accordance with the type of engine that is to be repaired.
Based on the results of a study of existing structures, a sketch drawing of the most optimal version of a cantilever-type tilter was developed. Overall dimensions in the diagram are given in millimeters.
In the sketch, the designations D 60 and D 52 correspond to diameters of 60 and 52 mm.
Materials for production
Due to the fact that the engine tilter will have to work under severe conditions of physical stress associated with the weight of the engine, high demands are placed on materials.
The following materials are used for manufacturing:
- steel square profile 70 x 70 with a wall thickness of 3 mm, length 3 m;
- steel pipe with outer diameter 60 mm, inner diameter 53 mm, length 245 mm;
- steel pipe with outer diameter 47 mm, length 480 mm;
- steel channel with internal side width 70 mm, wall thickness 3-4 mm, length 280 mm;
- flange for bolted connection to the engine - 1 pc.
Tools and hardware for stand assembly
To connect the nodes of a metal structure made of a steel channel and a square profile, you will definitely need a welding machine that allows you to work with an electrode with a cross-section of at least 3-4 mm. In addition, for cutting you will need a grinding machine with a metal cutting disc with a diameter of 115-125 mm. To ensure bolted connections of prefabricated parts, you will need a drill with the ability to work with a drill with a diameter of up to 14-20 mm. M12 bolts are also required to assemble the structure.
You will also need a set of files to cut off burrs and uneven edges, and remove flaws in metal cutting. It wouldn't hurt to purchase some sandpaper to remove rust from the surface before painting.
Assembly of the engine tilter
The first step is to cut out the channel and square profile in accordance with the sketch. Next, a vertical post is made from the profile and welded to the square from the channel. Then the structure is reinforced with metal slopes, which can be made from scrap parts.
After this, a base is welded from a cut square profile - a tilter stand for engine repair. At the site of the bolted connection to the base of the vertical post, preparatory work is carried out, steel bushings are inserted and welded to strengthen the structure.
Then you should begin the final assembly of the engine tilter. The stand is connected to the stand by welding and M12 bolts.
A horizontal pipe with an outer diameter of 60 mm and an inner diameter of 52 mm is welded to the vertical stand. A horizontal axis is inserted into this part. It can be made of a steel pipe with a diameter of 47 mm with a welded flange for bolting the cylinder block or cylinder head.
In the horizontal axis, you can drill through holes every 45° along the radius, to be able to fix the position in space with pins after rotating the attached motor to the required angle.
What is needed to make a machine
There is nothing complicated about assembling the equipment yourself. It is possible to make the simplest model of a lathe, the basis of which is a tool rest, a tailstock and an electric motor from an automatic washing machine.
To make a machine capable of processing wood material, you will have to prepare everything you need. The list of source materials includes:
- a motor from an old washing machine that has retained its functionality;
- the board from which the base of the device is prepared. As an option, the lathe can be mounted on a workbench;
- metal corners, the length of which is 19.5 cm, and the size is 2 by 2 cm. You will also need a pipe with a square cross-section. Steel blanks will be used to make tool rests;
- corner 6.2 by 6.2 cm, length 16.5 cm - you need to make a tailstock from it;
- the tool rest must be secured to the base with a bolt, the length of which must be at least 7 cm;
- a piece of steel pipe, the diameter of which is slightly larger than the size of the electric motor shaft;
- a bolt with a pointed tip that can be used to make a rotating headstock assembly.
The main operating parts of a lathe are the tool rest and the headstock, between which a piece of wood is inserted. Rotational motion from an electric motor is transmitted from the tool rest to the product. With the help of the tailstock, the product is held while maintaining its static position. The headstock is moved using a manual drive.
For ease of use, you will need certain tools and fasteners:
- electric drill with a set of drills;
- grinder with cutting discs;
- bolts and nuts with which the entire main structure will be assembled.
Once everything you need is prepared, you can move on to the main task. You just need to figure out how to properly make a lathe using an old motor from a washing machine.
Requirements for the tilting stand
A tilter, or stand tilter, is a device that can support the weight of a car engine, while the engine does not lie on the stand, but is movably fixed. Thus, in order to gain access, for example, to the crankcase, you do not need to turn it over on a workbench or think about how to strengthen the cylinder block on the surface. The engine mounted on the equipment can rotate freely around its axis and have several fixed positions, depending on the design features. In this case, it is necessary to achieve several indicators:
the device should not take up much space in the garage:
the engine must be fixed firmly and rigidly;
the design must allow a certain force to be applied while maintaining stability;
the structure must be rigid;
The tilter should allow you to easily select the desired position of the engine, holding it securely.
Selection of slipway design
The application of multidirectional forces is the most important feature of a power stand. Such work is difficult to do manually. You can make a slipway with your own hands of various designs. Such devices are made of durable metal, and their features depend on the type of repair being performed. When choosing a suitable slipway model, you should take into account the parameters of the transport for which it is being manufactured. The dimensions of the stand, characteristics of devices and mechanisms can be selected based on the most successful models from Trommelberg, Nordberg BAS or Autorobot.
Stands for assembly - disassembly
Engine stands.
This is a mobile or stationary device for engine repair in a car service center. Allows you to suspend the engine or gearbox for further disassembly of the unit. Using an engine disassembly stand allows you to tilt the internal combustion engine around its axis 360°.
The engine can be turned manually or by an electric motor with a worm gearbox.
Using clamps, the engine is fixed on the stand and then disassembled.
Based on the frame design, stands are classified into:
T-shaped. Not heavy, but not very stable either. These models are recommended for repairing minicar engines.
U-shaped frame. Such stands are more resistant to turning over. Such stands are needed for repairing engines of passenger cars, SUVs, etc.
Fully welded frame. These stands are mainly manufactured in Russia and have maximum load capacity and capabilities for repairing transfer cases, axles, etc.
To save space, stands are often made with a folding frame.
Engine weight classification:
Load up to 500kg. Such stands for internal combustion engines of passenger cars.
Load 500?1000kg. They are used in car service centers for repairing engines of passenger cars, minibuses and light trucks.
Motor weight over 1t. This type of stand is used for servicing engines and gearboxes of trucks and buses.
To repair V-shaped engines for domestic and imported trucks, gearboxes, axles, transfer cases, it is recommended to use a frame type tilter R-770 or R-776.
To buy a high-quality stand for engine assembly and disassembly, contact the Technosoyuz company.
Varieties
Since 30 years ago there was not such a wide variety of cars that are now found on the roads, engine stands with rear axles and other accessories did not have versatility. They were not mass produced on the hardware market. There are currently many types of cars and trucks. And due to the growing demand for repair services for engines of various brands, car service centers have a need to use universal stands to meet the needs of the market.
Definitely such a device for engines is the most rational. It is suitable as a stand for disassembling and assembling Kamaz and YaMZ engines. R-776 is the most common in this area. Models R-500E and R-776 E are also popular. They are designed for servicing engines, gearboxes, and rear axles.
Also popular is the P-1250 model, which has a load capacity of up to 2 tons. It is universal and suitable as a stand for disassembling and assembling Kamaz engines. It matters how many degrees of freedom the stand has. There are models with 2 and 4 positions. Two degrees of freedom allow you to rotate the equipment up and down, right and left. More universal varieties are those with four degrees of freedom. They can be rotated as many degrees as you like and fixed at different angles for comfort.
Working with the stand
Before starting operation, be sure to carry out a visual inspection of the system. If any defects are discovered that could damage the equipment during maintenance, they must be corrected. If upon inspection there are no such defects, you can begin work.
For a good and long service life of the structure, it is necessary to monitor its condition. It is necessary to check the reliability of the fixing fasteners each time you use it, regularly lubricate all moving parts and store the unit in a dry place. The possibility of direct contact with precipitation and moisture should be excluded.
You should not load the stand above the actual calculated weight, so as not to drop the engine due to breakdown. During operation, the structure must be placed on a stable surface. It is also worth using a fixing pin for the rotating mechanism
Work should be done carefully and carefully
You need to make sure the load is centered. The unit must be firmly secured with brackets. You should definitely follow safety precautions so as not to damage the engine or get injured. With proper care and proper use, the stand will last for many years.
If there is a stand for disassembling and assembling the engine, repair work is carried out efficiently and conveniently. Self-assembled installations can significantly save money on the family budget for the purchase of several models. Every home craftsman, if desired and has the appropriate tools, will be able to assemble a stand suitable for many types of mechanisms.
Engine tilter price
In principle, making a tilter for an engine with your own hands, the drawings and designs of which are posted on the page, is quite simple. Another thing is how useful it will be and how justified the use of garage space for its placement will be. Be that as it may, the equipment is very useful and functional, easy to manufacture and inexpensive in materials.
The price of a branded, factory-made tilting berth for passenger car engines will be at least 8 thousand rubles, and if you work hard and make a tilting crane with your own hands, you can save 20-25 thousand.
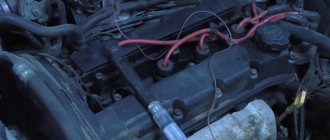
How to remove the engine from a car in the garage without resorting to the help of a car service?
In fact, this is not such a complicated procedure as it might seem at first glance. The main task is to select tools for removing the motor.
Important!
The engine weighs several hundred kilograms.
Falling it can not only cause property damage, but also cause serious injury. Before lifting the engine from the engine compartment, it is necessary to carry out the following procedures:
If you plan to remove the engine without the transmission, you need to unscrew all the tightening bolts and make sure that after removal the gearbox will not fall under the car. That is, you need to take care of temporarily securing the unit.
Homemade engine tilter
Many car enthusiasts repair their car engines on the garage floor or on a workbench. This is always inconvenient, associated with constant lifting of weights, tilting a bulky cylinder block or cylinder head. All these factors lead to excessive fatigue of the car mechanic and a decrease in the quality of engine assembly. To make their work easier, craftsmen have developed many homemade tilter designs for the engine.
Options for homemade tilter designs
There really aren't many options. In the West, complex and bulky home-made structures are known, like a crane beam, almost with hydraulic drives.
In domestic conditions, car enthusiasts assemble the simplest structures from what is at hand. Of the homemade tilters for the engine, two-support and cantilever versions are known. The last design is the easiest to manufacture. Its characteristics are sufficient to carry out major repairs of almost any passenger car engine weighing from 150 to 250 kg.
Before starting to manufacture the unit, it is necessary to study in detail the existing samples of stands for engine repair. The sample is selected to suit the immediate needs of an amateur car mechanic. The availability of materials and dimensions for ease of work in a small garage are assessed. The permissible load weight is calculated in accordance with the type of engine that is to be repaired.
Based on the results of a study of existing structures, a sketch drawing of the most optimal version of a cantilever-type tilter was developed. Overall dimensions in the diagram are given in millimeters.
In the sketch, the designations D 60 and D 52 correspond to diameters of 60 and 52 mm.
Materials for production
Due to the fact that the engine tilter will have to work under severe conditions of physical stress associated with the weight of the engine, high demands are placed on materials.
The following materials are used for manufacturing:
- steel square profile 70 x 70 with a wall thickness of 3 mm, length 3 m;
- steel pipe with outer diameter 60 mm, inner diameter 53 mm, length 245 mm;
- steel pipe with outer diameter 47 mm, length 480 mm;
- steel channel with internal side width 70 mm, wall thickness 3-4 mm, length 280 mm;
- flange for bolted connection to the engine - 1 pc.
Tools and hardware for stand assembly
To connect the nodes of a metal structure made of a steel channel and a square profile, you will definitely need a welding machine that allows you to work with an electrode with a cross-section of at least 3-4 mm. In addition, for cutting you will need a grinding machine with a metal cutting disc with a diameter of 115-125 mm. To ensure bolted connections of prefabricated parts, you will need a drill with the ability to work with a drill with a diameter of up to 14-20 mm. M12 bolts are also required to assemble the structure.
You will also need a set of files to cut off burrs and uneven edges, and remove flaws in metal cutting. It wouldn't hurt to purchase some sandpaper to remove rust from the surface before painting.
Assembly of the engine tilter
The first step is to cut out the channel and square profile in accordance with the sketch. Next, a vertical post is made from the profile and welded to the square from the channel. Then the structure is reinforced with metal slopes, which can be made from scrap parts.
After this, a base is welded from a cut square profile - a tilter stand for engine repair. At the site of the bolted connection to the base of the vertical post, preparatory work is carried out, steel bushings are inserted and welded to strengthen the structure.
Then you should begin the final assembly of the engine tilter. The stand is connected to the stand by welding and M12 bolts.
A horizontal pipe with an outer diameter of 60 mm and an inner diameter of 52 mm is welded to the vertical stand. A horizontal axis is inserted into this part. It can be made of a steel pipe with a diameter of 47 mm with a welded flange for bolting the cylinder block or cylinder head.
In the horizontal axis, you can drill through holes every 45° along the radius, to be able to fix the position in space with pins after rotating the attached motor to the required angle.
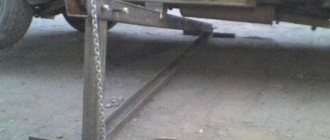
Materials for making homemade products:
- The vertical post and horizontal beam are made of a rectangular pipe 40 x 80 x 3 mm.
- The traverse is made of a pipe 40 x 20 x 2 mm.
- Supports made of round pipe with a diameter of 50 mm.
- The pipe that rests on the car wheels has an approximate diameter of 50 mm (the pipe needs to fit freely into the support pipes), 3 meters long.
- The lever is 1 meter long.
Actually the lift itself.
The tipper device works as follows: two bolts without nuts are inserted into the holes on the vertical stand, one bolt is under the beam on which the machine rests, the second secures the lever.
To raise the car by 10 cm (this is the distance between the holes on the vertical stand), you need to remove the bolt securing the lever, move the lever to the next hole and fix it by inserting the bolt.
Raising the lever up until the beam on which the machine is lying will not pass the next highest hole. As soon as it passes this hole, without releasing the lever, we move the bolt into this hole. By rearranging these two bolts, we lift the car, the whole process takes no more than a couple of minutes.
Drawings of a car tipper are also included.
Features of the engine stand design
Of course, you can do without any tilters and disassemble the Zhiguli engine on a box or on a workbench, if you have one. But there will always be a risk that the motor will slip out and fall on your feet or on the floor; you always need to call someone for help, it’s always inconvenient. Some of the drawings shown on the page are designed specifically for VAZ engines, and some are universal. But they all work for their owners and make engine repair easier.
Read more: Universal low and high beam headlights
The main thing that needs to be achieved is stability and rigidity. Not everyone graduated from a university with an “A” in strength of strength materials and technical mechanics, so we will give some main points as a basis for building with your own hands or changing the dimensions indicated in the drawings. There are also many options for tilters that attach the engine to only one console. This causes increased stress on one rack. This design also has the right to exist, but subject to certain conditions.
In any case, the stand will be made of profiles, it does not matter whether it will be a square pipe, a powerful angle or an I-beam. At the junction of two profiles, a certain amount of movement cannot be avoided.
In this case, an ordinary triangle will come to the rescue, which is the most rigid and indestructible figure. Consequently, it is necessary to unload the central post as much as possible, and this can only be done with the help of slopes, so that the maximum load falls on the support triangle.
It is very important to correctly position the center of gravity and relieve the lower frame from bending loads. Here, too, several braces will have to be included in the design.
The center of gravity must be located so that it is possible to rotate the engine without problems, but at the same time the entire structure remains stable. You need to take into account both the weight of one cylinder block and its weight together with the cylinder head, flywheel and crankshaft.
Removing Attachments
Also, for the convenience of performing work, it is better to drive the car into an inspection hole. Immediately after this, the negative terminal from the battery is removed.
Before starting work, you need to drain the engine oil and coolant system.
To make it more convenient to remove and disconnect engine attachments, you must remove the hood from the car. This will provide better access to the upper hanging elements.
Then all pipes and wiring from the engine are disconnected - the cooling system pipes going to the engine from the radiator, the pipes going to the stove.
As for the wiring, you will need to disconnect all connections going to the sensors:
You will also need to disconnect the wires from the spark plugs, starter, and generator. In the future, the generator will have to be completely dismantled.
| 4. Removing the coolant sensor | 5. Removing the solenoid valve |
| 8. Disconnecting high voltage |
You will also need to disconnect:
In general, removal of the Oka engine should be accompanied by preliminary dismantling of the gearbox and drive, but this may not be necessary.
Since the engine will still be disassembled, the method of removing the engine without a gearbox will require removing the cylinder head before removing the engine from the car.
| 10. Removing the carburetor pipe | 11. Removing the brake vacuum hose and manifold heating | 12. Removing the air filter housing |
| 13. Removing the air damper drive | 14. Removing the throttle drive |
Why does the engine break down?
Of course, we all want our vehicle to serve us for a long time and at the same time be in excellent working condition all the time. However, this only happens in fairy tales, and in practice, even new cars taken from branded showrooms need repairs after just a few years. And what can we say when the owner does not spare his “iron horse”? In general, many factors contribute to the failure or incorrect operation of one of the main parts of a car - the engine.
So, let's look at the main mistakes that lead to such disastrous consequences. As already mentioned, the most negative impact is the incorrect operation of the vehicle, for example, the use of unsuitable fuel or low-quality technical fluids. Untimely replacement of the oil and timing belt and constant overload of the vehicle will also have a negative impact. Neglecting the engine’s need to warm up in the cold season will be even more destructive. And what can we say about malfunctions after mechanical impact due to an accident?
Replacing the rod, valves, adjusting the stiffness of shock absorbers
The next malfunction is damage to the rod, seals, and valves inside the strut. There is a certain selection of spare parts on the market for repairing dismountable shock absorbers. In addition, an experienced car enthusiast never throws away old spare parts, but tries to repair them. In addition, you can always extract workable parts from them.
- So, let's disassemble the shock absorber.
Don't forget to wear gloves, the job is dusty
Turning work is usually cheaper than the cost of a new shock absorber
Tip: The entire process of disassembling the shock absorber should be photographed. This will avoid problems during assembly.
Get rid of stains, dirt and dust while disassembling
All parts must be carefully checked
It is recommended to replace the oil seal
After pumping the oil, the rack needs to be pumped as usual
Outboard motor trolley
Several models of trolleys for outboard motors are presented by Technomarine:
Free-standing trolley
Cart with motor mounted on the false transom using motor bracket clamps. The design of the trolley stand with a support and a handle for transportation forms a single non-separable structure. The stand is a rectangular frame made of a metal profile. Cost 4500 rubles. Trolley weight 15 kg, wheel diameter 254 mm. To install the motor on the transom, you will have to remove it and move it by hand.
- An improved cart of a similar design has two small wheels on the handle, allowing you to easily roll the motor in the trunk or trailer. It will be a little more expensive, 4650 rubles.
- A trolley with a free frame (false transom) allows you to install the motor on the transom of a boat without removing it from the trolley. The motor is attached to the cart using a pin through a hole for remote control of the boat. The cost of the cart is 4250 rubles. This is perhaps the most convenient version of the trolley from Technomarine, which excludes the complete raising of the motor.
How does a boat motor trolley work?
The principle of operation of the trolley, which is simple in design, is as follows. The lower part of the deadwood (keel, gearbox) rests the motor against the support frame. The motor is secured to the trolley rack on the false transom using standard threaded clamps. A slight shift of the center of gravity from the wheel axis towards the stops prevents the engine from tipping over.
To remove the motor from the transom of the boat, perform the steps in the reverse order. Loosen the threaded clamps on the outboard motor bracket. We roll the cart as close as possible. We remove the motor from the transom and hang it on the false transom of the cart. Tighten the threaded connections
Review and cost
To transport motors, water-motor boats use carts, both individually produced to suit their needs, the design and weight of the motor, and industrially produced (for universal use), which can be purchased in stores selling water-motor equipment and boats.
Trolley for transporting outboard motor TM-2
The trolley is designed to carry a fuel tank with the engine; it has a collapsible design. The support for a stable position, the mount for a standard fuel tank, the handle with wheels are easily detachable. To install the motor on a boat, it must be removed from the cart and moved to the transom of the boat. The weight of the aluminum trolley is 8.7 kg, which is two times lighter than a trolley made of structural steel. Cost 6500 rubles.
Price - 6500 rubles.
Morlab trolley
This is a transformable trolley. The design is patented. The stand, support, and handle for transportation are folded, the assembled cart is very compact and allows you to take it with you to the boat. The weight of the trolley is 6 kg, which is ensured by the frame being made of a square aluminum profile. The special design and shape of the false transom allows you to transfer the motor from the cart to the transom of the boat without lifting the motor. Cost 7500 rubles.
Price - 7500 rubles.
Recovery
First, the dismantled device must be washed and then carefully inspected. If there are cracks or jams, repairing the shock absorber makes no sense: it is better to scrap it and buy a new one. The whole body requires further checking: pull the rod up and push it down - if there is play or jamming, replace the spare part. There are two types of shock absorbers, disassembling each of them has its own characteristics:
- double-pipe: pull out the rod completely to gain access to the fastening nut, which can be unscrewed with a special wrench;
- single-pipe: there is a protective cap at the top, which must be knocked down, and then unscrew the fixing nut to remove the rod together with the cylinder or cartridge.
Peculiarities
If the shock absorber is oil, you need to drain the oil from the cylinder by pressing on the valve spring. Then knock down the bushing, remove the rod with the piston, remove the valve from the other side of the cylinder. If the device is gas or has a replaceable cartridge, simply unscrew the fixing nut and install a new one.
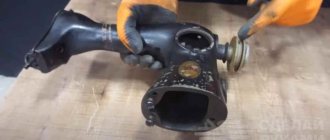
Drawings and photos of tilters for VAZ engines
The simplest solution to this issue is shown in the photo. The simplest tilter, albeit with one engine mounting point and only three additional braces, which remove the main load from most of the central pillar. And it is already reinforced with an additional stiffening rib in the form of the same profile.
The question remains about the stability of the entire structure, since the supporting area is relatively small. In this case, you can consider the option of two mounting points for the motor on the stand. There is a double-sided mounting of the engine, which also distributes the load evenly across the racks, and a large supporting area, which prevents the structure from tipping over.
All dimensions shown in the drawing correspond to the dimensions of VAZ studs and landing planes, and the motor is secured by a locking pin from turning. The locking mechanism allows you to select one of sixteen positions, which is quite enough to service any engine. Good luck to everyone!
Read more: Replacing the front driveshaft of a Suzuki Grand Vitara
After I made myself a crane www.drive2.ru/c/1481270/ there was still a little iron left, and I decided to also make a tilter for the engine, it’s still better to sort out the engine on a stand than on your knees, well, this is what came out of this idea
“Trade in” or changing the car “key to key”
The “Trade in” service involves the sale of a used car, the proceeds from which go towards paying for a new model. In this way, the owner only has to pay a fixed amount in order to transfer to a new vehicle.
Key-to-key car exchange differs from the previous service in that the owner exchanges his car for a suitable used model, subject to an appropriate surcharge.
These two relatively new ways of buying cars eliminate the risk of fraud that is common when a car is sold second-hand on the market. Transactions are formalized by leading auto companies in accordance with the current legislation of the Russian Federation.
Working with the stand
Before starting operation, be sure to carry out a visual inspection of the system. If any defects are discovered that could damage the equipment during maintenance, they must be corrected. If upon inspection there are no such defects, you can begin work.
For a good and long service life of the structure, it is necessary to monitor its condition. It is necessary to check the reliability of the fixing fasteners each time you use it, regularly lubricate all moving parts and store the unit in a dry place. The possibility of direct contact with precipitation and moisture should be excluded.
You should not load the stand above the actual calculated weight, so as not to drop the engine due to breakdown. During operation, the structure must be placed on a stable surface. It is also worth using a fixing pin for the rotating mechanism
Work should be done carefully and carefully
You need to make sure the load is centered. The unit must be firmly secured with brackets. You should definitely follow safety precautions so as not to damage the engine or get injured. With proper care and proper use, the stand will last for many years.
If there is a stand for disassembling and assembling the engine, repair work is carried out efficiently and conveniently. Self-assembled installations can significantly save money on the family budget for the purchase of several models. Every home craftsman, if desired and has the appropriate tools, will be able to assemble a stand suitable for many types of mechanisms.
Purpose
Every driver wants a vehicle to be reliable in operation and serve for many years. But situations still happen when the main breakdown of the car is the engine. This is where you will need a stand for disassembling and assembling engines. There are different versions of it.
Such a stand is designed to significantly simplify the process of inspecting the unit, as well as troubleshooting, repair and depreciation. After removing the engine from the compartment, the unit is tightly and securely mounted on a special stand.
The time spent on work is reduced when a prefabricated service unit is available in a car repair shop or garage.
Do-it-yourself disassembly and assembly stand for engine repair
Let's start with the fact that finished products are an excellent option if the service for repairing power units and components is put on stream, so to speak. In other words, the high initial cost of such products of appropriate quality often does not allow many to purchase disassembly and assembly stands both for personal use and for work in garages and even small service stations.
For the reason stated above, craftsmen and owners of small auto repair shops opt for the option of making their own stands, which are used for engine repairs. Note that drawings that are presented in the technical literature and can also be found in large quantities on the Internet will help you make a stand for engine repair with your own hands.
A simple engine repair stand has several basic elements:
- plate for securing the internal combustion engine;
- stand base;
- special baking tray;
- rotary mechanism (usually worm type);
It should also be noted that the stand must be a mobile device and be a universal solution. To put it simply, some disassembly and assembly stands may be suitable for working only with a specific type of engine or allow you to work with a narrowly limited category, while others provide the ability to install and securely fix all kinds of internal combustion engines.
For this reason, even if the tilting stand is initially made to service your own car, it is better to make the device universal, since in the future there may be a subsequent need to repair other cars. As an example, we can mention the engines of the domestic manufacturer AvtoVAZ, which can be mounted on a stand using flange fasteners at the rear, while reliable fixation of an engine from a foreign car cannot be achieved in this way.
To solve the problem of achieving universality, two channels are welded to a rotating plate. The indicated channels must have 10 mm holes. The distance between the holes should be about 5 cm. The holes themselves are made in the area where the mountings of the power unit cushions are located on the engine. This approach allows you to mount different motors that differ in size on the stand using adapter brackets.
In parallel with this, it is necessary to place the engine or a separate unit so that the center of gravity of the fixed part is opposite the axis of rotation of the rotary plate. This will allow you to rotate a fixed power unit, a separate part or assembly without unnecessary effort. Equipping the stand with wheels that can withstand heavy loads will make it easier to install the unit on the stand, and will also provide the ability to move large parts directly on the stand. This eliminates the need for frequent use of various lifts during internal combustion engine repairs.
Finally, we add that engine repair usually involves the need for external washing and flushing of internal cavities, cleaning parts from engine oil, various contaminants and deposits. After removing covers, pans and dismantling various elements, as a rule, a certain amount of residual technical fluids also leaks from the engine. To maintain cleanliness in the workplace, as well as to prevent such liquids from getting on the floor, a special tray is located at the bottom of the disassembly and assembly stand for engine repair.
A mesh with small cells is additionally installed on top of the pallet. The specified mesh is necessary in order to place it on it and then wash the removed elements over the pallet. The mesh also allows you to retain small engine parts that may fall into the pan during washing or repair work.
Drawings and photos of tilters for VAZ engines
The simplest solution to this issue is shown in the photo. The simplest tilter, albeit with one engine mounting point and only three additional braces, which remove the main load from most of the central pillar. And it is already reinforced with an additional stiffening rib in the form of the same profile.
The question remains about the stability of the entire structure, since the supporting area is relatively small. In this case, you can consider the option of two mounting points for the motor on the stand. There is a double-sided mounting of the engine, which also distributes the load evenly across the racks, and a large supporting area, which prevents the structure from tipping over.
All dimensions shown in the drawing correspond to the dimensions of VAZ studs and landing planes, and the motor is secured by a locking pin from turning. The locking mechanism allows you to select one of sixteen positions, which is quite enough to service any engine. Good luck to everyone!
Read more: How to convert kilowatts to amperes
After I made myself a crane www.drive2.ru/c/1481270/ there was still a little iron left, and I decided to also make a tilter for the engine, it’s still better to sort out the engine on a stand than on your knees, well, this is what came out of this idea
Primary requirements
The main requirements for a stand for disassembling and assembling engines are versatility and ease of use.
It is also important how many levels of freedom are provided in the design, what tonnage the selected equipment should withstand
Currently, stores offer a wide range of options to choose from. You can assemble the structure yourself. This will save money and help you choose parameters in accordance with your wishes for personal ease of use.
A homemade installation must be durable and reliable. All metal elements are assembled by welding. In this case, it is better to seek help from a specialist. He will be able to qualitatively weld all the parts together. In this case, the safety of service personnel can be guaranteed while performing their activities.