Maxi skirts are becoming more and more popular with each new fashion season. Products with a wide belt are being replaced by a simple-fitting, floor-length skirt with an elastic band . This model is easy to sew even for those who are barely familiar with a sewing machine. A spectacular skirt of variegated colors will decorate your summer wardrobe, and a plain model made of thick fabric will diversify your autumn-winter look.
The benefits of long skirts with elastic
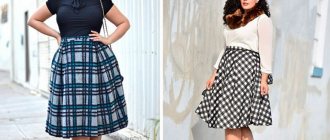
Floor-length models are universal and suitable for girls of any figure. If you are short, a high-waisted floor-length skirt and high-heeled shoes will help out. A figure with a short body can be balanced by a straight floor-length skirt with an elastic band that sits on the hips. A model made of flowing fabrics, softly enveloping the figure and visually lengthening the silhouette, can hide fullness .
Other advantages of the model include:
- universal and suitable for creating images in various styles;
- smoothes out the angularity of the figure;
- always looks feminine and elegant;
- makes the look sexier than the shortest mini skirt;
- hides the curvature of the legs;
- Suitable for women of any age.
A long skirt with elastic can become the basis for a casual or even evening look. If you choose the right accessories and companion clothes, you can get a spectacular holiday look or the best option for every day.
Long skirts can be safely called all-season. Models made of chiffon, cotton or linen will diversify your summer wardrobe. In winter, you can safely wear skirts made of thick denim, wool or leather.
Taking measurements
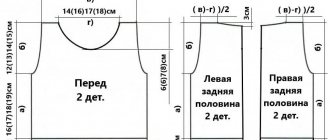
To create the correct skirt pattern, you need to take a few basic measurements. Typically, all the necessary parameters of a figure can be determined using the following scheme:
You might be interested in: Widening jeans and increasing their width at the waist
Taking measurements
In order not to make a mistake with the algorithm for taking measurements, you should additionally use the application instructions:
- Take measurements in full, without additional divisions.
- Measure the length of the finished product from the waist line to the desired length of the skirt.
- Waist circumference is measured at the narrowest point of the torso.
- Hip circumference is determined by the most convex part of the buttocks.
Note! When determining the length, it is worth adding a few cm for the allowance and rotation of the bottom/top seam.
The next step is to divide the measurements taken from the waist and hip circumference into two. Thanks to this, the half-girth will become clear.
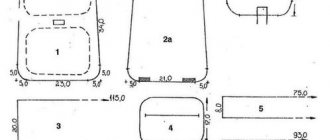
When all the measurements have been taken and compared, you can proceed to constructing the drawing itself. To begin this stage of work, you need to prepare graph paper (Whatman paper), a pencil, a ruler, and an eraser.
If you take quality measurements and write down the data obtained, then the instructions for obtaining the correct parameters of the figure will not become complicated or incomprehensible.
Shoes and accessories
The floor-length skirt is in harmony with both shoes with and without heels. Girls with curvy figures and short stature desperately need a heel. Tall girls can safely wear ballet flats, moccasins and even sports shoes under a floor-length skirt, if this does not contradict the intended image . In summer, the ensemble is diversified with sandals or sandals, clogs and espadrilles. A saddle bag over your shoulder or a soft clutch can complement your look.
When choosing a bag, a general rule applies: the fuller and longer the skirt, the more laconic and miniature the bag.
In a boho or casual style, backpacks, textile bags and even craft bags are appropriate, which not only serve to carry specific things, but are an integral part of the image. An evening ensemble will be complemented by a clutch with a clasp, a hard mini handbag or an embroidered pouch bag. A floor-length denim skirt goes well with bags made of soft suede in a natural shade, items with a reptile pattern or bags in a youth style.
How to sew a straight skirt: a master class for beginners
Transfer the outlines of the darts to the other side using basting stitches, tailor's chalk and a ruler.
Draw all other contours of the parts using a special ruler for marking allowances and tailor's chalk. If this method seems difficult to you, then transfer the remaining contours in the same way as the contours of the darts.
Duplicating the facing details of the upper section of the skirt
To avoid deformation of the facing while wearing the skirt, the details of the facings must be duplicated with woven interlining material. This will also give stability to the top section of the skirt.
Non-woven fabric or double linen, that is the question
Important!
Before duplicating, fabric-based cushioning material must be decatified - soak it in warm water for 10 minutes, then let it drain and dry it flat.
Attention, the cushioning material must not be ironed!
Preliminary duplicate a small section of the fabric to understand whether the selected material is suitable for processing.
Place the interfacing material on the back side of the facing parts with the adhesive side and iron it through an ironing iron (a small piece of thin cotton fabric).
Place paper parts on the duplicated facings and transfer the markings again.
Advice
It is most convenient to cut out parts made from adhesive cushioning material using facing parts.
To do this, place the facing part with the wrong side on the adhesive side of the interlining.
Carefully iron the facing in the middle, not reaching the edges of the part.
Then carefully trim the excess interlining exactly along the edge of the facing.
Iron the facing.
Sweeping parts
Baste the darts.
Place the parts of the front and back panels of the skirt with their right sides facing each other, aligning the side sections.
Sweep the right side.
Baste the left side to the cross stitch marks for the hidden zipper.
Fitting
Turn the skirt right side out and try it on, using tailor's pins to chip off the place where the zipper is sewn in.
Sewing a skirt
Darts
Sew darts on the front and back panels of the skirt, starting the stitching from the top edge of the skirt.
At the top of the darts, tie the stitch threads twice and hide the tails inside the dart.
Remove the basting stitch.
Iron the depths of the darts to the line of the middle of the front/back panels of the skirt.
Basics of sewing: how to make a dart
Place the stitch as close to the basting line as possible without touching it.
Right side seam
Sew the right side seam.
Overlock the seam allowances using an overlocker or with a zigzag stitch on a sewing machine and press.
Important!
Backtack at the beginning and end of each seam.
Concealed zip fastening
The hidden zipper must be decated before use: iron it with steam on both sides and let it cool.
Remove the basting stitch from the left side seam, overcast the seam allowances and press them.
Then baste the left side seam again to the cross stitch marks for the hidden zipper.
Baste the seam allowances under the zipper and press them lightly.
Place the closed zipper over the sour cream seam so that the teeth fit exactly into the seam.
Using tailor's pins, pin the zipper across the seam allowance just under the teeth.
Baste the zipper only to the seam allowances, stitching down the middle of the zipper tapes.
The upper end of the zipper tape lies on the seam allowance, the upper teeth of the hidden zipper should coincide with the marked stitching line for the facing.
Remove the tailor's pins and zipper seam basting.
Open the zipper and stitch it using a special single-arm foot.
Place the foot so that the needle is to the left of it.
Move the needle to the extreme left position.
Unscrew the zipper teeth on one side and place it under the foot. Lower the needle into the fabric, close to the teeth, then lower the presser foot.
Sew the zipper on one side all the way to the clasp.
Then stitch the zipper on the other side.
Close the zipper and check the quality of the operation from the front side of the product.
Sewing machine. Lesson 12: Concealed Zipper
How to sew a hidden zipper
Left side seam
Sew the left side seam, also using the single-cornered foot.
Place the foot so that the needle is on the right side, and move the needle to the extreme right position.
Start the stitch just above the zipper stitching seam, while lowering the needle close to the last stitches of the hidden zipper stitching seam. There is no need to hit the zipper stitching seam exactly!
After sewing, press the seam allowances.
Facing the top edge of the skirt
Place the front facing of the top edge of the skirt over the back facing of the top edge of the skirt, right side to right side.
Pin the pieces along the right side and stitch.
Cut the seam allowances at a corner, overcast and press.
Overlock the open seam allowances on the left side and the bottom edge of the facing using an overlocker or a zigzag stitch on a sewing machine.
Pin the facing and baste it to the top edge of the skirt, aligning the right side seams.
Sew the facing to the skirt.
Turn the facing up.
Press the seam allowances onto the facing.
Stitch the facing to the seam allowance, departing 2 mm from the stitching line for the facing to the skirt.
Turn the facing onto the wrong side of the skirt with a small transition edging.
Iron the top edge of the skirt.
How to make a seam with a transition edge
Hand sew the bottom edge of the facing to the right side seam allowance.
Fold the allowances at the ends of the facing on the left side and sew them by hand to the zipper braid using a blind seam.
The secret to the perfect facing
How to trim the top edge of waistbands
Hemming the bottom of the skirt
Overcast the bottom edge of the skirt using an overlocker or a zigzag stitch on a sewing machine and iron it.
Iron the hem allowance to the wrong side and baste.
Stitch the hem to the edge.
Remove the basting and iron the hem to the wrong side of the skirt.
Decorative processing of the bottom of the product: “wrong” hem
The skirt is ready!
Girl's outfit
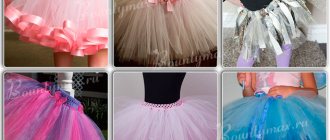
Every mother tries to buy beautiful clothes for her baby. You can please your child with a product you created yourself. To do this, you need to learn how to sew a skirt for a girl with your own hands. First of all, they select a model and go to the store to buy fabric.
Lightweight cotton materials are ideal for baby clothing. A tatyanka skirt looks great on a girl. To make it you will need a rectangular cloth and an elastic band.
You should stitch the seam, and then sew the workpiece to the elastic. All that remains is to process the bottom.
The elastic band can be hidden with a cloth. To do this, the top cut is folded, leaving room for the elastic band.
Where to begin?
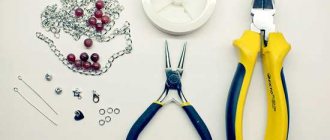
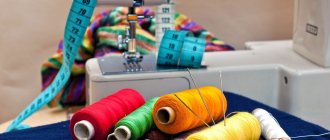
Whatever model you sew, you need to prepare tools and materials for making a skirt. You will need:
- textile;
- zipper, if provided in the model;
- scissors;
- pen;
- sewing pins;
- sewing machine;
- chalk;
- threads;
- tape measure;
- elastic band - also, if required by model.
And so we bought the fabric and chose a model. Now you can give free rein to your imagination. To begin with, choose a simple and stylish pencil skirt.