- Which rubber band should you choose, flat or round?
- How to choose the diameter of the elastic band to match the beads
- How to calculate the number of stones for a bracelet
- How to string beads onto an elastic band?
- How to tie the ends of an elastic band?
- How to hide a knot?
- What tools will you need?
- Do I need to glue the knot?
- Benefits of colored gum
- Does the rubber band break and how to avoid it?
- Should I attach the clasp to the bracelet with an elastic band?
- Is it worth weaving necklaces and beads with an elastic band?
- How to attach a charm to a bracelet?
- Why does the bracelet look bad?
- Which elastic band should you choose: elastic or not too elastic?
- How to extend the life of a bracelet with an elastic band?
- How to choose materials for a bracelet?
- Can bracelet elements change color?
Bracelets ideas from HandmadeMart
Elastic bracelets are quick to make and can be worn with any outfit. That is why they have held a high position in the line of jewelry trends for many seasons now.
It seems that it could be easier than stringing a few beads on an elastic band and securing it? However, beginning craftswomen often ask questions about making such bracelets. Therefore, we have created a small cheat sheet for those who want to master this type of needlework.
The first question is extremely obvious))). How to weave such bracelets? What kind of rubber band do you need? Or maybe regular fishing line will do? In no case! Simply because the line DOES NOT STRETCH. A bracelet made on a fishing line will “torture” its creator every time she puts it on until it breaks from constant tension.
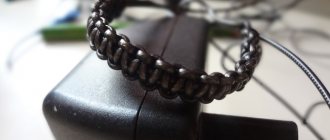
Which rubber band should you choose, flat or round?
Bracelet made of glass beads
A round elastic band is stronger than a flat one. It holds its shape itself, so it does not require the use of a needle (it easily fits into the holes of the beads). A clear rubber band is essential if you plan to use clear beads in your bracelet (I think it's obvious why).
The downside is that the rubber band is quite “slippery” in its structure, so it’s difficult to secure the product properly. The only “remedy” against this scourge is practice and more practice :).
Flat elastic is more elastic. This is good, for example, for creating multi-row bracelets that fit tightly around the wrist. It wears out gradually, so the bracelet will not break overnight; an unfortunate incident can be noticed and corrected in time. Flat elastic is great for pearl beads and stones with small holes.
The disadvantage of using a flat elastic band is that in the process of creating bracelets, it must be folded at least in half and threaded into the beads using a needle or other guide.
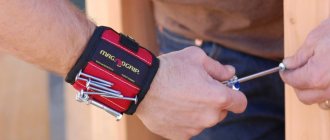
Use of special fittings
The next master class is devoted to making a carnelian bracelet. Special fittings will be used for its assembly. You will need:
- carnelian beads;
- silicone thread;
- pin with eye – 2 pieces;
- clasp;
- chain;
- decorative metal beads and pendants;
- connecting rings – 4 pieces;
- wire cutters and round nose pliers.
Use a metal pin to mask the ends of the fishing line. To attach this part to a bead, you need to put the bead on and form a loop from the open end using pliers. Carefully bite off the remaining wire tail and crimp it carefully so that it does not injure your hand when worn.
Related article: DIY last bell bell: master class with video
Prepare another bead using the described method. The string for the set is attached to the eye of the bead.
The size of the decorative metal bead that will be placed next should be such that the eye of the pin is completely hidden inside.
Attach the silicone thread with a double knot to the eye beads. String the required number of beads and decor and align the ends of the lines in the middle of the bracelet. Tie them with a straight knot. Pass the ends of the fishing line to the eye of the pin and duplicate the knots. Cut off excess thread. The knots will be securely hidden under the metal beads.
Now you need to attach the clasp. It will be easily adjustable due to the chain. Attach three links to one of the bracelet's ears, and attach 7-8 links to the second. The structure is attached using connecting rings.
Attach a clasp and add beautiful pendants to the ends of the product.
The stylish carnelian bracelet is ready.
How to choose the diameter of the elastic band to match the beads
The larger the beads, the heavier the stones, the thicker and more durable the elastic you need to choose. It is also important to pay attention to the size of the hole in the beads so that the elastic fits easily into it. For beads 6-7 mm, an elastic band of 0.6 mm is suitable, for beads 8 - 10 mm - an elastic band of 0.7 - 0.8 mm.
Of course, there are exceptions. For example, small beads may have a large hole or be very heavy. Or vice versa. In such cases, you just have to use the good old trial and error method.
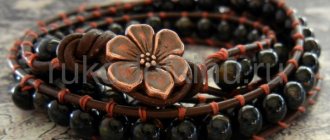
Delicate lace
Other materials are also used to create bracelets. They can be made from ribbons and beads, as in the photo:
Related article: Beautiful interior design with black and white paintings
Made from lace and beads using glue.
Weaving into a chain.
Or weaving lace from beads.
How to calculate the number of stones for a bracelet
It all depends on the diameter of the beads, the size of the wrist and the chosen weaving pattern. Below is a table that shows the average number of beads needed to create a bracelet for an average sized wrist.
Values may vary if you use unusually shaped stones or make the bracelet tighter (loose). It is also worth remembering that the beads may vary slightly in size.
The table is good for designing bracelets from identical beads. If you choose a material of different shapes or sizes, the numbers will change.
This is where trays for making bracelets come to the rescue. They are versatile and very convenient for quickly and easily creating bracelets for wrists of any circumference.
https://blog.royal-stone.pl/wszystko-co-chcialabys-wiedziec-o-robieniu-bransoletek-na-gumce-ale-balas-sie-zapytac/
Threading method
Threading can be considered the easiest way to make a bracelet. What could be easier than putting pebbles on a string? But even in this simple activity there are a number of nuances. Let's look at an example of creating a bracelet from noble agate. To complete it you will need:
- agate beads with a diameter of 10 mm;
- silicone thread or rubber band;
- nippers, scissors;
- accessories.
Article on the topic: Women's shirtfront on knitting needles: patterns with video tutorials
Let's take a closer look at the last item on the list. There are various decorative accessories to create jewelry. It will not only help make the decoration convenient, but will also add some zest to it.
For example, huggers. These are metal elements that are sometimes called caps. They cover the bead, creating a beautiful frame.
A bail is a metal connecting element equipped with an eye (or several ears) for pendants.
A rondel is a type of bead that most often has a concave shape.
Pendants are attached to bails and add zest and a finished look to the finished product.
A connector is a part that connects two parts of a bracelet.
To make a bracelet from natural cameos, you need to correctly calculate their quantity. Take your wrist measurement and add some extra size for comfortable wearing. For small beads it will be 0.5-1 cm, and for large ones up to 2.5 cm. Place beads on a prepared silicone thread and tie its ends with a straight knot. Cut off the excess thread, leaving tails 0.5 cm long. Tuck them inside the bead. This is what a regular low top looks like.
In the photo below you can see how decorative fittings can transform a boring bracelet into a fashionable accessory.
And this picture illustrates the correct tying of a straight knot.
How to tie the ends of an elastic band?
Beads for the bracelet
After stringing all the necessary beads, leave about 40 cm of elastic. Connect the ends, pull well and tie a tight knot without releasing the tension. After this, move the ends of the elastic in different directions and stretch them, tightening the knot. The stones on the bracelet should become closer to each other, and the product should shrink. After this, the elastic band must be cut very close to the knot, and the knot itself must be hidden in a bead.
Decor for the finished bracelet
If you wish, you can add rhinestones, spikes or even metal chains to the finished product. Rhinestones can be attached to a thread, and then simply sewed into the desired part of the accessory, using a thread of the appropriate shade.
The spike is also easy to place. As a rule, they always have fastenings. Determine the places where you want to attach the spikes. Then take scissors and make small holes there. Insert the tenon screw into the holes made, then tighten everything with a screwdriver.
It is easy to attach a metal chain to the side of the jewelry. To do this, take threads that match the shades and simply sew the part to the bracelet.
You can also weave other decorated elements into the bauble, for example, beads, small metal nuts, etc. Use your imagination and imagination - then the product will turn out to be very original and beautiful.
Why does the bracelet look bad?
https://blog.royal-stone.pl
It is best to make elastic bracelets using simple round beads. Stones of complex shapes, beads with large holes and other delights can simply “not settle down”, move out when worn, or rub the fragile base with sharp edges. In such cases, it is worth replacing the elastic band with fishing line or thread and making gaps between large stones (for example, inserting connecting beads).
Necessary calculations
An important step in creating a product is the correct calculation of its length. This is especially important when making a bracelet consisting of sections or having a finished design. Therefore, it is better to calculate its size in advance, focusing on the weaving pattern.
The easiest way to determine the length of the bracelet is the initial fitting. You can simply tie a thread or satin ribbon on your wrist. And then mark its length directly on the working surface of the table. Then you will see exactly how long the bracelet you need to weave.
On average, the girth of a woman’s hand is 18 - 20 cm, so it is best to calculate the pattern based on the diagram for a closed bracelet:
And a diagram for an open bracelet with a clasp, the average length of which is 15-16 cm:
Remember, even the most exquisite weaving will look impressive on your wrist only if the bracelet fits perfectly. However, if you made a slight mistake with the length, it can be corrected by unraveling one section or folding and hemming a small fragment.
How to choose materials for a bracelet?
You can choose one type of stone and add connecting beads or crystals of contrasting color to it. For a set, it is good to choose bracelets in the same color scheme, but from stones of different textures. You can complement the set with bracelets made using the soutache technique, macrame, cords, leather or jewelry mesh filled with small rhinestones.
Weaving methods
There are many techniques for weaving bead bracelets with your own hands. Let's look at the most popular ones.
Pigtail
One of the simplest weaving methods. Even novice craftswomen can easily handle it.
A beaded braid is woven according to the following pattern:
Cord
This spectacular and not very complicated technique is often used to create classic large bracelets. Such jewelry always looks expensive and elegant.
Moreover, there are three main techniques for weaving a cord:
Basic cord:
Openwork cord:
Coiled Cord:
Bricks
One of the main beading techniques is brick. With its help you can create not only interesting decorations, but also a variety of panels. The pattern made with bricks is always clear and clearly visible.
The weaving pattern is as follows:
Monastic cross
Also one of the basic patterns. This technique is most often used to create wide bracelets with names, phrases or interesting designs.
Weaving pattern:
Do-it-yourself Shambhala weaving
How to weave Shambhala bracelets from threads? To do this, you need to follow a step-by-step process:
- Weave 4-5 knots.
- In the sixth knot, string a pebble or bead onto the central thread of Shambhala.
- Weave decorative details into all knots.
- Finish the decoration with knots. Their number should be the same as at the beginning.
- Make a clasp. To do this, you need to turn the bracelet over and tie the left and right threads with an ordinary knot. Tighten well and apply glue to the plexus. Wait for it to dry completely.
- Cut off the tails. Burn them with a lighter to prevent fluff. Do the same on the second side.
Today there are many interesting patterns for weaving a Shambhala bracelet. To get a beautiful and neat result, you need to follow a step-by-step process. Equally important is the competent choice of varieties of stones and their shades.
Bracelet with zipper studs
You will need: zipper, rivets, elastic band, pliers, thread and needle.
Master Class
- Take the zipper.
- Poke the sharp end of the rivet along the zipper through the fabric.
- Secure the rivet on the reverse side with pliers.
- Attach the required number of rivets in this way.
- Sew a piece of elastic to the edges of the fabric part of the zipper, joining them together.