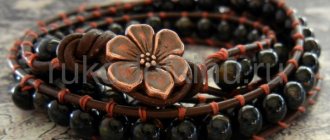
Shambhala is experiencing a rebirth: once these bracelets were extremely popular, and now they have returned to the leading positions in the list of fashion jewelry. Their popularity is based on the successful combination of aesthetic appearance and sacred meaning embedded in each knot. It was believed that such a bracelet was able to protect the owner from any extraneous negativity, be it a bad look, a thought or a real enemy.
During the story, we will tell you about the history of the bracelet and its origin, introduce you to the meanings of color, and tell you how to choose stones that match your horoscope for free.
It is noteworthy that weaving a shamballa bracelet is not difficult even for a beginner. Before you dare to create wicker structures, we recommend mastering the square knot: on its basis you can make bracelets of any complexity. We have collected the best master classes and videos, armed with which you will understand how to weave a shamballa bracelet. Let's get started!
I promised myself to make something similar! Twine, beads, beauty is ready in one evening.
Accessories Women Lifehacks Fashion Threads Handicrafts Handmade Jewelry
Eco-friendly jewelry is becoming more and more popular every year. But designer products from famous brands have an impressive price, which is a shame. An alternative option is to make a fashionable thing with your own hands. All you need is a skein of string and some beads... Wow!
DIY bead decoration
Such jewelry gives femininity and charm to its owner. At the same time, jewelry can be safely combined with any outfit, even from the merest wardrobe, and worn at any time of the year, be it summer or winter. Such things are suitable for both a young girl and a mature lady.
Editorial “So Simple!” I have prepared inspiring ideas for jewelry made from linen threads and beads that may inspire you to create your own masterpieces.
We invite you to familiarize yourself with a master class on making a bracelet from twine and beads. Perhaps this idea will interest you and you can make a unique thing for yourself. The process itself will help you relax, take your mind off problems and get aesthetic pleasure from an interesting activity.
Bracelet made of twine and beads
- skein of twine
- large beads
- scissors
- Cut 7 threads 1.5 meters long. Place 6 of them together and make a knot to form a loop.
- This is what it should look like.
- Then take the seventh piece of rope and tie it on the side in a loop so that the knot is not obvious. Tie a loop as shown in the photo.
- When the loop is formed, hide the remaining tail of the thread inside the knot and cut off the excess.
- Now your task is to string one bead of different sizes onto each of the 6 threads. Make sure that the largest ones are located away from each other.
- Then make a knot. Place a bead on each thread and tie a knot again.
- And again beads, and again a knot. When tying the last knot, place the largest ball on one thread. This will be the clasp.
- And here it is, the finished bracelet.
Beautiful and stylish handmade jewelry can become your pride. It's enough to just want it. Get ideas and create!
I hope this article has inspired you to create your own masterpiece using threads and beads. So quickly arm yourself with materials - and go! Save this selection and share with your friends, because such beautiful jewelry will inspire anyone.
takprosto.cc
MK double bracelet
*photo MK: Vera Mazepina
In the weaving of this bracelet, the beads are not fixed with a flat knot: in order to secure them to the base, you need to twist them alternately with working threads.
For this bracelet you need 18 turquoise beads with a diameter of 12 mm, 4 metal beads, waxed cord, scissors, glue and a lighter.
DIY thread beads
For the modern woman, beads are quite a popular accessory. After all, as the great Coco Chanel said: “You need to constantly change.” And in order to change, you need funds, and considerable ones at that. This is exactly what many girls think. However, this is a huge misconception. After all, you must admit that the same outfit can look different if you choose several different beads to match it. And to look festive and original, a real fashionista needs not only to know about different types of beads, but to be able to create beads from threads with her own hands. Moreover, creating jewelry with your own hands has become one of the most favorite hobbies among modern women.
Required materials and tools:
- yarn of several colors of your choice;
- forks of various sizes;
- scissors;
- thin chain for beads.
Cutting off the first piece
Cut a small length from the ball of yarn and place it between the middle tines of a fork.
Wrapping the yarn
Wrap the yarn around the fork. Pull the threads with medium strength.
Tighten the knot tight
Once you have wrapped enough yarn around the fork, take one piece from the middle and tie a tight knot as shown in the picture.
Pull the threads from the fork
Pull the ball of thread from the fork.
Making an incision
Carefully make a cut in the resulting skein. Trim the ball on all sides to create a pompom.
Trimming the threads
Using sharp scissors, trim all the threads around the pompom.
Repeating steps
Repeat steps 1-6 to make more pom poms in different colors.
Attach pompoms to the chain
Using threads from the pom pom, tie it to a thin chain, placing the first pom pom in the middle and the rest on the sides. DIY thread beads are ready!
This will be the most striking detail of your image. In the latest fashion shows of famous designers you can see a large number of pom-pom beads of various sizes and colors.
dekormyhome.ru
Balls and pompoms
It is best to make the elements of these crafts from yarn. They will become parts of fluffy toys, voluminous applications or panels. A yellow chicken, gray bunny, red kitten or black puppy will be made from two pompoms of different sizes (larger body, smaller head) connected to each other.
The beak, ears, eyes and tongues can be made from felt or colored paper, glued or sewn to the base - depending on the material. For a caterpillar or snake, much more pompoms will be required; for their manufacture it is possible to use threads of different colors.
Crafts made from woolen threads, made in the form of a mosaic of balls, require some kind of flat base: cardboard covered with fabric, vinyl or CD. In order not to make the product heavier, balls of different densities can be wound on foam balls of different sizes. You can glue them in the order that matches the idea and sketch using hot melt glue, PVA or silicone adhesives. Both pompoms and tassels are suitable for mosaics.The thread-winding technique is also useful when making flat snakes: a thick cardboard shape is wrapped with multi-colored threads and decorated by gluing buttons or beads. By practicing this basic skill, kids can prepare for more complex work.
Volumetric compositions
Good for competition entries and holiday decor. They are based on balls and cone-shaped shapes. These crafts made from threads and PVA glue can be either independent decorative elements or parts of complex compositions.
After removing the ball or cone from the well-dried, firmly glued web of threads, the part can be painted and further decorated - as desired. The balls will decorate the Christmas tree and the festive room, and the cones themselves can be miniature Christmas trees placed on the mantelpiece, desk or windowsill.
At the same time, the balls will make a cheerful snowman with a cone-shaped carrot nose, a Christmas angel playing the trumpet, or ice cream scoops in an openwork cone. Whatever composition you come up with, the lightness and transparency of these figures will bring an element of fairy tale and magic to your home.Beautiful images
A fashionable look with unusual accessories will sparkle with new colors. A summer suit, consisting of a cotton sundress and a short jacket made of the same material, looks great with multi-layered short beads made of large decorative pearls. If desired, the outfit can be complemented with massive bracelets from the same collection.
You can create a romantic summer look by choosing a stylish malachite-colored lace dress with short sleeves, complementing it with golden-colored pumps and a decorative clutch. And finally, add large beads to the outfit - a necklace with large beads and large stones.
When you add a drop of luxury to a business outfit, it completely transforms and looks completely different. For example, a classic light blue shirt with a pointed turn-down collar looks great with large accessories, namely, golden layered beads and a neat necklace worn on top.
An incredible retro look, of course, is not complete without the appropriate accessories. That is why the ivory-colored silk dress is complemented with multi-layered coral beads, the details of which are medium in size, so they look very neat and sophisticated.
Fluffy appliques
Kids will really like this kind of work. Crafts made from knitting threads differ from ordinary voluminous appliqué in their amazing spontaneity.
To make them, you will need a base made of colored cardboard with a contour pattern applied to it, depicting, for example, a mischievous puppy, and woolen or synthetic threads of different colors (for the fur - brown and white, for the nose and eyes - black, for the tongue - red, for grass - green, for dandelions - yellow).
The threads are cut into short pieces, which are collected into small bundles and intercepted in the middle with a double knot. These bundles are glued in the area of the knot, filling the space of the pattern. The ends of the threads remain free - this is what gives the applique liveliness and spontaneity.
For hair
DIY beaded hair jewelry is not only original and beautiful, but also pleasant and very interesting. A tiara with a flower will perfectly complement a ball gown; it can also be worn even with a wedding dress.
To make a beaded tiara, prepare the following materials:
- thin metal hair hoop;
- wire – 1 mm and 0.4 mm thick;
- beads – golden and silver;
- beads of different sizes;
- pliers.
You can make this decoration using beads and wire yourself by following these step-by-step instructions:
Making a tiara should begin with the formation of the flower itself. To do this, cut a wire approximately 0.8 m long. At the end of the wire, fix a large bead and form a loop.
Under the bead, twist the wire into a spiral and form flower petals, there should be five of them in total. Try to keep all the petals the same shape and size.
Twist the remaining wire and decorate it with a large bright bead, this will be the middle of the flower.
Now you need to braid each petal with beads. To do this, start stringing beads onto a thin wire, alternating them with glass beads and small beads. Tightly braid the petals with this wire. Make two more flowers using the same pattern, but slightly smaller.
When three flowers are ready, start decorating the hoop with beaded flowers. First, fix the small flowers on the hoop, then attach the large ones.
A beautiful beaded floral tiara is ready.