Jewelry made from wood has gained a new round of popularity, primarily due to their environmental friendliness and positive properties obtained from nature. Although fashion trends have a wavy nature, because wooden beads were used back in the Bronze Age and periodically found peaks of their popularity, today this jewelry has acquired different characteristics.
The point is that making wooden beads with your own hands is much more fashionable than purchasing them in a store or market. What technologies are used to process wood and subsequently produce beads from it will be discussed below.
DIY beads: step-by-step video instructions and description of how to make beads (95 photos + master class)
Handmade jewelry is now so popular that experienced needlewomen even manage to earn a lot of money from it.
If previously homemade jewelry was not in demand and was considered tasteless, now, on the contrary, every fashionista strives to purchase a handmade accessory or make it herself.
In addition, any available materials can be used to make such original and unique jewelry.
In this article we will talk about how to make beads with your own hands.
Necklace
Each bride can make crafts from beads and beads on her own for a special day of her life.Wedding decorations are always popular. But in stores, simple bracelets, earrings and necklaces cost a lot of money.
For work you will need the following materials:
- Copper wire, but the thinnest. You can replace it with fishing line;
- The beads are drop-shaped, but only white;
- Scissors;
- Black crystals;
- Finished clasp;
- Round beads are white, but large;
Stages of work:
- First of all, we need to make a flower, which will be the main one in the whole decoration. Take a small piece of wire and 5 drop-shaped beads. They need to be put on a wire;
- Take the other end of the wire and thread it through the beads from the other end. Tighten, but not too tight;
- We have the first row of the flower, or rather the first 5 petals of the future flower;
- We take 2-3 black crystals and make the core of a flower from them. The wire that holds the core should not be cut, it will still be useful;
- If you wish, you can make another row of petals. But, if you like this flower, then leave everything as it is;
- Now we string round beads onto the wires near the flower. Remember, the necklace should not be too tight, it should be loose;
- Attach the clasp.
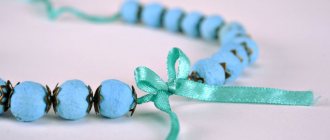
Beads made using the felting technique
Felting wool is a very interesting and exciting hobby, thanks to which you can make a lot of cute things.
Take a look at the photos of wool beads made by yourself, and you will see for yourself that it is not so easy to guess what material they are made of and how they are made, which means that you will have a unique and attractive accessory.
So, get ready for work:
- Wool of various colors.
- Film.
- Rubber mat.
- Sharp knife.
- Bamboo mat.
- Towel.
- Grid.
- Soap solution.
Let's look at a detailed master class on making beads with your own hands:
Pinch off small, equal-sized pieces of wool and place them in a row so that you get a multi-colored cloth measuring 30 by 20 centimeters.
Moisten the workpiece with water and cover it with a net, and sprinkle a previously prepared soap solution on top. Next, lay wool of a different, contrasting shade on top. It will serve as a separator between the colored pieces.
Cover the workpiece again with the mesh and spray with soapy water. Next, using film, wrap the workpiece into a roll and roll it thoroughly so that the layers adhere to each other.
After this, wrap the roll tightly with a towel, wrap it in a bamboo mat and continue rolling until the workpiece turns into a single whole.
Now all that remains is to cut the resulting roll into identical pieces, string them on fishing line or strong thread, and the beads are ready.
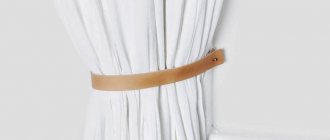
Beads from an old T-shirt
How to make fabric beads with your own hands? It’s hard to imagine that you can use an old T-shirt to make an original necklace.
The main material of the accessory is knitwear, cut into thin ribbons. In this way, you can make different versions of beads, adding large beads, metal rings and other decorative elements to the fabric.
It is worth noting that the strips can be of any length and any width. The finished product will look impressive in any case.
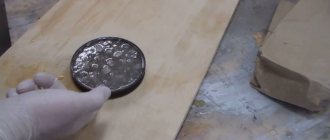
Candlestick
Materials:
- CD,
- beads,
- bugles,
- halves of beads (all elements have a glass-like texture),
- hot melt adhesive.
The work is very simple. The main thing is to think through the pattern in advance. The candle (scented from the set) is located in the center; a string of large beads can be glued in a circle. And make an ornament of beads, beads and glass beads around the entire disk - all elements are securely placed on glue.
Beads for jewelry - types and examples of use
In this article we will talk about beads for creating jewelry with your own hands, their main types and methods of use.
A bead is a three-dimensional decorative element of various shapes with a through hole for fastening on a thread. They vary in shape, size (from a few millimeters to several centimeters) and material of manufacture. Beads of various shapes have found the widest application in needlework: from traditional (making jewelry) to designing floral arrangements, embroidering clothes, etc.
Rainbow candlestick
Materials:
- small jar,
- beads of different colors and sizes,
- thread,
- hot glue gun.
The jar is glued in a spiral with a string of beads, collected in random order, using a gun. You need to leave space between the turns of the spiral; the candle light will penetrate into it and, reflecting off the beads, create a cheerful color effect.
Beads provide a rich field for creativity and the embodiment of imagination. Simple work can be done together with the child, because joint leisure brings children and parents closer together.
Who knows, maybe admiring reviews from relatives and friends will encourage you to master complex patterns of crafts made from beads and a simple hobby will develop into real skill?
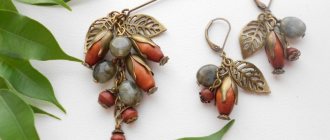
DIY beads - the best ideas and recommendations for selecting materials (video and 100 photos)
Designer jewelry attracts attention and is used as exclusive style accessories that highlight the taste of its owner. The high price of such products can often be compared with the cost of jewelry, so after several master classes, you can learn how to make unique jewelry yourself.
Looking at photos of beads made by yourself, you can be surprised at the rich variety of bright and unusual ideas that are easy to implement.
This skill is easy to master and bring any idea to life, complementing your own, individual style, which will become the basis of a unique, original and harmonious image.
Exclusive and original beads
Having chosen the jewelry you like, you can immediately find out how to make beads with your own hands by carefully studying all the necessary information.
After all, to create a real masterpiece you will need a certain amount of time, basic materials and auxiliary accessories or fittings that give the finished product a finished look.
Using inexpensive materials, you can create not just jewelry, but also a real work of art that does not look cheap.
Various ideas, different techniques and a wide choice of basic materials allow you to make status and designer jewelry with your own hands, suitable for a classic or modern outfit.
How to choose materials for production
To make stylish and beautiful beads with your own hands, you need to choose the appropriate materials, for processing which different techniques are used.
You can immediately purchase sets of ready-made beads, but then the product will turn out to look like standard jewelry, and for exclusive jewelry you can use the following materials:
- plain, colored and different-sized beads;
- balls made of plastic or wood, for beads;
- large and small shells of various mollusks;
- colored cardboard or thick paper, postcards;
- polymer clay, plastic mastic and salt dough;
- sea pebbles and ground glass of different colors;
- metal rings, arcs and wire made of metals;
- natural and artificial leather, suede materials;
- satin and grosgrain ribbons, strips of colored fabric.
In addition to the basic materials for the creative process, you need to stock up on fishing line or strong thread, scissors and several needles with a large eye.
It is important to purchase the appropriate fittings, fasteners or decorative elements that will help give the finished decoration a complete and presentable look.
Sources:
https://svoimirukami.guru/busy-svoimi-rukami/ https://melodiabisera.ru/stati/businy-dlya-bizhuterii-vidy-i-primery-ispolzovaniya/ https://mirrukodelija.ru/busy-svoimi- rukami/
Chandelier
Materials:
- wooden embroidery hoops large (1 pc.) and small (2 pcs.), for example, with a diameter of 12.5 and 27.5 cm;
- beads in three sizes,
- threads,
- needle,
- wood glue and superglue,
- scissors.
To make such a chandelier, follow these steps:
- The hoop forms the frame of the chandelier: one small circle near the ceiling, a large one in the middle and another small hoop at the end of the chandelier.
- Remove the outer circles and put them aside for now; work is being done on the inner ones. The threads are attached to the top hoop by simply tying. Beads are put on alternately: medium and small.
- The other end of the thread is attached to the middle hoop. All nodes are glued with superglue for strength. Threads will be placed rarely or often - at your discretion.
- The lower part of the chandelier is formed using the same principle: threads with large and medium beads are attached at one end to the middle hoop, and at the other to the lower circle. The knots are also glued.
- Then, one by one, the inside of the outer hoops is smeared with wood glue and glued onto the hoops with beads - the tied threads are no longer visible. All that remains is to secure the suspension with wire and hang the chandelier.
Note: you can place the beads in order of increasing size to the middle hoop, which, if desired, can be placed not in the middle, but moved to the lower part, adjusting the length of the threads accordingly. There are many options and all are original.