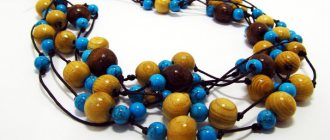
Unusual handmade jewelry always attracts attention, especially if made carefully and tastefully. Materials for crafts can be very diverse, for example, paper. Typically, such products perfectly complement an ethnic style outfit. Monochromatic and variegated, of various shapes and colors, they attract attention and make their owner stand out from the crowd.
In addition to adults, you can also make paper beads for children with your own hands. This is a great addition to a baby's summer outfit or to a New Year's carnival costume. Creating jewelry with your child is an interesting activity that teaches the child to work and develops creativity.
There are many techniques that allow you to make paper beads with your own hands. Below are the most affordable and popular options.
Beads made using papier-mâché technique
Materials: tissue paper, toilet paper or any thin and loose paper, toothpicks, fishing line, ready-made lock (you can do without it), acrylic paints, colorless varnish (optional).
Difficulty level: easy
- Soak small pieces of paper in warm water until completely swollen and fibrous. The water should only slightly cover the paper.
- Drain off the excess water and grind the resulting mass (papier-mâché) in a blender until smooth.
- We separate small portions from the resulting mass and form balls or cubes of the required size.
- We pierce each ball/block through the center with a toothpick and leave it there until completely dry.
- The drying process should be carried out naturally and should not be accelerated by artificially increasing the temperature. Future beads may become deformed or crack.
- Next, we paint each detail (you can apply a pattern, a transition from one tone to another). If you plan to paint in the form of a pattern, the next layer is applied to the previous one only after complete drying.
- If desired, the resulting beads are coated with colorless varnish. This will add shine and extend their service life.
- The blanks are removed from the toothpicks and put on a fishing line.
- The ends of the fishing line, if desired, are fastened with a lock or tied with a neat knot, which is hidden in one of the beads. If you do not plan to use a clasp, calculate the length of the beads correctly (they should fit freely over your head).
Multi-row button beads
To create this decoration for little girls, you will need a skein of floss, a pack of buttons in different colors and sizes, size 6 seed beads or small seed beads, and a lobster clasp with an extension chain.
Let's get started:
Prepare your materials. Buttons with both two and four holes are suitable. Make sure the needle is thick enough to thread through the selected beads.
Step 1 . You will need a thread 2.7 m long. Step back from the edge about 13 cm and string the bead. Sew it once, securing it in one place.
Step 2. We continue lowering from the second end of the thread, the longer one. Add a button, leaving a small distance to the bead.
Step 3 . Add beads and stitch in the same way as the first one.
Step 4 . We continue to alternate buttons and beads until the length of the hem is approximately 38 cm.
Step 5 . Leave an empty gap on the thread, about 13 cm, and fasten the bead again. Next, we continue to string the buttons, repeating the previous step.
Step 6 . You should have a total of four rows with empty spaces. We collect the received segments.
Step 7 . We align them along the length, tie the two free ends so that all the loops are approximately the same size.
Step 8 . Attach connecting rings to the loops. The fittings need to be secured: grab the ring, and, maintaining its location, tie a simple loop. Repeat the same with the second ring.
Step 9. Attach a clasp to one ring and a connecting chain to the second, which can be decorated with a small button.
The multi-row beads are ready, you can try them on and show off!
Beads using the twisting technique
This technique involves a more complex execution and requires some experience. But as a result, real masterpieces are created, reminiscent of ornate small shells or ornamental stones.
Materials: thin but durable plain or colored paper, bead templates, toothpicks, fishing line, acrylic paints (you can do without them if the paper is colored), colorless varnish, a ready-made lock (you can do without it), PVA glue, brush, scissors, pencil.
Difficulty level: Some skill required.
- Using the template, we transfer its contours onto paper manually or print it on a printer. The number of copies of the template corresponds to the number of beads. You can use different templates in one product and independently determine the quantity and sequence of stringing of future blanks.
- We cut out the beads along the contour of the blank.
- If the paper is colored, place the paper on the table with the colored side down.
- Using a toothpick, carefully wind (twist) the workpiece. It takes some skill to make the twist tight and even. Depending on the contours of the template, you can get a wide variety of shapes of bead blanks.
- Carefully glue the paper edge of each piece with PVA to the bead.
- If the beads are made of white paper, we color them using paints, you can choose options for natural stones, etc.
- After drying, coat with 1-2 layers of varnish.
- Remove the beads from the toothpick and string them onto a fishing line.
- The ends of the fishing line are secured with a lock or tied with a strong knot.
Thus, in addition to beads, you can make a set by adding a bracelet or earrings.
Beautiful ideas for paper beads
Original ideas for paper decorations:
- If you take paper with a certain ornament, design or even text, you can get a stylish decoration. For example, beads with images of notes.
- Another interesting option would be African paper beads. They are also made from strips of cut paper. But you should choose sheets of paper from the traditional colors of African ethnicity, for example, white and brown. And after gluing one skein, a strip of paper is applied on top of it, on top of which a design is drawn. It can be done with special fabric paints - they will provide a textured surface. To prevent the pattern from being erased, it must be secured on top with varnish.
- This decoration can be made in any ethnic style. It is enough to simply choose colors or patterns characteristic of a particular people - and the result will definitely be unlike anything else.
- It is worth considering that neck jewelry does not necessarily have to have cylindrical elements. You can make them original in their shape, thereby giving the decoration an unusual look. So, for example, paper can be wound not on a cylindrical rod, but on a flat part. In this case, the bead will be flattened. But you can also give a strip of paper a completely original shape.
- Beads can not be strung easily on a straight line, but various combinations can be used. You can make several threads or intertwine elements together, creating more complex configurations.
- More originality can be achieved by using inserts made of chains, crystals, glass and wooden beads, and bead weaving.
Necklace: important nuances
A beaded necklace can be worn to a special event or to the office; it will fit well into any look.
The play of light on beads is mesmerizing and attracts attention, so this piece of jewelry can truly decorate its owner.
- The necklace does not need to be combined with a brooch, this is considered bad manners;
- There is a separate necklace shape for different necklines;
- It is better not to combine a beaded accessory with other elements;
To measure the length of the necklace, you need to measure the diameter of the neck and add another five centimeters. Massive jewelry will look especially beneficial on a long and thin neck.
From a huge range of necklaces and necklaces, you can choose the one that is ideal for any occasion.
Using weaving patterns and high-quality materials, even a beginner can create a magnificent piece of jewelry in a short time and at no extra cost.
