Surely every home has an unnecessary thing that is a pity to throw away. Maybe it’s old or just doesn’t fit the interior of the room. To do this, there are many techniques that give life to old things. For example, using the decoupage technique you can decorate a cardboard shoe box.
This article will help you learn how to decorate a box in decoupage style.
Tools and materials: what is needed for the job?
In order to begin the process of decorating the selected product, you need to prepare all the materials and tools. This can be done in a specialized store or in regular offices.
To decorate cardboard boxes in decoupage style you need:
- box (it can be made of any material - cardboard, plastic, wood);
- acrylic paints (preferably light colors);
- glue (selected depending on the material of the box);
- napkins with drawings or printed pictures;
- varnish for fixing the finished product;
- brushes with good soft bristles;
- a bowl of water (preferably warm);
- scissors and sandpaper;
- additional decorations (rhinestones, beads, lace, etc.).
This is the basic set for work, supplemented depending on the complexity of the product design.
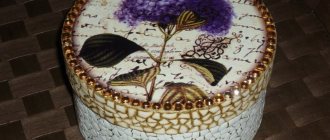
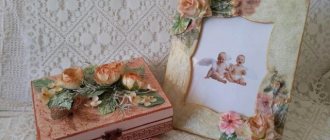
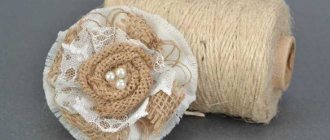
Box with roses (stencil)
In this master class, we combined several techniques for decorating a box with our own hands. Let's try to mix styles, textures and techniques. The main theme of this master class is fabric imitation using painting. Since not everyone knows how to draw well, we decided to use a stencil here.
A stencil design is attached, you can choose any one you like.
The master class is simple, even a beginner can handle it.
To work you will need:
- Casket or box.
- Acrylic primer.
- Acrylic paints.
- Tassels.
- Stencil.
- Masking tape.
- Sandpaper.
- Everything that can be useful for decoration: cord, ribbons, lace, braid, and so on.
If the box or blank is made of wood, you may need to sand it with sandpaper and varnish it. This way we will protect the workpiece from swelling.
We wait for it to dry and cover it with acrylic primer.
Dry and sand. Cover the bottom and top corners with masking tape.
We paint all sides of the box with any light acrylic paint. Thus, we make the bottom layer for imitation fabric.
We paint with a brush in a horizontal direction, applying the paint evenly and evenly. Next, let the workpiece dry, sand it with sandpaper and varnish it. We mix our light paint with the same beige paint a shade darker.
Popular articles New Year's lamb made of fabric
The paint should not be too thick, so be sure to wet the brush in water and squeeze it out. Apply it to the side with horizontal strokes.
Then take a sponge or brush and sweep it across the surface in a horizontal direction.
That is, we need to make an imitation of fabric. This will be one direction of our “fabric”. This is what should happen after processing with a sponge or brush:
We needed a layer of varnish to prevent the paint from being absorbed into the surface of the product. If it weren't for the varnish, we wouldn't have gotten such a textured surface. We do the same with all the side surfaces of the box: paint and wipe off the paint with a sponge or brush. It will be great if you apply varnish on top. We wait for the product to dry, put the same paint on a wet brush and paint the side parts, but this time vertically. We erase the paint with a sponge vertically. As a result, we should get “fabric”.
Dry and lightly sand the sides of the product. We choose a stencil for our pattern. Let's say this is a drawing with a rose.
We cover with tape the places that are not needed for decoration. We place the stencil on the side of the product.
Choosing colors for printing the pattern. In this master class these are yellow, burgundy, light green and dark green. We take paint onto a brush or sponge and apply it to the stencil. There should not be a lot of paint so that it does not flow under the template. Your brush should be semi-dry. Don’t rush, if the first time it didn’t turn out bright, you can go over it with a brush again. We remove the stencil and wait for the paint to dry. Turn the stencil over to the other side. Flowers should be arranged randomly. We paint the stencil.
This is what the side looks like. There should be no empty spaces; instead, draw leaves on the main background. Fill the empty space with small leaves.
Next, we make the rose drawing three-dimensional. When it dries, we apply our stencil to the familiar pattern. Secure with tape. Apply burgundy-colored paint to the middle of the rose, and use dark green paint to add volume to the leaf.
Next, sand the sides after the surface has dried. To complete the job, you can coat the sides of the product with several layers of varnish. It's time to work on the lid. Place strips of masking tape on the sides of the lid. We paint the lid in the same order as the sides. First, we varnish a light color, similar to the “fabric”. Then the “fabric” itself: paint horizontally with a brush, then vertically.
Dry the lid and place the stencil on it in different directions. Apply yellow and light green paints. We fill all empty spaces with small sheets. Apply the stencil again, paint the roses burgundy and the leaves dark green. Sand horizontally and vertically with a brush after drying. We admire our work and apply varnish in 2-3 layers.
We decorate the bottom of the box and the sides at our discretion. In this master class, the sides of the lid are painted yellow, and a cord is glued with a glue gun. At the bottom there is a velvet ribbon glued with Moment glue. Wooden legs are glued. It will be beautiful if you attach a strip of lace or gold braid, cord, and so on.
Decor for decoupage boxes
Usually, original and unusual spice sets and sweet stands have a high price. But you can save money by decoupaging a shoe box with your own hands. You can choose any style, decoration and box size to suit your kitchen interior.
If you are decorating a box for a children's room, then you should choose the appropriate designs. It is better that the design is made in one stylistic direction.
Step-by-step instructions for implanting a printout
- Apply a thin layer of acrylic varnish or special gel polish to the prepared, cleaned and primed base.
- Soak the pre-cut or torn picture in the same varnish.
- Place the picture face down on the base, smooth it out and leave it there until it dries completely (about one day).
- The next day, moisten the picture with water and carefully remove the paper layers with a sponge until the picture is fully developed.
- Complete the details of the picture and patterns.
- Cover the product with three to four layers of varnish according to the general rules of decoupage.
Tips for beginners in needlework
There are a number of tips that it is recommended to listen to when decoupaging boxes with napkins.
For children's rooms, it is recommended to use napkins of cute animals, beautiful flowers or favorite superheroes.
Men prefer designs with pictures of weapons or cars. You can make a beautiful box for a birthday gift.
To please your grandmother, you can make a box with images of family photos.
Drawings with fruit and vegetable still lifes, aromatic herbs, etc. are perfect for the kitchen. To store sewing accessories, use tin boxes with appropriate patterns (for example, fabrics, threads).
Regardless of the chosen design, a box made using decoupage technique will look original and stylish. It can become either a decoration for your home or a gift for loved ones.
Finishing the surface of the box
Several layers of varnish must be applied to create a protective coating that will give the product wear-resistant properties. The photo shows decoupage of a wooden box made using several elements. The varnish must be applied in a thin layer. Applying the next layer is possible only after the previous layer has completely dried.
The choice of varnish depends on the desired properties of the future surface. You can take a glossy varnish, then the surface of the box will be shiny. Matte varnish will create a “rough” surface that will not glare. Tint varnish will change the color of the product. It must be used with caution, since a large number of layers can create a very bright shade, against which the design will be lost.
You can apply the varnish with a small roller. To cover hard-to-reach areas, it is more convenient to use a brush. To ensure that the varnish lays down in an even, thin layer, you can use a spray bottle. If you decide to use this method, take care of the safety of your respiratory system.
Gift box: decoupage on wood
Wood is often used as a material for decoupage.
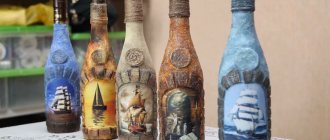
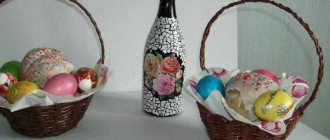
The best gift is one made by yourself. If you want to please your loved ones and give them an unusual gift, then decoupage a wooden wine box.
Such a gift is relevant for any holiday, and its design will not be difficult.
The technique for performing it is the same as described above, only with a few additions:
- a sanded wooden box should be treated with alcohol to degrease the surface;
- It is better to put sawdust and cut gift paper inside the box so that the bottle does not hit the walls.
Preparing the wooden surface
The surface of the wood must be carefully treated before starting to fix the picture. If there is old paint on the surface, you need to remove it with a scraper. Remove all mechanical impurities.
The entire surface of the object must be sanded. After this, a primer is applied. The primer layer must dry completely. This is followed by another stage of sanding and an additional layer of primer. The surface should be smooth and even.
If there are small cracks or crevices on the surface of the wood, then they need to be filled. Wood putty is suitable for these purposes. If you plan to make an antique item, then all surface imperfections should be left and even emphasis should be placed on them. You can make additional flaws and cracks.