First, let's figure out what origami is. This is the art of folding paper shapes. And modular origami is a traditional Japanese technique of folding origami, in the process of which several sheets of paper are used. From each individual sheet a module is made according to the rules of classic origami, and then the finished modules are connected by nesting into each other. Today we would like to give you a master class on making a three-dimensional heart using modular origami. This handmade figurine will serve you as a piece of furniture. It can be given to your loved one on Valentine's Day instead of an ordinary Valentine's card or on any other occasion. Receiving a gift made by yourself is much more pleasant. We offer you step-by-step instructions on how to make such a voluminous heart; modular origami will then become your favorite pastime.
Volumetric hearts
Volumetric paper hearts look interesting from all sides, no matter how you look at them. They can be hung, glued or attached to a shaped card. But first things first. Here are several options for making voluminous valentines with your own hands.
Paper heart using origami technique
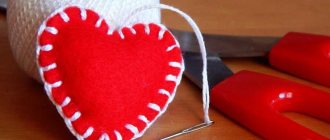
Creating such a voluminous paper heart will not take much time. It can be either a small surprise for the holiday or a simple decorative element. To make it you only need square paper. The master class was prepared by Marina.
Photo 1.
First, fold the square in half in the transverse direction. Photo 2.
Then we unfold the square, placing it so that the fold is vertical. After this, we make a small hem at the bottom. Photo 3.
Now fold the workpiece in half. Photo 4.
Let's unfold it so that the half with a narrow fold is located on top. And let's start forming the heart. To do this, we will first make a fold on the right side. Photo 5.
Let's bend it symmetrically to the left. Photo 6.
Let's rotate the resulting triangle 180 degrees and make folds at the corners, bending them up and to the sides. Photo 7.
Let's straighten the folds we just made; we needed them in order to outline guidelines for subsequent work. Photo 8.
At the intersections of the resulting folds with the vertical lines, we make new folds of the side corners. Photo 9.
We bend the corners located below on the inside up and to the right. Photo 10.
Now they need to be hidden. To do this, we put the bent corners into the previously created pockets. Photo 11.
All that remains is to work on the final shape of our heart. Therefore, we make small folds in the corners. All of them are located on the wrong side of the workpiece. Photo 12.
We carefully inflate our heart through the hole located below. At the same time, we bend it slightly at the top. Our 3D paper heart is ready. Photo 13.
This craft can be made from paper of any color. Several voluminous hearts made according to the proposed master class will look good.
Video:
Pattern for this heart: https://drive.google.com/file/d/0BzETiNieTq_XQzcxWDZjanNHOHM/view
Another option is a heart, which can serve as a box for a small gift - master class:
Nice bookmark for a book - owl -
And 6 more options for voluminous paper hearts from Tatyana Yablonskaya.
Option 1
First we draw and cut out stencils: 5 hearts of different sizes.
Cut out hearts from colored double-sided pink paper. In this case, there should be one large one, and all the rest should be made in 2 pieces.
We fold all the paired pieces in half and leave the larger one unchanged.
Glue the hearts one on top of the other, placing them according to size. The large blank is in the middle, and smaller blanks are glued onto it. It turns out this voluminous heart made of paper:
Beautiful Valentine in 5 minutes:
Option 2
Cut out a red heart from thick cardboard.
Fold it in half and make cuts in the middle, as shown on the stencil. On one side of the line it is necessary not to cut to the edge.
Open the heart and bend the inner parts a little. It turns out a heart in volume.
An original origami heart with the message:
Option 3
Cut out a circle from red double-sided construction paper.
We fold it like an accordion (the width of the side does not exceed 10 mm).
Now fold the accordion in half and glue it in the center with double-sided tape or PVA glue. The result is an original three-dimensional heart.
You can also make a pink and raspberry heart.
Let's place them on the stand. To make it, you need to cut a long strip of colored cardboard and fold it like an accordion (2 cm side) not completely.
Glue multi-colored accordion hearts into the recesses of the orange stand.
Very cute hearts with flowers:
Option 4
Cut out a square from double-sided red construction paper. Fold it diagonally twice. And open it to its original position.
Bend the top corner towards the center.
We turn the bottom corner to the center of the top side.
We bend the right side to the center of the workpiece.
We do the same manipulations with the left side.
Then we turn the workpiece over to the wrong side and bend 4 corners into the middle. They can be fixed with glue.
Now turn it over to the front side. The volumetric heart using the origami technique is ready.
Another box with a heart:
Option 5
We cut out a lot of hearts from raspberry corrugated paper. Approximately 25 pieces.
We bend each piece in half and coat the fold line with PVA glue.
Glue all the parts together into a large pile.
When the outer pieces are glued together, you will get a voluminous heart with free edges.
And we will glue the pink hearts a little differently. We also fold all the blanks in half.
First we glue each of them in the center, as shown on the right. Then all the parts are glued together at three points with a drop of glue, as shown on the left.
When the glue dries and the craft sticks together using the outer pieces, you will get such a voluminous heart with intertwined edges.
Another video about a gorgeous lush heart:
Option 6
Now let’s make a beautiful stand for our hearts. Take two sheets of cardboard in contrasting shades. For example, red and lilac. Cut a circle in the middle on each sheet. We make cuts at the top and bottom: for the lilac piece we cut from the circle, and for the red piece the cuts are made from the edge.
We connect 2 blanks along the cut lines and unfold the sides. This makes such a great stand.
We tie strings to the hearts and place them in the middle of the circles. They look amazing!
If you want, you can decorate the stand with delicate flowers using the quilling technique. This way the craft will acquire additional charm.
As you can see, voluminous hearts look beautiful, lush and unusual.
How to make a chic heart with wings, watch in this video:
And another simple but original option:
Option 2
This heart is made from thin red papyrus paper. Fold the paper in several layers and cut out a small heart. In general, you should get 10-15 such hearts.
To prevent our hearts from falling apart, we need to stitch them in the middle. Hands take a long time, so use a sewing machine. Do not cut the thread at the root, it should be long. For her we will hang our hearts.
Now you need to give the heart a shape, straighten all the petals. That's it, our heart is ready.
Multilayer hearts
Multi-layered hearts literally attract the eye. Subtle lines that transform into a different shade are truly mesmerizing. Try doing something like this and capture the imagination of your loved one. Here are several options for making multilayer hearts from colored paper and cardboard.
Option 1. Simple heart
Cut out several hearts of different sizes. We take into account the alternation of dark and light shades relative to the size of the workpiece.
Glue the hearts one on top of the other, moving from the largest to the smallest. The result is a multi-layered multi-colored heart.
Option 2. Heart with an accordion
Cut out a large pink heart. Glue a smaller heart onto it, cut out of crimson paper with curly scissors.
Now take red double-sided colored paper, cut off a strip and fold it like an accordion. On the very top part we draw half a heart. This must be done so that the fold lines capture the drawing.
Cut off the excess paper. We unfold the workpiece and see 4 hearts fastened together.
Glue them by the edges onto the raspberry heart.
Add a few more small hearts and fold the work in half.
It turns out to be a multi-layered valentine with a surprise inside.
Option 3. “Three-story” postcard
We bend a sheet of white cardboard so that we get 3 parts. We cut off the upper part at an angle, moving from the left corner to the right. As a result, some kind of steps should form. We also cut out small hearts from pink and raspberry crepe paper.
Glue hearts along the top edge, alternating shades.
Using a marker we write the word “Love” all over the white background. The multilayer valentine card is ready.
Option 4. Original Valentine's card
Cut out several hearts from colored cardboard: 1 large raspberry, 2 large red and 1 small raspberry.
We fold the red blanks in half, and apply a little PVA glue along the edge of the crimson one.
Glue the red hearts so that they can open on the sides.
We place stickers in them in the shape of miniature hearts.
On the central part we glue a small wicker heart and miniature blue stickers. There are so many layers to this valentine that it looks like a puzzle.
Option 5. Heart “iso-thread”
Draw the heart so that one edge is on the fold line. After we cut it out, you will get a blank in the form of two connected hearts.
On one of the parts we draw dots and make small holes with an awl.
Using a needle and thread, we embroider the design using the isothread technique.
The options can be very diverse. You can use red flowers and voluminous hearts as decorations. These valentines look very tender.
Option 6. Multilayer card with hearts
Cut a sheet of white cardboard in half lengthwise and fold it like an accordion 4 times. From colored paper we cut out rectangles (4 pieces) that are sized to fit the side of the accordion.
Glue them 2 pieces on each side of the paper strip. We prepare stencils of three hearts of different sizes.
On the first sheet we cut out the largest heart, on the second - a smaller one, on the third - the smallest, and the fourth side remains intact.
This is what the work looks like from the reverse side.
Fold the accordion and you get a multi-layered valentine.
If you unfold it, then all the hearts are clearly visible through the holes.
Option 7, in the spirit of “yin-yang”
We prepare a stencil in the form of two hearts connected by a curly part in the center.
We cut out a blank from double-sided colored cardboard using a stencil.
We bend along the line of joining the side hearts. And glue a beautiful openwork heart in the center.
Connect the side hearts together. Decorate with small hearts. The result is a multi-layer valentine in the shape of a book.
You can use 2 adjacent shades. To do this, cut out the middle part with one heart from pink double-sided cardboard, and let the second heart be red.
Glue the red heart to the side. We place a beautiful multi-layered heart in the center. Bend the sides into the middle.
We connect the halves and decorate with flowers. This valentine looks more original.
These multi-layer valentines can be made using stencils from colored cardboard and paper. Some of them even resemble a puzzle, so they will be interesting not only for an adult, but also for a child.
Materials and tools for work
The process will require traditional tools for cutting, pinning, stitching, and gluing. Each master decides on the material independently. The means for finishing the craft are also selected individually.
Flat and three-dimensional products are provided as samples.
Openwork valentines
Openwork paper hearts look gentle, like a weightless cloud or a pattern from a skilled artist. They are very easy to make, and the result exceeds all expectations. Here are several options for openwork hearts.
Option 1
First, we cut strips of pink paper about 1 cm wide. Their number must be even.
Now we stack all the blanks one on top of the other, in a stack. On one side we fix the strips with a stapler or PVA glue. And on the reverse side we shorten them trampled on. 2 long ones remain in the center, each subsequent one (symmetrically on both sides) becomes shorter by 1.5 cm.
We divide the strips in half and bend them downwards so that the fixed ends remain in the center of the work. We trim all the edges and again fix them with a stapler or glue. An openwork heart comes out of stripes.
If the top edge of the strips is connected to the bottom, you will get an equally beautiful heart.
Option 2
Using a stencil, cut out a heart from colored paper. Fold it in half and draw a beautiful pattern. You can depict a tree with fruits in the form of miniature hearts. Using sharp scissors, cut out according to the graphic design.
We open the resulting blank and see that the pattern on the left and right is the same. But in general it is a branched tree. This technique is called vytynanka.
All that remains is to glue the openwork heart onto a sheet of colored cardboard in a contrasting shade. The valentine card is ready.
Option 3
Using a stencil, we cut out a blank from white paper and a heart of the same size from red paper. On white paper we draw openwork patterns that are closely intertwined with each other.
Now we fold the red and white hearts and begin to cut out the extra fragments of the pattern with sharp scissors.
This is how beautiful a heart with a beautiful pattern looks.
Glue it onto a yellow rectangle so that the design can be seen even better.
Option 4
Using a stencil, draw a small heart on a sheet of pink paper. The paper must be double-sided.
In this heart we draw a spiral line that follows the contours of the image.
Fold the sheet in half and cut out two hearts according to the graphic design. They come out like a long spiral.
We fold a white sheet of paper in half and trace the palm so that the little finger is on the fold line of the paper. Cut it out and get something like this.
In the center we glue two openwork hearts, glued together by the centers. A valentine card entitled “Our hearts are in your hands” is released.
Option 5
Again, cut out the heart using a stencil on a sheet of double-sided colored paper.
Fold it in half.
And starting from the bottom corner we make cuts, trying not to reach the top edge by 0.5 cm. The distance between the cuts should not be too large (up to 1 cm depending on the size of the base). When we approach the semicircle of hearts, we need to make an additional fold and make cuts.
Then we unfold the workpiece to its original position. The result is a heart with horizontal stripes.
Now all the stripes need to be bent alternately to the right and left sides so that the heart acquires volume.
The result is weightless clouds in the form of openwork hearts. Smaller hearts look no less original.
If you attach a pink thread or fishing line to them, then the crafts can be hung on a chandelier. These openwork hearts are quite easily made from ordinary colored paper.
New ideas
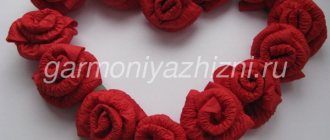
We offer you other diagrams for assembling beautiful hearts using the modular origami technique:
№ 1
№ 2
№ 3
№ 4
№ 5
A lot of beautiful figures, figurines and souvenirs can be made using the modular origami technique, but you should remember that this is not a simple task, but an activity that requires attentiveness and perseverance from a person. Therefore, if you decide to do this business, do not give it up halfway, and then you will achieve good results and great success.
Related article: Main diseases and pests of perennial phlox
Intertwined hearts
Wicker hearts also have their own zest and a certain charm. They are easy to make, and the result is a beautiful interweaving of straight or curved lines. Here are a couple of options for making intertwined hearts from colored paper.
Option 1
First, let's prepare a stencil. Take a rectangle measuring 8 by 14 cm. Cut off the corners on one edge and draw wavy lines on the other, as shown in the photo.
Cut out 2 blanks from red and pink paper using a stencil.
Let's connect the resulting stripes in a checkerboard pattern; the result should be a two-color heart with a beautiful weave.
Now let's take another stencil of the same size and draw other lines on it, straight and with curves.
A heart will come out with a different ornament.
The more creative the design on the stencil, the more original the weaves will be at the stage of connecting two halves of different shades.
If you use double-sided colored paper, then the valentine will be beautiful on both sides.
Types of hearts
What types of origami are there and how to use them later? We have selected several ideas for origami hearts:
You can make a simple heart and use it as a valentine. And you don’t have to wait until February 14th. Such a romantic gift is perfect any day.
This heart-shaped bookmark will appeal to those who love to read.
You can put a note or a small gift in the envelope heart.
A heart-shaped box will perfectly complement the main gift. Or it will become a box for small items.
Bookmark for true romantics
A cute Valentine's Day surprise for those who still prefer printed books to newfangled gadgets. The bookmark is very convenient - it is attached to the page, is always visible and does not get lost.
For this model you will need a sheet of double-sided colored paper; you can use craft or decorative sheets for scrapbooking. The optimal size is 15x15 cm. First, we fold the so-called “narrow” origami heart based on the “kite” shape. Description of the process in the video instructions:
We continue to make our bookmark:
- We place the heart in front of us.
- We open it from the inside, turning it into an elongated rhombus. Fold the top part in half to the midline.
- Close the workpiece again. Now it consists of a shorter upper part and a longer lower one.
- We work only with a shortened heart. We fold its right side, aligning it with the center line.
- We do the same with the left side.
- We lift the upper part of the workpiece and turn the last two folds inside out.
- We iron all the fold lines well.
- Return the top heart to its place. The bookmark is ready. It “works” on the principle of a clothespin, putting it on the desired book sheet.
Paper heart pendants
You can make beautiful and delicate pendants from paper hearts that can be hung on a window or decorated with a chandelier.
Pendant made of hearts and circles
You can even make a garland from many glued hearts.
Pendant made of multi-layered hearts