Wreath
What's a holiday without this decoration?
For the wreath we will need:
- Green foamiran;
- Glue;
- Scissors;
- Lots of shiny decorations;
- Ribbon.
Making:
- Cut out a circle.
- We create a pattern of shiny stones on it.
- We make a bow from the ribbon. And at the same time a loop.
- Author of the idea
You can come up with your own decor. Here I wanted to show the principle of operation.
Master class on how to make a Christmas wreath from newspaper tubes
If you want to make another masterpiece, and also from an unusual material. Namely, from tubes, but not plastic, but paper. Imagine, it’s hard to believe, but now it’s possible to do such things. Moreover, you will need old newspapers.
We will need:
- many newspapers
- PVA glue and moment
- stain or brown gouache
- thin wire
- thread
- bottle
- knitting needles
- decorative tape
- beads
- scissors
Stages:
1. Twist tubes from newspapers, use a knitting needle for this, treat the joint with glue. Then place them like shown in the picture and start weaving.
2. To complete the craft, you need to take a jar, like a tall flask, suitable for varnish or juice, and wrap it in a spiral.
3. You need to do it this way, take the first tube and bend it like this:
4. Afterwards, bend the adjacent one and place the next one, and so on until you have assembled the entire product.
5. Gradually raise the jar.
6. This is how the blank turned out, quite long.
7. Twist the resulting workpiece into a circle and connect the ends with wire. And then use stain or paint.
8. Thread the blue ribbon and glue on the beads.
There are still questions left, then take a look at this video, maybe there won’t be any more. Make such beauty from paper vine. Good luck!
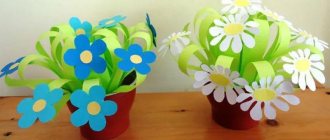
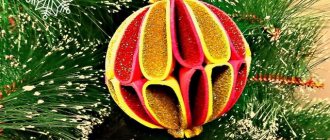
Flower
The photo shows all stages of work. The craft is beautiful and unusual. Can be used to decorate a room, a door, or even as a Christmas tree decoration. Paper is used in the photo, but I think the craft will only be better with foamiran. There are 3 red small inflatable balls inside the flower.
What are they?
Dolls made from Thomas are considered the pinnacle of craftsmanship. They are much more budget-friendly than traditional versions made of porcelain, wood and acrylic. That is why the material has become widespread in theater circles. But even outside the theater, such dolls have a right to life - they become children's toys or memorable souvenirs. The childhood industry widely uses foamiran to create educational puzzles, soft construction sets, New Year's toys and many other products.
A special place is occupied by bath toys, due to its high porosity, foamiran seems to stick to the tile. Plastic figures made from it delight children while bathing and make water procedures more exciting. And to prevent children from tearing and eating such products, they are made from thickened sheets of fom.
Working with foamiran is included in the practice of developing a child’s fine motor skills.
When working with children, it is not at all necessary to limit yourself to cutting out beautiful shapes. You can come up with stylish and practical crafts, these can be various mosaics, refrigerator magnets, as well as frames for children's drawings. Foamiran is in wide demand for making New Year's toys. Christmas trees, garlands, Christmas balls and even pine cones are made from it. The material is indispensable for making realistic masks for the children's New Year's carnival.
Christmas decorations
Even figures simply cut out of bright, dense material can already serve as a beautiful Christmas tree decoration. But you can also make a composition from the figures.
We create a designer toy:
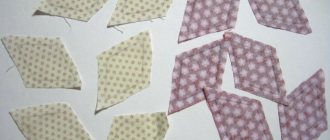
- Using a shaped hole punch, we cut out small flowers (it doesn’t matter if you have a hole punch with a different pattern, any one will do for this craft).
- Heat the iron; A minimum temperature is sufficient. We apply the workpieces to the hot surface. They must acquire volume.
- We pierce the prepared flowers with a French pin. We secure it with a pin to a foam ball.
- We secure the loop by stringing it onto one of the pins with a flower.
Snowflakes instead of flowers will look original! Such toys are excellent gifts; they will pleasantly surprise you with their elegance.
Tips from needlewomen
Most handmade foamiran toys have a fairly flat shape. Thanks to this, some of the figures can be placed on the Christmas tree, and some crafts can be attached to the refrigerator. In the second case, a small magnetic strip or square is glued to the back of the toys.
Important! If the figurine is too heavy, the magnet will not hold it, so you should select simple, lightweight crafts.
For a green Christmas tree, it is better to make your own New Year's toys from shiny foamiran, as they will contrast favorably with the dark green background. If the Christmas tree is white or silver, then matte toys will be more suitable for it.
If you sew or glue together two layers of foamiran with a cotton layer, you can get voluminous crafts
Various toys for the Christmas tree
These bumps will be much more elegant and voluminous if they are made from foamiran
You can also make a variety of balls with appliques - click on the pictures to enlarge:
More templates you may need. I would like to remind you that our Santa Claus does not have a clown’s hat, but a boyar’s hat without a balabon and his beard is much longer.
Christmas trees will also look harmonious from foamiran. In principle, everything that is made from felt can be made from foamiran, even better, because foamiran has two advantages - it holds the shape that is given to it when heated or twisted, and prints can be made on it. This means that the Christmas trees can be fluffier and the toys more natural; remember how in the article about crafts for school, there was a cookie - a heart made of foamiran. It's very easy to make and looks edible.
Pine with branches
This foamiran Christmas tree is almost as easy to make as the previous one, but it is made according to a different principle. The material should be two or three shades of green, or more if it is available for sale. For a craft 20 cm high, 4 A4 sheets are enough. In addition to foamiran, you will need the following materials and tools:
- scissors;
- iron;
- ruler;
- hot glue gun or clear glue;
- a cone made of cardboard or foam;
- decor (beads, bows, sequins, ribbons, etc.).
Tip: pine feet do not have to be made of green material; blue or white will do, but a combination of several colors looks best. If you want to make an original version, you can use absolutely any tones.
Headband
What I liked about this model was the ethnic style, and the fact that even if you don’t have templates, you can still make flowers and a headband with them.
We will need:
- 2 sheets of glitter white foamiran;
- Scissors;
- Wire cutters;
- Wire;
- Yellow beads;
- Four leaf flower template;
- Foil;
- Glue;
- Glue gun;
- Threads;
- Floral tape;
- Iron.
Making:
- We cut out the blanks according to the template.
- Using an iron we give them shape.
- For a bud: 1 square, 5 circles.
- We also heat the petals for the bud on an iron.
- Make a ball out of foil. While we bend and twist the foil, weave in the thread.
- We cover the circle with a square and fix it with glue.
- On top, around the circle we decorate with petals.
- We put 2 flower blanks together. We pull the thread and needle through them several times. There should be “tails” on both sides.
- On the front side, the tails are stamens. Dip them in glue and beads.
- Using the tails on the wrong side, we will attach the flowers to the rim. To avoid pulling the thread and spoiling the pattern, apply a drop of glue from the underside at the base of the thread.
- For the wreath we will need 4 sizes of wire. Let's cut it off.
- Wrap it with tape.
- When we wrap it, we insert flowers.
- It remains to weave the layers together, folding them 4 times. Glue ribbon to the edges to tie the wreath.
You can make a different design. For example, attach flowers to a finished headband or make hairpins with this jasmine.
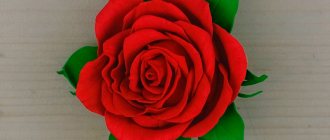
Poinsettia
Flowers made from foamiran turn out incredibly beautiful. This material seems to have been created for the purpose of making fantastic compositions from it. For the New Year, it is worth making the main Christmas flower from foamiran - poinsettia. It's quite simple.
You will need:
- stencil;
- glue gun;
- rhinestones;
- any decor;
- candle.
You can cut foamiran blanks using this stencil.
However, if you are unable to print it, you can easily replace it with your own design. Other leaf stencils are also suitable, from which you can create a flower similar in shape to a poinsettia.
If you are a beginner, it is better to work not with individual leaves, but with whole blanks of 5 petals. Light a candle and carefully bring the foamiran to it. Don't hold the material too close - it's important to make it pliable, but not melt it. Use tweezers to form small boat-shaped folds. Do this with each petal.
Connect all the pieces together. The most convenient way to fasten layers of foamiran is with a glue gun, forming a Christmas flower by layering. Place a bead or something else in the center. Form several poinsettias in this manner.
What can be made from a Christmas flower:
- New Year's wreath
- Women's headband
- Christmas tree decoration
- Flower arrangement
- Application on a postcard
- Holiday bracelet
- Brooch
- An alternative to a gift bow
- New Year's bouquet in a basket
- Decoration for the festive table
This is only part of the idea, and the rest is your imagination.
If you decide to make your own New Year's wreath using foamiran, check out our selection of ideas. Perhaps one of them will inspire you.
Christmas tree made of foamiran
I'll show you 2 options. This one is more complex.
- Cut squares from green foamiran.
- We make the fringe by making cuts on the side.
- Heat all parts on the iron.
- Glue the base to the cone.
- We fix the squares to the cone from bottom to top.
- At the top we glue a fringe of ribbon.
- We decorate with beads and ribbons.
- Author of the idea and master class
A very cute craft for the New Year.
Twig
A pine branch with a pine cone will look no less elegant in the interior of an apartment or house.
Such crafts for beginners and children from foamiran are easy to make if you follow the step-by-step instructions.
For work you will need the following materials:
- chocolate and dark green foamiran;
- white oil-based pastel;
- Super glue;
- brown tape;
- iron and scissors;
- wire with a cross section of 1.2 mm;
- acrylic based varnish;
- plastic egg.
"Video instruction"
Use these decorations as an addition to gifts or as a stand-alone foam tree ornament.
You can also use them to form original bouquets that will decorate your home.
Simple spruce
This job is for the little ones.
- Cut out the blank for the cone.
- We secure the edges.
Christmas tree made of foamiran - Using a hole punch or yourself, we cut out small multi-colored figures: stars, balls, hearts, snowflakes.
- The kid can attach all this decor to the craft.
- Author MK
Crown
Princesses need a crown!
How to do it, watch the video:
- Cut out a crown from foamiran. Length – 15 cm. Height of teeth – 8.5; lower level – 3.5 cm.
- Glue it together.
- We decorate with rhinestones and beads.
- From organza (1.5m by 5cm) we make an elegant “skirt”. We make folds and stitch. The last seam should be light, not fastened with knots, so that by pulling, you can pull the skirt to the desired size.
- Let's make a bow.
- We attach the base to the bottom of the crown.
- We assemble the design: attach a skirt to the headband, hairpin or headband, and a crown on top. There is a bow on the crown.
If you remove the organza “skirt”, such a crown will suit a prince too!
Cone
This Christmas tree toy made from foamiran is suitable for both experienced needlewomen and beginners. To help, step-by-step photos are included, thanks to which making the product yourself will not be difficult.
Necessary materials:
• brown foamiran; • round stack; • scissors; • glue; • white paint; • foam egg.
Progress:
1. Cut circles from foamiran with scissors. You can use a hole punch of the desired diameter.
2. The circles should be heated a little, then pressed with a round stack so that the parts become slightly rounded.
3. You get several scales for the cone.
4. Attach one scale to the edge of the foam egg, then the rest in a circle, overlapping the previous row. 5. After the surface of the egg is completely covered with scales, they should be painted with a little white paint.
For reference! You can make several of these cones to make a whole branch.
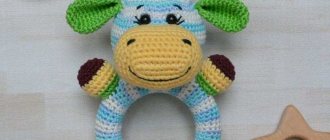
Piggy
If you have a universal mold, let's now try to make a cute pig.
- We heat the mold. Place a sheet of foamiran on it and press down. We fill it with pieces of foamiran. On top is glue from a hot gun. We cover it all with another sheet of foamiran and press it down with our fingers.
- Using the same scheme, we form the second (back) part.
- We cut off the excess. From it we make additional parts: a nickel, ears.
- We connect 2 parts.
- Let's paint.
- Author of the idea and MK
If you make only one, the front part, you can glue a magnet to the back. Such magnets can be made not only in the shape of a pig, but also of Santa Claus, etc.
Postcard
card from foamiran for the New Year
You can simply prepare a beautiful card. It is enough to cut out any winter composition. Select glue and connect all parts of the picture.
But you can also do it this way:
View this post on Instagram
Publication from Elena Selivanova (@daynotes.ru) December 3, 2022 at 11:28 PST
Subscribe to my Instagram, there are many useful MKs there
- We cut out a Christmas tree from foamiran according to the template. We have it in four parts. We make each part a little higher than the template. We make cuts along the bottom edge and twist it in our hands. We glue it onto colored or white cardboard; you can also make an applique for the background.
- We make a star out of yellow.
- And we decorate our picture with rhinestones or toys.
It will be very simple and interesting for kids to create this little miracle!
What ways do you know to make crafts using foamiran? Share! Your work is interesting. And if you share this article on social networks, and a lot of people come to visit us, can you imagine what a collection of work we will gather?!
Tools and materials
To make toys you will need a number of materials.
- Foamiran directly. There are a significant number of different varieties of foma on the modern market. The most popular materials among needlewomen are Iranian, Korean, silk, and marshmallow materials.
- Working with foamiran is unthinkable without an iron - this is an indispensable tool that allows you to give foamiran the desired shape. When heated on an iron, the foamiran becomes thinner and becomes very pliable.
- Most often, foms are sold in light shades - white, cream or pale green. That is why it needs to be additionally painted - without tinting it is impossible to achieve the realism of the toy. Each master has his own individual preferences - some work with paint, others like wax crayons, but most often they use pastel (oil or dry). Foamiran can also be tinted with oil paint - it will last for many years, but the cost of a set of dyes is quite high, so such decor will cost the needlewoman a pretty penny. You can use acrylic - it costs an order of magnitude cheaper. However, keep in mind that when applied to foam, any acrylic paints form a thin film. If it is rubbed, it simply begins to crumble off the surface of the toy. Therefore, acrylic paints can be used only for painting the thinnest elements, which, according to the author’s idea, will be in a static position.
- Scissors are required to cut out the templates. For large parts, the most ordinary tools are suitable, but for working on small elements it is better to use manicure models with curved blades.
- In order to give the elements the necessary textures, you can use molds - most often they are cast from plastic. They have a rather rough and rough texture. If you don’t have the necessary tool at hand, then use a regular embossed structured button.
- Hole punchers will also be indispensable assistants when performing small jobs. You can use both stationery models and scrapbooking products. They are optimal for making the smallest elements, but you shouldn’t get carried away with them in order to avoid the sameness of the crafts.
- The creative process will require the use of glue. Most often, needlewomen choose a hot-melt adhesive gun or Moment superglue, designed for working with plastic and rubber.