- Candlestick made from an inverted glass
- Available materials and simple tools
DIY glass candlestick master class
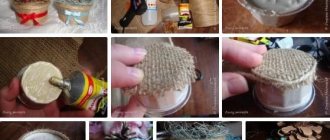
We offer you a fairly easy master class with a photo of a candlestick made from a glass, which you can make with your own hands. To make it you need the following materials:
- Small thuja branches.
- A piece of paper or newspaper.
- Large tall glass.
- Scissors.
- Spray or regular glue.
Let's start the work by cutting the thuja branches to the required size and laying them out on paper. Then we will apply glue to them; if you do not have it in the form of a spray, you will need to use a brush to apply it.
We paste thuja branches around the glass in a circle; this must be done quickly so that the glue does not have time to dry.
Interesting! Do-it-yourself candlestick from a jar for New Year 2022 - how to make a candlestick, step-by-step master class with photos
After the glue has completely dried, you need to carefully trim off all excess with scissors. At this stage, all the big work is finished, all that remains is to choose a suitable candle and place it in the glass. As a result, we got a very original and beautiful candlestick that will become a worthy interior decoration.
With thuja branches
There is a very stylish winter version of a candlestick with fresh pine needles. The idea is similar to the one where lace is supposed to be used, but a little more complex in execution. But the result will be truly New Year’s decor, which will fit perfectly into any stylistic design solution of the room: from loft to Scandinavian minimalism.
To work you will need:
- glass with high walls;
- small branches of thuja (at least 2-3 cm below the wine glass);
- glue (preferably in spray form);
- scissors;
- paper or polyethylene;
- snow spray (optional);
- glitter (optional).
Next you need to follow the step-by-step instructions:
- Cover the table with paper or plastic.
- Measure the thuja branches and cut off the protruding parts.
- Lay them out on the table and cover them with glue.
- Quickly attach the blanks to the glass.
- When they stick, you can place a candle inside.
If you have a spray with “snow”, it should be sprayed on the lower part before gluing the branches.
Then they will be like Christmas trees in a snowy forest. It is recommended to apply glitter to the finished product. They will add decorativeness and remind you of sparkling snowflakes.
Creating New Year's decor
Holiday decor with candles can greatly reduce the number of other decorations. The warm glow in itself creates a fabulous and inviting atmosphere, and combined with glass surfaces it also creates a play of light with shadow and highlights. Glasses are the simplest option to create a beautiful candlestick without resorting to buying expensive analogues. In the future, even just being next to the beaded Christmas tree, it will remind you of the New Year and Christmas.
Flying mug with birds
The bird is a symbol of lightness and freedom; it is very often found in interior solutions in various styles and variations. This motif is also reflected in the decoration of the floating mug.
A floating mug can become a wonderful house for a nest of birds. The nest resembles a home and an idyll in it.
A cup with daisies and a bird with a nest looks like a real symbol of family, love and fidelity.
A bird with delicate roses, fluttering butterflies and other decorative elements will help create a summer soaring composition.
With dry filling
A transparent glass looks beautiful when filled with bulk ingredients. Their roles may include:
- cereals and beans (looks especially appropriate with an ethnic theme for Christmas);
- acorns;
- cones;
- beads and Christmas balls;
- sea pebbles;
- anise and cinnamon sticks.
The “filling” can be combined, layered, and shiny New Year’s elements can be added.
Option 7
Just think, thanks to your imagination, a simple glass can easily be turned into a candle stand. Moreover, there are a lot of execution techniques. Let's consider a New Year's example.
We will need:
- wineglass;
- twine;
- for decoration peas, red beans, corn;
- candle.
Sequencing:
- In a clean, dry glass, first pour a layer of peas, then beans, and corn.
- We put a candle in the middle.
- We tie a rope on the glass with a bow.
How to make a candlestick from a wine glass with a long stem?
If you still have a glass or plastic wine glass or glass, you can turn it into a candlestick. This method belongs to the list of easily and quickly implementable ones - in conditions when there is little time left, but you still need to decorate the table additionally. There can be several candlesticks if the table is large and there are a dozen or more guests. A candlestick made from a large glass will serve as a decoration in the center (or closer to it) on a spacious table designed for 10-15 people.
But not only the festive table is the place where such candlesticks are used; they are placed in other prominent places within the kitchen-living room. Important: before using any candlesticks, make sure that the base is made of fireproof material so that the holiday does not suddenly become an incident or even an accident.
Also read! DIY New Year bottle decor: 20 ideas
With an inverted glass
To make one such decorative element - a candle on an upside-down champagne glass, use a candle that stands confidently on any surface. Check how stable it is before setting it on fire. An inverted glass or wine glass creates a space at the bottom that can be filled with something decorative.
The glass is left transparent when any figurative decoration or decoration that fills the entire volume is placed inside, into the cavity formed by its inverted state. It doesn’t matter what it is - a piece of garland, an LED lamp, a three-dimensional inscription on a workpiece, a figurine, a polyhedron or something else - this element must be clearly visible, otherwise the meaning of its insertion into this cavity is lost.
For example, they place figurines of characters from films or games, or a small matryoshka doll there. For a New Year's candlestick, this is a Christmas tree toy in the form of a ball with sparkles. If you don’t yet have such paraphernalia, use a decorated, painted spruce cone, a Christmas tree shower, or a piece of plastic garland.
As a special option - a small battery-powered flashlight with LEDs with a warm glow, the color and shade reminiscent of a candle flame or smoldering coals of a fire. Cold-colored light (from white to blue), as well as green and other backlight colors that create absolutely unnecessary contrast, do not suit the range of a candle flame.
When, for example, a triple candlestick is created, the old glasses are placed upside down on a worn CD or a neat blank made of natural wood or plywood, pre-painted and decorated with sparkles. To prevent them from moving, the candlestick, made in the form of a non-demountable structure, is glued together with epoxy or hot melt adhesive. Gluing the glasses prevents them from falling off the round base. Before gluing, do not forget to insert the selected attributes of additional decoration into the cavity under the inverted glasses (if the glasses remain transparent).
Lampshaded
Glasses are also suitable for making mini lamps with candles. Important: the lampshade must be fireproof. To do this, use a cone-shaped wine glass.
Step-by-step instruction.
- Select paper of the required color.
- Glue the cap for the future lamp. The layers of paper are joined together in an overlapping manner.
- Impregnate it with non-flammable compounds and varnish. This is important - the paper should not smolder, because it is located not far from the candle light.
- Paint the stem of the glass, for example, with acrylic paint of the desired color. Place a piece of candle on it.
- Place a lampshade on the stem of the wine glass.
Before lighting such a lamp, it is recommended to additionally decorate both the lampshade itself and the inverted container.
Painted with colored paints
Do not use a glass with cracks or scratches - the appearance will be ruined. It is quite difficult to paint chaotically spreading cracks with a “web” and thus disguise them.
A glass goblet accidentally split into two or several parts is glued together, painted and decorated. An outside observer will never guess that the product is broken - all defects are hidden very reliably.
Paint the stem of the glass - preferably to match the tone of the paraffin from which the candle is made: the color should be opalescent, whitish, vaguely reminiscent of a creamy tint.
Cracked glasses that are unsuitable for further use are covered with a decorative layer based on waterproof varnish or paint, and then painted according to the wishes of the owners of such a candlestick. To prevent the coating from falling off over time, sand the walls of the glass until matte. Next, the glass, which has become matte, is coated with colored varnish. For example, a coating made of silver paint (made from aluminum powder) or “golden” paint (made from brass or bronze powder) is considered especially chic. A copper shade can be obtained from the same copper - powdered copper is mixed with colorless varnish, then this composition is applied to a wine glass. After the layer applied to the product has dried, it is additionally painted with any paint interspersed with glitter.
Do not miss! Patterns of protruding cones for the New Year 2022 for cutting out onto the window
Alternatives from natural materials
Candlesticks can be hung along the garden fence to make cold evenings warmer
If you want to add more nature to your apartment, you can add a special theme - forest or sea.
From leaves
Stunning glowing jars will save you from the autumn blues
From leaves
Yellow fallen leaves in a candlestick will help preserve memories of a wonderful autumn:
- completely cover the glass jar with decoupage glue
- Gently apply clean, dried leaves to the surface (you can stir on top)
- in the process, go over each leaf with your finger wrapped in cloth
- secure a jute rope around the neck
From shells
Gold-painted shells will not let you forget about the sea
From shells
The easiest way to use seashells is to make a full-fledged candle out of them. Choose different shapes of large and medium sized shells. We paint the products in any color (gold, silver, bed and white shades are ideal) using one of the suggested methods:
- Aerosol can
- Acrylic (it is better to take a foam sponge/sponge)
- Thin decorative foil (apply glue to the shell, wrap it in a sheet, remove after 30 minutes)
Next, it remains to install the wick and fill it with a small amount of paraffin.
You can melt the wax of an almost finished candle in a water bath or scrape a little from a whole one. Gradually stir the paraffin until smooth using a wooden spatula.
From the cones
Pine cones can be combined with pine branches, red berries
From the cones
To create a candlestick, you can use either one whole cone or a collection of them. The second option uses similar techniques that we discussed: we attach different cones and additional decor to the base, leaving room for a candle.
The first one is more interesting - a fairly simple but elegant option. First, scrape off a few flakes from the top with pliers to create a flat surface. Push a metal pin (large needle) inside and place a long candle on it.
The candle can be attached to the pine cone using hot glue, but this design is not strong enough.
Veranda attached to the house - expanding the living space: projects, tips on how to create it yourself (200 original photo ideas)
Candlestick using decoupage technique
Don't know how to turn an unnecessary glass into an interesting decorative item? Try to transform it using the decoupage technique. Choose three-ply paper napkins with beautiful designs. For the work you will also need acrylic paint, PVA glue, varnish and special contours at your request for the final part of the decor. Degrease the surface of the glass goblet and apply the first layer of acrylic paint as a primer. The most convenient way to do this is with a sponge; one layer is enough, but if you think that the result is not even enough, repeat the manipulation. While the paint is drying, it's time to choose the designs that you will stick on. Cut out the most interesting and beautiful motifs from a napkin. Think about their location based on. After the paint has dried, glue the selected elements to the bowl of the glass using PVA glue. Gently smooth the napkin with a brush, try to glue the drawings without folds or wrinkles. When the glue dries, the craft can be tinted with paints and individual lines can be emphasized with a special outline. Finally, don't forget to coat your work with varnish.
Floating cup made of coffee beans
Coffee beans are still one of the most popular materials used in decoration. It’s very easy to create such a floating mug, but there are a few secrets .
1. When creating a flying bowl, it is better to wrap the base with masking tape. Next, the resulting “slide” must be painted in the color of coffee with acrylic paint so that the base does not show through between the grains.
2. Another option is to wrap the base with brown fabric.
After this, you can start gluing the coffee beans. There is also one important nuance here.
If you use hot glue, it is better to apply it to the grains themselves, and not to the base. This way, glue smudges will not be visible.
Coffee beans can be complemented with decorative elements such as cinnamon sticks, dried citrus fruits, and clove flowers.
Satin flowers using the Kanzashi technique will perfectly decorate your steaming coffee cup:
Master - Vera Litvinova
The tea pair can be decorated with simple twine. Twine can be used in either natural color or dyed or bleached.
An appetizing cake will perfectly complement your cup. The cake can be “made” from modeling mass by painting it with acrylic paint and pasting it with coconut shavings. Be careful, there is a high probability of not being distinguishable from the real thing!)
Kanzashi Needlework Video tutorials will clearly show how you can make a floating bowl with coffee decor:
Miracles under the glass dome
If you still have one or several unnecessary glasses/glasses on the stem, you can make a very original candlestick. Turn the existing container upside down. Now its leg is on top - and it is on it that the candle will be installed. The bowl of the glass magically turned into a container for placing decor. Take a fairly thick piece of cardboard, draw a circle around the edges of the glass and cut it out. If desired, the “plug” can be painted or even painted. Now you can start the most interesting part - decorating. Degrease and rub the inside of the bowl well. You can place any small figurines, souvenirs and simply beautiful little things in it. These can be sea pebbles and shells, artificial flowers, multi-colored beads or buttons. Using this technique, you can make candlesticks from glasses for the New Year with your own hands. Just choose the decor you need - voluminous snowflakes, miniature Christmas trees, a Santa Claus figurine, or just a mountain of gifts.
Option 1
We will need:
- stemmed glass;
- brush;
- PVA glue;
- salt;
- decor (buttons, rhinestones, stones).
Sequencing:
- Wash the glasses thoroughly and wipe dry.
- Dip a brush into glue and draw simple patterns (curls, inscriptions, funny figures).
- Pour salt into a deep container. Cover the glass with it, removing excess.
- We are waiting for it to dry completely.
- If desired, the inside of the glass can be decorated with rhinestones or beads, placed on glue.
- Drizzle a little wax onto the bottom of the glass. We attach a candle to them.
The candlestick is ready. All that remains is to decorate the festive table with it, creating a fabulous mood for yourself and your guests.
Interesting: DIY New Year's gift bags 2023: master class with photos
Beautiful examples
- You can decorate a lampshade at home, for example, with a texture reminiscent of colored stones or ice floes of a frozen coffee drink.
- A glass with a long stem, for example, is trimmed with lace. It, in turn, is impregnated with colored varnish or a colored adhesive base so that it hardens and does not peel off later. You can also line a measuring cup.
- Any glass can be given a matte shine. But, being applied to a smooth surface, such a candlestick requires extremely careful handling.
- Flat-cylindrical glasses with a stem, the bottom of which is equal in area to the inner surface of the main bottom, are decorated with thuja branches, “embalmed” in transparent glue or varnish. Once sealed in a hardened compound, they will retain their fresh green appearance dozens of months later.
Which is the best water heated towel rail to choose: manufacturer ratings
Types of water heated towel rails: which one is better to choose, manufacturer ratings and review of models. Advantages and disadvantages of towel dryers. Features and installation rules.
Ratings
- 14.05.2020
- 3217
DIY glass candlestick: step-by-step master class
Decorative craft supplies can transform hanging glass containers, which in turn make ideal candle or plant holders. Today we will tell you how to make a cute hanging candlestick with your own hands from a glass, beads and wire.
The glass glasses, bowls and other similar containers themselves can be purchased at convenience stores or in the hardware section of the supermarket. Don't worry if you can't find a glass container that is exactly the same size or shape, as the design shown is flexible enough to fit most other containers of the same size. You can also use a broken glass with a broken stem as a glass container for this project - you just need to sand the chipped area.
You can also use aluminum wire instead of copper wire and vice versa, although aluminum may be a little more difficult to shape.
Our project is divided into two stages: first we will create a wire braid to hold the glass container, and only then we will make a chain to hang the container and add decorative elements.
To make a wire frame you will need the following materials and tools:
- Pliers and round nose pliers for making jewelry
- 16 gauge aluminum wire
- Wire cutters
- Glass beaker, small aquarium or bowl with a diameter of about 10 cm
- Rubber
Step-by-step instruction
Step 1
Twisting pieces of wire into a loop
Cut two pieces of aluminum jewelry wire from the skein, each approximately 75 cm long.
Using a piece of pipe with a diameter of 1.5-2 cm or any other object, round in cross-section and of a similar diameter. Bend both pieces of wire in half and wrap them simultaneously around the pipe or cylinder at the bend in the middle. Twist them at least 3 or 4 turns to securely fasten one piece of wire around the other.
Remove the cylinder, resulting in a loop and four wire ends.
Step 2
Separating the ends of the wire in an "X" shape
Bend the ends of the wire away from each other and arrange them in the shape of the letter “X” - they should be evenly spread, as shown in the photo. These ends of the wire form the main frame that will hold the glass container.
Step 3
Forming a wire frame in the shape of a glass vessel
Loop each wire around your glass container. During this process, hold the loop down, under the bottom (at its center) of the glass bowl.
Step 4
Twisting the ends of the wire into spiral curls
Remove the wire craft from the glass container. Using pliers, wrap a small loop around one of the wire ends. And then, using your fingers or the same pliers, continue to wrap the wire around the resulting small loop until you get a spiral.
Step 5
Twisting the spiral on the remaining wire ends
Repeat the previous step on all other ends of the wire. In the next step, we will adjust the size of the spirals and frame to the outline of the glass vessel.
Step 6
Adjusting the size of the wire spirals
Place the glass container inside the wire frame. Continue twisting the wire ends in a spiral until their height is slightly higher than the neck of the glass container.
Step 7
Fixing the frame on the vessel with an elastic band
Stretch an elastic band over the wire frame with the container inside and secure it about halfway up so that it holds all four wires stationary around the glass container. Distribute the ends of the wire evenly around the container. Hold the loop in the center of the base of the vessel.
Step 8
Fixing the frame with wire
Cut a piece of 16- or 18-gauge aluminum wire at least 12 inches long. Wrap it around the wire frame just below the spiral, over the edge of the vessel.
Braid the wire around the edge of the glass vessel, then the next wire in the frame, directly under the spiral. Try to keep the frame wires fixed in the center. It will be ideal if the wire arches of the main frame are located at the same distance.
Use the free end of the wire to bend around the frame arcs until you come to the first arc. Braid the first arc again and cut off the end. Such a wire braid will perfectly fix a glass container of any shape; it should look like a drawing.
Step 9
Making a decorative chain
To hang the candlestick you need to make a chain with beads from aluminum wire. For this part of the project you will need the following materials:
- 18 or 20 gauge aluminum wire
- round pliers
- faceted glass beads with a diameter of 6 mm.
Step 10
Making wire loops
Cut the wire into pieces about 3 cm long. Make a loop on the end of each of them. Now string a glass bead onto the resulting pins. Wrap the loose ends of each pin into loops.
Step 11
Connecting links with beads into a chain
Connect the resulting links of the future chain to each other, opening the loops on the side, similar to opening the connecting rings to prevent them from bending.
All chains with beads must be the same length - at least 15 cm.
Step 12
Attaching the chain to the frame
Using jump rings, attach each chain to the wire frame by the outer loop of the wire spiral.
Step 13
Attaching chains to a ring
Using a large jump ring, tie the loose ends of the chains together into a bun. Now you can hang the candlestick from the large connecting ring.
Step 14
Manufacturing of additional pendants
If desired, you can make and attach more hanging decorations to the craft.
Step 14
Setting up a candle or plant
Once you've finished decorating your candle holder, place a candle or plant inside the glass container. After this, hang the product outside or inside the house where it will be visible and easy to use.
We are confident that such hand-made candlesticks made from wine glasses or bowls will decorate the interior of your home or garden and fill the atmosphere of evenings spent in candlelight with warmth and comfort and bring loved ones even closer.
Selecting a candlestick according to the size of the candle
The use of natural materials brings us closer to nature
For each type of candle it is worth choosing a variety of candlesticks. The most popular are long church, tea, traditional paraffin in the form of a cylinder. The shape of each of them is unique, so the same candlestick will not always suit the entire collection of your little lights.
Long church
Long candles look more advantageous in a solid composition
Long church
The peculiarity of church types is their elongated shape. Compared to other types, they require fastening at the base. Therefore, candlesticks are made in the form of a platform on which the lamp can stand stably.
Select a holder size so that falling wax does not fall on a table or other surface.
To decorate church candles or create an entire prayer corner, you can use:
- Clay or gypsum. Thanks to the plasticity of the material, it is easy to sculpt angel figures
- Spools for thread. This is the easiest way. You just need to place the candle right in the center
- Available materials. For example, you can make a candlestick from plastic bottles by cutting them in half, connecting the ends, which are closed with a cap.
Volumetric hemp
A wooden cut can be used as a holder
Volumetric hemp
Hemp models are the simplest, most typical, intended for everyday use. They have a cylindrical shape and are quite wide. Their length can be different - using low and high options you can create interesting installations.
Candlesticks for “stumps” can be created in a variety of ways. These are the easiest candles to decorate because they have a convenient shape. You can either simply add decorative elements at the base or create forged lanterns in which lights will be placed.
Tablet suppositories
Instead of empty glass, an aquarium with garden roses
Tablet suppositories
Using tea models is as easy as hemp models: their small size allows them to be placed in any vessel. What makes them unique is their flat shape. Thanks to it you can create a particularly original design:
- place along the wooden beam
- Fill the container with water, release the “tablet” onto the surface - you will get a floating candle
Perennial flowers (TOP 50 species): garden catalog for the garden with photos and names | Video + Reviews
Popular articles Making a bonbonniere
Looking for inspiration
Not only a professional, but anyone can create handmade candlesticks. The only things that matter are imagination and the desire to create. Very often, candles are decorated in a duet with glasses and wine glasses. You can get an idea from artists and paint the glass surface with paints.
Decoupage masters share the secrets of their technique and teach even children how to work with napkins. A sophisticated candlestick will be made from a wine glass decorated with beads, rhinestones and delicate lace. Exclusive independent work will always attract attention and will not leave anyone indifferent.
Easter flying mug
The bright holiday of Easter can be decorated with such a cute mug with yellow chicks in a nest with eggs. The nest can be woven from thin twigs, sisal or jute.
Plastic eggs and hatched chicks look cute on their own:
Artificial flowers will make your Easter composition more lush and elegant:
Handicraft masterpieces cover in their master class how to make an Easter floating bowl:
DelkiRu talks about another type of Easter composition in his master class:
Varieties of candlesticks made from glasses
There are many options for how glasses can be used as candlesticks.
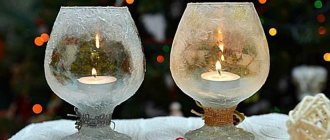
Candlestick made from an inverted glass
The simplest among them is to simply turn the glass upside down and place a suitable candle on the base of the stem. In this case, the glass can be decorated by wrapping a rope around it, a white lace border can be glued to the base, and textile flowers of the same shades can be glued above it. The candle itself, which will be placed on the stem of the glass, can also be tied several times with a tourniquet; overall, the result will be a very beautiful composition.
A very simple, but at the same time very elegant candlestick can be made if you create a decorative composition of cinnamon sticks and spruce branches, fresh flowers and leaves, berries, and Christmas tree balls in an inverted glass. To make such a candlestick more convenient, you can glue a CD to its base, thus removing the hole in the glass.
Painted with acrylic paint
You can create very beautiful candlesticks for the New Year holidays by painting them with acrylic paints. As a result, we can get excellent candlesticks from glasses in the shape of snowmen, Santa Clauses, penguins - everything will depend on your imagination!
Candlestick with floating candles
A candlestick with a floating candle would be a very romantic option. In the middle you can place decorated balls, rose hips, flowers, twigs, Christmas tree needles, sea pebbles, fern leaves, then fill with water, and place a small candle-tablet on the surface.
With beads and stones
Incredibly delicate and beautiful candlesticks will be obtained if you place mother-of-pearl beads in a glass and install a candle. The glass can be filled with absolutely any decor that matches the theme of the evening; these can be sea pebbles and shells, dry maple leaves, twigs and acorns. It will also look very original if you make several small layers of different grains.
Candlestick with lampshade
A very original candlestick from a glass, you can make it yourself in the form of a table lamp. To do this, you need to cut out a lampshade from thick colored paper, glue it and put it on a glass with candles. Thanks to the conical shape, the lampshade doesn’t even need to be fixed. Such an unusual lamp can be additionally decorated with any decor, such as braid, rhinestones, flowers, appliqués.
Decor ideas in the photo
You can make original candlesticks with your own hands not only for a festive feast. Candles can add romance to dinner at any time of the year.
Every home will probably have items and materials that can be used to decorate a wine glass for a candlestick.
Glasses in this role are used in different ways. When turned upside down, decor corresponding to the theme of the dinner is placed under the dome.
A wine glass will make a simple and elegant piece of furniture if you place a composition of sand, shells, pebbles, beads or other elements in its bowl.
Glasses for candlesticks can be painted with acrylic paints or filled with small decor, leaving them transparent, and can also be used in their usual or upside-down form.
DIY decorative candlestick made from a glass in a marine style
A single wine glass and trophies brought from vacations from the shores of the seas and oceans can easily be turned into an original candlestick for home decor or as a gift.
In this master class you will see how to make a candlestick from a glass with your own hands, using sea sand, shells and other natural materials for decoration. This accessory will decorate the bathroom, living room or bedroom. Don't forget to put a candle on the table for the New Year and warm the atmosphere on a romantic evening.
Available materials and simple tools
To make a decorative candle holder, find a glass wine glass. Any glass will do except champagne and fortified wine glasses. Their bowls are too narrow to create a marine-themed composition.
Glasses for red wine or cocktails are ideal because their rim diameter is larger than the diameter of the entire bowl. Look in the closet, ask your friends, there are often single glasses left without a pair that can no longer be placed on the table.
Also prepare:
- candle;
- CD;
- sea or river sand;
- sea salt;
- shells of different types;
- a simple pencil;
- transparent universal glue “Dragon”;
- tweezers.
Step-by-step transformation of a glass into a candlestick
Place sea salt in a bowl. Shake it a little so that small debris and small salt crystals fall to the bottom. Generously coat the stem of the glass with clear all-purpose adhesive. Deepen the base into the bowl of salt until the salt covers the entire surface.
Remove the wine glass, turn it upside down and set it aside until the glue dries completely. This will be the working part of the candlestick.
Take a damaged CD from your supplies. It would be better if it was a transparent round plate, which is used to cover the discs in a large package. Cover the central hole with any flat shell. The circle will make the candlestick stable, and the mirror surface will enhance the effect by reflecting the lights of the candle flame.
Place the glass on the disk in the center with the bowl facing down, and use a simple pencil to trace the outline of the edge. This way you will designate the area of the future composition of sand and seashells.
Apply a thin layer of transparent glue to the central platform and cover it generously with sand. Gently press down on the sand and then shake off the excess.
Glue the stones and discarded shells inside the drawn circle in the shape of a cone. At the same time, do not skimp on glue.
Apply glue selectively to the surface of the cone and add sand again. Shake off excess sand.
Select the most beautiful shells and colored pieces of glass and glue them onto the cone-shaped composition and on the inside.
Apply glue to the edge of the wine glass and glue it to the disc.
After complete drying, place a candle on a hand-made candlestick made from a glass and light it.
If you have a lot of seafood, be sure to check out our other master classes using this material:
- bottle decor,
- marine style candle,
- photo frame from a bottle,
- shell topiary.
Almost free souvenirs seal the memory of a wonderful vacation. Even after a few years, they will lift your spirits and warm you with pleasant memories.
A master class on making a candlestick from a glass with step-by-step photos was prepared specifically for the online magazine “Women’s Hobbies”. Find all handicraft lessons in the MK catalogue. Don't be afraid to try new things! Detailed instructions are intended for beginners.
From unnecessary cans
We use any jar for these purposes - from the smallest (for baby food) to a liter. The originality of future candlesticks will be emphasized by the unusual shape of the jar.
The most basic way to use a jar is to simply turn it over, throw a piece of fancy fabric on top and place a small candle on the bottom.
Let's consider creative candlesticks made from jars that will become a work of art. Let's try to dress up jars with the children. Let's take:
- colored markers;
- gouache;
- nail polish of different shades;
- PVA glue;
- brushes
If you are decorating the jars with markers or nail polish, no preparation is required. Take and draw different Christmas stories on them - snowflakes, fir trees, garlands, snowmen or just intricate abstract patterns.
When planning to decorate jars with gouache, prepare them for painting. Cover the container with glue and let it dry, then the paint will “stick” to the glass better. Draw outlines and color the shapes in bright shades.
Entrust painting to your child and do not try to correct his creativity. The result will definitely exceed your expectations! After the gouache has dried, coat it with clear varnish. If you don't have it, use hairspray. It is used to prevent the paint from peeling off and contaminating your hands.
Another interesting painting technique is stained glass paint. It is designed for drawing on smooth surfaces. This is a good idea for Christmas decorations too.
First draw a pattern on the jar with a marker. Then outline the outline with black paint, then leave it to dry for half an hour. Fill the space with any bright colors and leave to dry again (dry for a few hours).
We insert the candle into our jar - the pattern begins to flicker with colored lights. A wide-necked liter container can be filled halfway with water. The candle will float, and the light from the jar will shimmer and fill the room with warmth.
Do you want to celebrate New Year outside the city? Place your glowing decorations along paths, on windowsills and trees. Bright colored lights will create a wonderful mood.
Candlestick with frosty berries
Let's add a little winter fairy tale to the table setting; a candlestick made from a glass is a good idea for this. For the New Year, everyone is waiting for some kind of miracle, but you can really create it with your own hands. We install a glass candelabra with frozen red berries covered in ice. A master class will help you make this amazing craft.
What you will need: • a wine glass; • white acrylic enamel; • yellow and red acrylic paint; • black tinting paste; • a simple pencil; • alcohol or nail polish remover; • Matt lacquer; • cotton pad; • candle; • decorative decoration frosty berries; • palette and glass of water; • thin brush.
Step-by-step production: 1. Degrease the glass with medical alcohol.
2. Coat the stem of the glassware with black tinting paste.
3. We paint the bowl itself with white enamel.
4. Apply matte varnish to the dried paint.
5. Turn the glass upside down, and on the white part we depict a snowman, make his face, draw eyes, nose, mouth and cheeks.
6. We decorate his head with decorative berries.
7. Since the stem of the glass is on top, it will play the role of the candlestick itself. A charming and cute craft, if there are children in the house, they will undoubtedly be happy.
For reference! Frost can be applied to the berries with fine salt or sugar, using PVA glue.
Floating money mug
A floating mug made of coins and coffee beans looks very stylish. The design technique of using an unfastening zipper will also add originality to your mug. Keys, bells, old small toys - everything can be used as decorative elements for your mug.
With coins you can also use imitation bills in which we pack candies.
The secrets of creating a money mug can be found in the Sveta DIY video tutorial:
The money tap is created using the same principle as the flying mug. Instead of a mug, we use a plastic tap, and a small chest or casket can replace the saucer. Coins will look more impressive if they are coated with gold spray paint or varnish.
Master - Anastasia Spitsyna
Cash flows can be depicted using paper bills.
Master - Oksana Ankudinova
You can see how to create a money tap in the DIY Gifts master class:
floating candle
The “tablet” floating in a glass looks very nice. When performing this option, any shaped vessel is suitable - for champagne, wine or martini. The following is placed in the hollow part of the glass as decoration:
- beads;
- New Year's balls;
- rose hips and twigs;
- pine needles;
- fern leaves.
If you pour liquid glycerin into a glass half full of water, you can add sparkles - they will settle beautifully and slowly. Thanks to it, the candle-tablet will become more confident in adhering to the surface of the liquid.
Composition with an inverted glass
This method will be the fastest and easiest if you need to add decorativeness to the set table. The following details can be placed:
- near each guest;
- as a frame for the central composition;
- chaotically around the room where the holiday is planned.
To create one candlestick you will need a classic-looking glass and a candle with a stable bottom. The vessel must be turned upside down and placed under it in the hollow part:
- miniature New Year's toy/balls;
- spruce twig;
- painted pine cone;
- a figurine symbol of the coming year;
- artificial berries;
- "rain".
In fact, any similar decoration from the numerous decorative richness characteristic of the New Year's surroundings will do. Place a candle on top of the round base. This is a temporary and quick version of a candle holder made from a glass; for a more complex design, you will need to add additional elements to create the bottom. It can be regular cardboard (cut a circle out of it and glue it with a glue gun) or an old CD that can accommodate 3 glasses at once.