Stages of work:
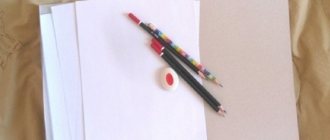
So you will need a blank sheet of paper, a pencil, an eraser and the desire to create!
Photo 1. We start the drawing by sketching the middle part of the flower. We outline its edges with general lines. The lower part (base) will be depicted much wider and more rounded than the upper pointed part:
Photo 2.
Draw two petals on the sides. They will differ in size due to the inclination of the plant. The left petal is twice as large as the right:
Photo 3.
Now let's outline the petals that are located in front of the bud. Their shapes are slightly careless, which is often found in flowers:
Photo 4.
Next, add the petals in the middle of the flower. Only the edges will be visible due to the fact that they are located deep in the bud:
Photo 5.
Use an eraser to remove unnecessary lines and strengthen the outline of the main petals:
Photo 6.
From the bud we will add several petals that hang slightly:
Photo 7.
A flower cannot do without a stem. Let's draw it peeking out from under the petals:
Photo 8.
Let's start applying the shadow. First you need to draw the darkest places, which are usually at the intersection and at the base of the petals:
Photo 9.
We continue to apply strokes to the lower petals with a simple pencil, creating a shadow. It is also worth remembering that in order for the shape of the leaves to be more voluminous, you need to draw lines according to their shape:
Photo 10.
In the same way we draw the side petals of the flower. At the growth site and edge we make the strokes denser, which will give a darker tone:
Photo 11.
Let's draw a shadow on the large petal that is in the foreground. Let's clarify its edges:
Photo 12.
We continue to do the same action with the rest of the nearby petals, without missing anything:
Photo 13.
After working out the tone on the petals, we move on to enhancing the contrast of the pattern. For this action, you can use a softer, simple pencil. Let's make the tips on the edges of the petals:
Photo 14.
Let's sketch the stem of the flower and finalize the details. Drawing completed:
Our lesson turned out to be so simple and easy, like a delicate flower... Using a similar scheme, you can continue to draw flowers and plants
. The main thing to remember is that constant practice gives good results, and therefore beautiful drawings.
How to draw a flower
Drawing a flower is not difficult if you have the desire to create. The selected plant can be depicted with pencils, watercolors, gouache, and felt-tip pens. You will need sheets of paper, an eraser and brushes. All flowers consist of leaves, petals and a stem.
It is important to choose the sketch of the future flower correctly. It is advisable that the child already knows geometric shapes and confidently uses a pencil and paints to decorate the picture.
Tulip
In one of our articles, you can learn how to make an origami tulip, and now let’s learn how to draw this spring plant. Using the instructions, you will spend only a few minutes drawing, as the work is easy and ideal for beginners. Let's get started:
- On the sheet we depict a horseshoe pointing upward. On the right side we supplement the sketch with a small segment. Now, starting from the middle, using an arcuate line, draw the tulip petal on the right side.
- Next, slightly below the middle of the segment on the left, we draw the silhouette of the second petal. We step back from the top section of this sketch to the right and show another petal in the background. Between this sketch and the right petal we show the next leaf.
- Then, we add another copy to this leaf. On the left side we also refine the petals. We outline the entire drawing with a thicker line. At the bottom of the silhouette, we draw the leg of the plant and complement the stem with two large leaves, like a tulip.
- Again we outline the entire silhouette of the plant with a thick layer. At this stage, the flower drawing is ready, all that remains is to paint the tulip in a suitable color.
- We color the bud with a red or yellow pencil; for this we used red, but you can use yellow. We paint the plant stem and leaves with a green pencil.
Jasmine flower
The fragrant jasmine bushes that bloom in May delight with their splendor. The flower is easy to depict on your own. You can use the sketching technique with schoolchildren, inspired by plucked branches or a photo of a beautiful plant:
- Using a pencil, draw a circle of any shape on a sheet of paper, which is divided into a vertical and horizontal line.
- The upper petals should not be identical and are located in an individual sector, slightly extending beyond the outlines of the other petal.
- The lower petals of jasmine are written according to the scheme described above. The edges of the petals are drawn with uneven lines.
- An inclined line drawn diagonally will be the axis for adding elongated green leaves to the jasmine image.
- After preparing the sketch, the veins on the leaves are drawn in places where they bend, and the stamens are drawn in the middle of the jasmine.
- Next, you need to erase the pencil sketches and start decorating the drawing. For the petals you will need white paint, for the stamens - yellow, the middle of the flower is painted with green paint.
- At the initial stage of learning, it is better to depict one large flower. When the child masters the technique of how to draw a beautiful flower, you can combine individual elements into a harmonious composition. A child will reach a professional level when he can draw a jasmine bush playing with snow-white and green colors.
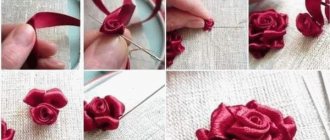
Beautiful rose with felt-tip pens
If you have a desire to draw a beautiful card for March 8 and May 9, then the image of a rose is quite suitable for this occasion. But if you haven’t learned how to draw this beautiful plant yet, then we suggest you learn how to draw a rose flower. The lesson we will provide is ideal for beginners, so follow the instructions and then you will succeed. To organize the work, we recommend using a simple pencil, but we will draw with a marker.
Let's start the creative process:
- In the middle of the sheet, draw a vertical arcuate line. At the top of it we draw a small bow towards it towards the left. We rise a little higher and between these sketches we draw a snail. We connect the left side of the snail with a vertical line to the main sketch.
- From the top edge of the bud, step back a little to the right and draw an arc. Now, from the middle of the vertical wavy segment, we draw the second part of this sketch and connect them together.
- In a similar way, we depict an identical shape on the left side of the picture. Extend the lines of the bell-like figure. Next, we connect the upper part of the sketch with the lower part with arcs.
- On the sides, starting from the bottom of the silhouette, draw one more petal. Under the plant we draw two leaves that are directed downwards. We divide them with a line into two pieces and draw a stem between the leaves.
- Then, outline the outline of the plant with a thick line, even if you used a pencil. Paint the inside of the sketch with a pink or red pencil. We paint the leaves and stem green.
Beginner's Guide
By following the instructions on how to draw a flower easily and simply, young artists are guaranteed a satisfactory result. To get started, you only need a sketchbook, an eraser for correction and a simple pencil.
- On the album sheet there is a circle in the center. Drop-shaped petals are drawn from it in any quantity.
- The stem is depicted as a curved stick emanating from the flower. Then leaves of any shape are drawn on the stem. They can be diamond-shaped or elongated, depending on your imagination. The number of leaves is also unlimited.
- The flower is almost ready. All that remains is to highlight it with a shaded shadow to make the drawing more realistic. You can shade the entire middle of the plant. Another option is to leave the middle of the flower unpainted, and shade the petals and stem with a pencil. Any of the selected options will be original in its own way.
Flowers in the sketch, which ones can be used?
Do you like flowers? Surely, if you are a fragile young lady of ten to fifteen years old, you really like delicate fragrant bouquets of flowers, small and fragile wildflowers... Unfortunately, we will not be able to give them through a computer monitor. But we have beautiful and easy flowers to draw with a pencil!
- Pencil drawings for sketching love
- Pencil sketches step by step
Using a regular graphite pencil or a set of colored pencils, you can draw one beautiful flower or a whole bouquet! In addition to pencils, you will need blank sheets of paper and a sample picture.
You can choose the one that suits you below. You can peek at the picture by placing it on the screen, or by printing it out. Do what is most convenient for you, put in a little effort - and real beauty will bloom on your sheet of paper!
Beautiful and easy flowers for sketching in pencil are an ideal option for the creativity of all representatives of the fair sex. Simple options are suitable for young girls, and more complex ones for adults. The examples presented above in the article are suitable as a sample for creating a single drawing or part of it. For example, flowers can be painted in a pot and vase, outdoors, or even in the interior of an apartment or any other room.
Pencil drawing techniques
Drawings can be linear or three-dimensional. A line drawing is a drawing, linear constructive drawing or sketch. It uses the only method of depiction - a line, with which you can convey the contours of objects and perspective.
But in addition to contours and locations, objects have such important properties as volume and surface texture. To convey them, the following pencil drawing techniques are used.
Hatching is strokes of various shapes and lengths with which the master gives volume to a flat image and shows the texture of the depicted material. What matters is the distance between the hatching lines, the angle of inclination and the color intensity, which is achieved by the degree of softness of the pencil used and the pressure applied. Hatching is considered a classic of pencil drawing and comes in the following types:
- parallel short strokes
- cross strokes intersecting at different angles
- long parallel strokes - vertical, horizontal or diagonal
- zigzag lines
- wavy lines
- chaotic short strokes
Shading is a type of shading in which the pencil does not come off the paper, and the strokes lie close to each other. Used on small parts of the image, the result is an even tone.
Feathering - "smearing" after preliminary shading - is used to give the image the effect of a photograph, so that even upon close examination it is impossible to see the fragments that make up the image. The disadvantage of this method is that when shading, the texture is partially lost. When drawing a portrait, this does not matter much, but when drawing, for example, fur, the shaded image will lose its realism.
To help shading convey the texture of an object, additional techniques have appeared.
The eraser lightening technique is used to lighten part of a drawing, sometimes to create a highlight. A small ball is rolled out of a soft eraser - a kneaded eraser - and the selected area is lightened by lightly touching the paper.
Engraving (scratching) - used to develop a textured surface. With its help, surface roughness and the effect of hairs are reproduced.
Flowers in a vase
Just like bouquets, flowers require focus and more time to complete. But vases are a great way to train the skills of a novice artist. You can place the still life on a postcard or a separate sheet of paper as a gift to a loved one.
We have selected several pictures to sketch for every taste. Strive for beauty with us!
Basic drawing rules
You shouldn’t start right away with complex plots. First, practice with linear drawings, paying attention to the proportions of objects. Sketch a street or railway going into the distance - this will help you become familiar with perspective and the horizon.
Take a sheet of paper, draw it into random sections and shade it using different types of shading. Use pencils of different softness, change the pressure, create smooth transitions.
Then move on to drawing simple three-dimensional images from life - for example, a ceramic vase or fruit. Experiment with light sources. You will become familiar with the laws of chiaroscuro and learn about 6 of its varieties: highlight, light, penumbra, own shadow, reflex and falling shadow. You will also notice that it is the boundary between light and shadow that conveys the basic shape of the object.
Try to depict several objects together so that they partially overlap each other. You will study more deeply the laws of perspective, composition, and understand the principles of arranging images on a sheet.
Copy paintings by famous artists. Pay attention to the types of shading, proportions, ways of conveying the dynamics of objects.
Take the risk of drawing something more complex in shape from life and conveying the texture of the surface. Which strokes will better convey the softness of cat fur, and which ones will depict the fluidity of a silk scarf? Practice and after a while you will be able to create a legend on the topic of depicting draperies from various fabrics.
The creation of any drawing must begin from the general to the specific. Analyze the image, mark the location of the main objects on the sheet. Break down complex shapes into simple ones, sketch them out, observing proportions. And continue to gradually complete the details of the image - from large to small.
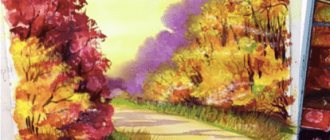
Drawings of flowers for sketching (40 photos)
Flowers are not divided into beautiful and not so beautiful. All flowers are beautiful in their own way. Some have a sophisticated appearance, others have a pleasant aroma that attracts attention, and some even combine two factors at once. Speaking of lightness, we cannot help but say that even complex flowers can be depicted in different ways. For example, roses can have an open and closed bud, a near and far view.
Every girl loves to receive flowers as a gift without any reason to get attention from a man. The types, shapes and sizes of these stunning fragrant plants do not matter, as the combination can create a stunning bouquet. See below for beautiful pencil drawings for sketching flowers.
Yellow sunflowers step by step. Beautiful bouquet of tulips.
White flowers for sketching.
Cute roses with leaves. Beautiful flower petals.
Beautiful drawing of flowers.
Green leaves in a bouquet.
Red rose step by step.
Drawing for sketching flowers.
Funny leaf shape.
A small bouquet in pencil. Large tulips in stages.
Wide light petals. Round flowers for sketching.
Beautiful roses.
Very long petals.
Stunning flower design.
Cute bouquet with leaves.
Petals in the shape of hearts.
Drawing of flowers for sketching. Cute flowers of different sizes.
Petals with colored pencil.
Easy colors to sketch.
Sharp petals. Three beautiful tulips.
Gray picture of flowers. Amazing rose with leaves.
Large bouquet in pencil.
Simple drawing of flowers. Easy flower step by step.
Delightful roses. For sketching a drawing of a flower.
White snowdrops on the snow.
Bouquet with a simple pencil. Colored flower for sketching. Beautiful petals with leaves. Different types of flowers. Easy flower drawing.
Sources
- https://FenLin.ru/uroki-risovaniya-dlya-detej/kak-narisovat-tsvetok-karandashom/
- https://megamaster.info/kak-narisovat-cvetok-krasivo/
- https://ladiesvenue.ru/risunki-karandashom-dlya-nachinayushhix-cvety-poetapno/
- https://srisovat.ru/cvety-dlya-srisovki-karandashom-krasivye-i-legkie/
- https://srisovki.ru/cvety/
- https://klike.net/2221-risunki-cvetov-dlya-srisovki-40-foto.html
Simple step by step lessons
Maple leaf in three steps
Step 1 - Sketch
Start your maple leaf drawing by roughly sketching its basic shape and central axis in light, thin lines. You don't need to draw any smaller curves of the sheet, just some basic lines respecting the proportions of the different sides of the sheet.
Step 2 - Outline
Add an outline drawing of the outer shape of the leaf to your sketch. Once you're done, you can erase the guide lines left from the previous step.
Step 3 - Details
Within the resulting outline, draw the main veins running from the base of the leaf to the tips, and smaller veins extending from them.