Greetings, friends!
Agree that many roles such as fauns/satyrs and demons require horns. How to make horns light and believable? Especially lately, many have been interested in how to make maleficent horns with their own hands, literally from improvised means and at home. Now there is an answer.
The geography of our project is expanding, and this time Ermelyn Hollerborn (Thank you very much for this wonderful tutorial, charming Ermelyn) from Germany shared her manual with us. Here is her blog //www.ermelyns-creatures.blogspot.de , there are a lot of really interesting and interesting things there.
And here is the manual itself in my free translation/retelling:
How to make paper horns
There are a huge number of different options for creating fake horns with your own hands. Depending on the desired topic, you should familiarize yourself with examples of ready-made crafts in advance. You can create not only animal horns (for carnival), but also an excellent “surprise” to congratulate a loved one, for example, a cornucopia made of paper. Any “hero of the occasion” will be pleased with wishes for financial well-being.
To work on the craft, purchase cardboard, paper, or use unnecessary cardboard boxes and other available materials.
Required materials and tools
To create horns from paper, you should prepare materials and tools:
- cardboard, paper;
- newspapers, notebook sheets or wrapping paper;
- glue gun – hot gluing securely fixes the elements;
- PVA glue, Moment, Solid;
- wire;
- scissors, stationery knife;
- ruler, pencil;
- tape, including double-sided tape, electrical tape;
- paints, brushes.
For some options, you will need foil, thread, twine or twine to give the horns some “natural” relief.
It is convenient to use hairbands, which securely fasten even large horns.
Step-by-step assembly of horns
One of the original methods is created step by step:
- Using a stencil, blanks of horns are cut out of cardboard, and slits are made along the contour to the middle (at intervals of 2-3 cm).
- Cut cardboard circles of different shapes in the amount of 23-26 pieces. (for one horn). On each of them a slot is made to the middle.
- The circles are joined to the blanks along the slots.
- Cardboard is cut into strips of different lengths and widths corresponding to the spaces between the circles. Roll them into rings and fill the voids.
- The blanks are wrapped in several layers with bandages, generously coated with PVA glue.
- After complete drying, the blanks are coated with modeling mass, giving them natural irregularities. You can use threads and twine.
- The last step is coloring. It is performed on a dry product. Shades and colors as desired.
It is more convenient to use the spray painting option.
For greater similarity, it is advisable to use stencils. For example, the demon horns template guarantees maximum similarity to the “original”.
A simple option for younger children is a cardboard unicorn horn and ears. The craft is created in stages:
- a sheet of paper is rolled into a bag and the excess is cut off, making the edge even, and glued together;
- The cone is covered with padding polyester and then with brocade or other spectacular fabric (pink for girls, blue for boys);
- the workpiece is wrapped with silver braid;
- make ear blanks from colored paper.
All elements are glued to the hair hoop.
The unicorn can be folded from paper with children according to these instructions. How to fold a cone is shown here.
Video master class
You can definitely make horns from cardboard the first time if you follow the step-by-step instructions outlined in the video.
Making devil horns
We offer the most popular way to create demon horns from paper and corrugated cardboard. The craft turns out spectacular the first time. Assembly is carried out in steps:
- Strips 5-6 cm wide are cut from corrugated cardboard (from packaging boxes).
- For each strip, the top layer is lightly sprinkled with water and removed.
- The strips are connected to each other with tape.
- The resulting “snake” is wound onto a thick marker and secured with tape. At the junction they cut with a stationery knife - blanks are obtained for one horn (of different sizes).
- Each of them is glued into a circle with tape.
- Insert the prepared mugs into each other.
- They form a horn by pushing the circles into the desired position and fix them with a glue gun. Everything is repeated when creating the second horn.
- Dilute water with PVA glue in a ratio of 3/1.
- Paper napkins are moistened in this adhesive solution and create relief formations and sharp ends on the horns.
- Give time for the glue to dry.
- The blanks are painted with spray paint or a brush in several layers.
- For shine, you can use hairspray.
The horns are glued to a wide hair hoop - the craft is ready.
Instructions on how to make ram horns
Aries horns can be created in stages:
- Circles of 50 pieces are cut out of thick cardboard. different sizes (for one horn) – from 8 mm to 35 mm radius, in increments of + 0.5 mm;
- Circles are strung onto the wire (starting with small ones from the top), adding spacers on each side (in the gaps);
- give the desired bends;
- using bandages, gauze or thin material, paste over the workpieces, forming an imitation of irregularities;
- allow the product to dry;
- Acrylic paints in several layers give the desired shade to the horns.
At the end of the work, a hairband or wide ribbon is used to secure it under the horns.
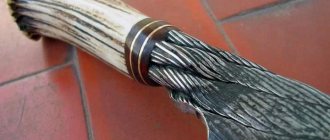
Maleficent's horns made of paper
The powerful fairy from the Disney cartoon, and later the famous film, is very popular among children and teenagers. Therefore, this image is very often used at themed parties. Maleficent's horns are easy to create from paper. The work is carried out in stages:
- Ribbons of different widths are cut from thick paper or cardboard: 1 pc. 7 cm, 7 pcs. 3cm each, 11 pcs. 2cm each, 9 pcs. 1 cm each, 3 pcs. 06-08 mm each.
- On a strip 7 cm wide (bottom of the horn), 4 cm are marked, then 3 cm sections are marked, they are cut into 1 cm sections for attaching to the base. The workpiece is glued together (preferably with tape), the cut strips are folded.
- From the remaining strips, round rings of different diameters are glued together.
- Collect the horn starting from the bottom. Each next circle is smaller than the previous one. The design allows you to make small bends of the desired shape.
- The top is cut and a point is attached.
- The same must be done for the second horn.
- To give the horn a natural, uneven texture, use a rope or twine, which is used to wrap the horn along its entire length, fixing it with glue.
- The blanks (starting from the top) are carefully covered with black electrical tape, which imitates the effect of leather.
- Then, if desired, the horns can be fixed on a wide, black hairband, or a helmet can be made from paper. To do this, strips 3-5 cm wide are cut to the size of the head. The main strip is the size of the head - it is glued together. Next, the remaining strips are glued to it in semicircles. The finished version should completely eliminate voids.
- The horns are glued onto the helmet, then it is also covered with electrical tape - a single design is obtained.
This option is lightweight and comfortable to wear.
Paper deer antlers
To create intricate deer antlers, the easiest way is to print out a ready-made deer antlers template. Next, proceed to assembly:
- Using a template, a blank of the desired shape is made from corrugated cardboard or wire and glued to the hairband;
- the workpiece is given a rounded shape - wrapped (tightly!) with foil;
- they are covered in several layers with newspapers and magazines using the papier-mâché technique;
- the workpiece is thoroughly dried for 24 hours;
- The last step is to apply acrylic paints in several layers - first a darker one (black or brown), at the end a lighter one (in certain areas) - gray, yellow, white.
For greater naturalness, you can lightly wipe off the paint in some places with a rag or a dry dishwashing sponge.
Deer antlers made of paper using this technique look very natural.
Scheme
Deer antler patterns can be complex (branchy) or quite simple (young deer). The patterns are great for kids to create independently.
Can be used as a stencil or printed and cut out
Video master class on how to do it
How to make antlers (deer, ram) from paper is clearly and clearly explained in the video master class. If you follow all the instructions when working, the finished craft will definitely be successful and beautiful.
Origami horns
An interesting and unusual assembly option using the origami technique is suitable even for children who go to kindergarten. A craft in the form of a unicorn bookmark is created in stages:
- the required size square of paper is folded twice diagonally;
- the top is lowered to the center, and the right and left sides are overlapped over it;
- the upper sides open to the sides;
- the upper corner is bent towards the center;
- the sharp lower corner is raised to the opposite edge, then bent down in a zigzag manner (05-07 mm);
- the side projections are bent inward.
Turn the blank over and draw the face of a unicorn.
If you make this craft from a large square of paper, make holes for the eyes, and tie an elastic band or ribbon on the head, you will get an original carnival mask.
First way
To create original evil sorceress horns, you need to prepare the following materials:
- chain-link mesh with a minimum wire diameter so that it is pliable in the hands (it is important that it can be cut, bent in the right directions, and given a certain shape);
- glue;
- newspapers;
- textile tape;
- thick insulating tape;
- black insulating tape.
Now you can start creating Maleficent's horns. We perform the following steps in the following sequence:
- We cut out a rectangle about 15-20 cm wide from the chain-link mesh.
- We give it a rounded shape so that it looks somewhat like a hat (this is the part that will subsequently be put on the head).
- We cut out two oblong rectangles and twist them into a tube so that on one side the base is larger than on the other.
- After receiving two twisted tubes, we give them the desired shape (something similar to the English letter “S”, only so that the first rounding is large and the second much smaller).
- We attach the horns to the “cap”, twisting the wire so that the overall structure is strong and confidently retains its shape.
- At the next stage, work is carried out using papier-mâché technology.
- The glue is diluted with water, the newspaper is torn into small pieces.
- A piece of newspaper is immersed in a water-glue solution, removed and glued to the wire structure.
- This is done until the entire metal structure is closed.
- Next, the mold is left for several hours until completely dry.
- After a few hours, the steps are repeated, pieces of newspaper are glued again so that a dense second layer is formed everywhere.
- The structures are again allowed to “rest” so that the glue has time to set.
- To do the third layer or not to do it is a question that can be considered individually. It is only important to understand that a larger number of layers provides additional strength to the entire structure.
- Next, we use textile tape, wrapping it around the horns from bottom to top, placing the next turn of tape on the previous one to completely cover the paper layer and make the surface of the horns smooth.
- To make the horns look more solid, we now wrap them with thick insulating tape (for example, the kind used to cover windows with a foam rubber or rubber base);
- We wrap it with insulating tape so that the horns are much thicker at the base, and the top remains very thin.
- The final stage remains - painting the structure. You can use paints, but it is unlikely that you will be able to apply a layer of paint evenly on the window tape, so it is better to use black insulating tape, which is also used to wrap the entire structure of the horns.
Now you can try on your own created masterpiece and think about what costume will suit such wonderful horns.
Thread painting
To get a New Year's deer, it is not at all necessary to create a three-dimensional figure. A painting that can be made relatively quickly from threads or yarn will also give you a feeling of celebration. In this case, you need to find a basis for it. A large cut of wood, a piece of thick plywood or a wide board can easily be turned into a convenient “canvas”.
Making a flat deer from threads cannot be called a complex process:
- First, choose the picture you like, then determine what size the craft will be. To prepare the chosen base, it is sanded, then coated with paint, stain or varnish.
- The sketch is transferred to the dry surface. Small nails are driven along all the lines of the drawing. After completing the preparatory stage, a thread is tied to the first of them. Then they begin to create a picture, connecting the elements with the help of fasteners - either randomly, or forming some kind of pattern.
If you choose a picture with a pair of deer, or with a whole family, then choose your own thread color for all the animals. In this case, each character will be clearly visible.
Face makeup
But further facial makeup is intended specifically for women to complete the image of the devil for Halloween.
Let's move on to eye makeup. It will be quite simple, but effective. Apply a thin layer of foundation over your eyelid and set with powder.
Using a fluffy brush, pick up brick-colored shadows and blend them into the crease of your eyelid. Don't be afraid to make the shade too intense. The main thing is that it is beautiful.
Set the direction of the arrow to the temple, and then draw it along the upper eyelid.
Fill the corner of your eye with eyeliner.
Fill the hollow of the nose bridge with a dark plum shade
and perform subzygomatic correction.
Also line your lower eyelid slightly. Finish your eye makeup with mascara.
Paint your lips with a rich burgundy lipstick shade.
Add a little blood to the base of the horns, which can also be replaced with liquid red lipstick or gloss.
We created such a creepy but interesting image of the devil for Halloween.
Source
New Year's deer Tilda made of fabric
Fabric, like felt, is used to make New Year's toys using appliqué or sewing. The latter option is more popular, but it is only suitable for people who know how to handle a thread and needle or a sewing machine. To obtain such crafts, only natural fabric is used, from which a deer is sewn and then the middle is filled with holofiber, cotton wool or padding polyester.
A bit of zoology
All ungulates are classified as bovids - bulls, yaks, bison, rams, goats, chamois, saigas, goitered gazelles, antelopes and bovids (deer). Deer species include fallow deer, reindeer, elk, muntjac, white-tailed deer, musk deer, and deer.
Full-horned ungulates are the most desirable trophies
For cooking, you need to take a vessel so that the skull fits completely. It must be filled with cold water and put on fire. At the same time, the antlers of roe deer, deer, and elk themselves should not come into contact with water. To do this, a transverse plank is tied to them, and the lower part must be wrapped in dry cloth.
Trophy elk antlers – high-end exhibition samples
New Year's deer made of foam
This craft will not require any expenses, since almost every household already has such material. To make this decor you will need paper, a marker, a template, polystyrene foam and a sharp knife with a long blade. An alternative for high-quality cutting of heat-insulating material is the thinnest wire. To obtain a neat cut, it is recommended to heat it.
Making a deer from insulating material involves several steps:
- First, they find and transfer to paper the image they like. Then it is cut out. The drawing is applied to a piece of foam plastic, then its outline is traced with a marker.
- The craft is carefully cut out. Decor made from thick material does not require making a base for the figurine. For products made of thin foam plastic, cut out the same stand, round or rectangular. Both parts are connected with glue (PVA, liquid nails, aerosol, etc.).
The carved deer can be left snow-white, or the figurine can be painted with gouache or acrylic paint. A New Year's craft decorated with sparkles looks very original.
Master class Craft product Modeling design Demon horns for Halloween Cardboard
Halloween is coming soon and I'm starting to get ready, I started preparing with demon horns
The first step was to make a lot of blanks from cardboard (I had sheet cardboard for packaging, it will also work with boxes, the main thing is that it is not very thick) 12 cm wide, 1.5 cm high, dividing 7 cm and 5 cm and bending.
I glue the strips at an angle with a gun
there is a bias in one direction
continue gluing only at a different angle and bending direction
so we got such curvy horns
cut off the excess cardboard making them sharp
apply the blank to the cardboard and trace it by adding a centimeter to the sides and cut it out and cut it into 4 pieces
We bend the cut pieces and start gluing them with a gun
we form a roundness and select a mosaic, cutting off what is not necessary and continue gluing
We glue the finished part, hiding the holes from the cardboard
when everything is dry we paint it and then open it with varnish
take the rim and glue it with a gun in one place
since the horns turned out to be a little heavy, I glued a tape to tie it at the back for greater reliability
The horns turned out to be natural, I’ll keep them in my piggy bank for when they come in handy
Not only would I not put this on my head, but I would not even take it in my hands! Not scary.
Cool horns, just super!)
Ooo! Just Maleficent! =)
For some reason I immediately remembered Loki’s helmet.
Very cool.
This is not only scary, but also dangerous. Why upset our Creator?
Girls, it’s not scary and not dangerous, especially if you perceive it as a masquerade; even sowers and generous people sometimes dressed as the devil (even though they chased and showed this character from the bad side). Although this is not our holiday, every year we become accustomed to it (photo from last year)
Small tricks
After drying, it is necessary to sand the horns with sandpaper to smooth out all roughness and unevenness. Then we attach the resulting frame with tape to the rim. To make the horns more realistic, you need to paint them with spray paint. But to save time, you can add black dye directly to the plaster mixture. The result will be excellent Maleficent horns. You can make them with your own hands for a carnival costume for Halloween or a themed party. Unlike paper horns, plaster props are more durable and are not afraid of rain (within reasonable limits).
Instant voluminous cones
Below is another way to make goat horns with your own hands from paper. The photo shows the design. It is made in the form of a regular cone.
This is the easiest method for getting voluminous horns. The sequence of actions is as follows:
- Draw two identical circles on paper. Their radius will be equal to the height of the horn.
- Cut out the pieces.
- Make a cut from the outer circle to the center along the radius on either side on both workpieces. You can cut out a sector to make the horn thinner and without much overlap.
- Roll the cones and glue the seam.
- You can trim the products from the bottom side.
This is how simple three-dimensional horns are easily made in a couple of minutes.
Deer made from scrap materials
Wine corks
You can make a cool craft from wooden corks. For one deer you will need: 2 corks, twigs, glue. You can use a miniature pompom for the nose, and hang a small bell around your neck.
Twigs
By collecting small twigs on the street or buying wooden sticks in a store, you can quickly build a deer head with antlers. A triangle is glued from sticks, buttons are glued to two sides, which will serve as eyes. At the intersection of these sides, a spout is made, and horns are attached to the base of the triangle. They can be made from polystyrene foam or thick cardboard.
Hunting trophies and their collecting
They even came up with the term “trophy hunting.” People who hunt bears consider the skin, skull and claws of the killed animal to be trophies. Killed birds are stuffed or their claws and most beautiful feathers are preserved. Boar and elk heads are also highly prized. But the most valuable exhibit in any hunter’s collection is the horns of ungulates - elk, deer, deer or bison. Even if for some reason the animal only had one horn, it can be used to make a beautiful wall decoration. The horns of ungulates are not always the same size or shape. But this does not stop avid collectors at all.
An indicator of the success of any hunter is the collection of antlers of one animal. They are collected after the elk or deer shed their antlers. You need to monitor the ungulate, know all its habitats, and the main routes of movement. The main exhibit is a skull with horns, which the hunter obtains after the death of the animal.
The horns of ungulates are most often voluminous and heavy. A special shield or medallion is made for them. Medallions for hunting trophies can be purchased at the store or made with your own hands. Even a person without special knowledge and skills can cope with this matter.
Tags
believable deer antlers Deer antlers deer antlers Reindeer horns time deer antlers New Year's decorations Making New Year's antlers New Year's accessory deer. New Year's reindeer. New Year's deer How to make believable How to make antlers How to make antlers with your own hands with your own hands or with your own hands with your own hands. with your own hands to us with your own hands with your own hands
answerdecorationstoysthankyouboilershapesmearticlegarlandshomehomeyouryoucanphotodetailsmeusualphotographyideasballoonsaccessories
The simplest method
Let us describe in more detail the technology of how to make goat horns with your own hands quickly and easily. Work like this:
- On a piece of paper or newspaper, draw the shape of one horn.
- Cut out the template. This will be your stencil.
- Take a disposable paper plate or sheet of the appropriate size and trace the outline of your workpiece.
All is ready. You can try the product on your paper goat.
Hairband “Halloween”
What is the holiday associated with Halloween? First of all, with Jack's lantern - the famous pumpkin head for Halloween, and although this creature is quite scary with an ominously grinning smile, we will not be afraid of it and will create with our own hands a wonderful accessory in the shape of pumpkins from polymer clay.
And if you like to celebrate Halloween, then you simply must honor the main symbol and attribute of this day - a pumpkin in the shape of Jack's head!
So, for sculpting and assembly we need the following:
So, let's start the sculpting process:
1. First, we need to form even balls from paper napkins: two of the same size (exactly half a napkin per ball) and one larger (one whole napkin).
Filing the skull
This is a very important stage, because it would be a shame to spoil the trophy after the most unpleasant operations have been completed.
Rule 1. The skulls of deer, rams and goats are not filed.
The fact is that a trophy with teeth is very valuable, because the age of the animal can be determined by the wear of the teeth. For these ungulates, the lower jaw is attached to the upper part by wire or cord.
Be sure to do it while the skull is wet so that it does not crumble.
Making horns for the devil
First, let's create the horns with our own hands. For this you will need one cardboard circle. Choose the diameter based on the size and height you want the horns. In master classes they turned out to be about 5 cm high. We make a cut to the center of the circle.
Now we roll the circle into a cone to a certain diameter and fix the edge with a finger. We cut off the excess cardboard and glue the edges with super glue or other quick-drying glue. We make the second part by folding the cone further.
To give the horns some texture, cover them with a thin layer of cotton wool. We will glue it using liquid latex for makeup or PVA glue, which takes longer to dry. Apply a very thin layer of glue to the cone and attach a thin layer of cotton wool to it over the entire surface.
We deliberately leave a skirt up to 1 cm wide, for which we will glue the horns to the skin of the face.
Before gluing the blanks, degrease the area we need with alcohol. Apply a thin layer of latex or glue strictly along the diameter of the workpiece along with the skirt. While the glue is still wet, attach the cardboard piece.
We cover the top of the horns with glue so that the surface is not fluffy and the skirt sticks properly.
The blanks should dry a little, and then we cover them with foundation and blend it onto the skin, and then completely cover the entire face.
While the foundation dries, draw a beautiful and clear eyebrow. It can be even darker than your hair color.
Let's return to the horns. The version in the master class is more bloodthirsty. For a girl's Halloween, you can make a lighter version. To disguise the transition between leather and cardboard, paint this area with brown watercolor.
At the junction the shade will be more saturated. Cover the rest of the space with bloody watercolors.
This horn making technique can be used by both young people and children to create devil or imp makeup for Halloween.
Complex but beautiful option
Below is a way to make your own goat horns from paper that look more realistic than the previous ones. The technique is this:
- Prepare a strip of paper, preferably thin (the length and width depend on the size of your horns).
- Make a blank in the form of a cone using the technology of the previous version or make a base from plasticine of a more complex shape. If there is an appropriately shaped object available, such as real antlers or a child's toy of the appropriate size, use it.
- Start wrapping your workpiece with paper tape in a spiral, gluing where one layer overlaps another.
- After the glue has dried, remove the horns from the base. To make this procedure easier, you should first, before pasting with paper, cover the workpiece with cling film and do not wrap the tape too tightly.
DIY hairband “Bats”
The following are considered traditional Halloween costumes: ghosts, vampires, zombies, werewolves, witches on a broom, skeletons, dead people, mermaids and many others, which belong to a very scary company of mystical creatures.
We will talk about a hairband that we called “Bats”.
Making such an original and beautiful headband is not at all difficult if you use a detailed photo master class.
Necessary materials:
Manufacturing:
And now the original Halloween headband is ready.