Published: 05/15/2017
Rating:
Among drivers who travel long distances out of town, the question of how to make a tow hitch for a car with your own hands is a very pressing question. On sale you can find ready-made options for “classics” and new generation cars, but there is a category of car owners who prefer to make them themselves.
For a number of reasons, factory products do not always satisfy demanding users. Sometimes it is not possible to find a successful design, in some cases a person has his own ideas that he wants to bring to life, and some prefer to spend time and effort to avoid unnecessary financial expenses.
On the Internet you can easily find drawings of coupling devices for various brands of cars and instructions on how to weld and assemble the structure. Search forums and specialized websites - and you can choose a stationary, removable or quick-release option for your car model.
See also:
Drawing of a towbar for Renault Duster
Do-it-yourself matching block for a towbar
For owners of modern models equipped with a large number of electronic components and computer control systems, in addition to the device itself, you will need a special smart connector. It is needed so that the vehicle’s electrics do not perceive the connection of the trailer as an emergency and do not use the emergency shutdown.
The towbar is an indispensable device for car enthusiasts who lead an active lifestyle, love to travel, that is, people who often have to transport large luggage
The fact is that a towbar is not just a hook or a rear step, it is a device that, in addition to the direct clutch, connects the trailer’s electrical equipment to the vehicle’s on-board network. At the same time, turning on each electrical device increases the load on the car network, which computer control systems can perceive as an unauthorized intrusion.
A matching unit is a device that helps to intelligently distribute additional load according to a scheme that is understandable and acceptable for the machine’s electronics. It helps to avoid emergency shutdowns, overloads and other emergency situations.
See also:
Tow bar for Renault Duster 4x4
Preparatory part of the installation
For installation you will need:
- towbar;
- Screwdriver Set;
- a set of keys;
- scrap;
- neutral sealant;
- drill;
- felt-tip pen;
- corrugation.
It's better to buy a new unit. Its package includes: wiring diagram for the towbar, bolts, electrical kit, instructions.
There are three types of towbars:
- The most common option for VAZ is removable. This is the most popular option in Russia. The name speaks for itself. If necessary, it can be easily removed.
- Flanged towbars are more difficult to install. They are made for different brands of cars. There is a possibility that the driver will have to drill additional holes.
- Fixed. These can also include welded ones.
If you do not want problems with the traffic police, then install a tow bar designed for a specific VAZ model. According to the new cargo transportation rules, the driver must not install homemade towbars. In any case, it's up to you to decide. Therefore, we will consider in more detail the installation of each type of towbar. For convenience, you should drive your car onto the overpass.
Installation of the tow bar begins with turning off the power to the machine.
Do-it-yourself towbar ball
European coupling devices use a unified 50 mm ball - this is the same size for all brands of cars and trailers. In America there are two types of sizes:
- two-inch;
- 17/8 inch.
Practice shows that it is better to purchase this element ready-made on the car market. If you can’t find a suitable size, order it from a good turner - you won’t be able to turn such a part by hand.
The towbar design is attached to the vehicle using a special platform
Content
Necessary materials
Preparatory work
Dimensions
Drawings and templates
Manufacturing process
Expert recommendations
Many car owners, not wanting to overpay for cargo transportation services, decide to make a towbar with their own hands.
It may be needed in many cases. In the modern world, living without a trailer and having a car is quite difficult. Everyone sooner or later makes repairs in their homes, and to transport building materials you have to overpay and order delivery. Those who own a country house or dacha, at the end of each season, rack their brains: how to transport the harvest to their city home. Residents living near the seas transport their boats to the water at the beginning of the season. In general, a towbar is an irreplaceable thing that should be on every car, unless in your garage, in addition to a passenger car, there is also a truck. If your car does not have a towbar, you can buy it at the car market or make it yourself. It’s not difficult to make a tow hitch for a car with your own hands.
But the very first thing you need to know is that before you take up the materials, be sure to go and register with the traffic police, otherwise installing a tow bar will be illegal and you will have to pay a fine.
Tow hitch for car
Necessary materials
To make a part yourself, you will need the following tools and equipment:
The do-it-yourself towbar ball must be absolutely round and have a diameter of 50 mm. This is the standard diameter used for European and domestic cars. For American cars, the ball diameter ranges from 50.8 mm to 53.975 mm.
Materials required for work:
Semi-automatic welding
As you can see, you won’t need many consumables to make such a useful device for everyday use.
Preparatory work
In order to decide how to make a towbar with your own hands, you should understand what the maximum load the device will have and install the type of fastening that is suitable for a particular car.
The load cannot exceed the total weight of the machine. Don't miss this moment, it is very important.
Ideally, it is recommended to install towbars manufactured in a factory, but there is nothing wrong if you make it yourself. This is not difficult and it will serve you for as long as the factory one, if everything is done technically correctly and all the nuances are taken into account.
Most often, homemade towbars are installed on domestically produced vehicles. Do-it-yourself towbars on Oka come in different types: welded, flanged and collapsible. Installation is carried out using general rules.
Dimensions
The sizes of towbars are selected individually for each vehicle, taking into account the design features and size of the vehicle. The expected load and type of fastening are taken into account. You should not miss the appearance of the car after attaching the part.
Towbar sizes are selected individually for each vehicle
Drawings and templates
In the era of computer technology, you can easily get any information and download any drawing on the Internet. The same applies to the do-it-yourself towbar drawings.
There are several design options:
You should select the one you need, taking into account the design features of your vehicle. They have a common scheme, but the types are different - depending on the method of attachment to the body.
Fixed, or as it is also called, stationary, is attached in such a way that the tow bar with the car body is one piece and cannot be removed.
Removable parts are preferred by those drivers who do not want to spoil the appearance of the car with this device and dismantle it after use.
Using a flange mount, which is also removable, the tow bar is secured to the frame or power bumper using bolts. This method is used to make it possible to transport heavy loads.
Fixed tow bar
The flange towbar is the most versatile; its only drawback is that even if the part is dismantled, the bar will still be visible. However, it fits absolutely all vehicles, and it is possible to adjust its height.
Manufacturing process
So, how to make a tow hitch with your own hands? The first thing you need to start with is to purchase a ball with eyes. It doesn't matter whether it's new or used.
First, remove the car bumper, cut off the lugs and use a drill to make holes. Using a pipe of the selected diameter and a length of up to one meter, we connect the fasteners. This must be done using a welding machine. Using the same welding, we fasten another pipe at a right angle in the center of the first. After completing the welding work, the structure should be primed and painted.
Do-it-yourself bicycle rack on a tow bar
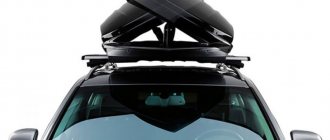
Those who have to carry one or more bicycles in a car try to come up with the most convenient design for a luggage rack for transportation. It can be installed on the roof of a car, but this option negatively affects the aerodynamic properties of the vehicle.
More interesting in terms of comfort is the bicycle rack in the rear of the car - it has a special cap that fits onto the ball and stops from below. If we are talking about a station wagon with a fifth rear door, you can install a “gate” type system with locks - it allows you to tilt the trunk to gain access to open the fifth door.
Nowadays, the choice of such accessories is very diverse
. See also:
How to install a towbar on a VAZ 2110/2112 with your own hands
Do-it-yourself trailer hitch
You can make your own towbar for a passenger car using an angle grinder and a welding machine. We present the basic algorithm for the manufacturing process:
- remove the rear bumper;
- find the holes that lead into the voids of the side members;
- measure the length of the segment between the holes found;
- cut a section of steel pipe 50x50 mm according to the obtained length;
- make a mark in the middle of the workpiece;
- take two pieces of 5 mm thick sheet steel measuring 20x7 cm and make holes 5 cm in size at the edge of each;
- place the strips on the pipe with the holes and weld them - the distance should allow you to place a coupling hook with a ball between them;
- secure the hook with nuts and bolts 10;
- then we move on to working on the attachment to the side members - weld steel strips 5 mm thick and 30x7 cm in size onto the ends. The direction should be opposite to the hook, and with the hook bracket the angle should be 900;
- insert these strips into the side members;
How to make a homemade towbar for your car
- drill holes with a diameter of 12 mm in the rear side members and inserted plates;
- weld nuts of the same size to them;
- take a 3 mm thick plate and mark the holes for the socket, then drill them;
- weld the plate to the hook bracket, install the socket on it.
The product is ready - you can install it and connect it to the machine’s electrical network.
See also:
Installing a towbar on a Hyundai Solaris
Parts, materials and tools for the manufacture of trailer hitches
To make a towbar with your own hands you will need:
- Welding machine.
- Angle grinder (grinder). Cutting and cleaning discs.
- Protective glasses.
- Drill.
- Drill.
- Steel ball on a hook. Its diameter depends on the trailer manufacturer.
The hitch for a trailer made in Europe must have a ball with a diameter of 50 mm. The ball for the “Americans” comes in two options: with a diameter of 2″, that is, 50.8 mm, or 17/8″, which is equal to 53.975 mm. For a Russian-made trailer, its diameter is exactly 50 mm as for a European one.
A hook with a ball can be bought inexpensively at a salvage yard, and if you can’t find a ready-made one, try ordering the product from a turner and bending it at the desired angle.
You also need to have:
- A piece of steel pipe with a cross section of 50 × 50 mm and a length of slightly more than one and a half meters.
- Two strips of 5 mm thick sheet steel measuring 300 × 70 mm and another pair of the same thickness measuring 200 × 70 mm, as well as a piece of 2 mm thick steel sheet measuring approximately 120 × 120 mm for the socket bracket.
- Bolt M 10 × 1.25, length 80 mm with nut - 2 pcs.
- Bolt M 12 × 1.25, length 50 mm with nut - 6 pcs.
- Screws with nuts for fastening the socket (M 3 or M4, about 40 mm long).
- Socket.
- Multi-colored stranded copper insulated wires and PVC electrical tape.
Do-it-yourself square towbar
The American towbar differs from the European one in that it is made for a square, and not for a ball clutch. Instead of a ball hitch hook, there is a square measuring 50x50 mm - below we will look at how you can make it yourself:
- Cut the edges from a 200 mm channel to get a plate of the required length - drill holes in it for fastening to the frame;
- For additional vertical fastening, weld a corner 50x50x4;
- Bore the holes in the frame that already exist - drill through them in the upper part;
The strength of the structure allows you to carry a full trailer
- Insert pieces of half-inch pipe inside the frame so that it does not flatten when tightening the mounting bolt;
- For a horizontal section, weld half-meter plates 8 mm thick and 10 cm wide;
- Make a pipe from two corners 75x75x6 and weld to the fasteners;
- take a 60x60x4 profile pipe 20 cm long and weld a strip of steel 4 mm thick and 30 mm long onto the working end;
- cut out a square section in the power frame and place it there. Weld and reinforce with slopes;
- Next you will need to drill holes for the locking pin;
- Now you can move on to sanding, puttying and priming, after which painting is done - the paint has dried, the product is ready.
See also:
Choosing accessories for the towbar
Description of the technical process
- Remove the rear bumper of the car. Under the bumper mount there are two holes that open cavities inside the side members.
- Measure the distance between the outer edges of the holes inside the side members. Cut a piece from the pipe with a length equal to this distance.
- Mark the middle of the resulting segment.
- At the edges of strips 20 cm long, cut holes 5 × 5 cm. Place the strips with holes in the middle of the pipe and weld to it at a distance that allows you to insert a hook with a ball between them. If the hook has mounting holes, drill the same ones in the plates, corresponding to them, and secure the hook between them using bolts and nuts 10.
Attaching the towbar to the side members
After completing point No. 11, you have practically made a towbar with your own hands. All you have to do is install it and connect the socket to the car wiring.
Useful tips
- Due to the fact that a breakdown of the structure while driving can cause a lot of trouble. Avoid butt welding metal. Therefore, it is preferable to attach steel strips to the edges of the beam by cutting holes in them to the size of the pipe section, putting them on its ends, and then welding them.
- Do not use an angle grinder without protective glasses, and do not cook without a mask: take care of your eyes.
- If you want to paint a new towbar with your own hands, then first, thoroughly prepare its surface for painting. To do this, pickle it with any product that contains phosphoric acid to convert rust. Then sand the surface with waterproof sandpaper, pouring water on it to wash away the waste. Dry the assembly, degrease it with solvent for nitro paints or acetone, and cover it with adhesive primer from a spray can. Dry the soil according to the instructions. Sand with 400 grit sandpaper and water until the surface is evenly matte after the water dries. The surface is ready - dry, degrease with alcohol or B-70 gasoline (the solvent will smear the fresh soil). Then you can paint. After this preparation, your paint will last a very long time.
How to attach the towbar
The coupling device is attached to the power parts of the body, but in no case to the bumper - the latter is not able to withstand the loads associated with moving the trailer.
Below we provide several examples of where the coupling device is attached in some cars.
To "Niva"
The Niva towbar is a design consisting of a coupling ball, which is placed on the car, and a coupling head, which is placed on the trailer drawbar.
On Renault Logan
For the Renault Logan car, the simplest type of design is used
On VAZ 2109 and on VAZ 21099
Installing a towbar is a complex process and involves some difficulties
On VAZ 2110
On VAZ 2107
See also:
Installing a towbar on a Toyota Prado
Main works
To install the first type of unit, you will need to clean the holes by tightening the bolts. This procedure lasts no more than 15 minutes. It should be noted that in this case it is recommended to buy a branded towbar for the VAZ 21099. Homemade designs may not coincide with the existing holes.
When attaching the second element, you should pay attention to the holes in the side members. Often such a unit is installed on a VAZ bumper. In some cases it will be necessary to make additional holes.
The last category involves making holes yourself. More than one VAZ 21099 owner has installed a tow bar in this way. To give the structure greater reliability, it is recommended to strengthen the trunk floor.
Initially, markings of future holes are made. An assistant will be needed for this. They are then drilled out and cleaned. If necessary, VAZ bumper covers are used. To install them, you will have to dismantle this unit. Every driver knows how to remove the rear bumper of a VAZ. In rare cases, it is cut with a grinder. If you need to install a branded towbar, then it is recommended to use the appropriate instructions.
Often, towbars are installed without any additional work. They are used:
- for transportation of additional cargo;
- for rear impact protection.
Another important point in this matter is connecting the wiring to the corresponding towbar block. If the weight of the VAZ 21099 together with the trailer is no more than 3500 kg, then to drive the car it is enough to have a category “B” license. Otherwise you will have to get category “E”.
Do-it-yourself tow bar for Niva
Now a few words about how to make a coupling device for a Niva with your own hands - drawings and general recommendations. The following types of structures are usually installed on the Niva 21214 or other classic model:
Assembly and installation is carried out according to the following scheme:
On a Chevrolet Niva the diagram looks like this:
By the way, a similar principle is used when installing a station wagon on the Lacetti.
See also:
Installing a towbar on a Lada Kalina with your own hands
Manufacturer's arguments
Every car owner who has encountered such a problem has wondered: why didn’t the developers initially provide for the presence of a towbar?
It really would be that simple. But AvtoVAZ employees who work on the design of passenger cars have their own professional opinion on this topic. Of course, they are aware that the owners install tow hooks on the VAZ-2115 with their own hands and categorically do not advise doing this.
Of course, they dissuade:
- the body design of this car does not provide space for attaching a special tow hook;
- the standard wiring does not have connectors for connecting the electrical equipment of an additional trailer;
- It is not possible to connect the brake system of a trailer coupled to a vehicle as a trailer.
Sources
- https://mahsar.ru/vyazanie/farkop-na-vaz-2114-svoimi-rukami-chertezhi.html
- https://lemzspb.ru/podklyucheniye-rozetki-pritsepa-vaz-21099/
- https://yapomoshnik.ru/avtomobil/farkop-na-vaz-21099-svoimi-rukami-chertezhi.html
- https://LedStrong.ru/remont/ustanovka-farkopa-na-vaz-2109.html
- https://av-1.ru/remont-i-to/kak-postavit-farkop-na-vaz-21.html
- https://SergievskoeMo.ru/dlya-hozyajki/farkop-na-vaz-21099-svoimi-rukami-chertezhi.html
- https://AdminUbuntu.ru/remont/farkop-na-vaz-21099-svoimi-rukami.html
- https://pricep-vlg.ru/farcop/farkop-svoimi-rukami/
- https://saturn-lada.ru/remont/farkop-na-vaz-2109-svoimi-rukami.html
- https://avto-spassk.ru/tyuning/ustanovka-farkopa-na-vaz-21010.html
- https://y-mastera.ru/elektrika/farkop-na-vaz-2109-svoimi-rukami-chertezhi.html
- https://litezona.ru/farkop-na-vaz-21099-svoimi-rukami-chertezhi/
- https://vazgarage.ru/remont/body/711-kak-sdelat-farkop-svoimi-rukami-ustanovka.html
- https://AcademyMasters.ru/zemlya/farkop-na-vaz-21099-svoimi-rukami-chertezhi.html
- https://master-lok.ru/dekor/farkop-na-vaz-2109-svoimi-rukami-chertezhi.html
- https://okuzove.ru/modifikacii/pricepnoe-ustrojstvo-dlya-avtomobilya-svoimi-rukami.html
- https://ach22.ru/lada-granta/kak-postavit-farkop-na-vaz-21.html
- https://www.umeltsi.ru/avtosamodelki/5266-izgotovlenie-farkopa-svoimi-rukami-ustanovka.html
Do-it-yourself tow bar for Logan
The picture below shows the coupling device for Renault Logan:
To manufacture it you will need drawings and dimensions of individual elements:
Power beam
Side bracket
Hook with ball
Flange
Right and left cheeks
Installation is carried out in special technological holes provided by the manufacturer for this purpose - they will need to be freed from plugs and adhesive tape.
What to choose?
To connect a trailer, you first need to acquire the towbar itself. Today, VAZ 2110 owners are offered two options:
- Use a homemade device;
- Purchase a certified factory-made unit.
It is noteworthy that both options are worthy of each other, they have positive and negative sides. Let's look at them.
Homemade tow bar
To manufacture it, you will need the appropriate drawings, according to which the unit is assembled. Often their level of reliability is in no way inferior to their factory counterparts, and sometimes even surpasses them. Homemade does not mean you will assemble it yourself. Although some are capable of this. There are many workshops where you can order the production of a tow bar. The price depends entirely on your requirements and the manufacturer's conditions.
Drawing
This is due to the use of higher quality materials by craftsmen than those provided at the factory. But at the same time, the overall weight of the structure increases.
But the makeshift towbar has a weak point - the seams. They are not subject to control similar to the factory control. Therefore, in appearance the design may be reliable, but in reality the seam barely holds the towbar elements together.
Don’t forget that homemade towbars are often sold without anything, so all kinds of fastenings have to be purchased separately.
Factory tow bar
Factory products are more expensive than homemade ones. Actually, this is the only serious drawback of such towbars. Of course, if you don’t take into account potential marriage, which, unfortunately, you sometimes have to deal with.
Towbar
However, the price is actually not that high. A good towbar from the factory will cost about 1.5 thousand rubles. But you get a reliable design, matching elements, and a complete set of fasteners.
To summarize, we can say that it is better to choose towbars with a removable tow ball. Similar systems are provided on European cars from leading companies.
If the trailer part can be removed, this will allow you not to get dirty while in the garage and not have to deal with eternal grease on your pants. When required, the element is put in place, a trailer is attached to it and off you go.
But if you were unable to purchase such a unit, and the structure turned out to be solid, take into account protective caps and linings. They are affordable and can be found at any auto parts store.
Do-it-yourself tow bar for Duster
Below is an option for Duster - drawings and diagrams for independent production and installation. For Duster 2014 4 by 4, the following option is suitable:
For independent production you will need drawings of individual elements for the Duster 4x4:
See also:
How to install a tow bar on a Niva Chevrolet
Option #3
As you can see, external fastening points allow you to avoid drilling extra holes in the body. In addition to this, the supports of the towbar itself (yellow arrow) replace the central brackets of the bumper and, unlike the “original” ones, are made of thicker metal, and the pipe connecting them will make the bumper itself more resistant to side impacts.
The disadvantage of this option is the greater amount of work required for installation - you will need to remove the bumper.
Installing a towbar on a Renault Logan with your own hands
The installation of the coupling device on the Logan, as well as on the Renault Duster, Sandero Stepway and Fluence, is carried out in the technological seats provided by the manufacturer. Therefore, when looking for drawings on the Internet or drawing up your own project, make sure that the dimensions of the mounting holes match the mounting sockets in the car.
The towing device consists of two units - a supporting frame and a connecting mechanism
See also:
How to install a towbar on Lada Priora?
Connecting the socket
After the tow bar has been installed, proceed to connecting the socket with wires. They provide an electrical connection to the vehicle's towbar. The pinout looks like this:
- Yellow (Left turn signal).
- Free.
- Black (Mass).
- White (Right turn signal).
- Free.
- Red (Stop light).
- Blue (Parking lights).
After making the connection, the wires are pulled into the holes in the niche for the spare wheel. The socket is powered from the car's rear headlight connectors.
We install a towbar on a UAZ with our own hands
On sale you can find coupling devices for various UAZ models without any problems. For those who prefer to make them on their own, it will not be difficult to find drawings for the UAZ “loaf”, UAZ 469, UAZ “Hunter”, UAZ “Farmer” or “Patriot”.
Below we show a few photos of what it might look like.
In addition to selecting a trailer with the required characteristics, you need to purchase or make your own tow bar for the UAZ
The simplest shop towbar consists of a mounting base with a transport hook with a ball end attached to it
See also:
Installing a towbar on a Renault Sandero
Option #3
As you can see, external fastening points allow you to avoid drilling extra holes in the body. In addition to this, the supports of the towbar itself (yellow arrow) replace the central brackets of the bumper and, unlike the “original” ones, are made of thicker metal, and the pipe connecting them will make the bumper itself more resistant to side impacts.
The disadvantage of this option is the greater amount of work required for installation - you will need to remove the bumper.
Installing a towbar on a Hover with your own hands
Installation on the Great Wall Hover will also not require drilling additional seats - the manufacturer has provided them in the frame. However, you may have to trim the bumper slightly.
Below is a general view of the coupling mechanism for the Hover H3 - it is best to purchase a standard product, the dimensions of which are suitable for the seats in the car.
The product comes with drawings that clearly demonstrate the algorithm for installing it on a vehicle.
Below is a photo of the removable structure for the Hover H5 - the dimensions are the same as for the H5.
Try on the tow bar in the place where it will be installed, i.e. to the rear of the car
See also:
How to install a tow bar on a KIA Rio?
Kinds
Depending on the method of installation on the body of a VAZ car, the following models are distinguished:
- removable. They are attached to the holes pre-provided for in VAZ 2108 or 21099. Installation of the product involves preliminary cleaning of the holes and tightening the bolts, which will take you no more than 15 minutes. This type of product is the most popular among drivers of the 21099 model due to the ease of installation;
Removable towbar for car
- fixed. If you are attaching such a product, pay attention to the alignment of the holes in the side members;
Fixed towbar for VAZ 2109
- flanged (bolted). Provide additional holes. This way you can select a towbar for a model from another car and install it on your car. To provide greater reliability, some motorists also recommend strengthening the trunk floor.
Flange tow bar for a car
We install the VAZ 2111 towbar with our own hands
Installing a coupling device on various VAZ models is not difficult - along with the product, the kit includes drawings that will help you understand all the nuances of such work.
Below are photos of cars of this brand to show clearly how the coupling mechanism is installed on them.
VAZ 2101
This is very simple to do and does not even require disassembling the car, since the towbar is simply attached under the bumper of the car and protrudes a few centimeters beyond it
VAZ 2105, 2106, 2107
Homemade towbars made by the car owners themselves can be dangerous and unreliable
VAZ 2109, 2199, 21099, 2110
If you live in a private house or have a dacha outside the city, then sooner or later you will be faced with the need to install a towbar on a VAZ 2109 car
Step-by-step instruction
Auto mechanics recommend installing a towbar only on an overpass. To do this, you will need the following tools and materials: pencil, keys, drill, corrugation, sealant. Initially, the unit is attached to the rear spar. The outlines are made using a pencil. There are 4 holes in the spare wheel well and in the side member. The towbar is tightened and pressed against the body using a set of bolts, nuts and washers. The corrugation is pushed through the holes. It contains the wiring that goes to the outlet. All cracks are sealed with sealant.
As for the connection features of the electrical part of this unit, it is recommended to use a rear light. To do this, cut the wires:
- side light,
- brake light,
- left and right turn signals.
The ground wire is placed on the headlight fixing bolt. The wiring is soldered or placed in a special connector. The corresponding diagram will tell you how to perform this procedure correctly. Installing a towbar is a complex process and involves some difficulties. The threaded corners included with the mounted unit should be installed in the holes made in the bottom inside the trunk.
Please note that they are covered with soundproofing material, so they are difficult to find. Another difficult point is connected with the wiring. In this case, you need to remember that the “female” connector goes to the towbar.
Car owners who live outside the city or own a house in the village as a summer cottage often need to transport bulky cargo. Those of them who have not yet acquired a trailer for their car, for the most part, want to do so. Despite the fact that car stores today offer a wide range of towing devices, some drivers sometimes still fail to find a towing device for their car model, or its price turns out to be prohibitively high. The ability to make a tow bar with your own hands brings such car enthusiasts closer to fulfilling their desire to transport large cargo on their own trailer.