In any village, a stupa was previously used in everyday life. A village man with carpentry skills made a stupa with his own hands.
Today, few people can thoroughly explain to you how a stupa works, much less show you clearly with an example. To do this, the stupa still needs to be found. And now, using the example of this article, we will try to explain to you what a stupa is, and how more than one hut could not live without it before. The stupa is the breadwinner in any rural hut. You've never seen porridge without a mortar before. The stupa was used by everyone, young and old. The stupa, like other household items, had miraculous powers, was an intercessor in the house, and was used during rituals. A large, clumsy woman was often compared to a stupa.
Pounding water in a mortar is truly a stupid job.
About fools: Make him pound in a mortar and he will break the bottom; You can't talk about a fool in a mortar. Today, with the advent of social networks, the stupa is often remembered with a more modern expression. For example, pound verbal husks in a virtual mortar. This means useless correspondence on a social network.
To make the stupa, a log of strong birch or oak wood was used, mainly the lower part of the trunk without knots. Inside the log, a cone was hollowed out with a cone 60-70 centimeters deep. And this is a mandatory condition: the stupa must initially be made from a single piece of wood, and not from parts.
A pestle was made for the mortar from a piece of strong wood. The lower part of the pestle was the same diameter as the bottom of the recess in the mortar. Not a single rural hut could cook porridge without a mortar. To peel buckwheat grains from the husks, you need a mortar, to turn millet into millet, you need a mortar, to peel oats from the husks, how can you do without a mortar? Grain was poured into the mortar and crushed with a pestle. They were accustomed to this work from childhood. It was not convenient for an adult to use the mortar, since it was lower than the table height and had to be bent. And just right for teenagers and village girls.
In early spring, we ran out of meat and mostly ate porridge. Grinding grain in a mortar is a tedious, monotonous process and requires patience. You need to start slowly, gradually, so as not to scatter the grain around the mortar. When the husks begin to appear in the mortar, you can start hitting harder with the pestle. In the process, they removed the pestle from the mortar and checked with their hands how many grains were in the husk and how many were peeled. For example, it was impossible to grind grains for the whole week. It was daily work, preparing food for ourselves. The 95 percent purified grain was poured from the mortar into a bucket. The mortar was turned upside down and the pestle was placed in a corner. They took a bucket of grain and went out into the yard. Some kind of cloth was spread on the ground, and the grain was blown from the husk in the wind. Clean cereals were collected in a bowl and washed with water. And in the house, cow's milk was already heated in the oven. They poured cereal into a boiling cast iron pot with milk and poured it in. Then they simmered in the oven a little more. And the porridge turned out sweet and tasty even without adding sugar. Because homemade milk contains all the necessary elements. And I assure you that porridge prepared in this way is much tastier than simply made from store-bought millet and milk.
Picture of pounding grain in a mortar
During the famine years, in some Svyatogorsk courtyards there were still stupas in the huts. Potato peelings, rotten potatoes, and beets were cut into pieces and dried. Then everything was mixed and pounded in a mortar. The resulting flour was diluted with water and delicious cakes were baked! Those who survived the famine remember that time with tears. Today, many housewives use small mortars and pestles in their households. But this is just a small memory of that large stupa in a rural hut that fed a whole family.
Baba Yaga is one of the most striking fairy-tale characters of Russian folklore. Many cartoons and films depict it in different ways. She is an evil old woman who steals children and wants to eat them, but sometimes she shows pity for the hero, and in many films she is portrayed as funny and cheerful. This is probably why the kids still love her. She wants to eat someone, she threatens, but she hasn’t eaten or killed anyone yet. She can fly, but she can’t catch up with anyone.
Baba Yaga’s crafts are also all funny and not at all scary. Children happily convey the image of this resident of the hut on chicken legs in their drawings and applications. A broom is also made from plasticine. A mandatory attribute of this fairy-tale heroine is a flying stupa.
Let's consider what Baba Yaga crafts can be made from natural materials, what needs to be collected in the park for this, and what additional materials will be needed to connect the parts together.
Why is the stupa called that?
Stupa (suburgan, Sanskrit. स्तूप, IAST: stūpa, “top of the head, heap of earth, stones, earthen hill”, Tib. chorten, Mong.
Interesting materials:
How to clean the system on a laptop? How to peel a whole pineapple? How to clean the central processor? How to clean a raccoon fur collar? How to clean a yellow leather bag? How to submit an adjustment of 2 personal income taxes for 2022? How to submit an ad in VKontakte? How to apply for an RTS tender under Federal Law 223? How to apply for participation in the auction at the RTS tender? How can a graduate of previous years apply for the Unified State Examination 2022?
How to make a mortar for grinding spices with your own hands
Grinding spices is possible only with the use of a special device - a mortar and pestle. Such dishes can be purchased at the store, but many owners prefer to do everything with their own hands. In this article we will give a couple of examples of making mortars yourself.
This process is quite complicated and will require the master to have certain tools and skills to work with them. The material for making a mortar is most often stone or wood. Since the mortar will experience significant mechanical stress during operation, it is best to use hardwood. For example, oak, hornbeam or larch.
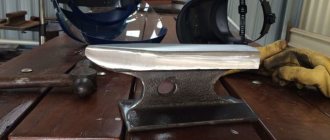
The easiest way to make a mortar is using a wood lathe. A wooden workpiece of the required size is clamped into its chuck and ground with a cutter, giving the workpiece an external shape. Then, using the end chuck of the machine, wood is removed from inside the workpiece, thereby obtaining an almost finished mortar.
The next step will be thorough polishing of the resulting product. To do this, it is scrolled on the machine, setting the minimum spindle speed. The final stage will be impregnation of the wood with protective oil. This will give it an aesthetic appearance and protect the tree from destruction. A mortar pestle is also made on a lathe using similar techniques and technology.
Another option for a homemade mortar can be made from stone. To do this you will need a rounded cobblestone with a smooth surface. A grinder will be used as the main tool for work. A special diamond-coated cutting disc is installed on it.
Having marked the stone, the upper third is cut off. To prevent the stone from collapsing during processing, it must be watered with water, which will serve as a coolant and lubricant for the disc. The resulting lower part of the stone is ground, obtaining a smooth horizontal surface. A circle is marked on it and they begin to make cuts inside it with a grinder. The cuts should be made gradually, to a depth of no more than 5-7 cm, placing them perpendicular to each other.
The stone is removed from the cavity of the future bowl using the same grinder with a cutting disc and a chisel. To give the inner surface a smooth shape, the bowl is treated with an electric grinder. The pestle is also made from stone, giving it an elongated round shape by grinding.
Selection based on shape and size
Mortars of various shapes and sizes are used for certain culinary purposes. Before choosing, you need to define the tasks.
The grinding process involves two types of effects on products:
- The force of friction is rubbing.
- Impact force - breaking.
The grinding method is applicable for spices, herbs, and other bulk ingredients. For them, you should choose flat dishes or ones with a hemispherical inner surface. The base is thickened cylindrical or hemispherical. These mortars are small and wide.
Active impact force may be needed when breaking kernels of walnuts, pine and other nuts, large seeds, and coffee. To do this, it is best to purchase a mortar in the form of a glass, that is, tall and narrow . Unlike wide ones, these can withstand intense blows with a pestle and prevent crushed raw materials from scattering throughout the kitchen.
Grinding bowls can be small (8-12 cm) and large (about 17 cm) in size. Small ones are mainly suitable for grinding spices. Larger containers are needed for processing larger products: nuts, grains, cereals.
Some models have a spout for draining - a very useful addition if you plan to prepare sauces. Initially, such spouts were on models for chemical experiments, but now they are being actively introduced into kitchen models. It’s good if there is a lid with a hole in the center that you can use to cover the container while working.
When purchasing, you should also pay attention to the pestle. The pestles in the sets can be made from the same material as the mortar or from a different one. It’s good if the working part is slightly rough, this makes the task faster and easier.
The pestle should be weighty, heavy, but at the same time fit comfortably in your hand. A small contact area is not very practical. You will have to constantly use physical force to crush the product efficiently.
A hut on chicken legs
If you ask any child, the answer will be the same for everyone - in a hut on chicken legs. When making Baba Yaga's crafts with their own hands, many craftsmen try to build her forest dwelling nearby. This house is not simple; it itself is a fairy-tale character. He can run, jump, turn, kick someone, sit down and refuse to obey his owner.
It’s difficult to make even a simple house from branches, but here it still has to stand on two legs. How to do this? Let's try to explain in detail now.
Double stamens on a wire
- pat,
- wire 0.3 mm,
- beads,
- acrylic paints.
Let's cut the wire, approximately 12 mm long, bend it in half and each half in half again. We string the bead onto the wire on one side and twist it, on the other side we also put the bead on and twist the wire. The ends of the wire should be together at the base.
Let's put the wire with beads in a stalemate and twist it, you get neat little balls at the ends, hang them up or put them out to dry.
Dip the dried stamens into acrylic paints and dry again.
How to make an anti-stress toy out of paper at home
The most accessible material we have for creativity is plain paper. You will be surprised, but you can also make a toy out of it that will distract attention and calm you down in difficult moments. It is made, as you might have guessed, using the well-known “origami” technique.
All we need:
Stages:
So, first we need squares of blue and yellow paper measuring 10x10 cm.
Take a piece of paper and fold it into a triangle.
Open and fold along the other diagonal again.
We open the workpiece again. Fold the bottom corner towards the center.
Same thing with the top one.
Now we bend the already bent lower corner to the large horizontal fold line.
We bend the right corner of the resulting strip to this point:
Bend the bottom cut of the strip to the right edge.
Then bend the left side as shown in the photo.
And bend its upper part to the left edge of the workpiece.
It turns out this is the figure.
This is the first part of one module. We make the second part in exactly the same way, but from blue paper.
We insert them into each other.
We coat the colored triangles obtained at the top and bottom with glue and bend them.
We are making several such modules in total.
We take the first module and apply glue to its entire surface.
We attach the second module to it.
We connect all the parts in this way.
If you open them, you get this design of cubes.
They fold back just as easily. Anti-stress is ready.
Other toys of this kind can be made from paper. For example, one of them is hexaflexagon. It's hard to even pronounce.
All anti-stress products of this type have the same effect: they can be folded and unfolded to create different figures. This process is calming.
They are also called “transformer toys”. If you urgently need to keep yourself busy and you love origami, I recommend taking an interest in this topic.
Anti-stress from water and a bag
Another way to make an anti-stress toy is perhaps the simplest of those proposed. And definitely known to everyone! You need to take a regular plastic bag and fill it with water. After this, tie the knot tightly. You will get this kind of squish that is pleasant to hold and roll in your hands. And most importantly, you don’t need almost anything to create it!
Another common version of a similar toy is bags containing slime (also called “slime”). Due to its consistency, this anti-stress is also quite pleasant to the touch.
Liquid anti-stress products come in different forms. And you can do them all completely yourself.
Steps
Choosing a Mortar and Pestle
Grind the spices with a pestle to the desired consistency.
Hold the mortar with one hand and, holding the pestle with the other, grind the spices in a rotating motion until the mixture becomes homogeneous. Grind, crush and crush the spices evenly by moving the pestle along the bottom and sides of the mortar. Continue until you reach the desired grind level.
- Below are other techniques for grinding and crushing spices, each of which will allow you to achieve a different consistency, which will affect the taste and smell of the final product.
- Store or use spices.
You can either pour freshly ground spices into a glass jar with a tight-fitting lid, or measure them out and use them in your recipe.
Other grinding techniques
- Explore other grinding techniques.
This option is ideal for use in baking, making sauces and other dishes. You can grind the spices to a coarse, medium or fine grind.
- Place the ingredients in a mortar and hold it with your hand.
- Use the rounded end of the pestle to press firmly on the ingredients and rotate it around its axis.
- Grind until you achieve the desired result.
Hold the pestle firmly and comfortably in your other hand.
If any part does not give in or is simply too large,
gently
but firmly with a pestle. You can then change your technique to get a finer grind.
- Grind the ingredients first. This will reveal the stronger particles and make it easier for you to grind them.
Push or push. Using the wide end of the pestle, gently press down on the stubborn seed or piece. Make short and precise strokes to speed up the process and save energy.
If a recipe requires using crushed rather than ground spices, this means that they do not need to be ground into powder. The technique described below can also be used for processing garlic.
- Place the ingredients in a mortar.
Rotate the pestle to pop and crumble the ingredients.
Cleaning the Mortar and Pestle
- Clean the mortar and pestle after use.
The cleaning method depends on the material your mortar and pestle is made of. Refer to the instructions included with them for proper cleaning. Below are the most widely used methods:
- If your mortar and pestle are dishwasher safe, you can use the normal cycle.
If they are not dishwasher safe (such as wooden sets), wash them in warm water and dry thoroughly before storing them.
- If you are grinding dry ingredients, then simply wiping the tools with a dry, clean towel is usually enough.
- Do not use detergents unless necessary.
As mentioned above, many mortars and pestles are slightly porous and can absorb some soap, which will then affect the taste of your next grind. Rinsing with warm water and wiping dry is usually sufficient to clean these items.
Try using dry rice to get rid of stubborn odors and stains.
Sometimes it can be difficult to remove stubborn stains and odors from strong spices. A great way to get rid of them is to finely grind dry white rice, which should absorb the smell and color of the last ground spices. Replace the rice and repeat the process until the ground rice remains white after grinding.
- Some herbs contain oils and fibers that form thin but strong plaques on the surface of the mortar that are difficult to remove. If you can't peel them off with the tip of a knife, try soaking them in warm water or alcohol. If the plaques are dry enough, you can sand them down with fine sandpaper.
- Other uses: Grinding medicinal products (such as aspirin to dissolve in water), grinding natural dyes to a finer consistency, grinding pet food pellets, etc.
- Crush rather than beat to avoid damaging stone or ceramic mortars and pestles.
- What else can you do with a mortar and pestle? Try the following: grinding fresh herbs into a fine paste (great for making herb butter), crushing garlic for garlic croutons, making hummus, making almond butter, or making old-fashioned flour.
- Check with your pharmacist before crushing medications; Some medications cannot be chewed or crushed and must be swallowed whole.
Warnings
- One note about crushing: Ceramic, stone, and wooden mortars can break if hit too hard or if nothing is placed in them. Most metal mortars are designed to crush relatively soft components to avoid pitting and chipping.
- Please note that mortars and pestles, once used to grind toxic or harmful substances, can no longer be used
for cooking. Instead, remove them from the kitchen and store them with the rest of the tools you use in your hobbies, gardening, or chemistry experiments. - Check with your pharmacist before crushing medications; some are absorbed too quickly if crushed. Never crush or chew coated (gastro-resistant) medications. These medications look like clear capsules with powder or liquid inside. Otherwise, you may get a serious stomach upset.
Baba Yaga figurine
To make such a character, you need to have a fir cone, a small pine cone, Christmas tree branches, rowan berries for beads, hemp rope for tying branches and making hair, and twigs for a mortar.
The big bump is the torso. To easily install the head, you need to cut off a few of the top scales from it. A small pine cone is glued onto the plasticine into the resulting hollow, with the blunt part facing forward to make it easier to stick small parts.
The body and head of the headstock are ready. One branch of the Christmas tree is cleared of needles, which are attached to the neck on plasticine. These will be the hands of a fairy-tale heroine. Hair is knitted from rope as follows. Segments are cut to the same length, folded in half and tied on the loop side with a knot. Then they are glued to the small bump on top. The more segments, the more voluminous the old woman’s hair.
Eyes, a mouth and a hooked nose are made from plasticine. As a nose, you can use one curved pasta glued to the base.
Now let's take a closer look at how to make the main part of Baba Yaga's craft - a flying stupa.
Squishy sponge for washing dishes
Paper toys are a good way to keep yourself busy, but not very suitable if you just want to crush something in your hands. A suitable material in this case would be a regular dish sponge. It can also be used to make a wonderful anti-stress. In this MK it will have the shape of a French cookie - macaroon.
What do you need:
Stages:
And cut off the hard part from it.
Use a felt-tip pen to draw or trace a circle on a sponge.
Slightly round the edges.
In order to make pasta, you will need two of these parts.
From the foam we cut out a circle the same size as we drew on the sponge.
Let's tint its edges with white acrylic paint to make the finished toy prettier.
Glue the circle between the cookie halves.
The result is a toy cookie that is pleasant to crush in your hands.
You can use a dish sponge to make this cute SpongeBob. Making it is even easier: you just need to paint the sponge, as in the photo below.
Broom
The fairy-tale character's transport, which she also uses for flying, is a broom. It's simple to make. To do this, you need to have one thick twig and several small and thin ones collected from bushes. They are cut into small equal pieces, collected in a bunch with a thick stick in the middle, and tied with a rope.
This attribute always finds its place in Baba Yaga’s crafts. Usually the broom is either attached to the old woman's hand or to the mortar. You can also put a scarf on her head, because previously in Rus' all women wore these headdresses. In all films and fairy tales, she is also depicted wearing a headscarf.