What little boy doesn’t imagine himself as an epic hero? Who, in their dreams, does not see themselves with a sword in their hands, destroying enemies on a beautiful horse? Naturally, most boys will be happy to appear at a school event in the guise of one of the heroes - Ilya Muromets, Dobrynya Nikitich or Alyosha Popovich.
There is no need to talk about a mighty horse, but it is quite possible to make such heroic accessories as a helmet, shield and sword at home.
Interesting Facts
Archaeological excavations have shown that primitive people began to protect the head. They used tree branches and animal skins for this. The very first images of helmets made of metals (gold and silver) date back to the 3rd millennium BC.
It is impossible to imagine a heavily armed warrior (hoplite) of the Hellenic era without a Corinthian or Boeotian type of helmet.
Helmets were used by the peoples of Asia Minor, and by the warriors of the East, and by European knights, and by knights in Rus'. In principle, this effective head protection has survived to this day, transformed into the helmets of modern soldiers.
Hero costume
As such, the special production of an epic hero’s outfit will not cause difficulties. Any wardrobe will contain:
- pants and shirt;
- toy sword and shield;
- belt and boots.
Instead of a cloak, you can throw on a piece of bright fabric, secure it with a sash and a brooch, that’s the whole outfit of a medieval warrior.
If the boy does not have a sword and shield, it is very easy to cut them out of cardboard, color them and give them to the defender of the Fatherland from enemies and mythical villains.
If there are no problems with the suit and conventional “weapons,” then making a helmet will require some effort. But even here, there is no need for any supernatural actions, special skills or the acquisition of special materials and tools.
Yarn selection
It is worth taking a responsible approach to the choice of yarn. Products made from natural wool or cotton can be rough on a child's skin, so you should choose yarn with the addition of acrylic or nylon thread.
In addition, such a product will not stretch or shrink when washed. Most often used for knitting hats:
- merino wool;
- mercerized cotton;
- natural materials (mohair, angora);
- mixed yarn with a synthetic fiber content of no more than 50% (acrylic, viscose).
Helmet
It is impossible to imagine the image of a Russian hero without a special headdress that protects him from enemy swords and arrows. A parent making a costume for a medieval knight is faced with the question of how to make a hero’s helmet with his own hands?
Let's look at what exactly is needed to make a plausible security device.
Helmet and sword of a Russian hero
Dear friends! I am very glad to share with you the technology for making such helmets for Russian heroes. And swords to them. I made these helmets for the holiday of February 23rd for 4th grade boys. I made the helmets myself. And children from the first grade and above were quite able to make swords. I wish you success in your creativity!
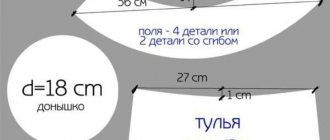
We make the following drawing on ordinary packaging cardboard. Please note that the ribs in the inner corrugated layer of cardboard are directed horizontally.
We cut out the development of the helmet with “ears for gluing.” Using a not very sharp knife, we make creasing (punching) between the sectors of the helmet for better bending.
First we glue the beginning and end of the development, applying hot glue to the “ear” for gluing.
Then we glue the sectors of the helmet’s development end-to-end, also with hot glue.
If the glue seams are not very neat, you can seal them with paper tape.
We mark the cutout in the helmet from the side of the face.
And cut it out with scissors.
For decoration we use large buttons, cord, or other similar materials. I glue them on with hot glue, forming a pattern according to my own imagination.
We carefully paint the helmets with silver spray paint. This must be done in a respirator. After painting, ventilate the room well. The paint dries quite quickly. But it is better to let the product dry for 5-10 hours.
This is such a beauty!
Now let's start making a cardboard sword.
We prepare two strips of cardboard (thick, but not packaging). Long strip 30x10 cm, short strip 20x10 cm. Draw a line in the middle of each strip.
We bend the long strip after creasing it with a non-sharp knife. Cut the short strip in half along the drawn line.
Lubricate all parts of the sword with PVA glue. There shouldn't be a lot of glue. And it should be well spread over the entire surface of the cardboard. Otherwise, it will soak the cardboard.
Necessary materials
Fortunately, you don't need anything out of the ordinary for the helmet. All raw materials and tools can be found at home:
- five-liter plastic bottle;
- high-quality glue;
- disposable plastic cup;
- scissors.
You will only have to spend money on purchasing waterproof paint of silver or gold color.
Progress
The steps of making a helmet do not present any difficulty even for a person who has decided to do such work for the first time.
- A part of the bottle is cut off so that it fits the volume of the child's head.
- A piece of plastic is cut out of the resulting blank so as to reveal the hero’s face.
- A long narrow strip is cut out of a disposable glass, which will serve as a nose guard, protecting the knight’s face from the blows of enemy swords.
- The helmet elements are fastened together with glue.
- The place where the cap is screwed to the bottle is covered with a piece of foil.
- Paint is applied to the helmet.
Important! Check to see if there are any nicks left on the cuts. If there are any, so as not to injure the child, cover them with several layers of tape.
The hero's head blow is almost ready. It is necessary to make chain mail that covers the warrior’s neck and shoulders. The basis for the chain mail can be a piece of cardboard, onto which small circles should be drawn with a felt-tip pen, imitating steel links.
An even simpler way out of the situation would be to use an old “string bag” to protect the hero’s neck and shoulders.
Base: old newspapers
It is possible to make head protection from scrap material. To do this you will need the following materials and tools:
- balloon;
- centimeter;
- plasticine;
- Vaseline or hand cream;
- glue and old newspapers;
- sponge and mesh fabric;
- paint – black and silver.
How to make boots and pants for a hero boy costume with your own hands
Old Russian heroes wore high boots with curved toes and a figured top. You won’t find these on sale, but making them is quite simple from scrap materials.
What you need for work:
- thick fabric for boots;
- doublerin;
- thick linoleum or leather for the sole;
- thick threads for decorative work;
- awl, scissors.
Step No. 1 Pattern of boots
We take the necessary measurements from the child’s leg and draw a pattern like this.
We transfer the details of the side and front of the boots onto the fabric, not forgetting about the seam allowances. We cut out the sole from thick linoleum or leather.
Step No. 2 Assembling boots
We iron all the details. We additionally seal the front part of the boot with doublerin so that the boots keep their shape.
We use an awl to make holes on the sole through which the boot will be sewn.
We fold the parts of the fabric boots with the right sides inward and sew them on a machine. Turn it inside out and try it on the sole. We distribute the fabric along the side of the sole, pinning it with pins. The sole must be sewn on by hand, using even and neat stitches.
The boots for the hero costume are ready!
The pants of the ancient Russian hero are made of plain fabric. For cutting them, the pattern of any sweatpants or bloomers is suitable. We transfer the pattern to the fabric and sew the pants along the side and crotch seams, not forgetting to tuck the bottom of the legs and insert the elastic into the waistband.
You can use ready-made sweatpants made of knitted fabric in soft colors.
Step-by-step instruction
The work should begin by measuring the head circumference of the child for whom the helmet is being made. Then work on a paper hero’s helmet with your own hands proceeds according to the following scheme:
- the balloon is inflated to a size slightly larger than the future helmet;
- the ball is lubricated with gel or petroleum jelly so that it can later be easily separated from the papier-mâché;
- the outlines of the future helmet are carefully drawn onto the ball with a felt-tip pen;
- Pieces of newspaper soaked in glue are glued along the marked lines;
- Several layers should be applied to achieve the required volume;
- you should wait for each layer to dry completely before applying the next one;
- when the desired volume of the helmet is obtained, the ball should be deflated (piercing is not recommended, it can destroy the entire structure);
- because the ball has been pre-lubricated, it will easily separate from the workpiece;
- check the edges of the helmet; if you find any nicks, sand the workpiece;
- after waiting for the last layer of papier-mâché to dry completely, you should mix the remaining newsprint with white paint and cover the helmet with the resulting composition, hiding all the irregularities, and at the same time ensuring a light color of the headdress;
- soak a piece of sponge in black paint and start rubbing it over the helmet, giving it an antique look.
A helmet is made using the same principle, but not from newspapers, but from foil. The only difference in the work process will be that you will not need to use paint, because... The silver color of the foil will add the necessary elegance to the headdress.
Custom hat
Making a warm hat in the form of a knight's helmet does not require a high level of skill. It is enough to have a little knowledge of crochet technique.
Related article: How to compactly put things in a closet and put things in order
Before starting work, you should measure the circumference of your head. The following master class is designed for a size of 59 cm.
To make the product you will need wool blend yarn (50% wool, 50% acrylic) of gray color and some black yarn, hook number 3 and 2 identical buttons.
The attached diagram will speed up the knitting process:
A simple technique is used when working on the hat. The initial seven rows are worked with a double crochet, following the pattern. As you can see, the addition of loops is introduced gradually.
The eighth row is knitted without any additions.
Starting from the ninth row, increases are made for every tenth loop. The tenth line is knitted without introducing additional loops.
In the eleventh row, additions are again required: in every eleventh loop two stitches are knitted instead of one.
The twelfth row continues without additions.
During work, it is advisable to measure the product around the circumference using a meter tape, so as not to go beyond the required size. Ideally, it is possible to periodically try on a knitted piece for the future owner.
In the thirteenth row, one additional column is also introduced in every twelfth loop.
Upon reaching the required size, subsequent rows (in this case from 14 to 18) are knitted without increments.
The nineteenth and all other rows are knitted in a semicircle. To do this, 33 loops are counted in both directions from the center of the back of the hat and marked with threads so as not to get tangled.
The semicircle is knitted in six rows. In this case, on the second row it is advisable to make increases in the form of one column on each edge, so that the future helmet is most comfortable to fit.
The base is ready. The next step is to make the visor. Here you will need to introduce prepared black yarn.
A chain of gray yarn is cast on in the amount of 22 loops. It will be the center of the visor.
From the chain in both directions there will be a gradual decrease in loops. Every two rows the color of the thread changes from gray to black.
Related article: What do you need to know before gluing photo wallpaper?
The loops are decreased by alternating through the row. Towards the end, you should reduce the number of loops in each line so that the edges of the visor are sharp.
At the ends of the visor, air loops are knitted in sizes corresponding to the prepared buttons.
When the visor is finished, you need to tie it in one row along the entire edge to align the rows.
The last part of the helmet will be the comb. A chain of 42 loops is cast for it. The comb consists of three rows, in the second of which increases are made.
For a beautiful crest shape, the edge that will be located at the top of the helmet should be knitted with two stitches instead of one.
When the individual parts are ready, all that remains is to assemble them together. Buttons are sewn on the sides to which the visor is attached.
The comb is sewn on with a thin thread in the color of the yarn on both sides. To make the task easier, you can use additional threads as an aid.
At the final stage, all protruding threads are hidden. The hat-helmet is ready.
Decoration
The blank blank is ready and you can start decorating.
Maybe your child wants to be like a Norman knight? Don't disappoint him - make some horns and attach them to your helmet. That's all - your child can imagine at the matinee in the image of a medieval knight from Normandy.
You can additionally decorate individual areas of the helmet with colored pencils or felt-tip pens and place them on the child’s head.
Sequence of actions for sewing in the lining
Having familiarized yourself with the technology, it is much easier to create a knitted hat on fleece.
First, both products are turned inside out and the tops are sewn together by hand - there is no need to tighten them too much, the only important thing here is to secure the lining in the hat.
The back seams should match - they are also secured with light stitches.
Only after all these manipulations is the lining placed inside the cap - carefully and evenly. Since sewing fleece to a knitted hat using a machine is very problematic, because in this case the seam will become obvious, they do it manually.
Using blind stitches, without pulling the stitching, sew along the entire circumference, remove pins and basting threads - and that’s it! Warm little thing is ready!
Manufacturing
First, you should take a measurement from the child's head. Then, when making a hero’s helmet with your own hands from cardboard, you should use a kind of pattern:
- cut a ribbon up to ten centimeters wide to the size of the child’s head and glue it together like a hoop;
- make a nozzle;
- cut out a couple of elements from cardboard necessary to protect the face from oblique blows with a sword;
- cut four narrow ribbons that are glued on top of the hoop and fasten the structure;
- Using plasticine, connect the elements of the future helmet.
In addition to the helmet, you can cut out several rectangles and squares from cardboard, connect them with thread or glue, and make real armor for the knight, as well as bracers and leggings.
A boy completely “clad” in armor can safely go to a formal event.
Paper props
The simplest version of a knight's helmet is to make it using the material at hand. Almost every home with children has cardboard for all kinds of crafts for kindergarten and school. It can be used at work.
In order to make a helmet from cardboard, you will need a sheet of cardboard for the base (the length is calculated by the circumference of the head with an addition of 10 cm, width - 35 cm), plus a piece of cardboard for the upper part of the product; glue (PVA is most convenient to use); scissors; a piece of soft colored paper or a bright pen.
In the center of the sheet of cardboard taken for the base, a square-shaped window is cut on three sides. On the uncut side it bends outward. This will be a visor.
Then the base is twisted until the two sections touch. The edges are glued together. The resulting cylinder is placed on a piece of cardboard provided for the top of the helmet and outlined.
The made circle is complemented by drawn small rectangles.
The drawing is cut out.
Small rectangles should be bent inward and used to glue the cut out circle to the base.
All that remains is to insert a feather or something similar into the center of the top, for example, several pieces cut from bright-colored paper.
The product is ready.
If you want a gift for a boy to also have a functional load, you can surprise your baby with a knitted knight’s helmet. The child will not want to part with it, using it as a headdress in the cold season.