Decorative Sequins Luxart Glitter Bronze 20 ml
100 ₽ More details
Natural colored jute ribbon (width 7cm, length 4.5m)
292 ₽ More details
Wall curtain rods
Arranging your own home and the surrounding area is an important and responsible task. One of the indispensable attributes of any private home is a basement or cellar. This is a great place to store food. During its construction, the owner will be faced with the problem of arranging a convenient entrance. This is due to the fact that the stairs will take up too much space for a comfortable descent.
The descent, made in the form of a hatch cut into the floor and a vertical ladder for descent, is compact, but extremely inconvenient. The way out of the situation is to build a small lift that will take you and your cargo to the basement with all the convenience. We will learn below how to make a metal elevator to the basement with your own hands and what types of elevators there are.
Build an elevator to the basement
Operating principles of various elevator systems
Elevator lifts are divided into the following main types:
1) Electric
(electromechanical).
2) Hydraulic
.
3) Pneumatic
(air lift).
DIY elevator guides
To move the elevator, some kind of power device is required, the most convenient and practical power supply for which is electricity. Therefore, electric motors are part of the drive, regardless of its type. However, it is customary to call the elevators of the most common cable system electric, probably because in them the engine force is directly transmitted to the cables that move the cabin.
1. Electric elevator
, which we use in multi-storey buildings, works on the principle of a counterweight: the cabin is fixed on cables, at the other ends of which a counterweight is attached. The drive mechanism, located in the upper part of the elevator (engine room), having received an electrical signal from the panel buttons, sets the system in motion through a pulley wheel. Thanks to the counterweight, cabin inertia is reduced to a minimum, which ensures smooth movement and allows you to get by with a significantly lower power electric motor.
2. Hydraulic lift
works on the principle of a jack. The electric motor creates fluid pressure in the system, and the hydraulic cylinder pushes the cabin upward. No electricity is consumed during descent. This type of elevator has no counterweights and is silent. But due to the high pressure in the hydraulic system, it requires qualified maintenance and a powerful power plant.
3.
The pneumatic elevator
cabin works like a piston. To move the elevator upward, a vacuum of air is created in the air shaft above the cabin by powerful fans. As a result, increased pressure under the cabin pushes it upward. To descend, the pressure at the top and bottom of the cabin is equalized, and it smoothly goes down.
DIY pneumatic elevator
Now let’s ask ourselves the question: how to make an elevator with your own hands in the house, is it feasible for your hands and wallet?
A pneumatic elevator requires components that are almost impossible to make with your own hands. If you buy ready-made ones or order their production, the very idea of making an elevator with your own hands is lost. And the final cost will be rounded up to such a figure that purchasing and installing a ready-made airlift will cost less.
DIY hydraulic lift
Now - hydraulics
. Alas, it is no less difficult and expensive. A high-performance hydraulic pumping station will be required, and it is not cheap. Well, and most importantly – the hydraulic cylinder. Even raising an elevator car one floor requires significant extension of the rods. Dump trucks have similar units, but even if we decide to install such a hydraulic cylinder, we will be faced with another problem - lowering the cab. Automotive-type hydraulic cylinders fold under the weight of the heavy load bed of the dump truck. The weight of the elevator car will not be enough here. Combining various other ready-made mechanisms will be no less difficult and expensive.
The solution to the question of how to make an elevator yourself is obvious: make an electromechanical
.
High-quality and reliable elevator for a house on 3 floors in Moscow
DIY wigwam for children: patterns, sizes and step-by-step manufacturing instructions
Such an elevator is a truly useful acquisition that is necessary for a private home. If elderly or disabled people also live there, then the need for installation does not raise any questions at all. Hydraulic models for three-story houses are especially popular. This is the best option due to its noiselessness and other characteristics. The speed of movement is not the highest, but this characteristic is not the most important for a private house. Hydraulic elevators are installed in houses with no more than three floors. The lifting capacity of an elevator for a house with 3 floors is usually up to 250 kg, which is usually quite enough in most cases. The basis of such equipment is a hydraulic cylinder, which sets the mechanism in motion. The hydraulics are built according to the traditional scheme. Modern models are automated, which simplifies operation.
Electric lifts can also be installed in a three-story house. There are many such models on the modern market that differ in type, size and other characteristics. The preferred option is flat ropes, which produce minimal noise during operation. Such models are characterized by increased safety and reliability. But such equipment is very rarely installed in private homes, because it is not very profitable economically.
How to make an electromechanical elevator with your own hands
General elevator parameters
In our case, the design of a self-made elevator is a movable frame made of a 60×40 square pipe, which moves between two channels - guides. There are 8 wheels installed in pairs at the corners of the frame, with the axes of one pair (one corner of the frame) located perpendicular to each other. One wheel rests against the wall of the channel, the other against the shelf. This design ensures free movement of the elevator frame up and down, while reliably fixing it from frontal and lateral displacement (Fig. 1).
We weld the loading platform to the bottom of the frame. To ensure structural rigidity, we connect the platform and frame with stringers. When constructing an elevator, you will need to use a welding machine; here we describe in detail how to weld with electric welding.
The location of the stringers at the top or bottom is dictated by the specific conditions of the room, since each option has both pros and cons. Stringers located above the platform can complicate the installation of the cabin walls. The location of the stringers from below will require lengthening the movable frame. In this case, you will have to make a pit, otherwise the elevator car will not reach the floor.
DIY electromechanical elevator guide diagram
Installation of guides
We take no less than No. 10 channel for the guides. Its length depends on the required lifting height. As practice has shown, even channel No. 12 with a length of 7.5 meters has high flexibility and “plays” under its own weight. Therefore, during the installation process we repeatedly control the verticality, checking it in different places.
We attach the channel to the wall every 600 mm at two points. To do this, we pre-weld fastening plates to the channel, the edges of which protrude from both sides of the shelf.
How to attach the plates to the wall depends on its material. For brick or concrete - concrete anchors 200x16, for aerated concrete - plastic anchors for aerated concrete 10x120 and self-tapping screws, for wood - self-tapping screws with a hexagonal head, 4-5 mm in diameter (we do not use nails!).
Channels - guides for an electromechanical elevator with welded strips
To install the second guide, we place the assembled movable elevator frame (with wheels) between the channels, and gradually lifting it up, we position and fasten the second channel “in place.” In this way, the most accurate geometry of the structure is achieved. Tolerances will be minimal, which means that the elevator movement will be stable, without swaying.
Lifting mechanism
When deciding how to make an elevator with your own hands, special attention should be paid to the choice of power plant. An electric hoist with an asynchronous motor and a worm gearbox is suitable. This mechanism is inexpensive, reliable and also low noise.
Depending on the installation location, the hoist can be placed either from above, attaching it to a supporting metal beam, or from below, in a basement or pit, passing the cable through a roller attached to the top.
rent an apartment in the city of Moscow on Avito
Our home elevator is designed for one person
, therefore it is not advisable to use a counterweight. It will only complicate the design and take up additional space.
Pneumatic home elevator: classic characteristics
The total weight of a home elevator is 300 kg (for a shaft to a lifting height of 3 meters - 2 stops) or 450 kg (for a lifting height of 6 meters - 3 stops). The lifting capacity of the home pneumatic elevator is 200 kg. The speed of the passenger capsule is 0.75 m/minute.
Typically, halogen lights are used inside the cab. Electrical power circuits support voltages above 24 volts. Illuminated push-button switches are used on the panel inside the cabin and on each loading platform next to the home elevator door.
An example of a home pneumatic lift, equipped to create complete comfort for the end user
The opening of polycarbonate barrel-cylinder doors is supported, both on one side on each floor and on opposite sides. The design of a pneumatic home elevator is installed with a self-supporting block - the emphasis is on the floor of a residential building.
Main parts of the vacuum elevator design
- A lift cylinder is a transparent, self-supporting tube constructed from sections specially designed for home pneumatic elevators. The walls of the lifting cylinder are made of curved polycarbonate sheets. The pipe is made of long modules that are easily combined with one another.
The lift cylinder doors are made of the same material - polycarbonate. The door structures are sealed and equipped with safety magnetic locks.
The head of the lifting cylinder is made of steel, which ensures tightness in the area of connection with the polycarbonate base. The steel head is equipped with suction valves and air intakes.
- The vacuum lift cabin is made of transparent polycarbonate and mounted on a steel frame. There is a sealed connection on the roof of the cabin, which ensures normal pressure and conditions inside the passenger area. An anchor system is used, which is activated when the desired floor is reached. This ensures precise stopping at a specific level.
- Vacuum module (vacuum pump) – supports two typical assembly designs. Either directly on the lifting cylinder as a head, or separately at a distance of up to 9 meters from the lifting cylinder. In any case, the pump electric motor is single-phase.
Overall dimensions of a vacuum elevator for home use
Overall dimensions of the classic design of a pneumatic lift for the home:
- outer diameter of lifting cylinder: 0.95 m;
- internal diameter of the passenger capsule: 0.81 m;
- internal height of the passenger capsule: 1.95 m;
- elevator door height: 1.9 m;
- elevator door width: 0.53 m;
- vacuum pump head: (diameter * height, m) 0.95 * 0.28;
Remote pumping system
The remote vacuum unit is mounted in the attic or engine room. This module (classic) has overall dimensions: 73 * 45 * 53 cm. The connecting line is connected directly to the top of the cylinder. For the installation option in the attic, a hole with a diameter of 1 m or more must be made in the ceiling.
In addition, you will need a beam-to-beam loft height of at least 0.9 meters to provide enough space for proper installation. The pumping part is connected to the elevator via PVC pipes with a diameter of 5-10 cm and a length of up to 7.5 meters.
Demonstration video about pneumatic elevators
The demonstration video clearly shows all the advantages of pneumatic (vacuum) lifts, the designs of which are well suited for installation in a private home. In addition to technical functionality, such a structure also becomes part of the home design:
The final touch
Of course, one should not rely on the advantages traditionally promoted by manufacturers of any equipment. If a potential user chooses a vacuum home lift, you just need to be careful when getting to know the specific equipment.
As in any field, the quality of elevator equipment depends largely on the capabilities and abilities of the manufacturers. Or maybe it’s worth thinking about how to make a pneumatic elevator with your own hands.
Safety
Be sure to periodically inspect the elevator parts. We pay special attention to the cable, checking:
•
presence of lubricant;
•
uniform laying on the drum;
•
no kinks or breaks in weaving threads;
•
serviceability of the cable fastening units on the drum and elevator frame.
Electromechanical elevator motor with winch
It would be useful to make a simple but effective safety system in case the main cable breaks. To do this, we simply take a pair of ratchets from the inertial seat belts of a passenger car and install a drum with a safety cable between them. Assembling and fastening such a mechanism will not cause any particular difficulties, and its reliability is quite sufficient to support the significant weight of the elevator with a passenger.
In a control unit for a do-it-yourself elevator, it is preferable to use buttons without locking. According to the principle: “pressed - it goes, let go - it doesn’t go.” And be sure to provide an emergency power off button. power supply in case of “stuck” control button.
In addition, be sure to ensure reliable grounding of the elevator electrical equipment.
We haven't mentioned the finishing of the elevator car. This can be either painting the metal parts (the link describes how to properly paint metal) of the elevator, or covering it with sheet materials, such as OSB, followed by cladding. It seems that, having solved the constructive part of the question of how to make an elevator with your own hands, the finishing work will not be particularly difficult for you.
Leave your tips and comments below. Subscribe to our newsletter. Good luck to you and good luck to your family!
Source
What should you not forget?
Every person wonders whether it is safe to build a homemade elevator in a private house? Everyone has their own opinion, but the concern is that if such a device collapses or something fails, there may be casualties. Therefore, it is sometimes better to take and order a design from professionals. Although some people do it themselves, the design lasts for many years and does not fail.
When an elevator appears in a private house, installed with your own hands, it is worth checking it periodically. Each family member should be aware that the elevator is a complex structure and must be handled with special care. In addition, it is worth knowing that an elevator for people differs from a simple lifting elevator. The first one must be installed in compliance with all rules and regulations. The house should be as safe as possible for all its inhabitants. Care must be taken to ensure that the protection is:
- Accidentally entering a traffic block.
- Opening the door while moving.
- Protection from unauthorized movement (if people are not yet inside, but movement has begun).
You can always find information and detailed instructions in the documentation. It is designed with all the conditions and methods. When installing even a small elevator for a private home, do not forget about GOSTs and standards.
Your own “lift”. Portal user elevators
In the first part of the article, we talked about the difficulties that await those who are thinking about having their own elevator in the house. Of course, for true “do-it-yourselfers” who are firmly confident in their own engineering abilities, they only inspire (to try) and provoke (to discuss). Especially those who have already made a similar elevator at home. And as their experience shows, an attentive mechanic and owner always have time for regular technical inspection and installation of numerous “protective” devices.
User Tehnoman identifies the following components of a “home” elevator:
1. Pit equipment: speed limiter tensioner. 2. Drive (winch). 3. Cabin:
4. Counterweight. 5. Installation of guides. 6. Mine door. 7. Speed limiter.
Judging by the stories of portal participants, they adhere to exactly this layout (with minor variations).
. Several years ago, the user Grandfather completed renovations in an old village house. After all the alterations, he ended up with a spacious living room downstairs and a bedroom in the attic. All that remained was to make the stairs to the attic. However, after studying all the options, the craftsman abandoned this idea: the staircase would take up too much space, reducing the area of the room. As a result, he decided to make a device that, according to its characteristics, is classified as an elevator, since “an elevator is a more complex structure.”
The design of the device is simple, he claims. The main parts of the lift are a cabin, guides with rollers, an electric hoist and control buttons with limiters. Cabin dimensions: 600*600 mm (length-width), height – 1800 mm. The side and rear walls of the cabin have continuous fencing; the top and entrance are left without fencing. The frame is made of a 45*45 mm bar. An electric hoist with a lifting capacity of 300 kg is located behind the attic wall on the ceiling. The support rope runs along the wall.
According to the user, the hardest thing for him was choosing the guides and rollers for the cabin. As a result, the search led to guides and rollers for hanging doors weighing up to 100 kg. The rollers are installed in 2 pieces at the top and bottom of the cabin - the top pair works to separate the guides, the bottom pair works to compress.
The cabin of such an elevator is designed for one person weighing up to 130 kg. To control the lift, three double (up and down), self-returning buttons are used: as long as you hold the button, the lift goes up or down. When you let go, it stops. The entire control system is switched to 12 volts. At the top and bottom, the circuit includes limit switches that provide stopping in the extreme positions of the cabin. Movement speed is 15 cm per second.
Coupled with push-button control, this speed ensures the safety of using the design, the forum member believes. If the power goes out in the house, you can go down or up the folding retractable stairs. Grandfather systematically inspects the rope, but during the entire period of operation he did not find any signs of wear.
What advice does the craftsman give to beginning “elevator builders”? According to him, the location of the rope attachment must be determined depending on the specific height of the cabin, the height of the attic ceiling and the installation locations of the blocks for the passage of the rope. As for the length of the rope, it must be chosen so that it fits in one row on the hoist drum.
I use Chinese winches, the price and quality are optimal. They have a gear reducer, with an electromagnetic brake, which is “released” only when 220 W is supplied. In the event of a lack of electricity, breakdown, combustion of the coil, etc., the winch is braked. The only significant drawback is the loud noise. Additional lubrication does not help. The weakest point is the cable; it is advisable to replace it immediately with a stronger one with a margin of 2-3 times. When overloaded, these winches simply “don’t move”, we must give them their due, and they don’t burn.
According to a forum member, there is an important feature in installing a winch: it must be mounted strictly horizontally. Otherwise there will be problems with winding the cable. The user lubricates the cable itself with lithol and carefully monitors the integrity of the rope. If even one thread comes out, it should be replaced immediately.
As for the guides, Dibor usually uses channels to which pieces of an angle with a hole are welded. The channel itself, 60-gauge, is attached to the wall with through studs, dowels, or welded to the mortgages. The most important thing is that the guides are parallel to each other.
don't throw bulls off the balcony ad
Source
Homemade lift and mini-crane: inexpensive and effective
Options for budget and simple “iron helpers” for lifting sand, slag, bricks, gas and foam concrete blocks
Building a house alone is possible, but difficult. Especially if you have to lay stone walls, lift bricks to the second floor, or “throw” sand and bags of cement onto the ceiling. So as not to overstrain yourself. To save on ordering a crane and, in general, to simplify your task, many FORUMHOUSE users make mini-cranes and hoists. In this article we will talk about two successful designs.
- Automatic lifting and unloading mechanism for bulk materials
- Homemade crane based on an electric hoist for lifting aerated concrete
How to make a crane for lifting slag, sawdust and sand
I'm building a house. I try to do without helpers. I want to fill the attic floor with insulation - 20 cubic meters of sawdust and 10 cubic meters of slag. The age is no longer the age to run back and forth with buckets. I decided to make a collapsible automatic lift for bulk materials. And this is what I got.
To make a homemade lift you need:
- Electric hoist, power 0.9 kW with a maximum load capacity of 500 kg.
- A trough or body from a garden wheelbarrow, with a load capacity of 250 kg.
- 12th steel I-beam.
- 8 pcs. bearings for rollers.
- Electrical cable.
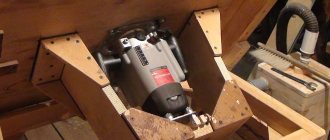
First make the carriage. How it is arranged can be seen in the photo.
Secure the beam, at the end of which a restrictor plate and a bracket for the carriage movement roller are welded.
The internal stop (support for the carriage in the attic) is detachable. The hoist assembly with the carriage is driven onto an I-beam, after which the limiter is screwed on.
Important!
The beam is installed with a slope of 3 cm per 1 linear meter.
Due to this, the carriage with the load moves into the attic itself
.
The carriage is pulled back to the end of the beam with a rope thrown over a roller. The same rope holds the carriage so that the load, after lifting, does not move uncontrollably to the unloading site.
The telpher is placed in a horizontal position. The user adjusted the level using a set of engraving washers.
String holders are welded to the beam, on which the electric cable is fixed.
Important!
The cable is movable.
The lift works like this:
- Load the trough with bulk.
- Lift the load up.
- You drive the trough to the unloading site.
- To unload, lower the trough onto the ceiling. The lift locks are automatically released.
- Unload.
- Pull the carriage with a rope onto the end of the I-beam.
- Lower the trough down.
- Secure the locks.
- Load the trough.
- Repeat the operation.
I used a hoist to load 12 cubic meters of slag into the attic. The device worked great. Not a single breakdown. I disassembled it and put it away for the next construction.
Features of manufacturing a cellar elevator
An elevator is a fairly heavy structure; its fixation area is a load-bearing wall. When planning the manufacture of a home elevator, you need to understand that this is a heavy structure that needs a strong, reliable support and foundation.
When making a cellar lift with your own hands, you must follow these rules:
The possibility of a power outage or sudden failure of one of the mechanisms should be considered. For such cases, a portable or stationary ladder and a battery-powered light source should be prepared. Another effective solution is a hand winch. The ascent and descent will be slower, but the elevator will remain operational.
How to start installation?
The simplest model of elevator to the 2nd floor in a private house is electric. To create, you do not need to purchase or rent special equipment. But you shouldn’t think that everything is so simple and easy - there is a lot of manual work in this process. In addition, you will need to comply with the rules and recommendations of GOST. True, when creating such an installation with your own hands, the result is a high-quality design, even no worse than a factory installation.
You need to decide where exactly to mount the unit. Since the rails will need to be fixed to move the cabin, the walls themselves must be reliable. Sometimes they are even improved or strengthened to create safe movement. In order for a home elevator to move safely in a private home, it is worth considering several points:
- If the cable breaks, there must be a special system that allows the elevator to automatically stop.
- There should be any communication system inside in case the unit stops at an unnecessary moment or between floors.
- The voltage should not exceed 24 Volts, otherwise it is dangerous.
Experts advise entrusting the development of the plan to a professional who has experience in this work, and you can already implement the finished project with your own hands. Today there are not many real masters, but you have to pay for such services. But you shouldn’t save money when looking for a master. Otherwise, the structure will be unreliable and may pose a danger to residents.
What nuances are taken into account?
The question often arises, which door to choose. At the moment there are two types of structures. These are swing and telescopic. But the decision is not made only at personal discretion. Seats in the stopping and boarding area are taken into account. For the first option you need to have more free space. Telescopic is an opportunity not to take up much space in the hall. If there are no problems with space limitations, then you can choose any.
Roller blinds are one of the simplified options in terms of installation and cost. In order for such a structure to move, a winch with a power reserve is mounted. In addition, reliable components are purchased:
In addition, the cabin frame is prepared in advance. For this, a metal profile is used (the strongest one is selected), after which it is sheathed with the selected material (wood, plastic, etc.).
What types of elevator cabins are there in country houses?
The most popular among homeowners today are panoramic elevators - with continuous glazing from floor to ceiling.
In second place are the originally decorated elevator cabins - with bright elements made from rare materials - for example, rare and valuable tinted stainless steel, valuable wood in an antique style, and unusual ultra-modern lighting. This approach is designed to make your guests captivated by your home.
Interestingly, such bright designs do not interfere with functionality. The elevator in the cottage is, of course, different from what we are used to seeing in apartment buildings, but it performs its functions. It works reliably and smoothly, and the owner can comfortably move between floors and not worry about safety.
However, it should be borne in mind that it will not be easy for emergency services to gain access to private territory if such an elevator gets stuck. Therefore, this security option must be provided in advance. For example, automatic movement of the elevator car to the nearest floor in case of power outages, ensuring continuous communication with the security service, because a mobile phone may not be at hand.
Requirements for a home lift
The main criterion for an elevator is its load capacity. To make a cellar elevator with your own hands, you need to carefully study the structure of this structure and the requirements that apply to it.
Standard elevators consist of the following parts and mechanisms:
A homemade elevator to the cellar must meet the following criteria:
When choosing a control method, it is recommended to use a remote control with lifting, lowering and emergency stop buttons.
Why is a cargo lift for a dacha and a private home 70% cheaper than an elevator?
The manufacture of elevators meets complex technical requirements: their production requires 40% more metal, which increases the weight of the structure. To set it in motion, a drive with a larger load capacity is installed. This is reflected in the price. The design of the cargo lift is developed and calculated according to the customer’s requirements, based on the platform dimensions, lifting height and load capacity required for you.
ZPTM LLC can offer 3 types of lifts for a dacha or country house: MINI lift, chain lift, service lift. They are characterized by low load capacity and compact dimensions.
You receive the terms of reference for the preparatory work free of charge. It is enough to pay close attention to each point. Order a cargo lift for your dacha or country house: calculate the cost online, indicating the parameters you need. Or call and the manager will calculate an offer especially for you!
Purchase and installation of an elevator
To purchase an elevator, you can go to the sellers’ website, where you can see all the models offered and choose the one that suits you.
After choosing, the site administration will contact you; this is done to clarify the dimensions of the future elevator shaft. Then you can drive up to the warehouse and see the model live. Well, then everything is simple - you pay for the elevator itself and its installation, which can cost up to 20 thousand rubles.
And so, in this article we looked at the main points that will definitely help you when choosing and purchasing an elevator for your private home.
Why is it difficult to install an elevator yourself?
Making a homemade small elevator in a private house is very difficult. Even a regular lift must meet safety criteria. In some cases, the owners of a country house try to install an elevator on their own, bypassing the stage of correct design with the correct diagrams and drawings, in order to reduce costs. But this is not always possible. Let's talk about the requirements that need to be taken into account when installing elevator equipment:
- Ensuring reliability and safety. Elevator equipment must be completely safe. When disconnected from the power source, cabin passengers must be able to get out independently. The cabins must be silent and not create any interference with the operation of television or radio equipment.
- Design features. Elevator equipment for a summer house or cottage is very similar to office equipment, but the difficulties during installation lie in the dimensions and limited free space. It is very difficult to independently calculate capacity.
- Service or home elevator cabins can have exits on several sides. It is very difficult to design such a system on your own.
- Design. Craftsmen can quickly select the optimal appearance of the cabin. Typically the most popular materials are glass and metal. Glass booths require careful handling during installation.
But the main parameter for equipment is safety. All rules are regulated by law, so it is very difficult to comply with all the conditions on your own. specializes in the installation of electric, hydraulic, pneumatic elevator equipment and lifts for cottages and country houses. We cooperate with leading European companies, so the quality and reliability of cabins and installations is beyond doubt. Our craftsmen can solve the most complex problems and install an elevator for any room at the most affordable prices.
Types of elevators to the basement
Lift with electric motor The basement lift can be equipped with various types of drives, differing in the operating principle of the applied force.
Electrical structures are equipped with a motor, gearbox and winch. The movement of the cabin is carried out by winding and unwinding the cable from the drum. To ensure smooth movement and reduce the load on the motor, the platform is equipped with a counterweight, the mass of which matches the moving part or slightly exceeds it. The system is reliable, but subject to rapid wear due to the presence of many parts that rub under load. The device produces a loud noise that can be heard in all corners of the building.
Hydraulic elevators operate quietly; the load is lifted by a piston into which a special liquid is pumped through a high-pressure hose. The power plant can be located below, above, even to the side of the shaft. In case of power outages, provision is made for the installation of hand pumps. The downside of this solution is the likelihood of hose ruptures and oil contamination of the entire basement.
The pneumatic elevator moves by creating a vacuum in one of the chambers under the influence of pressure pumps. The devices are safe, reliable, but rarely used. This is justified by their high cost, insufficient power and difficulty in maintenance.
As an option, you can consider mechanical lifts. To move the cabin, muscular force is applied to the drum. To increase torque, extended handles or large steering wheels are used.
Using an Electric Elevator
This is a bulky structure, which, with the help of a gearbox, begins its movement based on traction cables. But a cabin is first mounted on them, and movement occurs on special rails. This self-made elevator in a private house can reach a certain speed, and it is not small. In this case, you need to find a suitable place for the power unit.
There is one important point: if the entire system is located in the attic, then the load-bearing beams will have to be strengthened, since the load becomes significant. Since the entire structure is pulled by a winch, the sounds will be strong. There are also situations when it breaks (rarely, but this should not be ruled out). Electricity is also considered an important component. It will not be too expensive to make such an elevator in a private house, but in comparison with other devices.
Safety
Be sure to periodically inspect the elevator parts. We pay special attention to the cable, checking:
presence of lubricant; •
uniform laying on the drum;
•
no kinks or breaks in weaving threads;
•
serviceability of the cable fastening units on the drum and elevator frame.
Electromechanical elevator motor with winch
It would be useful to make a simple but effective safety system in case the main cable breaks. To do this, we simply take a pair of ratchets from the inertial seat belts of a passenger car and install a drum with a safety cable between them. Assembling and fastening such a mechanism will not cause any particular difficulties, and its reliability is quite sufficient to support the significant weight of the elevator with a passenger.
In a control unit for a do-it-yourself elevator, it is preferable to use buttons without locking. According to the principle: “pressed - it goes, let go - it doesn’t go.” And be sure to provide an emergency power off button. power supply in case of “stuck” control button.
In addition, be sure to ensure reliable grounding of the elevator electrical equipment.
We haven't mentioned the finishing of the elevator car. This can be either painting the metal parts (the link describes how to properly paint metal) of the elevator, or covering it with sheet materials, such as OSB, followed by cladding. It seems that, having solved the constructive part of the question of how to make an elevator with your own hands, the finishing work will not be particularly difficult for you.
Leave your tips and comments below. Subscribe to our newsletter. Good luck to you and good luck to your family!
In the first part of the article, we talked about the difficulties that await those who are thinking about having their own elevator in the house. Of course, for true “do-it-yourselfers” who are firmly confident in their own engineering abilities, they only inspire (to try) and provoke (to discuss). Especially those who have already made a similar elevator at home. And as their experience shows, an attentive mechanic and owner always have time for regular technical inspection and installation of numerous “protective” devices.
User Tehnoman identifies the following components of a “home” elevator:
1. Pit equipment: speed limiter tensioner. 2. Drive (winch). 3. Cabin:
Avito Kirishi rent an apartment for a long time
4. Counterweight. 5. Installation of guides. 6. Mine door. 7. Speed limiter.
Judging by the stories of portal participants, they adhere to exactly this layout (with minor variations).
. Several years ago, the user Grandfather completed renovations in an old village house. After all the alterations, he ended up with a spacious living room downstairs and a bedroom in the attic. All that remained was to make the stairs to the attic. However, after studying all the options, the craftsman abandoned this idea: the staircase would take up too much space, reducing the area of the room. As a result, he decided to make a device that, according to its characteristics, is classified as an elevator, since “an elevator is a more complex structure.”
However, it performs its functions properly. “I’ve been using the lift for three years, I’m very pleased,” Dedush wrote in 2014.
The design of the device is simple, he claims. The main parts of the lift are a cabin, guides with rollers, an electric hoist and control buttons with limiters. Cabin dimensions: 600*600 mm (length-width), height – 1800 mm. The side and rear walls of the cabin have continuous fencing; the top and entrance are left without fencing. The frame is made of a 45*45 mm bar. An electric hoist with a lifting capacity of 300 kg is located behind the attic wall on the ceiling. The support rope runs along the wall.
According to the user, the hardest thing for him was choosing the guides and rollers for the cabin. As a result, the search led to guides and rollers for hanging doors weighing up to 100 kg. The rollers are installed in 2 pieces at the top and bottom of the cabin - the top pair works to separate the guides, the bottom pair works to compress.
The cabin of such an elevator is designed for one person weighing up to 130 kg. To control the lift, three double (up and down), self-returning buttons are used: as long as you hold the button, the lift goes up or down. When you let go, it stops. The entire control system is switched to 12 volts. At the top and bottom, the circuit includes limit switches that provide stopping in the extreme positions of the cabin. Movement speed is 15 cm per second.
Hatch design
You need to know the basic dimensional parameters and features of the mechanical device.
These options include:
1. Dimensions:
- external - common around the perimeter;
- landing - installation hole in the underground;
- light clearance - the clear size of the opening;
- door size.
2. Design:
- frame made of steel angle with seal;
- prefabricated metal hinge for fastening the door;
- welded metal cover with an internal tray and an outer steel rim around the perimeter;
- latch lock;
- gas stops with lock.
For silent closing and sealing, a seal is placed around the perimeter of the frame, inserted into grooves or glued. The door of even a small metal hatch is quite heavy; pneumatic shock absorbers greatly facilitate the process of use. On the lid there is a welded pallet with additional stiffening ribs. The base for the floor covering or insulation is installed in it. On the surface there are holes for removable handles.
The thickness of the metal is calculated depending on the expected load. Products are painted with powder paint with the addition of polymers. More expensive models can be made of stainless steel, aluminum, and brass. Recently, composite materials have been used for small hatches.
Installation nuances
The frame is installed until the final concrete screed is poured; it must be level with the floor. It is first necessary to decide on the model of the revision design.
Sequence of work:
- The opening is being prepared. It is better to adjust the size of the entrance to the underground using a metal profile.
- Installation of the hatch under tiles and other coverings is carried out after the rough screed, taking into account the rise to the finishing level.
- Secure using fasteners such as dowels or long self-tapping screws.
When purchasing an entrance to the basement, take into account:
- Overall dimensions of stored items. If there are large barrels in the cellar, then it is necessary to take into account that they need to be lifted and sanitized periodically. The opening is especially carefully calculated when it comes to installing technical equipment that needs to be serviced and its individual elements replaced.
- The environment in which the hatch or massive inspection entrance is operated. For a wet basement, it is better to choose materials that are not susceptible to corrosion. Good sealing is needed if the underground is located in a residential area to prevent odors from leaking out.
- Load on the surface of the cover. Garage, technical hatch should be more durable.
- Type of floor covering, its thickness.
- The physique of the owners of the house.
- Price.
Manufacturers and cost
1. One of the leading companies in Russia is Praktika. She patented the design of invisible hatches for Portal series tiles with a hinged system. They are made of steel coated with metal powder paint. When you press the built-in button, the hatch, equipped with a shock absorber, opens easily and effortlessly. It is enough to slightly pull it towards you. The Praktika-yug company produces inspection hatches for the basement, which do not require preliminary preparation of the base for the final decorative coating.
3. The Revizor factory produces hatches with pneumatic cylinders, reinforced with zigzag stiffeners, and a rubber seal. Thanks to this mechanism, they can be used in wet rooms (swimming pools, baths). One- and two-door revisions can withstand increased loads.
4. The Diva company produces a wide range of products from small hatches to non-standard large-sized models with several opening doors, which can be equipped with electric drives.
Manufacturers produce structures of non-standard sizes, according to special projects.
| Company | Material | Dimensions, mm | Price, rub |
| Revizor | Aluminum, galvanized steel | 600 x 600 | 9 660 |
| 700 x 800 | 14 350 | ||
| 900 x 900 | 14 230 | ||
| 1100 x 1100 | 18 440 | ||
| LLC Diva | Steel, powder coated | 600 x 600 | 6 600 |
| 700 x 700 | 8 550 | ||
| 800 x 600 | 8 550 | ||
| 900 x 700 | 9 450 | ||
| 900 x 900 | 10 350 | ||
| 1200 x 800 | 11 550 | ||
| Design and production company Praktika | Painted steel profile | 692 x 692 | 9 950 |
| 692 x 992 | 11 100 | ||
| 792 x 792 | 10 600 | ||
| 892 x 892 | 11 300 | ||
| 992 x 992 | 11 950 |
Before buying a hatch, read the information about the device, manufacturers, and materials. It is better to decide on the model at the design and construction stage so that it corresponds to the overall dimensions of the basement and its purpose.
Preparation for installation
To make an elevator with your own hands, you will need a welding machine. The success of all subsequent actions largely depends on the correct execution of the preparatory stage of work.
First you need to choose the type of elevator, decide on its installation location, and draw up a detailed diagram. Then you need to make calculations and purchase the necessary property. To build an elevator to the basement with your own hands you will need the following tools:
Worm gearbox Material list:
You need to think through safety issues in advance. Effective ventilation and lighting should be provided, and a respirator, helmet, safety glasses and gloves should be prepared.
What is pneumatics?
Everyone wants to have something new and modern in their home. It's real. A striking example is the pneumatic elevator. Its operating system is simplified. These are so-called vacuum elevators - they have neither cables nor pulleys. Visually, it is a polycarbonate capsule. Movement occurs due to pressure differences. The pump pumps out air from the upper section and the installation itself begins to move.
Afterwards the air is returned and directed in the opposite direction. This type of elevator for a private home is considered the most relevant. Because no additional installations are needed, and the level of security is high. If during operation the light turns off or the capsule depressurizes, then nothing will happen. The elevator will go down carefully because the air will escape. It is worth noting one important point - the cost of such an installation is high. Even when choosing the simplest elevator with such a system of operation, you need to prepare at least 500 thousand rubles.
Since many people want to create the design with their own hands, it is worth listening to the opinion of experts. They claim that the best and most affordable option is electromechanical. Such a project is affordable and not too expensive in terms of materials. Before you begin, you should figure out how to install an elevator with your own hands.
Simple manual lift (winch)
— profile pipe; - a piece of thick steel plate; - bolt; — sheet steel for making a hook; - dye. List of tools:
— grinder (angle grinder); - welding machine; - vice; - drill or drilling machine; - sharpener; - tape measure, marker, caliper. Homemade manufacturing process:
First of all, let's make a homemade body. For such purposes, the author used a piece of rectangular profile pipe. We cut the pipe to the required length and mark it. We need to cut a fork on one side of the pipe. Finally, we drill holes for the axle on the edges of the fork.
We place the finished axle on the fork and weld a ratchet wheel to it.
Step five. Hook and assembly
We make a reliable hook, with the help of which we will attach the winch to a chain, beam or other fastener. The hook can be made from sheet steel, or it can be bent from reinforcement or other strong material.
This completes the project, I hope you liked the homemade product and found useful thoughts for yourself. Good luck and creative inspiration if you decide to do this again. Don't forget to share your ideas and crafts with us!
Become the author of the site, publish your own articles, descriptions of homemade products and pay for the text. Read more here.
Place for arranging an elevator
The corner is the best place to install a lift. A finished lift should provide comfortable conditions for operation.
The design should help and not hinder economic activity. First of all, it is necessary to provide for the issues of ensuring and maintaining the strength of the load-bearing structures of the building. The total weight of the elevator along with its cargo can reach a ton, and this is a large load on the floor and walls of the cellar. The best option is considered to be a monolithic box made of reinforced concrete, where all components have a sufficient margin of safety, and the additional weight is evenly distributed over the slab. The minimum thickness of the slab is 10 cm. If this figure is less, then the base will need to be reinforced.
There are these options:
The best place to install an elevator is the corner of the cellar. There the floor is stronger and there are two walls for attaching the guides.
Rules and instructions
Oddly enough, there are many emergency and dangerous situations that have already happened more than once. Sometimes hands or feet get stuck in the cracks of the door, or the cabin falls from a height. And children's games with elevators never bring positive stories. All this is taken as a basis in the process of installation work and installations. Such a unit should not cause problems for the owner.
Many people do not agree to ready-made installations due to the need to create a non-standard cabin. But these dimensions should not be made too high. It is much easier to remake a finished structure than to create a full-fledged new elevator that will fully cope with its purpose. Of course, an elevator to the second floor in a private house is a reality, but you shouldn’t forget about safety.
Of course, every person believes that comfortable living conditions should be in any private home. Today, creating a lifting device is not so difficult, but only if all the rules are followed.
Types of gas shock absorbers
There are the following types of furniture gas lifts:
Most often, shock absorbers of direct action are used in the manufacture of furniture.
By installing the device in different ranges, it is possible to ensure that the door opens at different angles. This is especially true for cabinets that are located very high, or, conversely, low.
What are the main advantages of using gas elevators over other fastening fittings?
Let's look at the main stages of installing gas furniture struts on horizontal opening doors.