The gas burner and electric hair dryer are rarely used in the household. This is explained by the complexity of their design and operating principle. The blowtorch is widely used in everyday life due to its fast heating and low price. When purchasing a device, you need to know its types and principles of use.
Powerful burner made from scrap materials
Greetings to DIY enthusiasts, today we will build a powerful outdoor burner. The principle of its operation is similar to a blowtorch, and there is no less power. Almost anything that burns can be used as a fuel source for such a burner, it can be alcohol, gasoline, kerosene, and so on. Everything is assembled quite simply; you can cook on such a burner, take it with you to nature, heat up pieces of iron, and even melt some non-ferrous metals. If the homemade product interests you, I suggest you study the project in more detail!
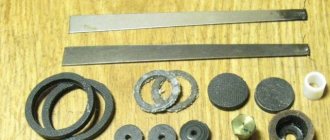
Materials and tools used by the author:
List of materials:
- iron wire (thick for legs and thin); — copper tube; - dropper; - bottle; - a suitable pump (to increase the pressure in the bottle).
Burner manufacturing process:
Step one. Coil
First, let's make the most important burner unit - the heating coil. A flame will burn inside this coil, from which it will heat up. The coil is made of a copper tube and fuel flows through it. Of course, in the hot tube the fuel instantly turns into gas and leaves the nozzle at high speed, resulting in a closed cycle.
We take a tube of suitable diameter and twist a copper tube coil around it. As for the number of turns, the author has about ten of them, which is quite a lot and five should be enough.
Next, we need to twist the coil around the existing one, it will heat up less, this will allow us to connect a rubber hose to the coil. For such purposes, we will need another pipe of larger diameter so that the manufactured coil can fit into it. Here we already make about 5 turns and center the outer coil over the inner one. We leave a longer piece of tube so that we can connect the rubber hose. That's all, the heating element is ready.
Step four. Assembly and testing
We connect a dropper to the burner, with its help you can regulate the fuel supply. But it is better to use a more reliable hose for connection, since such a thin hose from the dropper will probably melt and fly off with all the consequences.
Connect the other end of the hose to a bottle with a pump. To operate the burner, you need to raise the pressure in the bottle so that the fuel flows through the tube.
Well, that’s all, the homemade product is ready, pour a little fuel onto the burner and set it on fire so that the coil warms up. Next, we let the fuel into the spiral and watch the burner flare up. After some time, the flame will turn turquoise and the burner will begin to hum, this will mean that the device has reached operating temperature and power.
At this point the project can be considered successfully completed, I hope you liked it. Good luck and creative inspiration if you decide to do this again! Don't forget to share your ideas and crafts with us!
Source
The best gasoline and kerosene blowtorches
10Caliber LP-1.0
It is considered a budget model with a wide range of applications. It can not only warm up metal pipes, but also warm up a diesel engine, as well as perform other tasks. Using a manual blower and valve, the user can adjust the flame strength.
The capacity is quite small - only a liter. There are other versions of the same model with a larger tank capacity - 1.5 and even 2 liters.
pros
- flame power adjustment using a manual blower and valve;
- user-friendly design;
- strong flame;
- affordable price.
Minuses
- small capacity.
Caliber LP-1.0
9STURM 5015-01-15
This lamp from the Sturm company is designed for heating various objects. It has a durable steel body that can prevent explosion or fire. This tool is characterized by the presence of an adjusting screw that regulates the flame power and heating temperature. The comfortable handle of this model allows you to work with the tool as comfortably as possible.
Flame temperature – 1100 degrees. Consumption – 1200 grams per hour. The tank volume of this model is 1.5 liters, although the fuel runs out quickly.
pros
- affordable price;
- high strength;
- Ease of use.
Minuses
- high fuel consumption.
STURM 5015-01-15
8Zubr Samotlor SM-15
One of the best models from Zubr is Samotlor SM-15. This lamp can work for an hour with two types of fuel - gasoline and kerosene.
This model has two advantages. The first is a cast iron ejector, with which the operation of the device will become more reliable and convenient. The second was a protective casing, which avoids blowing out the flame on the street.
Important! The container must not be completely filled so that the air acts as a compensator, creating the required pressure.
For convenience, there is a large handle at the bottom of the device. All the controls are located at the top.
pros
- long operating time;
- cast iron ejector;
- durable protective casing;
- ease of use;
- high degree of security.
Minuses
- there are none.
Bison Samotlor SM-15
7ZUBR 40652-2.0_z02
This blowtorch is a more modern version compared to the SM-15. It can not be used to heat pipes and heat the paintwork, but also do other things right up to the roof of the roof.
Fast heating is made possible due to the special design of the supply tube, which is located in the lamp ejector.
The piston seal is made of natural material. This solution can increase the service life of the device. The small ejector helps produce the most concentrated flame.
The handle turned out to be quite comfortable from a geometric point of view. It's pretty easy to grab.
Interesting! Inside the handle there is everything needed for repair.
The tank capacity of this model is two liters. Large volume is combined with long work due to low consumption.
pros
- large tank capacity;
- low fuel consumption;
- ease of use.
Minuses
- not detected.
BISON 40652-2.0_z02
6ZUBR “PROFESSIONAL”
The domestically produced blowtorch has an ejector in its design that runs on gasoline. It is distinguished by good performance and high quality materials.
Important! This model is one of the few that can run on A92/A95 gasoline.
This lamp can be used indoors. The reason for this is the design, which allows the release of less harmful fumes.
This model is sold with two tank options - 1.5 and 2 liters.
pros
- high quality of materials used in lamp assembly;
- works with any gasoline;
- two variations of tanks;
- Little odor is released during operation.
Minuses
- high price.
BISON "PROFESSIONAL"
5SPARTA 91443
This model opens the TOP 5 gasoline and kerosene models of blowtorches. The housing is strong enough to prevent fuel explosion or fire. The handle is made closed in order to prevent the collection of water in it and, accordingly, the appearance of corrosion. The pump neck is located on the side rather than on top, which allows the nozzle to be pushed into tight spaces.
The flame temperature can reach up to 1100 degrees. The narrow nozzle makes the flame thinner and the heating more precise. The torch heats up quite quickly, which can be used when covering the roof and heating the liquid.
Important! Tank volume – 1.5 l. Fuel consumption – 900 g/h. Weight – 2 kg.
This model is considered one of the best in terms of safety. For example, ignition in other models requires opening a special, relatively large hatch. There is a fuel leak in their tank and a match falls there. This model has a closed chamber and has a small hole for a match to enter. This makes ignition safer.
pros
- closed handle;
- you can adjust the torch level;
- The default narrow nozzle lengthens the torch.
Minuses
- there is no pre-heating function;
- the valve turned out to be tight.
SPARTA 91443
4Bars MIR-91451
The Bars company has released a high-quality kerosene blowtorch. It has a chamber with preheating and a powerful nozzle, which makes the flame stable and the heating of the material constant.
The tank volume of this blowtorch is 1.5 liters.
This lamp is suitable for those who prefer to use kerosene instead of gasoline, since the former is considered more harmful to health than the latter.
pros
- high quality workmanship;
- easy to use;
- presence of a preheating chamber.
Minuses
- high price.
Leopard MIR-91451
3BARS 91452
The top three is opened by another model, already the oldest, from the BARS brand. It attracts many of its potential buyers. First of all, with its durable frame, which is not afraid of corrosion due to powder coating. In addition, this model has a very comfortable closed-type handle with a compartment for storing small items.
The tank volume of this model is two liters, which allows this device to work for about two hours without interruption. The tank is refilled using a pump, which is connected to the tank at a certain location. The neck with a steel butterfly stop makes it easier to unscrew the lid if necessary. The handle is a closed type, which allows water not to linger on it.
The blowtorch in this rating is noted not only for its good technical characteristics, but also for the presence of a preheating function.
If you need a stable burning torch when working in the wind or in cold climates, a potential buyer should purchase this blowtorch.
pros
- small dimensions and light weight;
- efficiency;
- the volumetric handle is made in a convenient shape, which makes it easier to hold in the hand;
- The body is high quality and beautifully painted.
Minuses
- welding seams are somewhat sloppy;
- refilling using a pump.
BARS 91452
2SIBRTECH 91442
In this category, “silver” goes to a model manufactured by the domestic brand Sibrtech.
The installation is powered by gasoline and is capable of producing a torch of the highest possible temperature. It turns out the flame temperature is 1450 degrees. With a 1.5-liter tank, the lamp consumes about 900 grams of fuel per hour, which is enough for an hour and a half of operation without interruption.
The designers installed a tray under the nozzle used for pre-ignition. The ignition principle is simple:
- the tap opens,
- gasoline dripping onto the tray
- gasoline spilled in the tray is lit with a match
- air supply increases.
You need to fill the tank with gasoline through the neck with the pump, so the first thing you need to do is remove the rod with the cylinder. At the back there is a raised regulator that is quite convenient to turn.
Important! It is considered “unkillable” because it can survive many events.
If you need a tool with a long service life, then you should take a closer look at this blowtorch.
pros
- good flame;
- easy to use;
- safe ignition tray;
- comfortable handle.
Minuses
- The black paint on this device swells when heated;
- even when the valve is closed, air flows out.
SIBRTECH 91442
1Sibrteh 2.0 L 91444
The best model was a blowtorch from the domestic brand Sibrtech. It is excellent for various soldering and thermal work that requires open heating.
The flame power and heating temperature can be adjusted using a valve. The consumption of this model is 1.2 liters per hour.
Important! AI 92/95 gasoline is suitable as fuel.
This lamp is suitable for use in various conditions - domestic, road and industrial conditions.
pros
- long operating time;
- good ejector and protective casing;
- easy to use;
- high degree of security.
Minuses
- none.
Sibrteh 2.0 L 91444
You may be wondering which electricity meter to get.
Homemade alcohol burner similar to a blowtorch
The good thing about homemade products is that they are very cheap and practical, and they are quite easy to assemble. It all works very simply; when the alcohol vapor is set on fire, it creates pressure in the container, and the fuel independently comes out through the nozzle and burns. That is, everything works approximately the same as in a blowtorch, only simpler, since you do not need to pre-pump the air.
Materials and tools for assembling the burner: - copper tube with a diameter of 8-10 mm; - a small aerosol can or another cylinder with a diameter of 30-40 mm; - a small glass jar with a metal lid (must close tightly); - a bunch of thread or cotton fabric; - alcohol; - sand.
The following tools will be needed: a drill, a hacksaw, an awl, a hammer, a soldering iron or torch, solder, and a vice will not be superfluous.
How to assemble an alcohol burner:
Step one. Making the base for the burner
The basis for the burner is an element in the form of a spiral, which is made of a copper tube. The length of the tube should be slightly less than 40 cm, and its diameter should be 8-10 mm. The sharp edges of the tube must be carefully processed with a file.
You need to make a spiral from the tube yourself. To prevent the tube from bending, it must be filled with sand. To do this, you need to plug one end with a stick, pour sand into the tube, and then plug the other end in the same way. To make a spiral you will need a cylinder with a diameter of 30-40 mm. An aerosol can is perfect for these purposes; almost everyone can find one at home. The copper tube needs to be looped around the cylinder one and a half turns. There is no need to rush.
There should be a distance of a couple of millimeters between the turns of the tube. This directly determines the size of the flame when the burner is operating. Ideally, the flame should pass through the gap between the two tubes and touch them at the same time.
Step two. Burner wick
To operate the burner you need a wick, it is done very simply, you need any cotton fabric, knitting threads are also suitable. The length of the wick should be such that it touches the beginning of the bend of the tube. On the other hand, the wick should stick out a couple of centimeters. As for the thickness of the wick, it is selected experimentally.
If the burner spits fire when starting up, the wick needs to be made smaller or the size of the nozzle increased.
To install the spiral, you need to drill two holes in the lid along the diameter of the tube. It should fit into the lid with minimal clearance. Next you can start soldering. The cover must first be cleaned of paint, otherwise the solder will not stick. You can solder from the bottom and top to ensure maximum tightness and strength.
Step five. Burner tests
To test the burner, you need to pour alcohol into it; gasoline will also work; you need to experiment with other types of fuel. Next, the lid must be screwed on tightly so that no fuel vapors escape from the can, otherwise the device will not work.
Starting the burner is very simple; you just need to use matches or a lighter to heat the tube in the area of the hole. Heat will begin to spread through the tube, while the fuel on the wick will evaporate and create pressure, which in turn will force the fuel out of the can towards the nozzle. As a result, a closed cycle is formed; the burner will burn as long as there is fuel in the can.
If you want to assemble something much more powerful, then the video below shows a flamethrower, which you can also assemble with your own hands. Enjoy watching.
Source
How to use a blowtorch?
The devices are a fire hazard, so strict precautions must be taken. You can understand how to set up a blowtorch by following the algorithm of actions:
- Fill the tank with fuel no more than 3/4 of the tank volume.
- Obtain pressure after 6–10 smooth manual pressures.
- Pour fuel into the bath: gasoline or ethyl alcohol, which does not leave soot when burned.
- Light the fuel to initially preheat the evaporator.
- Open the shut-off needle after combustion and adjust the flame size.
- Stop the blowtorch by extinguishing it. To do this you need to close the needle.
- Cool the device, then open the reservoir to release the pressure.
Device and principle of operation
In order to understand how to make a forge with your own hands, you need to understand its design. Physical processes are based on the combination of carbon and oxygen. In other words, the process of carbon combustion occurs, releasing heat.
To prevent complete combustion of the metal, the amount of oxygen is not supplied in full. This is regulated by air blowing. You shouldn’t overcook the workpiece in the forge either. The metal will dry out and become hard but brittle. The classic example is cast iron.
A homemade forge for forging consists of the following parts:
Figure 1: Drawing of a forge For lining a table with your own hands, use refractory bricks. The hearth is based on a form that includes a firebox, grate bars and an air chamber. With the help of air drainage, the blowing is adjusted. The chimney is designed to remove accumulated gases. A hardening chamber is not always necessary. It is required in the case of forging damask steel so that the product undergoes the necessary heat treatment. The crucible is the place where the maximum temperature is maintained. At home, it is made of fireclay bricks.
What breakdowns and malfunctions are most likely?
Let’s take the “bull by the horns” and immediately name the most likely reasons for the inappropriate behavior of the blowtorch:
- it is not possible to create and maintain sufficient air pressure in the fuel container to spray fuel;
- fuel leaks anywhere, but not through the nozzle;
- the fuel from the nozzle is not sprayed, but flows out in a stream, and not evenly, like that of a well-known animal.
Most often, the listed “adventures” can be resolved with the help of basic cleaning of “sore” areas. To do this you need to have a certain set of tools.
It also happens that it is not possible to revive the instrument without replacing parts. In such a situation, most problems can be eliminated with the help of a special repair kit, which is better to purchase in advance.
Repair kit for blowtorch
Most likely, the pressure problem is caused by a faulty pump. If there is a spare one, it is simply replaced. Otherwise, you will have to work hard to repair it yourself.
If you have to constantly pump air, it means it comes out through a safety or service valve or threaded connections. It helps to clean the surfaces of these components and replace the gaskets.
If the fuel from the nozzle is not sprayed, but comes out in some other form, a normal flame will not work. The most likely cause is dirty fuel. You will have to drain the gasoline and fill it with clean gasoline, after rinsing the container. Of course, the nozzle and all fuel supply channels should be cleaned, rinsed and purged before refilling the lamp.
It happens that cleaning does not help and fuel continues to flow out in a stream. This will happen if the tool is not warmed up sufficiently. If warming up does not help, you will have to change the burner nozzle.
Sometimes gasoline flows down the flame adjustment valve rod. So the fire is not far away! We stop work, disassemble the control valve and change its seal, which is the stuffing box.
Solid fuel forges
To figure out how to make a forge that runs on solid fuel, you need to study the instructions and decide on the type. A closed-type forge furnace is better suited for working on coal or wood. It is made at home from scrap materials. A charcoal forge does not require special equipment.
Figure 2: Drawing of a forge using solid fuel Making a forge for heating metal with your own hands makes it possible to adjust it to the necessary conditions. The material used must only be of high quality to ensure fire safety is maintained.
Security measures
A burner with an open nozzle must not be left running unattended! The Babington burner, unlike a blowtorch converted for working in mining, is a reliable and durable unit that does not require complex maintenance. It is enough to periodically clean the fuel system, tank and sump, blow out the air duct in idle mode, and also monitor the serviceability of the compressor and oil pump. A working burner is a reliable and economical unit with a long service life.
How to choose a blowtorch?
A large selection of heating devices makes it difficult to purchase them. The following criteria may influence the choice of a blowtorch:
- Apparatus design
. Mostly on the market there are models with a solid body. However, some devices are equipped with a special hose up to 1.5 m long. This design is convenient for working while suspended. - Igniting the flame
. Options for blowtorches with liquid fuel take much longer to prepare for use, so if frequent use is necessary, it will be more convenient to opt for a gas device with piezo ignition. - Fuel
. A gasoline blowtorch is refueled at a gas station and produces a high-temperature flame. Gas models will be more expensive to provide with fuel, and sometimes fuel must be purchased in cylinders. - Volume of the tank
. To operate gasoline blowtorches for an hour, you must choose a model with a tank capacity of one liter or more. - Maintenance and operation
. This is an important indicator, because during use it will be necessary to clean the nozzle and flush the fuel tank from sediment. In this regard, blowtorches with a completely disassembled design are more convenient. Any type of product is designed to operate for 5 years.
Blowtorch rating
A wide range of heating devices makes it possible to choose models that meet all the necessary requirements of the future owner. Among the best blowtorches are:
- SIBRTECH 91442
. This is a reliable and high-quality device at a low price. The lamp is used on gasoline of various brands, except leaded. The tank capacity is about 1.5 liters, but you don’t need to fill it completely. The device consumes fuel economically, so one refill is enough for an hour of use. The model's steel handle has a comfortable design. Among the advantages, users note the ease of adjusting the fuel supply, but the disadvantages include frequent clogging of the nozzle. It has to be cleaned after each use.
- BARS 91452
. This model of blowtorch heats up quickly and has a stable flame, so you can work with it in windy weather. A significant drawback of the device is the clogging of the nozzle, but its structural arrangement helps to quickly clean it. The thick metal case is designed for long service life. The device is intended for repair work, soldering and heat treatment of various parts.
- DREMEL VERSAFLAME 2200-4
. Experts consider this model to be the best among gas blowtorches. Interesting appearance and wide range of applications make the device popular. This small blowtorch has a small reservoir that lasts for 75 minutes of intensive use. The kit includes several types of attachments designed for soldering and torch extension. The only drawback is the high price of the device.
Waste oil furnace
Considering that petroleum products are expensive, it is beneficial to use a forge using waste oil. To make the forge during mining, parts that have served their useful life are used. After processing the furnaces, a significant drawback emerged - the spent mixture did not ignite well. To eliminate this problem, an additional compartment was built into the mining forge. Here the oil is preheated with coal or wood. To improve combustion, waste fuel passes through filters and diesel fuel or gasoline is added to it.
As a result, the mining forge has the advantages of a yellow flame and stable temperature.
Read also: Laser cutting machine for wood plywood
You can make it yourself:
Air is pumped into the chamber by a fan. A waste tank is installed on a hill. From it, the oil enters the chamber through a pipeline, where it is picked up by air, which moves under a pressure of 2 atm. The waste is broken up and fed into the nozzle.
To reduce the ignition time, a heating element is installed in the forge during testing. Ignition time may take up to 30 minutes. But the hot mixture burns well. Now you need to make sure that the fireclay does not melt.
Scheme of the furnace during development:
Preparing for ignition
You need to start using a blowtorch by checking its serviceability and functionality.
During inspection, make sure that all threaded connections on the filler neck and pump are clean and functioning well, while ensuring the tightness of the internal volume of the fuel tank.
The condition of the rubber gaskets also affects the tightness. It is also necessary to pay attention to the ease of rotation of the adjusting screw. It is prohibited to use a faulty blowtorch, as fuel vapors escaping from the tank may ignite.
The housing must be clean and not oily. It is not recommended to use dirty tools, as some oils can also ignite when heated.
To refill the blowtorch without spilling gasoline, you must use a funnel of the appropriate size. The reservoir is filled no more than three quarters so that air remains inside, which will be compressed by the pump, creating pressure.
It is necessary to use only clean fuel without impurities and with a minimum amount of additives.
The adjusting screw is closed before filling. Next, create a slight pressure in the tank by pumping 10-15 times. Now you can use the blowtorch!
Aluminum smelting
Aluminum, which has a high degree of ductility, is a low-melting non-ferrous metal. A forge for melting aluminum is easy to make with your own hands. There are many designs that use furnace smelting. They have no fundamental differences between themselves.
Step-by-step instructions for creating a forge for melting aluminum:
Such a homemade blacksmith's forge can only be used in open space, due to the absence of a chimney. During operation, a lot of gases are released that should not accumulate in a confined space.
Device using two needles
A miniature propane torch is made by hand from 2 needles. One needle can be taken from the pump and the other from the syringe. You will also need two droppers and a compressor from the aquarium. The device is connected to the canister for charging lighters. You will also need copper wire.
The temperature in such a burner reaches 1000 degrees. It is made in the following order:
The gas coming from the can is mixed in a thick needle with air coming from the compressor. The composition of the mixture is changed by regulators.
If there is no compressor
, you can replace it with a plastic bottle:
The burner is ready for use.
Mini horn
A small, portable forge is often useful on the farm. It can be used not only in the forge, but also in the garage or at the dacha.
To make a mini-forge with your own hands, you need to have 2 refractory bricks, a hacksaw, a drill with a diameter of 8 cm and a length of 15 cm. It is advisable to have a pobedite tip at the end. To fasten the structure, 2 pins with a diameter of 8 cm and a length of 21 cm are prepared. During the work, you will need 2 hole saws, 63 and 26 mm in diameter.
The operating procedure is as follows:
The burner is inserted into this hole and ignited. Any metal is fed into the main passage, which falls under the flame and heats up in a few seconds.
DIY alcohol burner
Production time: About half an hour
Available materials: ██████░░░░ 60%
Sometimes a compact source of open flame is missing on the workbench in a home workshop.
All these problems can be solved by a cheap and practical homemade burner, which you will learn how to make further.
How to make a burner
Burner wick
If you are cold even when heating with a couple of dozen homemade burners, then you need something more serious: a multi-barrel circular flamethrower
Watch the video, it's COMPLETE MADNESS.
Results of work and advice
View all projects by tag: burner
Making a forge from a potbelly stove
Essentially, this is the same potbelly stove, only without the grate. The appearance of blacksmiths can be in the form of a cube, parallelepiped and cylinder. After cleaning the grate, the air does not come from the space below, but is blown through a side channel, which can be adjusted. As a result, the oven heats up better. It retains gases longer, which also increases the heat.
The manufacturing procedure is as follows:
The disadvantages of such a stove include the absence of an ash pan. However, longer combustion results in improved combustion of solid waste. Ash removal can be done less frequently.
Making a forge from a bucket
The bucket forge is also designed for melting aluminum. To do this, you need a bucket with a capacity of 10 to 20 liters. In addition, gypsum and sand. This mixture is placed at the bottom of the bucket.
Read also: How to recognize a battery or accumulator
Step-by-step instructions for a forge made from a bucket with your own hands:
Small items can be cast in this way.
A hand-made blacksmith's forge is a necessary household device. However, first, you need to read the instructions for its use. Purchase the necessary drawings. The risk of fire must be completely eliminated. The right place has been chosen for it. Working with hot metal will bring not only pleasure, but also benefits.
Source
What is the frequency of checking blowtorches?
A heating device is a source of increased danger that requires compliance with certain rules during use:
- Do not use low octane gasoline.
- Stop working with the device if there is a leak, the fuel tank is overheated or in an unventilated area.
- Do not refuel the device during its operation or immediately after use.
In addition, the frequency of checking the parameters of blowtorches is important:
- To ensure the integrity of the liquid fuel supply systems, the unit must be inspected at least once a year.
- To check the tightness and tightness of the connection, inspect the device monthly.
- To ensure a stable flame of the torch, the body of the heating structure is tested after each use.