There are creatures in the mythical world that do not frighten or horrify people, but have extraordinary attractiveness. Beautiful and mysterious elves can safely be counted among these.
Magical people, inhabitants of forests and meadows, they came to us from German-Scandinavian folklore, where they were also called Alfs and Seeds.
According to ancient belief, If you believe in miracles, Elves used to inhabit all the surrounding forests...
Elves are very close to nature, almost one with it.
These creatures are usually depicted as very beautiful, with refined and graceful features of the face and body.
They are bright in spirit and friendly to people. Their senses are perfect, which allows them to be ideal hunters, musicians or explorers.
It is believed that their life could have been centuries, or even millennia. But there was no old age, only wisdom grew
They are often found in old legends and fairy tales.
Descriptions of elves in different mythologies vary, but, as a rule, they are beautiful, bright creatures, spirits of the forest. Although there are exceptions, they will be discussed below... It should be noted that in many works there is actually no difference between elves and fairies.
***************************************************************************************************** Interesting))) One of the problems of the Russian word “elf” is that, according to an established tradition, several varieties of mythical creatures are translated into it - both the Scandinavian elves (who can largely be considered the prototypes of Tolkien’s elves), and the Celtic sidhe, or Old French fairies (Faie or fee, later in English - fey and fairy). Because of this, many “elves” from literature are not “elves” in the usual sense - for example, the elf from the ending of “Thumbelina” is a typical fairy, and it would be more correct to call him a fairy if this word in Russian was not associated with female creatures floor.
**************************************** ******************************* For example, if you take a very popular book
It’s written there in black and white: “Fluttering baby”, “fairy” - these words were borrowed from French, during the Tudor era they replaced the Old English “elf”... The authors of the book are Brian Froud and Alan Lee (by the way, Alan received “ Oscar" in the director-director category for the film "The Return of the King" from the "Lord of the Rings" trilogy) offer the viewer an amazing book, after which you know for sure that you don't want to meet "these creatures" in the forest, much less at home. ... Fairy elves are very peculiar, and they are not at all distinguished by their friendly attitude towards people, rather the opposite...
Brrr... At the end of the book there is an interesting phrase - supposedly fairies and elves are actually in an ethereal state all the time, and how we “see” them, how they appear to us, depends on our own idea of them. Therefore, the more attractive we imagine them, the better for us))) Elves are no less popular in modern fantasy novels and films. For me, a “classic elf” is an elf from The Lord of the Rings... I took my breath away from the first seconds of the show of Lorien and Mirkwood, from the mysterious music, this magical glow, like from thousands of fireflies, gothic “crystal” buildings...
and most importantly, of course, the impression of delight from the characters themselves and their outfits... Mmmmm... love for life)))) Arwen...
Galadriel
Legolas
Thranduil, the king of the wood elves... oh, good!
And finally Tauriel
How many years do elves live? They are almost eternal... If grief and the sword do not destroy them, then they will live as long as our land lives. Grief and mental anguish are as destructive for elves as illnesses are for us... Most of all, elves love stars... and moonlight)))
And now head to the puppet world! Elf dolls!!! The first elf that I would like to show was made by the wonderful master Larisa Isaeva. The doll is made based on the elf Arwen from the film “The Lord of the Rings”
Next, an unearthly porcelain elf from BiDolls, master Rafael, name - Elven Pearl The author of these magnificent photographs and the owner of this magical creation is Victoria Samoilova.
Among the BJD dolls there are many very beautiful elves. Unfortunately, I don't understand BJD. I’ll show you a few, all photos are taken from the Internet, I apologize if I’m using someone’s personal photos. I couldn't find the authors.
And now my favorite elves Zwergnase Little Malva Alcea, Viola Arvensis and Rosa Canina Beauties Gagea Lutea and Fragária vésca.
Senior elves Veronica persica and Carlina acaulis. And the last (for “now”))) elf, released specifically for the Snowdrops store - Galanthus nivalis
But my girls are elves, who inspired me to create this topic)))
They are the best for me)))))
Thank you all very much for your attention!
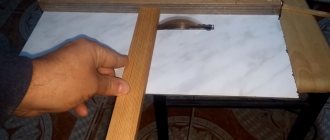
The first, most important, is to cut them out of colored or leather, and attach them to a plastic rim. But to make your ears look like this, you will have to work hard. First you need to make a mold. To do this, take paraffin or silicone and slowly pour it into previously prepared clay containers shaped like elf ears. Leave the preparations for a day until they completely harden. Then carefully remove the future ears from the molds and use a paper knife to adjust their shape. The elves are ready!
All that remains is to give them color. To do this, you can use foundation or theatrical makeup of a greenish tint. It’s easy to attach them to your own ears using a flesh-colored medical patch
By the way, skilled fans of the inhabitants of the magical forest often make ears entirely out of adhesive plaster. Layer after layer of adhesive tape strips are placed on top of each other until they reach the required thickness. Then, using scissors, the ears are shaped and the irregularities are covered with foundation. Such elves are easy to make, but short-lived. If you want to transform into an elf forever, then feel free to contact Chinese plastic surgeons! For them, such an operation is by no means new.
One of the fabulous symbols of Christmas, loved by children and adults around the world, is the Christmas elf. Despite the fact that elves are fairy-tale characters, you can please yourself and your children with hand-sewn elves that will stay with you for many years and will attract the attention of your family.
Instructions
Choose bright holiday fabrics for your elves. Find a suitable pattern or draw one yourself. Cut out the parts from the fabric and prepare the filler (for example, padding polyester). When cutting fabric with, do not forget to add seam allowances - this will help make it more neat.
After cutting out the fabric pieces, hand baste the front and back of the doll together. Then sew the halves of the arms and legs, turn them inside out and stuff them with stuffing. Place the arms and legs on the elf's body to determine where they will be placed.
Elves are beautiful and magical creatures that live in nature and are invisible to people. Each type of elf has its own purpose. Some of the elves are considered the spirit of the forest, some are skilled blacksmiths living underground, and some work as Santa's Christmas assistant or the tooth fairy.
Every child should have an elf doll. Is it possible to do without good little wizards in your games? We offer several ideas for making an elf with your own hands.
Elves made of wire and thread.
Craftsman Emily Lefler makes amazing elves out of wire and thread. These dolls can be played with or used as a decorative element.
For the craft, Emily uses: thread, wire, artificial flowers, glitter, hot glue and a large wooden bead for the head.
In this video she makes Christmas elves. The video language is English, but the master shows everything in detail and clearly.
(function(w, d, n, s, t) { w[n] = w[n] || ; w[n].push(function() { Ya.Context.AdvManager.render({ blockId: "RA -265551-7", renderTo: "yandex_rtb_R-A-265551-7", async: true }); }); t = d.getElementsByTagName("script"); s = d.createElement("script"); s .type = "text/javascript"; s.src = "//an.yandex.ru/system/context.js"; s.async = true; t.parentNode.insertBefore(s, t); })(this , this.document, "yandexContextAsyncCallbacks");
And this is an extraordinary purple fairy.
In the twilight of large, dense trees, with their heads covered in a warm train, little elves fall asleep on pillows made of peacock feathers. In cups of flowers, like on a bed, On soft and fragrant feather beds, little fairies fall asleep in warm golden pajamas.
Children always like masquerade, because they love to dress up in costumes of fairy-tale creatures and favorite characters. But if earlier everyone was bunnies or musketeers, today children have new interesting characters. So, the elf costume is very popular, and making one with your own hands is not at all difficult.
Possible complications after changing the shape of the ears
There are several problems that may arise after this type of otoplasty:
- Wound infection. It manifests itself as redness of the skin, throbbing pain, and leakage of fluid from the wounds. May lead to superficial bacterial or fungal otitis media.
- Hematoma. Its signs include increased pain, tissue tension, swelling, bleeding through the skin and sutures.
- Pronounced scars. They can be hypertrophic or keloid, formed due to prolonged healing or characteristics of the body.
- Perichondritis . This is a consequence of the inflammatory process in tissues, which can lead to necrosis. The cartilage will have to be removed and replaced with grafts.
- Unraveling of sewn fabrics. Because of this, the new shape of the ear is disrupted, it may return to its previous appearance or become deformed. The problem also arises after rehabilitation due to the growth of blood vessels in the cartilage area and its gradual resorption.
Who are elves
These are fabulous creatures that, according to mythology, inhabit all of Europe. They have a very complex character and are treated differently in different countries. They are also called spirits of the forest, so the image of an elf is often depicted in green clothes. A characteristic feature of this character is long ears. Another attribute of an elf is wings, and he often has a bow and arrow or other weapon.
There is another image of an elf associated with the fantasy world. These creatures are especially vividly represented in Tolkien's works. These elves are not funny little green men. They are fair-haired and beautiful, and have the appearance of a human being. However, they also have such details as long ears, wings and a certain belligerence.
There are also Christmas elves - Santa Claus's little helpers. They help him deliver gifts, and their costumes must be a mixture of red and green.
All these characters are perfect for creating children's carnival costumes with your own hands from available materials.
What you need to know before making your dream come true - elven ears
Not all plastic surgeons agree to change ordinary ears to elf ones. And for good reason. This type of otoplasty has several disadvantages:
- It changes the appearance of your ears forever. When you get tired of surprising others, you won’t be able to do a second operation. A new intervention may cause the ears to become deformed.
- This type of surgery is much more complex than other types of otoplasty . And it may end in failure, that is, the ears return to their previous state (but with damage) or deformation. Cartilage, fixed in an unusual position, tends to straighten.
- After the intervention you will have to endure pain . And it will last for several weeks .
- You need to take care of the stitches for a long time and endure the inconvenience so as not to damage your ears . For example, you will only have to sleep on your back, you should not drink alcohol, smoke or take certain medications for a long time.
We recommend reading the article that protruding ears is not a death sentence; surgery will fix everything. From it you will learn about the indications for changing the shape of the ears, examples of famous people who got rid of the problem, contraindications for the procedure, the technique of performing the operation, possible complications and cost. And here is more information about how to correct the shape of your earlobe.
Fantasy elf costume
Female characters have long white hair, translucent flowing clothes and long cloaks. Remember, for example, Arwen from The Lord of the Rings. The basis of such a costume for a girl will be a long dress made of flowing satin or organza. You can buy ready-made ones, but its main feature is long sleeves that flare out at the bottom, reminiscent of wings. Therefore, it is better to sew the dress yourself. You can use any pattern, just lengthen the line of the sleeve and widen it so that you get beautiful folds.
A raincoat will help add ambience. It can be sewn from light satin or satin fabric. Buy a piece that is sufficient in length and width, draw a pattern on it (just round the bottom corners and narrow the top so that the coat can be tied comfortably around the neck). Next, trim the edges of the fabric and sew the ties on top.
A hairstyle of loose hair and a braid braided at the back of the head will support the image of a beautiful elf.
The male image is also easily embodied in an elf costume. Photos of the characters from the film “The Lord of the Rings” will help create an image, for example, of the elf Legolas. He is dressed in dark clothes and a cloak, and has a bow and arrows. The basis for the suit can be black trousers. You can sew a tunic from satin black fabric or use a black long T-shirt. Also, the image of a warrior will be helped by creating details that imitate leather armor, such as armbands. They can be sewn from two pieces of thick faux leather or glued together from thick brown cardboard. Don't forget to draw patterns on them using a marker.
A wide leather belt with a large buckle and a cloak can complement the elf costume with your own hands. A cloak made of dark satin is sewn in the same way as for a girl. All that remains is to buy or make a toy bow.
Paper ears
What if the child comes home and says he needs a dress tomorrow? I propose to become an elf. The suit can be sewn in just half an hour. DIY paper elf ears are usually made in 10 minutes. To make them you will need a color printer. Print the image above. Now cut out the ear along the contour. And don't forget to cut along the dotted line. It is thanks to this notch that the pad will remain on the ear.
Wood Elf Costume
Little spirits of the forest, according to legend, are dressed in green clothes made of leaves, funny boots with rounded toes and caps.
You can sew a tunic from green fabric yourself, but the easiest way is to buy a large green T-shirt. Draw a zigzag on the hem of the T-shirt and cut it out to simulate a ragged edge. The tunic can be belted with twine or a belt made of green fabric. A girl can wear thick green tights under a T-shirt, and a boy can wear green shorts or leggings.
To sew a pointed hat, buy thick green felt or felt. Cut out 6 identical triangles from it and sew them together along the long sides. You can sew a bell to the end of the cap.
The essence of the operation to change the shape of the ears to elven ones
The intervention is performed under local anesthesia. But it involves the implementation of more complex actions than when correcting protruding or ugly ears. First, the changes are simulated on a computer, and the lines along which the cuts will be made are identified. Next, the process moves into the operating room:
- the ear is treated with an antiseptic;
- the patient receives anesthesia in the form of an anesthetic injection;
- the surgeon makes incisions to release the cartilage;
- they are folded so that the tip of the ear becomes pointed;
- sutures made of biodegradable material are applied to the cartilage tissue;
- the skin of the ears is fixed in the new position with non-absorbable threads;
- a plaster is applied on top.
During the operation, an important point is the tension of the cartilage. If it is not strong enough, it will not be possible to achieve the desired result, because these tissues are elastic. Therefore, the tip of the ear always curls up more than it should.
Christmas Elf Outfit
These special elves are Santa Claus' helpers. In those days when he did not yet have reindeer, gnomes and elves helped Santa deliver gifts. This costume is similar to the previous one, but it has a lot of red and white colors, thanks to them you will get a real New Year's elf costume.
The green tunic for this costume can be made from a T-shirt as in the previous version, but you can sew it together. Since this outfit is suitable for the New Year, it can be made warmer. For the base you need a red turtleneck or long sleeve with white and red stripes and a green vest. It can be sewn from green jersey. Fold a piece of fabric and attach the child's T-shirt to it. Trace the outline and cut out. Sew the side and shoulder seams of the shirt and cut the hem with a zigzag. Wear a vest over a turtleneck.
Below you can use red or striped tights, leggings or trousers, and when preparing an elf costume for a girl, you can choose a bright fluffy red skirt.
LiveInternetLiveInternet
–
Categories
–
Help for newbies
–
Tags
–
Quotation book
New Year's tildo magnet)) Photo-MK. Good evening, girls! Photo-MK prepared for the blog “Attic.
100 Delicious cakes for all occasions Culinary community Li.Ru – Recipes prepared.
Dress for the little lady. Scheme Dress for a little lady The dress is crocheted.
Diagonal crochet. Master class Diagonal crochet An interesting way to crochet elm.
Prince of the Elves
This character comes from the fairy tale “Thumbelina” and is perfect for carnivals and kindergarten parties. The elf costume for a boy consists of a camisole and breeches made of green satin, wings and the indispensable crown. You can make all this with your own hands.
The basis of the suit can be a white shirt and white tights. From green satin you need to sew the simplest shorts, but a little larger than those that your child wears. The belt and trouser legs will need to be gathered with an elastic band, imitating breeches. From the same green fabric you can sew a simple vest with a fastener. If you choose large and shiny buttons, it will look like a real camisole.
You can buy the wings ready-made or make them yourself, just like the crown.
Plaster ears
Bright ideas are always very easy to bring to life. How to make elf ears? The easiest way to make them is from regular plaster. It is best to get a kitten or the same skin color. We take a thin strip and glue it to the auricle. We bend the ends of the plaster inward and cut off the excess with scissors. That's it - the ear is ready. If it doesn't match your skin color, you can color it with powder or eye shadow. The use of foundation is not recommended. Does not absorb into synthetic fabric.
Elf Weapon
In addition to clothes, details add similarity to the image. In the case of a boy elf, this is a bow and arrow or a knife on his belt. In classic depictions of elves, even harmless forest spirits have weapons.
You can buy a bow and arrows ready-made at a toy store, or you can make them yourself. The easiest way to make it is from a wooden stick, not too thick, but flexible. At its ends you need to make notches to which the bowstring will cling.
Place the stick on the floor and tie a string of twine to one end. By pulling it, bend the stick in an arc and tie a piece of rope to the other end. For arrows, you can use thin straight twigs or plastic sticks like those on which you put balloons. Just to avoid hurting anyone, glue pieces of foam rubber to the ends of the strips.
All that remains is to make the quiver. Sew a pipe from dark green dense fabric, such as raincoat fabric or felt. Cut out a circle from the same fabric with a diameter equal to the pipe hole, plus 2 centimeters for the seams. Sew the bottom to the pipe and turn the quiver inside out. Sew a ribbon onto it so you can wear it behind your back.
If you don't want to spend so much time on a bow, cut out a large knife from cardboard, paint the handle brown and the blade silver, and tuck it into your suit belt.
Origami ears
To make such overlays, it is not necessary to have the talent of a sculptor. Folding the ears of a paper elf is a matter of an hour. You need to print the stencil shown in the first image. Ears are best made from thick paper or soft cardboard. We cut out the blanks. Place the pattern with a cutout on the right and use a utility knife to draw a triangle at the top. Place the piece on top of it and do the same with the second piece. Glue the parts together and bend the semicircular protrusion outward. In order for the product to take on the shape of an ear, you need to hold it in water for a while. Let's take out the future ear and try it. If necessary, it can be slightly deformed. We make the second ear using the same principle. Finished products can be painted or left white or brown.
How to make wings
One of the attributes that an elf costume must have is wings. Sometimes you can do without them, as is the case with fantasy characters, but sometimes they are simply necessary, for example, the prince of the elves. Of course, you can buy ready-made wings, but sometimes it’s better to make them yourself.
For the wings you will need wire and children's nylon tights of the desired color. Use wire to make a frame of two wings of the desired shape and size. Pull the nylon over each wing and tie it in a knot. Tie the wings together. They can be sewn to the back of the suit or made removable with straps.
"Precious" ears
This manufacturing option is quite simple, you just need to have special tools and materials. The ears will look very impressive and elegant, and will be an excellent option for creating the image of an elven princess. And in everyday life, such a product will only cause a storm of delight among others.
For work you will need the following materials:
- wire cutters;
- pliers;
- decorative elements - stones, brooches, beads, rhinestones, etc.;
- brass wire with a thickness of 0.5; 1; 1.5 and 2 mm;
The thickest wire is 2 mm. It is used to form the base, the remaining elements are bent from thin brass wire. The one with a thickness of 0.5 mm is used for intermediate elements.
How to make elf ears
Another indispensable attribute of an elf is ears stretched upward. Making ear pads is not difficult, the main thing is that they do not interfere with the child and fit well on the head.
The easiest way is to make them from thick cardboard and glue them to the rim. For boys, you can look for a black headband and hide it in your hair. Volumetric ears made of papier-mâché look a little more complicated, but more realistic. First, make a base out of foil, giving it the shape of a pointed ear. Next, cover the foil with pieces of napkin or toilet paper using the papier-mâché technique. Tint the finished base with paints to match the color of your skin and glue the ears to the headband.
Once again I am convinced that those who seek will always find!!! And I was lucky: quite by accident I found patterns with detailed instructions for sewing the beloved Elf Maileg (Maileg brand), which I was incredibly happy about. I am absolutely sure that these Christmas Elves should appear in every Scandi home at Christmas time.
So, you will need:
— A piece of red fabric 30 x 120(140) cm; — A piece of beige fabric 15 x 25 cm; — A piece of red fabric with a pattern (for example, striped or checkered) 30 x 120(140) cm; — Red yarn for the mouth; — Two tiny dark buttons (eyelets, buttons) for the eyes; — A little lace; — A piece of woolen fabric for a scarf (but you can also knit a scarf); — Filler, approximately 250 g; — Sewing machine, scissors, pins, chalk, etc.
Step 1. Patterns
First, save the 3 Christmas Elf pattern pictures on your PC, print and cut them out. Then transfer the cut out parts onto the fabric, folded right sides together, taking into account the colors of the fabrics for the various parts of the Elf (boots, mittens and cap - red, face - beige, arms, legs and body - red design). Don't forget to allow seam allowances.
Step 2: Sew boots, mittens and cap
Sew the front of the boots along the fold line from the wrong side, as shown in the photo. In a similar way, you need to sew the mittens and cap.
Then turn the mittens and shoes inside out and sew them with the corresponding parts of the legs and arms, placing the right sides together, as shown in the photo:
Then all that remains is to stitch the arms and legs and turn them right side out. In this case, in the middle of the seam of the legs and arms, you need to leave a small unstitched section, through which you can then fill the arms and legs with cotton wool. On the patterns, these segments are indicated by small dashes.
Step 3. Sew the body
From the wrong side, sew a seam along the belly line, folding the fabric right sides together. Next, secure the handles to the edge of the neck (see photo). Please note that your fingers are pointing forward!
Then sew the legs on the lower abdomen, as shown in the photo below:
Step 4. Elf Head
Sew the ear pieces, turn them inside out, and set them aside. Sew the details of the head along the face line and the side seams of the head, inserting the previously sewn ears on the front side:
Align the front side of the Elf's head and cap as shown in the picture below (the seam on the cap should match the seam on the face):
Step 5: Head on Shoulders
Attach the head piece to the body piece (in the place where the arms are marked) face to face. In this case, the seam on the face should coincide with the seam on the stomach.
Having sewn these two parts, the handles will be sewn between them:
Step 6: Torso
Sew a small lace ribbon folded into a loop in the back seam of the cap (later you can hang your Elf from this loop). Then stitch from top to bottom along the back seam line from the wrong side, the neck line should match. But at the same time, leave an unstitched section on the cap along the back seam line, through which you can then turn the Elf out and fill it with cotton wool. Sew an oval at the bottom of the body, as shown in the photo below.
Turn the toy inside out:
Step 7: Stuffing the toy!
Next, through the holes left on the arms and legs, fill them with cotton wool (you can use a pencil or a spoon), while the arms and legs should be soft, and the body, head and cap should be hard. Place a small bag of sand in the lower part of the body - this is necessary for the Elf’s perseverance, and then fill it with cotton wool.
All that remains is to carefully manually sew up the holes left unstitched on the arms, legs and cap using a hidden seam.
Step 8: Eyes and Mouth
Sew the eyes in the place marked on the pattern, pulling them slightly towards each other (see photo), but not very tightly.
All that remains is to sew (or knit) a scarf from woolen fabric and tie it around your neck. And voila, you have your Christmas Elf!!!
And by the way, Elves can come in different sizes! And Scandinavian needlewomen have gotten used to dressing their Elves in clothes with winter motifs, usually natural fabrics and threads. So for inspiration I made a small one.
Bright craft
It’s not difficult to make a New Year’s gnome yourself; instructions and a master class will help you with this.
First you need to prepare a pattern, and then proceed to the step-by-step instructions:
1 Print the pattern and transfer it to the fabric.
Choose shades of material at your discretion. Remember that the toy will become more interesting if interesting and contrasting shades are selected. Scarlet felt can be used for the body of the toy, green for the hat and base, and snow-beige for the hands, face and beard.
2 Making a gnome should start with the face. Connect the beard and face using white threads. Sew on the hat using green threads. Then the beard is attached to the body with scarlet threads. First, roll the part into a cone shape and sew the edges of the workpiece together.
3 Fill the toy with stuffing. To make it more convenient to insert the padding polyester, use a pencil.
4 Once the body is formed, sew it to the base.
5 Sew the arms and fill them with padding polyester. Sew the formed blanks to the gnome.
6 Complete the gnome’s hands with original cuffs. You can embroider your face with beads. Black ones are for the eyes, and red ones are for the mouth.
7 Embroider the body with beads, lace inserts and decorative fur.
As you can see, there are many different techniques that allow you to make beautiful crafts. First you need to find a pattern, and then start creating the toy.
Recovery after surgery and care for elf ears
Otoplasty is a traumatic operation. In addition, cartilage takes a long time to grow together, especially in such an unnatural position for them . Therefore, rehabilitation lasts at least 3 months. During this time, the patient should:
- take care of the sutures, treating them with chlorhexidine twice a day, getting rid of blood stains with hydrogen peroxide;
- take painkillers (not analgin), but not too often;
- after 9 - 12 days, come to the clinic to remove the stitches, but even after that continue to care for fresh scars using the same products, as well as Actovegin ointment, Traumeel S gel;
- after treatment, apply a fixing bandage and do this for 3 months;
- protect your ears from any mechanical impact, that is, do not sleep on your side, do not wear tight hats;
- do not drink alcohol, do not smoke, limit coffee in your diet;
- do not undergo thermal procedures, that is, refuse a hot bath, visit the bathhouse, solarium and beach;
- To smooth out scars, apply Contractubex gel to them a few days after removing the sutures.
We recommend reading the article on how to do it. From it you will learn about the types of otoplasty, ear shapes that can be corrected, preparation for the operation and its implementation, and also compare which is better - a surgical solution to the problem or a laser.
Alternative methods to get elf ears
If you want to have an unusual ear shape, you don’t have to immediately rush to the surgeon. There are safer ways to make them elven temporarily:
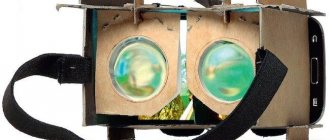
- Decorations . There are ready-made cuffs that are worn on the top of the ear. They are made from precious and cheaper metals, with or without stones. Such jewelry is worn mainly by women. The products are original, easy to put on and take off, and can be used without piercing your ears.
- Imitation. Pointed ears can be made from construction silicone. First, the model is created from plasticine. The material is applied directly to the ear, having obtained the desired shape, and carefully removed. The plasticine model is frozen, then coated with oil and used to make a plaster cast.
The powder is diluted in water until a thick mass is obtained. It is applied to a plasticine model and kept for 2 days. Then construction silicone is mixed with foundation. This mass is placed in a plaster mold cleared of plasticine and kept until it hardens for 3-4 days. At the end, the solid model is broken. The removed silicone ears can be used. They are attached with cosmetic glue. And foundation is applied to the border between the silicone jewelry and the skin.
An alternative option is elven ears made from adhesive tape.
Silicone or paraffin ears
To make the image more believable and make ears that are as similar to real ones as possible, you should put in a little effort and time. For the next manufacturing option, silicone or paraffin is used. Silicone ears will be more reliable and durable.
Read also: ✅ How to make a flower from a scarf -
The main thing in this case is to make the correct shape. To do this, you need to choose a container that is as similar as possible to the elf’s ears. You can look for similar options in handicraft stores or come up with improvised materials.
Prepared silicone or paraffin must be poured into molds. At this stage, you should not rush to avoid unevenness and stagnation of air. Having filled the material to the required size, leave it to dry for more than a day. Before removing from the mold, it is better to make sure that the material is completely dry, otherwise the work may not work out.
The next step is finishing the surface of the material. To do this you will need a stationery knife and paints. Using a knife, grind out the irregularities that are inherent in the shape of the ear and sand the surface. Then use paints to tint it to match the skin color.
Read also: DIY charabanc
In this case, the image will be more believable. If you choose the right technique, it will be difficult to tell whether the ears are real or not. How to make elf ears is now known.