Dear girls, in this article we decided to look at very interesting, but for some reason rarely used accessories - an elastic “gossamer”, a veil clip and a hair net for sleeping.
We are sure you will like them, because with their help you can easily create both everyday and evening hairstyles. All you need is a little imagination and free time!
Forgotten wonderful devices
What you need to make hairpins
To make a hair clip with your own hands, you need a ready-made base. The task of the needlewoman is to decorate it, making it beautiful and original. But don’t buy a hairpin in the accessories department, you just need a blank, and they are sold in handicraft stores.
The choice depends on the length and thickness of the hair, preferred hairstyles, and the age of the girl or woman. It can be:
- clamps;
- crocodiles:
- crabs;
- click-clack;
- invisible and others.
Why is it better not to take a ready-made clip for decoration? Because there is a lot of unnecessary stuff, and all you need is a mechanism .
Having decided on the type of hair accessory, proceed to the choice of equipment and materials. In simple master classes, the decoration is glued to the mechanism. In more complex ones, the base is also pasted over or sheathed.
What is suitable for decorating hairpins with your own hands:
- satin, grosgrain and other ribbons;
- foamiran (plastic suede);
- polymer clay;
- light plasticine;
- beads and beads;
- fabrics (including shiny);
- tulle and mesh;
- lace;
- rhinestones;
- chains;
- natural and artificial leather, suede;
- cabochons;
- centers for bows.
As a rule, craftswomen do not limit themselves to one material, but skillfully combine them, creating masterpieces! Often in the works there are original “things”, for example, feathers, buttons, zippers.
It is important to understand that the decoration technique and choice of materials depend on the type of mechanism. For example, small decorations - beads, small flowers, beads, stones - are suitable for invisible ones. And for the clip it is better to make voluminous flowers from ribbons, foamiran, tulle. It’s beautiful when the decor completely hides the base.
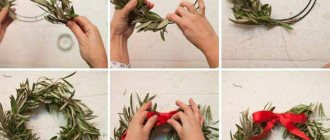
How to make a bun with a mesh
1. You will also need to gather your hair into a ponytail at the back of your head, secure it with an elastic band, then divide it into two identical strands - one on top, the other below.
2. The top strand needs to be temporarily secured above the ponytail with a hairpin so that it does not interfere with working on the hairstyle.
3. The lower part must be combed using a comb with sparse teeth. This will create the effect of thick hair.
4. Distribute the top strand evenly over the elastic and secure with bobby pins.
5. A special mesh is placed on top of the bun. It should match the color of your hair, otherwise it will stand out too much.
7. In the center of the bun, the mesh can be hidden with a stylish bow or decorated with a flower.
For information on how to make a romantic bun, see the story:
Hairpins made of satin ribbons - step-by-step instructions
This is the most popular direction. Satin ribbons are affordable, and on sale it is easy to find ribbons of different widths and colors to suit every taste. The kanzashi technique produces beautiful flowers, both small and voluminous. The work of making jewelry from ribbons is not very difficult, but it is painstaking and requires patience and accuracy.
The tape must be cut into squares or strips and be sure to treat the cuts with a candle flame, if you do not have a special thermal knife, so that they do not crumble. The parts are also connected and fixed with a flame.
Flowers are created from petals - this is the main element of kanzashi. Petals come in different types. On our website we have many master classes on making hairpins from satin ribbons with your own hands, here we will show the most interesting ones.
For beginning needlewomen, we suggest making your own click-clack hairpin with simple kanzashi flowers. The center of the flower is a bead. These hairpins are suitable for girls and young women.
If you want to decorate the clip, then make a lush blue flower from satin ribbons. The lower part is decorated with lace, and the middle is made of beads. Suitable for a hoop or elastic band.
No less charming is a white flower made from 2.5 cm wide ribbons. It is suitable for a 7.5 cm long clip-pin. New type kanzashi petals are used for decoration. The middle is decorated with 7 double-sided stamens.
One of our favorites is the bouquet bow and clip. Satin ribbon of different widths was used in this work. There are a lot of details, but the result is worth the effort!
The next master class is a volumetric automatic hairpin for experienced craftsmen. A complex flower made of different types of petals: double round, triple, inverted, multi-layered. Here you will have to work not only on the decoration, but also on the main one. Start practicing when you have time, step-by-step photos and detailed descriptions will help you cope with a difficult task with your own hands!
The multi-colored flower seems complex, but it is assembled from simple petals made from ribbons of different colors and golden brocade. Quite a festive option!
A lush dahlia made of blue and white ribbons is intended to decorate a 7.5 cm clip. If your hair is thick, you can make two clips.
A summer idea for making hairpins for girls with your own hands - round marshmallow daisies with a sun in the middle. Suitable for hair clip.
Cute butterflies for girls turn a 5 cm long click-clack hairpin into an elegant accessory. The middle of the butterfly is a small doll that will not leave the baby and her friends indifferent.
About the product
The bun mesh “Baby's Joy” will highlight the uniqueness of your little fashionista and will be a wonderful addition to her unique style. The bun mesh with an elastic band and lace decoration will not only allow you to remove unruly hair from your face, but also add romance and charm to your image. Characteristics: Diameter when stretched: 13 cm Material: mesh fabric, cotton lace. The accessory is made of environmentally friendly materials and is absolutely safe for children. ATTENTION! The product is in assortment, the price is for 1 option. Photos are for illustrative purposes only: other options may be available in the store, and those shown in the photo may not be available. Pre-selection when ordering is not possible, because... the specific option is determined based on availability. Article MN 05 Product code 1000050040 Country of origin China Package dimensions 1 cm x 6 cm x 6 cm Package weight 0.02 kg
Rep ribbon hair clips
Rep tape is easier to work with, does not slip, and holds its shape well, so we recommend starting with them. There are ribbon reps on sale in different colors, as well as with patterns and sparkles.
The 5.5cm long nautical style baby bows for the clip clip are perfect for beginners. The manufacturing technique in this master class is very simple, and the effect is achieved through the design and the middle.
Blue and white flowers are recommended for a 5.5 cm clip or elastic band. The decor consists of kanzashi petals in the “butterfly wing” .
And this master class presents a school set - hairpins on a 7.5 cm clip and a tie made of thick grosgrain ribbon and track-type lace. A spectacular set will suit not only schoolgirls, but also older girls.
White hairpins made of grosgrain ribbons with gold lurex will not cause any difficulties for beginners; simple bows do not require experience or skill.
And these children's bows made from Mickey Mouse ribbons will delight the young fashionista who loves cartoons and bright outfits.
Decor using foamiran
It’s no less exciting, and for some, easier, to create hair clips from foamiran with your own hands. Plastic suede is an interesting material; after a short heating it takes on a realistic shape. Foamiran is not afraid of moisture and retains its decorative appearance for a long time.
A simple yellow flower with a brown center from Chinese foma is a godsend for beginning craftsmen. Designed to decorate a 6.5 cm long hair clip.
Bright daffodils made of white and yellow foamiran 2 mm thick look realistic, it seems that the girl decorated her hair with real spring flowers. Daffodils keep their shape well. The master class is suitable for beginners.
A bright pink peony is also difficult to distinguish from the real thing! Despite its apparent complexity, a peony is not so labor-intensive to make with your own hands, and then attach it to a hairpin or brooch.
Bright butterflies made from glitter foamiran hold their shape well because this material is denser. True, it is not suitable for everything and shines on one side. In MK you will find a pattern and step-by-step description.
Other hairstyles
A simple ponytail makes a great base for holiday hairstyles. Before you start creating such a base, you can separate several strands so that you can later lay them on one side or style them with a careless braid.
The bouffant adds a special charm to the hairstyle. It can be done as follows:
A spikelet with fleece is also easy to make. The scheme is as follows:
There is also an option for a scorpion hairstyle with a braid:
Other techniques and tips
Not only ribbons are suitable for making hair clips with your own hands; sheets of felt . Sheet felt makes beautiful flowers that hold their shape well. And all kinds of children's decorations. For example, funny ears for a girl.
If you have real leather or don't need a leather item that needs to be disposed of, then good luck! make a stylish leather hairpin that is suitable for girls and women of any age. You can use boots or a bag as a basis, the main thing is that the leather is thin and drapes well.
A hat with feathers will decorate the hairstyle of a preschooler or first-grader. To make such a hairpin with your own hands you need a cardboard tube, feathers and some finishing materials.
Chiffon flowers decorate paired hairpins for girls, but you can also make one. A master class on making such a hairpin with your own hands is good for those who have leftover chiffon. Ready-made leaves complement the composition. In addition to the techniques listed above, you can choose others. For example, beading, felting, knitting, modeling from hardening materials.
When creating paired hair accessories, novice hairdressers need to decide what is easier - first make one product and then the second, or prepare all the details, and then simultaneously assemble the jewelry step by step. It is important that the accessories are identical or mirrored if the design requires it.
Now you know how and from what you can make hairpins with your own hands, and, we hope, you will definitely use the acquired knowledge in practice. We wish you pleasant crafting and success!
How to do a low bun
Shutterstock
Most often, girls with short hair make a low bun. This hairstyle looks very original, but, nevertheless, has a long history. This bun is made according to the same principle as the original version described above, only without combing. A low bun can be decorated with various accessories or fresh flowers, or you can use hair ribbons. Then the short hair length will not be so noticeable.
If you have a question - how to make a hairnet, then welcome here! The topic of our conversation is exactly this.
Just like that, out of boredom, making a thing is always uninteresting, because it will not be useful to anyone, and, therefore, you will not always be diligent in making it. The reason is a completely different matter!
This is where fantasy comes into play, when you are preparing a gift for a specific person or your favorite kids are in front of you, whom you are preparing for their next performance. In any case, you have a goal, which means serious work begins.
If we were in the Middle Ages, we would be surprised at the level of skill in making hair nets in those days. Gold threads, decoration with pearls and precious stones are materials for real masters.
The approach to making and decorating our products will probably differ significantly from the medieval period. We will take the material for such a wonderful decoration much simpler. Soft, not thick synthetic cords, threads of different quality - all this can be used for work.
You must understand that a thick material will result in a coarser knitted mesh; the pattern will be clear, but a little rough. The thinner the threads, the more elegant the product will look, the pattern will be small, the mesh will be thinner, which means there will be more rows of knitting.
For the first lesson we will make a hairnet from soft cord. Choose a hook that matches the material. The knitting will be soft, loose and neat. In this case, the mesh will take the shape of the bun well, fitting it tightly and beautifully. So, we have selected the material and tools.
It's time to choose a pattern. I would not like to use as a sample the common bazaar version, which is knitted with a very large mesh in the form of a square, and then an elastic band is threaded around the perimeter of it.
The technique for making nets is crocheting in the round. If you have ever knitted napkins, then you will make a mesh for your baby very quickly. As you understand, crocheting requires some experience in crocheting.
Let us take you through the basic steps for making hair nets in more detail. The knitting pattern is in front of you. The pattern is simple and don't let that confuse you. After all, simple doesn’t mean bad.
Hook, ball - and get to work. In the photo you can see the steps of knitting a mesh.
Row by row, a product is born.
Arches create a feeling of airiness.
Be careful when counting the air loops in the arches.
A few more steps and the job will be done.
We finish knitting.
Please note that meshes come in different sizes. Its size depends on the length of the hair. The longer they are, the larger the bun itself will be, and accordingly, the decoration will be larger.
ADVICE!!!
Each subsequent row crocheted is an increase in size. In order not to make a mistake in the size of the product, without cutting the thread, pull the elastic band in and do a preliminary fitting. Try it on your bun, check the tension of the elastic on the mesh. If the mesh is small, loosen the elastic and knit a few more required rows.
This is how we pull in the elastic.
There is one very important point in a hairstyle with a mesh. The secret lies in the right
and
carefully
putting it on the bun.
Do your hair.
Put a mesh on your hair.
You see, all the elastic and its ends are visible. Let's fix this bug.
Pinch the pins from the hairstyle one by one, catching with them the edge of the mesh and the elastic band itself, the ends of which are hidden inside the hairstyle. In some cases, it is better to choose an elastic band to match your hair color. In this case, it was necessary to pull in a black elastic band that matched the color of the girl’s hair.
That's it, the hairstyle with a beautiful mesh is ready!
Now you can easily come up with these beautiful accessories for long hair. And not only to come up with them, but also to bring them to life. Pattern, size, material, finishing - everything is in your hands, according to your desire.
Hair net (39 photos) – options for use + weaving a “web” on the head
Dear girls, in this article we decided to look at very interesting, but for some reason rarely used accessories - an elastic “gossamer”, a veil clip and a hair net for sleeping.
We are sure you will like them, because with their help you can easily create both everyday and evening hairstyles. All you need is a little imagination and free time!
Forgotten wonderful devices
Conclusion
Using such seemingly unremarkable accessories, you can create real masterpieces! And by combining them with each other and imagining with styling your curls, you will get new hairstyles every time.
Also for your attention is the video in this article, which will certainly inspire you to experiment.
Did you like the article? Subscribe to our Yandex.Zen channel
Text \ Photo Victoria BOLSHOVA Posted 01/22/2015
0
share:
To favorites
To print
If you want to thank, add clarification or objection to the author - add a comment!
Currently being discussed:
- Lyubov Burkina
20.08.2018
What hair color should I choose? Please give me some advice. I don't know which one I have...
- I
19.08.2018
I had eyelash extensions for 6 months and took a break. After 3 months I increased it again...
- Vasilisa
18.08.2018
Cool hairstyle
18.08.2018
Hi, can I dye my bleached hair (currently red) bright purple...
16.08.2018
Hello! I am a dark girl with black eyes. I want to dye my hair dark...
15.08.2018
The photo shows young beauties. Can older ladies have their eyebrows done? Age...
Comments »
Headnets: a little history, their types and methods of wearing
As soon as people learned to make fibers from plants and wool, all sorts of methods for making products began to appear - weaving, knitting, sewing, etc. Soon canvases, fabrics, and decorations, including various meshes, came into use.
For your information! Archaeological research proves that already in the 13th and 14th centuries not only fishing gear was woven, but also nets to decorate the head. Then the shuttle was a knitting needle with two ears at the ends. The process itself was quite labor-intensive and long. But you won’t go to any lengths for the sake of beauty!
Girl from the past. And what's on her head? Mesh!
However, the peak of popularity of this accessory came in the last century, when in the 30s, due to the difficult economic situation, the fashion for minimalism returned. The shortage of household products has forced the fair half of humanity to have short haircuts. In order to somehow hide flaws in the appearance of their hair, and at the same time to embellish themselves, women often put hand-woven nets on their heads.
Types of modern meshes
With the improvement of the economy in the country, fashion began to change rapidly, and the popularity of the so-called “spider webs” for the head waned. Unfortunately, today few people remember these wonderful devices.
But in vain! Now you can see for yourself.
All meshes can be divided into the following types:
- A veil hairpin is a romantic addition to an evening or wedding hairstyle. The main part, which partially covers the head, is made of thin mesh fabric. And the decorative elements on it can be very different - feathers, flowers, rhinestones, ribbons, beads, hats, butterflies and much, much more.
Look how many cute models there are
- Mesh scarf . In its appearance, it resembles a cobweb and often serves as an auxiliary accessory when creating a beautiful, complex hairstyle. To do this, the curls are placed in a mesh elastic scarf and given the required shape.
Important! In order for the hairstyle to be a success, the mesh on the hair should stretch to 30-40 centimeters. Check this ability of the accessory in the store when purchasing.
These graceful hairstyles are made using a mesh scarf.
This product is multifunctional, easy to use, aesthetically pleasing and inexpensive (the price for the simplest models is 30-70 rubles). It can be used on hair of any length, giving it volume and unusual shapes. By the way, such “kerchiefs” are made from highly stretchable polyester. The weave is very thin, and if you choose an accessory that matches the color of the strands, it will be almost invisible.
- There are also mesh decorations . These are the same “kerchiefs”, only their design is not so simple: multi-colored, with large cells, made of silver or gold material, decorated with precious stones, beads, ribbons...
Hand-knitted “spider webs” (crocheted or knitted) are very impressive. Surely a woman who has mastered this type of needlework knows how to knit a hairnet. Such products are always original, exclusive and are the embodiment of the rich imagination of the craftswoman.
Unique knitted accessories
How to make a hairnet in an easier way? You can weave it from beads. Below, as an example, we have given one of the many weaving patterns.
One of the patterns for weaving a mesh with beads
- A mesh sleep cap that keeps your hair healthy and beautiful. During sleep, any curls (whether up to the waist or up to the shoulders) become disheveled on the pillow and become tangled. The result is split ends, dull color, and loss of root volume. Exit? Wear a special hat, just like our mothers and grandmothers did. This simple device helps maintain hairstyle almost 100%. (See also the article Boomerangs for hair: how to use.)
Secrets of stylistics
Secret #1: props
First of all, you should understand the things that the mother equipped with the child, since it is with their help that the problem of disheveled hair will be solved:
| Name | Purpose |
| Comb | Even stern short-haired machos must still remember the purpose and rules of use of this item, so I will not focus on it, especially since my wife probably put the most suitable model for her daughter’s hair. |
| Small rubber band | A rubber ring covered with fabric, the diameter of a finger. It will help to make a ponytail, which I personally use as the basis for a bun. |
| Mesh | Do you remember what a fishing net looks like? Only this one is the size of a palm, and is tied at the edges with an elastic band. |
| Large elastic band with decoration | A rubber ring decorated with bows, flowers or other decorations. In tandem with the previous accessory, it allows you to shape your future hairstyle. |
| Hairpins | They fix the hair in a styled position so that all your work does not fall apart at the most inopportune moment for the child. |
Secret #2: combing
You shouldn’t immediately start designing your hairstyle because of your haste, since in this case, on the contrary, you will only spend much more time fighting the disobedience of tousled hair and, in the end, you still won’t be able to style it well.
That's why I make sure to take a minute to comb my daughter's hair:
- I disassemble the masterpiece created by my wife, carefully removing and folding separately all the elastic bands, hairpins, invisible pins and other similar accessories involved in it;
- Then I run a comb through my hair, achieving at least visual alignment.
Secret #3: foundation
What exactly is this bun? Essentially, this is hair collected and fixed in a bun:
But how do you group this insanely long coat of hair, the most precious creature in the world to you, into something with volume and shape? I went the following way:
- With one hand he pulled his hair into a ponytail;
- Another put a small elastic band on them;
- I made another loop and put it on as well, after which a fairly reliable “lash” was formed;
- But the tail continued to fall apart into a million hairs, so I simply twisted it around its own axis;
- The resulting “rope” was laid out in a spiral on the back of the head.
If the princess initially had her hair braided, then you can immediately put it in a spiral. This way the bun will turn out even stronger, and you will save the running seconds.
Secret #4: Commitment
Now if you constantly hold your hair with one hand, then you don’t have to do anything else with the resulting design. But they wouldn’t let me into the dance class, so I set about consolidating the results achieved:
- I put the net on my fingers;
- He brought it to the bun and, turning it out, put it on top, clasping his hair;
- Then he tied the bun around with a large elastic band. By the way, I have not seen this in some children, but without it the result does not look so elegant and sophisticated;
- And finally he stuck pins into his hair from different sides. Most often I use three such fastening elements, but here you need to look individually at how tightly the styled hair holds. Also, do not forget to squeeze them before diving, then they, again straightening their metal tendrils inside the hairstyle, create a more reliable fastening.
When, in the last seconds before the start of the lesson, I asked my daughter to shake her head in order to make sure of the result, and my “work of art” did not fall apart, my happiness knew no bounds. The family's reputation was saved! In addition, we managed to prepare for the lesson on time, since the whole process took only about three minutes.
When testing a hairstyle, it is not enough just to hold it in place. The hair should not move at all, only then can the child be released with confidence that the bun will not fall apart in the middle of class, and the teacher will not express everything he thinks about you about this.
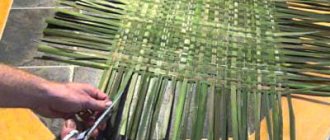
Weaving "cobwebs" from hair
Let’s deviate a little from the topic and talk about weaving a beautiful “cobweb” on the head. This is no less delicate and unusual hairstyle than the previous ones. And it couldn’t be easier to create! (See also the article Kerating hair: how to do it.)
How to make a hair net? It is based on a regular three-strand braid. You need to select and lightly moisten a curl on the side of your head. Then braid it into a braid, leaving unbraided strands on one side.
Weaving a net on the hair - first steps
Iron unbraided hair with an iron and spray with hairspray. Next, before weaving the first ironed strand into the braid, you need to pass it through all the other strands using the basket weaving method.
The basket weaving method is clearly visible here.
And only after that can we attach it to our braid. We do the same with other hair that was not initially woven in.
The finished hairstyle is a hair net. Now you can secure this openwork element somewhere on the bottom side.
The essence of the problem
What's so terrible that can happen in front of the door to a dance class? I will describe to you an approximate course of events:
- Today is your turn to pick up your daughter from school and take her to the dance, which you do excellently, although you see that time is running out;
- Walking along the long street, you glance at your watch every now and then;
- You help the future ballet star change clothes, and there are still five whole minutes left;
- And then your child tells you that you can only dance with a bun, otherwise your hair will get in the way;
- Next, she hands you some strange, clearly feminine accessories and clearly points her finger at her stunning hairstyle, which her mother gave her for school in the morning;
- You look around, horrified to see that all the girls really have their hair tied up, except for your daughter;
- The seconds are ticking, and the problem urgently needs to be solved somehow.
If from all of the above you are already clutching your heart, and perspiration appears on your temples, then I recommend that if such a situation arises, it is better to seek help from the mother or grandmother of some other girl from the group. As a rule, they are incredibly touched by this situation, and they willingly come to help. Otherwise, with your shaking hands you will give the child not a strong bun, but a collapsing nest on his head, which will ultimately turn into a disaster.