Weaving various jewelry and crafts is a fascinating craft that has won the hearts of experienced craftswomen, children and teenagers. Brooches, beaded bracelets, wicker belts, earrings and other unique handmade items do not leave the most sophisticated fashionistas indifferent and are highly valued. Therefore, beadwork is not only an excellent opportunity to realize your dreams and fantasies in beautiful products, but also a good extra income.
In addition, learning how to weave is very simple. Thanks to these video tutorials for beginners, you will quickly master the technique and get acquainted with different options for creating truly royal handmade creations. The formula for success is desire, idea and available materials, of which beads have occupied a special place for many centuries due to their marvelous beauty and ease of work.
A beaded bracelet can be made of any shape, color and complexity.
Schemes for making beaded bracelets
Today we’ll talk about creating bracelets from beads and beads - hand, ankle, and also chokers that fit tightly to the neck, which, despite the rapidly changing fashion, are always relevant. A few tips before starting work:
- purchase all the necessary material at once, so that it does not turn out that there are not enough beads, but there are no such beads on sale;
- choose Japanese or Czech-made beads - although they are more expensive, they have beads of the same size, which makes the products smooth and neat;
- It is advisable for beginners to practice on cheap Chinese beads in order to acquire skills and get better at a rough draft, and only then weave masterpieces from expensive material;
- select beads, glass beads and other interesting blanks for the beads in case you want to change the pattern and diversify your product with inserts;
- do not forget about the base, which will require strong smooth threads (lavsan, nylon, polyester) or fishing line, as well as carabiners, clasps and special thin needles for needlework.
What materials will you need
To work, you need to purchase certain tools and materials: it will be difficult for you to do without them. But a video or step-by-step tutorial will tell you how to weave beaded baubles for beginners.
The work requires:
- Beads.
This material must be calibrated and of proper quality. After all, in such a miniature product as a bracelet, small flaws will be immediately visible. An example of using high-quality material Therefore, buy material of appropriate quality made in the Czech Republic or Japan. - Beads, pebbles, glass beads - everything that is provided for in the diagram or your imagination.
- Fishing line, waxed thread, floss - what you will string the beads on.
- Beading needle with a thin eye.
- Scissors.
- Clasps or rings for fixing the product on the hand.
Fastenings can be very different
The designs for beaded baubles are varied. If you are just starting your journey into the world of needlework, choose simpler items and weaving techniques. You can start weaving on specialized machines. If you don’t have one, you can make a homemade one. To do this, you will need a hardcover book or cardboard box.
Weaving machine
Homemade machine out of the box
Weaving a simple bracelet
Among the various techniques, the simplest is the technique of weaving beads - beads of different colors are strung on nine pieces of fishing line, and then the pieces are braided according to the chosen pattern, securing a button on one side and forming a loop on the other. Products made using this pattern are simple but beautiful.
If you make simple bracelets, you can wear several of them at once
Another option on how to make a decoration is suitable for those who have crocheting skills. Its essence is as follows:
- Beads are threaded onto strong cotton threads and skeins are formed again. Threads and marguerites are selected in the same tone, but you can experiment if you wish.
- Then a flagellum is crocheted from bead threads.
But the most popular beading technique is the monastery cross, which, although a little more complicated than the first two technologies, is nevertheless also intended for beginner craftswomen. Only after mastering cross weaving can you move on to more intricate techniques.
Option for weaving a bracelet with a cross
To work you will need:
- plain or multi-colored beads;
- very thin needle;
- clasp;
- waxed thread or fishing line.
Variant of the technique of weaving a beaded bracelet Step
-by-step guide:
- Collect 4 beads and insert a fishing line or needle into the first of them, then sequentially into the second and third, connecting them into a ring. Thus, the first cross (cell, link) is obtained.
- String the next 3 beads and insert the needle into the fourth bead of the previous cell. Tighten the threads, forming the next cross, and bring the working needle to the top of the link.
- Repeat until the desired size, resulting in a string of crosses, but still uneven and sloppy.
- To give the workpiece a completed look, they return along the created chain to its beginning.
- Insert the needle into the bead of the first cross located on the side, collect 3 beads and create a new cell, bringing the needle to the upper zone of the outermost cross.
- String the next 2 beads onto the base and insert the needle into the side bead of the second cell and the top bead of the previous one, as shown in the photo.
- Pull the needle (fishing line or waxed thread, if a needle is not used) through the top and side beads of the newly formed cross, as well as the side bead of the third link.
- According to the pattern, weaving continues to the edge of the chain, and then along the second row they return to the beginning of the product.
- If desired, do the third, fourth, etc. in the same way. rows.
- Attach the clasp.
The cross-weaving pattern is elementary, the main thing is not to rush, and also not to be afraid of mistakes and alterations, which will certainly happen at the very beginning, to be guided by photographs for each stage and the general video.
Another simple pattern for weaving a beaded bracelet, for which you will need:
- plain beads of any color;
- thin cord;
- medium size button.
Thin beaded bracelets in several rows
Step-by-step master class:
- Take 2 pieces of cord of different sizes, bend the tip of the short piece, and fold the long one in half.
- Make a small ring, tie a knot and cut the short end of the cord.
- From the remaining three threads, braid a braid about 4 cm long, string 1 bead on one thread and weave it into the braid.
- Continue to collect beads on each of the three threads, weaving them one by one into a braid, as shown in the photo.
- At the end of weaving, when the area with beads covers the wrist, a braid without beads 4 cm long is again braided, just as it was done at the beginning.
- String a button and secure it with a strong knot.
- The beaded bracelet is ready, put it on and fasten it on your hand, threading the button into the loop.
Historical information
They started making baubles back in ancient times. Previously, this was done by Indians living in North America. For them, these bracelets were very important because they were more special symbols than decoration.
They usually meant strong relationships between friends or lovers. If a person gave his best friend a bauble, then it was impossible to remove it from his hand until the thread broke by itself.
Removing such a bracelet from your wrist on your own was considered a strong insult. According to many people, such a gesture meant a quick break in friendship.
In the twentieth century, hippies began to weave baubles, which is why bracelets quickly spread throughout the world. Bracelets continued to be used as a sign of friendship and devotion. Best friends exchanged them, and lovers used them as wedding rings.
Closer to the present time, baubles have become more accessories that decorate a person’s appearance and image. However, exchanging them still symbolizes friendship.
Weaving a bracelet with a name
This beading technique is often used by needlewomen. It is easy to implement and allows you to create original things with inscriptions or pictures - various ornaments, animal figures, sacred symbols and entire artistic subjects.
Bracelets can be made with inscriptions
To create a personalized bracelet with your own hands you will need:
- nylon thread or fishing line;
- multi-colored beads.
The weaving technique is a monastic cross.
Step-by-step instructions:
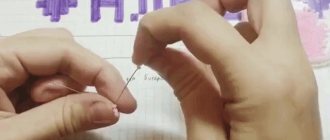
- On a checkered piece of paper they make a schematic representation of the bracelet they want to make. One cell - one bead.
- Then the diagram is colored with colored pencils or felt-tip pens, forming an inscription or pattern and the main field.
- The beads are sorted, rejecting unsuitable specimens.
- A piece of thread (or fishing line) is bent in half and 4 beads are strung on one part. Another thread is passed through the outermost bead, and then the threads are tightened, creating a cross.
- Place 2 beads on the left end of the thread and one on the right. Pull the right edge through the second bead and tighten again. They work with beads of a basic tone. The name is formed in the same way, but beads of a different color are used. Proceed according to the given pattern until the required length is obtained.
- To make a personalized bracelet wider, place not two, but three beads on the left end of the thread and thread the right thread through the third bead. With this option, both threads will come out of the side element of the first row.
- Next, switch sides - string two beads on the right thread, and one on the left, passing the right thread through it. The left thread is pulled through the side beads of the first line and the threads are pulled together.
- Next, pick up one bead on both threads and pull the right thread through the left bead and the side bead of the previous row. Tighten the threads again.
Personalized bracelets are suitable for girlfriends or close friends.
A personalized bracelet or decoration with a pattern must be made strictly according to the scheme, following the sequence, and also using the appropriate colors in the right places.
"Scythe" technique
This technique is the easiest for any long-haired girl. Its essence is to weave a braid of three or more “strands” of beaded threads. Such bracelets and necklaces look laconic and expensive due to their simplicity.
To make the decoration softer, instead of fishing line, you can use a silk thread or a waxed cord of small cross-section; for decorations of a rigid shape, weave a pattern on a wire.
In order to weave a braid bracelet, you need to take three or more pieces of thread equal to the length of the bracelet, plus extra, and secure them in the bracelet lock. Next, on each thread you need to string beads of a color and size you like.
Then you need to weave a braid from the threads. This can be a regular, flat, multi-tiered braid (similar to women's hairstyles), it all depends on the chosen width of the bracelet and the material used. Necklaces made of glass beads mixed with small beads look very unusual.
Different methods of weaving bracelets are applicable in completely different looks. A simple thin bracelet with flowers or crosses will decorate the hand of a schoolgirl, a wide bracelet with a pattern “under famous brands” will well complement the image of a young woman, and a woven necklace made of expensive beads will complete the evening look of a noble lady. Learn the basics of beading and create your own masterpieces!
How to make an openwork bracelet from beads and beads
Having mastered the basics of beading, you should not stop at the achieved result. It is necessary to move forward, study complex and interesting techniques in order to create voluminous, but at the same time elegant jewelry that certainly will not go unnoticed. Such handmade items include openwork bracelets, where large beads are braided with small glass beads.
An openwork beaded bracelet will look very impressive
Here there is freedom for the imagination of craftswomen - the beads can be chosen round or oval, smooth or faceted, where the light will miraculously play. The main thing is harmony in the selection of colors and shades.
To make a bracelet you need to prepare:
- beads imitating pearls;
- nylon thread;
- padlock;
- beads to match the beads;
- bicones;
- needle for needlework.
Wooden beads are suitable for crafts in a certain style
. Step-by-step work:
- For strength, the thread must be folded in half and secured with a sewing knot to one part of the lock in the resulting loop.
- Then two large beads are collected to form the base, followed by 6 beads, a bicone and again six beads. Pass the needle through the large beads and tighten.
- Repeat on the second side.
- Next, string one bead, 6 beads, a bicone, 6 beads and pass the needle through the newly collected bead and the outermost one from the previous link.
- Create a second fragment on the other side in the same way.
- Weave to the required size and secure the second part of the lock.
Flower technique
In order to get a flower, you need to collect 5-8 beads, the number depends on the selected size of beads. Next, the fishing line is passed through all the beads, another one is put on for the middle and the fishing line is threaded through the nearest petal to move on to the next flower. For the second flower you need to collect two less beads.
Using this technique, single and multi-level bracelets are made; flowers can be single-colored or with multi-colored petals. The main thing is to master the technique, and the further path will be dictated by taste and mood.
Between the flowers you can make transitions from smaller beads or oblong bugles (to form flower stems) or weave a continuous wreath. In some cases, the bracelet looks better in the form of circles, it depends on the selected beads.
If the bracelet is intended to be worn by a child, it is better to weave a single-tier version and leave a distance between the flowers (straight lines without patterns). Such a bracelet will look more elegant and will better suit a thin girl’s hand.
If you leave threads with one row of beads between the flowers on both sides, you will get a weightless openwork bracelet. Thin circles form between the flowers, adding elegance to the decoration.
Volumetric beaded bracelet
Looking at such an exquisite decoration, it is difficult to imagine that this beauty was made by hand. However, only a visually voluminous bracelet can be called an intricate product. The technique of its execution is quite simple, as you will now see for yourself.
Beaded cat bracelet
Everything you need to get started:
- bead caps and margheritas;
- lanka (jewelry cable);
- pliers;
- crimps and end caps.
Making a bracelet step by step:
- Cut off 20 cm of the strap and put a small crimp on it.
- Stepping back 6 cm from the edge, clamp it with pliers.
- Beads, for example bright blue, are collected along the entire length of the product.
- Before reaching the edge 6 cm, put on the small crimp again and clamp it.
- In a similar way, 4 pieces of stripe are formed using different shades of the main color. In our case - blue, sea green, sky and light gray.
- Put all the pieces together and put a cap on the edges, pushing it closer to the beads, then the end cap and a large crimp hermetically sealed into the groove of the end cap.
- Clamp it with pliers and, after cutting off the excess edges, close the end cap.
- The other edge is treated in the same way.
- In a similar way, 2 more blanks are formed.
- Then all the blanks are collected and closed into a ring.
- They give the product the desired shape - braid it or simply twist it together.
- A carabiner is put on the other ring, the remaining edges of the blanks are closed.
- The product is twisted and fastened.
Preparation of the workplace
Working with beads is very painstaking work. Therefore, the workplace must be properly equipped to make it comfortable. Then the creative process will be a joy.
First, you need to provide a good light source
. Any microscopic work (embroidery, knitting, beading) creates severe strain on the eyesight. Ideally, beading should be done in daylight. But often we cannot afford this and we do handicrafts in the evenings, so we must have a good table lamp.
Secondly, you need to get a small piece of plain matte fleecy fabric
. It makes it easier for the eye to perceive beads. It can be felt, felt, velvet, tapestry, velor. Due to their texture, these fabrics prevent beads from scattering on the table.
Thirdly, it is necessary to equip the workplace with a storage system
. So that a variety of all the materials needed for beading are always at hand.
Bracelet made of pins and beads
You can make an unusual decoration with your own hands from beads and pins in literally a matter of minutes. Such a stylish and at the same time elegant accessory will appeal to both young girls and older women.
The pins in the bracelet can be used for the frame
Necessary materials for work:
- thick needle with elastic band;
- beads and pins.
Work order:
- Prepare 70 pins of the same size. This should be enough for an average wrist. If necessary, increase the number of pins. Keep in mind that the width of the decoration depends on the size of the pins.
- They sort the beads by color and come up with a pattern for the bracelet - a one-color thing or with alternating colors on one pin, through 1-2 pins, 5-10, etc.
- Beads are placed on each pin according to the pattern, and all the blanks are carefully placed on a rubber thread from above and below at the same time. An important point: the pins should be placed with the jack - clasp up, clasp down.
- When all the pins are on, the threads at the top and bottom are tied, and the ends are neatly sealed. If desired, attach a clasp, which will make the thing presentable.
- Instead of ordinary safety pins, you can use gold-colored items, then the bracelet will look more rich. Or, between the pins at the top and bottom, string one bead or bead in a contrasting color or to match the main product. In this case, you will get a completely different bead bracelet, no less fashionable, elegant and beautiful.
Design option for a beaded bracelet on pins
Although hand-made beaded jewelry cannot be classified as a very expensive accessory, however, when made skillfully, they are not inferior to, and sometimes superior to, stamped jewelry.
Their advantage is their originality and originality, which is appreciated even by very wealthy people. Therefore, master classes on making beadwork are very popular. In this article we tried to cover the topic as fully as possible. Try, experiment, add your own twist, and you will end up with rare, amazing jewelry worthy of being worn by queens. Good luck to you.
Options for securing threads during work
Before starting work, you should choose the method in which you will fasten the threads. You can take any of the existing ones, based on what items are at hand:
- Stationery clip. With its help, you can attach the ends of the threads to a book or other platform. The threads must be placed in the correct order for the pattern to be correct. They also need to be pressed well to the surface.
- Pin. The threads are tied in knots on one side and then placed on a pin in the correct strand. Then you can pin it onto the fabric and start working.
- Scotch. This option is the simplest - just attach the threads with a piece of tape to a flat surface, for example, on a table.
- A special tablet. You can make it from a flat board with a clamp on top. To make fixation more convenient, you can place a ruler in the middle of the threads and the clamp. There you can also place a diagram for work and other pieces of paper that you will need during the weaving process.
Baubles forever
You may not know the history of baubles and not be interested in it, but it is impossible to deny their beauty. They emphasize individuality and have exceptional charm.
It’s nice to make them and receive them as a gift, because they still remain a symbol of friendship and mutual affection.
And so much has been said about the benefits of weaving them that there is no doubt about it:
- Development of attention and perseverance
- Development of fine motor skills
- Constructive and spatial thinking
- Imagination and aesthetic taste
In a word, beautiful in every way! Therefore, their returning and growing popularity pleases not only needlewomen, but also fashionistas who know a lot about stylish jewelry. This means that what was a childhood hobby today can become a matter of life tomorrow.
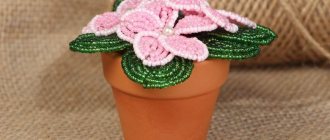
Flower pot pendant
Materials:
- cord (10 m),
- large beads – 36 pcs.,
- scissors, wooden ring.
Creation instructions:
- Cut 4 threads 2.5 m long. Fold them in half and loop them into the ring. Tighten with a knot, passing all the threads through the loop. Now there are 8 of them.
- For convenience, you need to hang the product and weave it in weight.
- Each pair of threads is decorated with three beads, one after another. To prevent them from rolling down, you need to tie a knot under the last one.
- This is how all 12 beads are strung. They are located strictly on the same level. Further along the threads, already at the intended one, the edges of the pot are strung with 2 more beads (8 in total).
- There is no need to tie a knot under the last one, since the two threads will spread apart and be connected by a bead to the neighboring ones. This is how a basket of flowerpots is woven. In the next row, the beads are already in a checkerboard pattern. This way you will get a honeycomb string bag, fastened with beads.
How to close the weave? The threads under the bottom are gathered together and can be tied in a knot or wrapped like a tourniquet with a separate piece of cord, masking the ends, and making a tassel from the free ends.
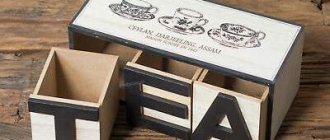
Interior decor ideas
Curtains, chandeliers and lamps, stands for teapots and mugs, mirrors and photo frames, boxes and candlesticks, decorative panels - there are so many items in the interior for the manufacture or decoration of which beads can be useful!
In recent years, eco-style, which involves the use of natural materials, has been gaining more and more appreciation, so products made from wooden elements, durable and light, pleasant to the touch, are widely used.
Geometric figures
Bracelets with stripes, which can be either transverse or longitudinal, look interesting. Multi-colored triangles and squares in a bracelet or belt are very suitable for a bright summer outfit.
Animal motifs
Favorite cats or birds on a bracelet can always lift the mood and decorate the owner’s appearance.
Making a wedding decoration
You can create a beautiful decoration for a wedding that will highlight the femininity of the bride and fit well into the wedding look. For weaving, you need to prepare white high-quality beads and pearls, do not forget to choose convenient fittings for the clasp. To weave this decoration you need to follow these steps:
- Six beads are put on a fishing line 85 cm long, then one pearl.
- The end of the fishing line is threaded through the last bead; pearl beads will appear in the center of the weaving.
- There should be at least fifteen elements in total, this depends on the desired length of the decoration. Such a necklace made of beads looks incredibly impressive; in the same likeness you can weave earrings and a bracelet for an upcoming celebration.