Beaded bracelets in the form of baubles, in particular versions with names, are especially popular with children. The most common design is made using the canvas technique. Such products are simple, but at the same time original. Often such baubles are taught to be made in children's health camps, schools and even kindergartens. More experienced craftsmen can complicate the decoration by adding an interesting pattern to the design, as well as using additional decorative fittings. Let's look at the basic techniques that will help us figure out how to make a beaded bracelet with a name.
Master class on beading a name bracelet Alice
I offer a step-by-step training lesson.
We will need:
- pink beads of two colors, size ten
- bead needle and thread
- padlock
- checkered paper for drawing a diagram
Video master class
Bracelet pattern
We take paper and write a name, remember that one cell is one bead. As can be seen from the diagram, the width is 9 beads, and the name itself takes up 24 beads - this is approximately 5 cm. This means that 1 cm will be occupied by 5 beads.
The length needed for a child's hand is approximately 10-11 cm. It turns out that about 3 cm remains at the edges of the name. We will fill it with a beautiful pattern. You can draw your own pattern, for example, a heart or a diamond.
Step by step weaving
The main color will be light pink beads, and the name will stand out in a darkish color. We work from top to bottom - like a snake. We collect nine light pink beads on a needle for the first row.
We collect 1 bead for the 2nd row, and pass the needle through the bead from the 1st row, and again pass the needle through the bead of the second row. Thus we secured the ranks.
From the first row, move 1 bead and take 1 bead for the second row with a needle, insert it into the prepared bead with a needle and again pass through the bead of the 2nd row, using a needle for fastening.
Thus we complete the second row to the end. The first two rows were completed.
Let's take the third row. We take a bead with a needle and insert it in the second row into the first bead, tightening them, and again we pass the needle through the collected bead of the third row.
As you can see, we snake up to the fifth row with light pink beads, and in the sixth we will insert a dark color for the pattern.
Let's move on to the sixth row. We collect 4 beads of light color, the fifth one is dark and again we collect 4 beads of light color.
Let's continue and follow the thread. If the tip of the thread remains approximately fifteen centimeters during beading, then you will need to increase the thread. It is necessary to make a knot and hide the thread in the warp, making the last strong knot and cutting the thread.
Now we weave with a new thread, but in reverse. Having increased the thread, we continue to move according to the pattern.
Upon completion, you need to design the product for the locks. To do this, we extend the thread and bring it out from the middle to the edge of the product. We collect 9 beads, then put on a ring and weave.
Insert a needle into two beads and tighten the ring. We carry on further, grabbing 4 beads and thus continue until the thread is secured in the ring.
Useful tips
- If you want to get a quality product, then do not buy cheap materials for its manufacture. It is better to take trusted manufacturers. Their beads will not lose color or burst with slight physical contact.
- Use special programs to make the bracelet making process easier.
- It should be noted that all materials necessary to complete this product must be taken in reserve.
Follow the tips and you will get great results.
Fashionable bracelets 2019
What is a paracord bracelet used for?
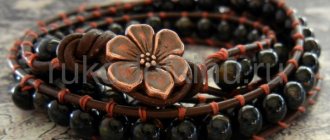
Thread jewelry
Thanks to the diversity in the world of needlework, you can learn how to weave bracelets not only with beads, but also with threads. For those who are just learning, I offer lessons on how to create baubles with your name.
Required material
- 2.5 m white rope
- letters of the name
- glue moment
- scotch
- scissors
- ruler
Video master class
Weaving technique
Prepare two threads of 50 cm and one of 1.5 m. Everything is very simple, it starts with a rope 50 cm long. You need to cut the tip obliquely and treat it with a drop of glue. This will give rigidity for easy insertion of the thread into the letters. Now you need to enter the letters with the name one by one.
We are preparing a device for a rope strung with personalized letters - it can be a notebook or a heavier material in the form of a wooden block. We fasten its end, already tied with a knot, to the device with tape.
Next, take a solid thread 1.5 m long and connect its ends exactly. In this way, we determine the middle of the rope and place it under the bottom of the main working thread with the letters. Begin. On the left side we put the rope on top of the main one (it turns out to be an intersection), and on the right side we thread the other end of the thread from below into this intersection. The result is a knot on the right side.
We measure 8 cm from the edge to the knot made with a ruler.
We continue weaving, but in reverse. We put a rope on the right side over the central one, and with the left end from below we pass into the corner and make the next knot.
We alternate knots from left to right and vice versa. Duration – 5 cm. Look how beautiful it turns out.
Let's get started. We lift the first letter up and make two knots, while tightening it tightly, then again the letter and two knots. We continue this procedure with all symbols.
After all the letters have been woven, you need to treat the last knots with transparent glue and trim the ends of the thread. We take a second rope 50 cm long and place it under the central thread with the letters near the last knot. The technique is still the same up to 5 cm.
When finished, glue the knots and cut the threads. Align the ends and make knots at the ends.
Next, you need to fold them crosswise and fix them about 3 cm according to the size of your hand. The process is the same, nothing complicated, as you can see.
Apply glue to the last knots in the same way and trim the threads. The result is pleasing, isn't it? Success in creative work!
Step-by-step instruction
Materials you need:
- small box (tissue box works very well)
- craft knife
- ruler
- a thread
- beading needle or beading wire
- beads for beads
Total time: fifteen minutes for a loom, 45 minutes-1.5 hours for a bracelet
- First remove the plastic. Then, using the hole as a guide, remove the top of the box along the longer sides, leaving behind the top along the shorter sides.
- Cut off the sides of the remaining box top.
- Then fold the sides.
- Using a ruler, cut slits along the edge every 1/16 inch.
- Repeat on the other side.
You have a loom! It's not the prettiest thing ever made, but it works very well.
To make a bracelet:
- Get out your beading needle (a very fine needle) or make one using a piece of beading wire (a very fine wire) folded in half and twisted at the end.
- Take a long piece of thread (60-90 centimeters depending on how long or wide you want your bracelet) and tie a bead close to one end. This will be your stop bead and will hold your thread in place.
- Place as many beads on the thread as there is space on your loom.
- Holding the beads under the loom threads, insert each bead into the space and hold them there.
- Then go back through the beads over the threads. Be careful not to go through the stopper.
- Tighten and repeat.
Name bracelet made of beads
Such an original decoration, woven with your own hands, can add to your jewelry collection, and in the future give it to someone either for a birthday or as a keepsake.
Required accessories and materials:
- rubber band
- pink beads
- letters
- hanger connector
- decorative dividers
- needle
- pliers
- scissors
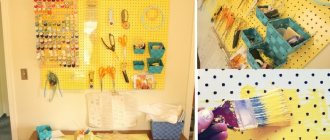
First, you need to distribute the accessories for the creation process on the table in order to see an approximate picture.
If you are ready to start working, then cut off 30 cm of elastic fishing line and pull it into the needle. Then we string it step by step from the first bead to the end. Having cut the fishing line from the needle, tie it in a knot three times, tighten the tails with pliers and cut off the ends of the fishing line, leaving 3 mm tails.
All that remains is to attach the pendant on the opposite side of the name. That's all, it's ready, wear it with pleasure! Nowadays it is very fashionable and popular among young people to wear such simple jewelry with their own names.
Video master class bead decoration
Selection of materials
To weave beaded bracelets with names, we will need standard materials:
- scheme;
- needle;
- thread or fishing line;
- beads;
- accessories (fasteners, decorative ones can be used if desired);
- machine (optional).
You will need at least two colors of beads. Since such jewelry must be smooth, you will need calibrated beads - Japanese or Czech. If you still want to use Chinese, calibrate it yourself, try to select approximately the same beads.
Chinese beads
Czech beads
Personalized beaded bracelet with the name Andrey
You will learn how to create a wonderful gift for the holiday dedicated to St. Andrew the First-Called - the Apostle of Jesus Christ, which is celebrated annually on December 13. On this day, it is customary to go to church for service in the morning, and then gather with the whole family at the large dining table. If among the relatives there is a man named Andrey, then the family gives him a small gift.
Preparing for work
To create a unique gift in the form of a beaded bracelet, you need to prepare the necessary working material:
- three shades of size ten beads: lilac, black and green
- black silk thread
- bead machine
- scissors
- schematic images
Having thoroughly prepared for an exciting activity, let’s begin performing scrupulous and interesting work.
Weaving technique
You and I will learn how to make such an unusual decoration
So, we need a machine. They come in different types.
We make the machine ourselves
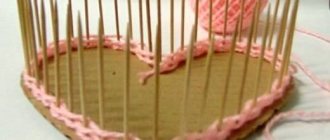
I don't have a standard machine, so I'll show you how to make it yourself. For these purposes, I prepared an ordinary lid from a cardboard shoe box.
- We need to take the prepared material and mark it with a ruler and a simple pencil on each side, 0.5 mm.
- We mark the entire width of the product.
- Having finished marking the lid, we take scissors in our hands and make small cuts with them. We carry out the work carefully and efficiently.
- Next, we connect the cuts along the entire length of the lid with a thread, wrapping it around both sides. Having finished wrapping the workpiece, we tie the fiber on the wrong side into a knot and secure it with tape.
Workflow and diagrams
To begin with, I suggest making a decoration diagram with a name. This is done very simply, draw your product on a notebook sheet in a box and color it, highlighting the name in a separate color. To your liking, create a pattern or a solid color. In this diagram, one cell is counted as one bead. Example diagrams could be:
The next step is to tie the thread to the first stretched fiber. Next, we carefully consider the diagram of the selected pattern. Let's start with the starting row.
1. String nine beads, alternating black and lilac beads, focusing on the template. Stringed on a thread, pass under the stretched threads.
2. Carefully place it in the space between the threads. We fix them well with our fingers. We pass the needle through all the beads in the opposite direction. The initial row is usually difficult, but further work will be easy and they will all fit in even bead rows.
3. Next, we collect the second row. We alternate lilac and black. Do not forget about the schematic image - follow it strictly.
4. Just like in the first row, place the strung beads evenly, evenly under the stretched yarn and place them in the cells.
5. Take a needle, thread it through the second row and carefully tighten the thread. The bead weaving technology is repeated. It is important to stick to the pattern and make the right set of beads - and then you will weave the desired product.
6. We knit the third, fourth, fifth, sixth and seventh rows like the first two, alternating in a checkerboard pattern - black and lilac beads.
7. Eighth, ninth and eleventh - we use exclusively black ones.
Weaving patterns for all the letters of the alphabet
You can create a name scheme using CorelDraw or AutoCad, or you can use “Beads with MyJane”, which is used for schemes of any complexity.
If you are planning to make a pattern yourself, the easiest way is to focus on the “monastic cross” technique, with which you can weave letters of the Russian alphabet or numbers.
So what do we need?
- Ice cream sticks. They can be easily found in any supermarket (if you go the simple route). If the procedure is a little more complicated, then you will need to buy a popsicle on a stick and eat it, but... two or three of these fillings will not have a very positive effect on your figure, then this procedure is best entrusted to your husband or child